


Sadly Tarangus idea of putting all sprues in one bag is not the best and one part was broken.


Agreed, nice!TommyKillander wrote:Sweet!

/Tommy


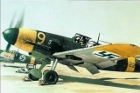
The thing is that I started with painting the tan and then adding those masks that are located in the middle of the wing only using the panel lines as reference. The problem then comes when adding the second layer of masking that has to line up with more the one of the tan masks that might not be perfectly placed. If one of them is off by only 1 mm or 1 degree you have problems, especially when you get to the third layer of masking that has to align to three (or more) misplaced masks. Also some of the masks overlap, the ones that are on the edge of the sheet and also the ones on the edges of the wing. All of this adds up to make it really hard to get it perfect. The masks probably fit just as they should, I blame everything on "skit bakom spakarna". If I where to do this again I might start in one corner and just paint that area, mask it, pain the adjacent area, mask that and keep going until the whole model is painted. This would take a lot longer, but that way all the masks will line up as they should.patrickroos wrote:Sorry forgot...
So Your saying that the pre-cut camo masks does not really fit?


I second thatNige201980 wrote:Oh man she looks so SEXY. Brilliant work on the camo outstanding.
OK!JonMW wrote:Thanks for the comments!
The thing is that I started with painting the tan and then adding those masks that are located in the middle of the wing only using the panel lines as reference. The problem then comes when adding the second layer of masking that has to line up with more the one of the tan masks that might not be perfectly placed. If one of them is off by only 1 mm or 1 degree you have problems, especially when you get to the third layer of masking that has to align to three (or more) misplaced masks. Also some of the masks overlap, the ones that are on the edge of the sheet and also the ones on the edges of the wing. All of this adds up to make it really hard to get it perfect. The masks probably fit just as they should, I blame everything on "skit bakom spakarna". If I where to do this again I might start in one corner and just paint that area, mask it, pain the adjacent area, mask that and keep going until the whole model is painted. This would take a lot longer, but that way all the masks will line up as they should.patrickroos wrote:Sorry forgot...
So Your saying that the pre-cut camo masks does not really fit?


