Lots of progress this week as it was time to apply the base colors!
The first order of business was to mix up some orange yellow using XF-3 Flat Yellow and XF-7 Flat Red. I tried to match the color on the decals, but you can see it isn't nearly red enough. That's OK though since I won't be using the lightning bolt decal and the only other decal this color is for the stripes on the tips of the prop; I ended up just painting those as you'll see later.
 Identification Color/Orange Yellow?
 by
Bob Mortensen, on Flickr
After painting applying this, I masked off the identification stripe. I've seen a few builds on the web where it looks like they got these a bit too wide; I did my best to follow the paint scheme in the instructions and as you'll see when I umask, I think I did well. With all the orange/yellow overspray, I decided to cover it with more Stynylrez Black after masking. Then it was on to the bottom light gray.
For this, I thought I had found that the correct color was XF-77 IJN Gray, but to me it looked really dark. I'm not sure if I was confused or found a bad reference or if I'm just wrong, but my model, my colors! So I lightened the XF-77 with XF-2 Flat White and added just a touch of XF-70 Dark Green 2 (since again, I found a reference that indicated the color might be slightly green). However, I added so little that I don't think it really mattered and I ended up with the light gray you see below (although I think I looks lighter in the picture than it really is). I tried keeping the panel lines a little darker and the centers lighter; I don't know how successful I was since I'm still learning to control the amount of paint being laid down. I'd be happy to hear feedback, good or bad.
 Light Gray Bottom
 by
Bob Mortensen, on Flickr
Next I masked this off so I could apply the top color, XF-77 Dark Green 2. To mask, I basically laid Tamiya masking tape along the wing and stabilizer edges leaving it stick out over the edge a bit. Except along the fuselage and cowl where I just followed the lines shown in the instructions painting scheme. The trickiest area was where the horizontal stabilizers meet the fuselage; I just cut some thin strips of masking tape and followed the panel line where the two meet; it worked out well. I found the XF-77 to be a bit dark for me as well, so I lighted it very slightly with XF-2 Flat White. I was hoping to it would make it look faded, but not really... Hopefully some weathering later will take care of that.
Once that was on I need to mask off for the blue black anti-glare. I mixed XF-1 Flat Black and XF-8 Flat Blue at a ratio of 3:1; it's hard to say it isn't just black! I probably should have taken some photos with the masking tape still in place, but I was to excited to see the results!
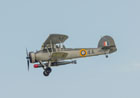
And here it is umasked! I also popped on the prop temporarily. You can see the "orange/yellow" strips I hand painted on the prop and the nice identification stripes. Oh, the prop and spinner are just straight XF-64 Red Brown. In these pictures you can also see the painted and assembled landing gear.
 Unmasked
 by
Bob Mortensen, on Flickr
 Unmasked
 by
Bob Mortensen, on Flickr
 Unmasked
 by
Bob Mortensen, on Flickr
At this point I wasn't sure how to proceed

; clear coat and decals or painting some details. I chose the latter and painted the antenna stay, landing gear indicator rods, cartridge outlets, exhaust pipes and wingtip and tail lights. And being impatient to see my first model fully painted, I removed the canopy masks! (I hope that wasn't a mistake.

) In the remaining pictures you can see some of the details; and also where I already started chipping the cowl (not on purpose mind you!).
 Ready for Clear Coat and Decals
 by
Bob Mortensen, on Flickr
And look who still there! This also shows the "Rusty Iron" exhaust pipes; for these I mixed XF-1 Flat Black, XF-64 Red Brown, a little XF-3 Flat Yellow and a touch of XF-16 Flat Aluminum to give it a slight metallic look; I think it worked out.
 He's Still In There!
 by
Bob Mortensen, on Flickr
Next up is a clear coat and decals; I'll be using Pledge/Future/Klear or whatever it's called. That will be followed by another clear coat, some intentional chipping, weathering and a final flat coat. It's getting there!
Thanks again for "tuning in"!


 J2M3 Contents by Bob Mortensen, on Flickr