Tamiya 1:35 SU-76M SPG

All your build threads here...

Moderator: T3hGuppy

Post Reply
User avatar
papatika
Master Sergeant
Master Sergeant
Posts: 382
Joined: Thu Jun 05, 2014 11:12 am
Location: Budapest, Hungary
Hungary

Tamiya 1:35 SU-76M SPG

Post by papatika »

Hi all!

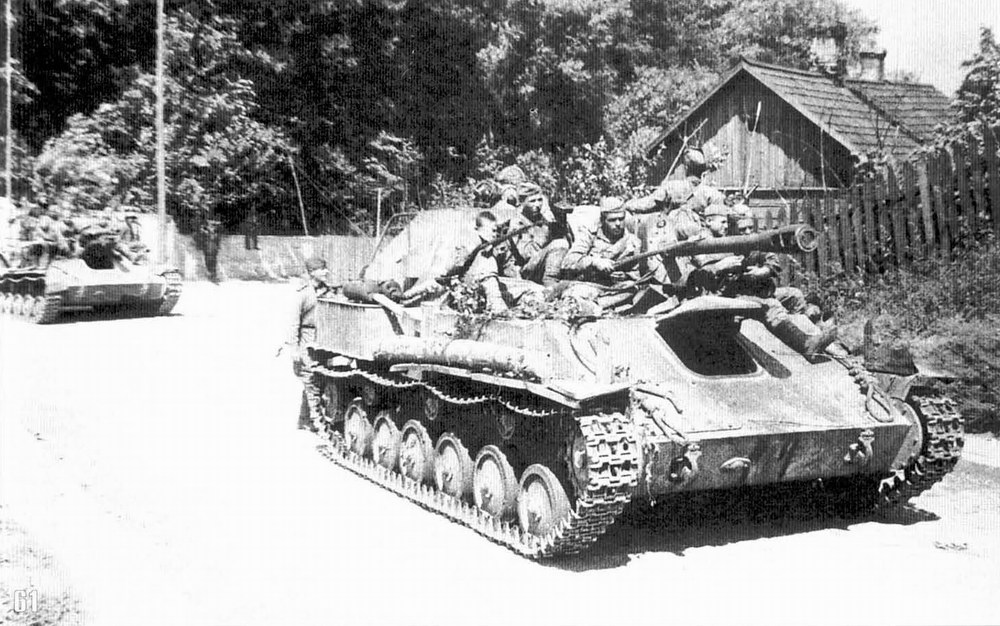
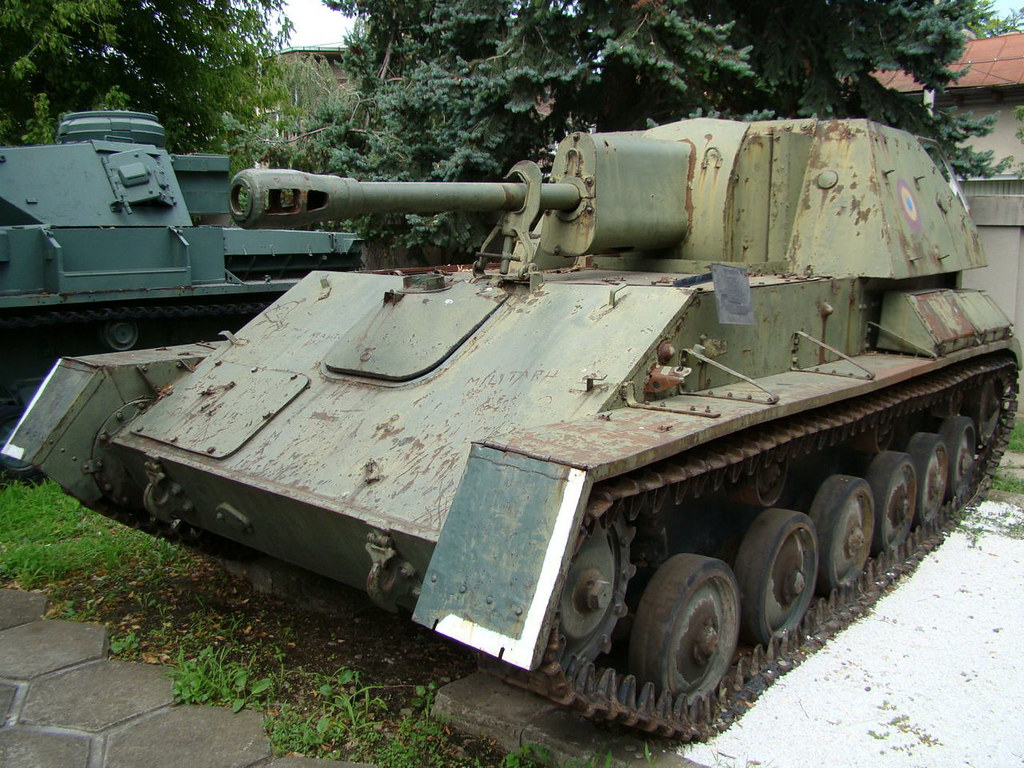
My entry will be Tamiya's brand new kit, the SU-76M Self-propelled Gun.
Finally something new armor from this company, not just reboxings, or new parts. Their bikes, cars, propelled airplanes are superb, no question. The armor? Well, they are good, but not that much. Let's see, how this kit looks like.

The box contains 7 sprues (5 green, 1 gray, 1 clear), a rope for toe-cable, a small sheet with decals, and a manual.
Image

Sprue A:
Most of it is about the gears and tracks. There are a few rounds of ammunition, a ppsh with ammo, and a few parts from the exterior. This spure is doubled.
Image

Sprue B:
Big chunks of the upper hull.
Image
Great details all over. The plastic shows some cooling remarks, but the surface is smooth, I'm sure it won't be seen once painted.
Image
Also there are some ejection pinmarks here and there. but they are pretty shallow, a gently sending shall get rid of them.
Image

Sprue C:
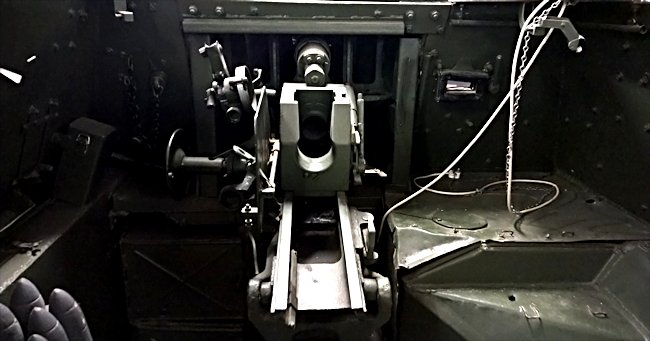
Tools, gun breach, armor plates, exhausts, misc parts of the exterior and interior.
Image
Again, crisp details, beautiful cast texture on the driver's hatch.
Image

Sprue D:
Lower hull elements, gun (one piece), muzzle break (2 pieces)
Image
Image

Sprue G:
Clear parts are nice and clean. (Who knows what happened to E and F? Placeholders for future releases?)
Image

Sprue Z:
Highly detailed figures...
Image
.. including the President of Russia, Vladimir Putin... :)
Image

Altogether it seems to be a fantastic kit, a joy to build, almost perfect for an excellent OOB build. Almost, because of the lack of PE parts. I'm sure there are some places where a small, thin metal would come handy.
We'll see. I can't wait to get into the middle! :)
User avatar
papatika
Master Sergeant
Master Sergeant
Posts: 382
Joined: Thu Jun 05, 2014 11:12 am
Location: Budapest, Hungary
Hungary

Re: Tamiya 1:35 SU-76M SPG

Post by papatika »

P.S.:
If you don't see the pictures, let me know. Google sometimes changes the urls. Now they work. :)
User avatar
TommyKillander
Chief Warrant Officer 5
Posts: 2776
Joined: Sat Dec 27, 2014 1:59 pm
Location: Gothenburg, Sweden
Sweden

Re: Tamiya 1:35 SU-76M SPG

Post by TommyKillander »

That kit looks fantastic! :thumb2:

Good luck with the build, I will follow it since I will probably get that kit aswell somewhere down the line

:pop:
Tommy
User avatar
papatika
Master Sergeant
Master Sergeant
Posts: 382
Joined: Thu Jun 05, 2014 11:12 am
Location: Budapest, Hungary
Hungary

Re: Tamiya 1:35 SU-76M SPG

Post by papatika »

Until now I have to say this kit totally worth it!
Accurate, detailed, fun to build. Absolutely astonishing! So Tommy, don't hesitate! ):

I started by building the hull and the fighting compartment. I assembled the walls separately, haven't glued them together for easier access.
Image

Image

I taped it together so the glue lines will remain paintless, and gave a nice layer of black primer, which will also serve as a shadow coat.
Image

Dark olive green was applied. I kept the kit taped together to achieve a better visualization of lights and shadows.
Image

Image

To continue with the small parts of the fighting compartment the shells received a brass color.
Image

Details painted and glued to the walls (warheads painted with black in the background). A lighter olive green was used to highlight edges by drybrushing. Then the same color was applied with sponge the create light chipping. Also gunmetal (for deeper and older scratches) and steel (younger and superficial demages) was "sponged" onto the surfaces to have deeper chipping. I haven't used dark brown for chipping here. I would like to display a vehicle in use. The fighting compartment is pretty small for 3 person. Because the lack of space, they are going to hit the walls (specially around the racks, and the exposed edges) with the shells, weapons, whatever they have in hand, resulting a lot of chipping. But also because the lack of space, these hits won't be so big, thus chips will be small. While they move in that small "cage" they continuously cleaning and polishing the surfaces with their uniforms preventing rust to accumulate, and keeping chipped areas shiny.
Image

Image

Image

Image

Image

I will now add some dust and dirt, and build the gun.

Thanx for stopping by!

Bye!
User avatar
papatika
Master Sergeant
Master Sergeant
Posts: 382
Joined: Thu Jun 05, 2014 11:12 am
Location: Budapest, Hungary
Hungary

Re: Tamiya 1:35 SU-76M SPG

Post by papatika »

Hi!

Reporting in with some progress.

The gun is almost completed, but to finish it properly I have to build the gunner first to position the gun's leveling crank where it has to be.
Additionally I haven't added the muzzle break yet, because this way the mantlet can be removed. This way I have the possibility to paint the gun breech and the inside of the mantlet, and assemble the complete interior, before moving on to paint and weather the exterior. Additionally I have much better access to the tiny details of the gun.
The gun itself is a masterpiece, with loads of details.
Image

Image

I removed two bolts from the exterior covering plate, and drilled 2 holes with a .4 mil dirllbit.
Image

I also weathered the interior using Dust pigments from AK and Dark earth from Humbrol. I applied the dust fist, concentrating on the corners and the lower half on the side walls, using a soft brush only. Since the whole interior has a flat coat, pigments stick very well. Next I added dark earth the same way, but in smaller amount, and applying to the corners and the floor panel. Still with a soft, dry brush.
In some corners of the floor I piled up some dark earth pigment, and this time I added a few drops of Humbrol's Decal Fix. This serves as an adhesive, makes it darker, wet-like color, and if you let it dry without touching it, you'll get a nice, hard edge. Since it is a decal fix, it can be reactivated with simple tap water. After a few minutes I came back with a moistened brush to soften those hard edges a bit here and here.
Image

Image

Finally added a few drops of Humbrol's engine oil to bottom part of the firewall. There is a door and two boxes. I don't know what they are exactly, but the engine is there, so perfect place for some leaking oil and grime. :) By adding turpentine on and around the fuel stains the paint speared nicely and in a natural way.
Image

Image

Finally I added a bunch of stuff to the exterior. It is now almost ready for the paintjob, but the gun comes first.
Image

Thank you for stopping by, having a look, asking questions, or leaving comments! :)

See you soon!
User avatar
kiwigav
Warrant Officer
Warrant Officer
Posts: 1425
Joined: Tue Oct 01, 2013 8:38 am
Location: Nelson - New Zealand
New Zealand

Re: Tamiya 1:35 SU-76M SPG

Post by kiwigav »

Build coming along sweet. like the way the shells have come out :th: :th:
Cheers Gav

On The Bench OK where do I start :wtf:
User avatar
papatika
Master Sergeant
Master Sergeant
Posts: 382
Joined: Thu Jun 05, 2014 11:12 am
Location: Budapest, Hungary
Hungary

Re: Tamiya 1:35 SU-76M SPG

Post by papatika »

kiwigav wrote:Build coming along sweet. like the way the shells have come out :th: :th:
Thanks Gav!
Yes, the underlying black primer shines through the brass cover, which gives it an interesting effect. I was thinking a lot what color to be used for the warheads. Tamiya suggests black, so I went for it. But maybe a dark grey would be better. I have no accurate information how a russian 76mm shell looked like, but on this picture it is definitely grey:
Image
(http://tank-photographs.s3-website-eu-w ... y-spg.html)
But is this accurate?
Actually the greens I used are also not accurate, but they look nice. Maybe grey is not accurate, but has looked better than this black one imho. Argh... Options, options, options... Maybe next time... :)
User avatar
papatika
Master Sergeant
Master Sergeant
Posts: 382
Joined: Thu Jun 05, 2014 11:12 am
Location: Budapest, Hungary
Hungary

Re: Tamiya 1:35 SU-76M SPG

Post by papatika »

Man! I don't want to serve on one of these!
To locate the proper place and position of the control wheels I glued together the body of the gunner. The room that surrounds him is next to nothing. It was a nice challenge to find him the correct location, having both feet on the ground, left hand on the armor, right hand holding the crank straight.
At the end I managed to do it gluing the crank to it's place, and let it dry a bit, so it was still twistable. Then I gently put it in the figure's hand, and placed both pieces (gun & gunner) together into the into their final places, and let the glue set overnight. I haven't removed them yet, I'm not sure the figure can be added properly once the gun is not removable anymore. Maybe I have to paint this figure before I finish the interior.
I also built the other figures' body to have an overall impression. They fit really sweet, no problem there at all.

Image

Image

Image

Cheers!
:hi:
User avatar
gustavlekstal
Command Sergeant Major
Posts: 966
Joined: Tue Dec 03, 2013 3:02 pm
Location: Sweden

Re: Tamiya 1:35 SU-76M SPG

Post by gustavlekstal »

:pop: freaking well done with this ugly duckling. Swaning up!
Regards Gustav

Dragon t-34/85 premium mod 44
Done! viewtopic.php?f=46&t=15153&p=189978#p189978

Dragon 15cm sig33 auf pz.kpfw Ib
viewtopic.php?f=29&t=10747

Jsu-152 tamiya with et modelling pe
viewtopic.php?f=29&t=12313
User avatar
Quax
Sergeant Major of the Army
Posts: 1263
Joined: Thu Feb 26, 2015 9:52 am
Location: Andover, Hampshire
England

Re: Tamiya 1:35 SU-76M SPG

Post by Quax »

Looks great! As already said the shells look amazing :clap:
Paul :hi: (not THE Paul a more inconsequential Paul)

On the bench:
A mess as usual...
now residing in the Peoples Democratic Republic of Penguinland - long live the Emperor!
User avatar
TommyKillander
Chief Warrant Officer 5
Posts: 2776
Joined: Sat Dec 27, 2014 1:59 pm
Location: Gothenburg, Sweden
Sweden

Re: Tamiya 1:35 SU-76M SPG

Post by TommyKillander »

Wow !

That fighting compartment looks a bit crowded...

Well, Russians never bothered too much about ergonomics :lol:

Keep up the good work, it looks marvelous :thumb2:

:cheers2:
Tommy
User avatar
papatika
Master Sergeant
Master Sergeant
Posts: 382
Joined: Thu Jun 05, 2014 11:12 am
Location: Budapest, Hungary
Hungary

Re: Tamiya 1:35 SU-76M SPG

Post by papatika »

gustavlekstal wrote::pop: freaking well done with this ugly duckling. Swaning up!
Thanks Gustav! Swaning up, and becoming a
Image

:tongue:
Quax wrote:Looks great! As already said the shells look amazing :clap:
Yes, MIG's Brass color really hits. And since it is water based acrylic, even I can use in my small room. :)
TommyKillander wrote:Wow !

That fighting compartment looks a bit crowded...

Well, Russians never bothered too much about ergonomics :lol:

Keep up the good work, it looks marvelous :thumb2:

:cheers2:
Tommy
Thanks pal! :)


Yesterday I was working on the gun breech. Black primer, green cover, lightgreen and steel drybrush, darkbrown wash.
Image

Image

Additionally I painted the periscopes' optics. First Tamiya X-11 silver chrome background, then Mr. Hobby H93 transparent blue.
Image

Image

Image

Now I try to build the fenders. I want to make them look warn, bent, creased, twisted. My problem is that the fender is a 1mm thick one-piece plastic. IRL it has an edge, but it is too thin for plastic, Though PE would solve it, this GB allows only OOB builds. I don't know yet how, But I want to destroy those fenders... :)
Something like these would do:
Image
Image

Cu soon!
User avatar
papatika
Master Sergeant
Master Sergeant
Posts: 382
Joined: Thu Jun 05, 2014 11:12 am
Location: Budapest, Hungary
Hungary

Re: Tamiya 1:35 SU-76M SPG

Post by papatika »

Hi all!

So, fenders.
The front mudguards seem to be inaccurate. Maybe they are too long, I don't know. If you check the picture below you will see a thin line which leads from the drive sprocket up to the fender. I suppose it would like to represent the line, here the mudguard can be folded up. If so, it should lead to the joints.
Image

I want to show this piece in an up-folded position, so I cut them accordingly. I had to be careful not to damage the molded hinges.
Image

Because now the mudguard is in a folded-up position, the lower part, which would be normally hidden, is now fully visible. And it is way too thick.
Image

So I took a rotary tool, and thinned it down leaving only a small stripe at the edge.
Image

I also thinned down the side plate of the mudguard, glued to it's place, and bent the tip. Somewhere here I found an other inaccuracy. The fenders have a curved edge all along, although in the real life it is angular. My sanding stick did a nice job here :) The seam lines were also removed, they have to be replaced later on.
Image

Finally I bent, creased, twisted the fenders, tortured them with different files. Here are the fenders now. I'm quite pleased with the results. I hope the will look better when primed. (Oh, and meanwhile I was working on the tracks, too).
Image

Image

Thanks for hopping in!

Cheers! :hi:
User avatar
papatika
Master Sergeant
Master Sergeant
Posts: 382
Joined: Thu Jun 05, 2014 11:12 am
Location: Budapest, Hungary
Hungary

Re: Tamiya 1:35 SU-76M SPG

Post by papatika »

Just a small progress report.

Last night I managed to capsize one of my greens... :wall:

After I cleaned up my desk I fired up the compressor, and painted the gun and the hull. I'm not sure yet, whether I want to apply a winter camo, or not. :think:

Image

Image

Image

Image

:hi:
User avatar
NorthernModeller
Command Sergeant Major
Posts: 927
Joined: Sat Jan 09, 2016 8:39 pm
Location: Preston, Lancashire, England
Contact:
England

Re: Tamiya 1:35 SU-76M SPG

Post by NorthernModeller »

Been after this kit for a while but never actually bought it. after seeing yours, I think I have to now :) KUTGW
SAMI Magazine, Model aircraft and Tamiya Model Magazine contributor
User avatar
papatika
Master Sergeant
Master Sergeant
Posts: 382
Joined: Thu Jun 05, 2014 11:12 am
Location: Budapest, Hungary
Hungary

Re: Tamiya 1:35 SU-76M SPG

Post by papatika »

NorthernModeller wrote:Been after this kit for a while but never actually bought it. after seeing yours, I think I have to now :) KUTGW
Don't think, just do it! :-D
User avatar
papatika
Master Sergeant
Master Sergeant
Posts: 382
Joined: Thu Jun 05, 2014 11:12 am
Location: Budapest, Hungary
Hungary

Re: Tamiya 1:35 SU-76M SPG

Post by papatika »

Hi there!

I was pretty busy since my last post. I added
- 2 coats of glossy varnish (Revell 01),
- applied the decals (great quality Tamiya decals),
- sealed with a 3rd layer gloss (Hobby Color H30),
- added a dark brown wash (MIG-1005 Dark Brown Wash for Green Vehicles),
- some two-tone chipping (AK136 Olive Drab Highlights and MIG-044 Chipping),
- streaking grime (AK012 Streaking Grime for Dark Yellow vehicles),
- dust (MIG-1401 Light Dust) and earth (MIG-1400 Kurst Soil) applied with paintbrush
- mud with Humbrol's Dark Earth pigments
- and completed by applying a satin finish (AK776 Satin Varnish)

I also added a few details, like the exhausts, lights, and tools.
I applied a light rusty wash to the exhausts. Here first I added a transparent layer of rust color (MIG-2006 Rust Primer). Then added some color variations using an other rust color (Revell 83) with stippling motions. When it dried, I covered the whole thing with white spirit, and while it was still wet, dabbed Rust and Sand pigments from Humbrol.
The tools were painted with MIG-037 New Wood and MIG-045 Gun Metal, and the wooden parts were washed with MIG-913 Red Brown Base.
The light was painted with Tamiya X-11 Chrome Silver.

Also the tracks were assembled, and painted (AK722 Dark Tracks and a 10:1 diluted mixture of rust colors and pigments I have). Still have to add a wash and some metallic shine to the running surfaces. After painting the wheels I put everything together, and glued the wheels. So I can still remove the tracks with the wheels, which allows me to add mud wherever I'd like to. I don't know yet how the mud would look like. Dry or wet? Heavy or light? What do you think? Please share your opinion with me!

So, here I am now. The tank is 99% completed, I move on the figures.

Until then here are some of the latest pictures I took:

Image

Image

Image

Image

Image

Image

Image

Image

Image

Image

See you soon! :)

:hi:
Last edited by papatika on Sat Oct 22, 2016 12:24 pm, edited 1 time in total.
User avatar
papatika
Master Sergeant
Master Sergeant
Posts: 382
Joined: Thu Jun 05, 2014 11:12 am
Location: Budapest, Hungary
Hungary

Re: Tamiya 1:35 SU-76M SPG

Post by papatika »

Hi all,

the beast is almost ready.

First I assembled and painted the figures. They are not the best ever, but I'm happy with them.
Image

Image

Image

I'd like to present an autumn-like visual experience. It is already cold, but not snowing yet. Everything gets wet and muddy because of the rains.
In a cup I mixed earth from the garden, static grass, fine trimmed roots, plaster, pigments and paints, and applied to the bottom of the vehicle. But I think there was too much plaster in the mix. When it dried I realized, that it is too light, the texture is too boring, typical symptoms of overdoing something. And I could not remove it. :( I was totally upset.
To make it better I moistened the muddy surfaces with turpentine, and applied a small amount of MIG's Dark Mud. Waited a few minutes, then blended it by dabbing the brush moistened with turpentine. By applying the paint onto the wet surface it lightly started to spread, creating a slightly deeper tone in random shapes. While dabbing the brush, an other wave of turpentine was released, creating new shades, plus the paint on the edges was also blended in a more versatile way. With this I achieved to break a monotony of the surface, having dry and wet like areas.

Image

Image

Some smaller parts are still missing, like tow cable, periscopes, cross beam of the fighting compartment.

Next up: final reveal! :banana:

:hi:
User avatar
papatika
Master Sergeant
Master Sergeant
Posts: 382
Joined: Thu Jun 05, 2014 11:12 am
Location: Budapest, Hungary
Hungary

Re: Tamiya 1:35 SU-76M SPG

Post by papatika »

I discovered, that Google massed up the image links again. They were fixed, so enjoy!

And next time, guys, please let me know, so I can take care! :thumb1:
User avatar
NorthernModeller
Command Sergeant Major
Posts: 927
Joined: Sat Jan 09, 2016 8:39 pm
Location: Preston, Lancashire, England
Contact:
England

Re: Tamiya 1:35 SU-76M SPG

Post by NorthernModeller »

Excellent mud effects :) Loving it
SAMI Magazine, Model aircraft and Tamiya Model Magazine contributor
User avatar
papatika
Master Sergeant
Master Sergeant
Posts: 382
Joined: Thu Jun 05, 2014 11:12 am
Location: Budapest, Hungary
Hungary

Re: Tamiya 1:35 SU-76M SPG

Post by papatika »

NorthernModeller wrote:Excellent mud effects :) Loving it
Thank you very much! :)
User avatar
papatika
Master Sergeant
Master Sergeant
Posts: 382
Joined: Thu Jun 05, 2014 11:12 am
Location: Budapest, Hungary
Hungary

Re: Tamiya 1:35 SU-76M SPG

Post by papatika »

Please find the final reveal here!
:banana:
User avatar
Stokesy44
Major General
Major General
Posts: 8232
Joined: Thu Jun 18, 2015 10:13 am
Location: The Midlands, UK
Great Britain

Re: Tamiya 1:35 SU-76M SPG

Post by Stokesy44 »

Superb effort. Quality painting and weathering. Final mud effects are great to finish it all off. Top drawer.
Its been tried and tested, it works! So don't blame the system if you're no good. :doh:
Post Reply

Return to “Builds”