Page 1 of 2
Steve's Stug III ausf B
Posted: Wed Aug 31, 2016 8:39 pm
by SteveAFV
First GB and will have a lot on at the same time so fingers crossed.


Nice hinge detail.

In box photo etch and metal barrel.

Nice detailed gun parts and interior.

Great colour paint card.
Not sure yet which I'll be going for yet.
Re: Steve's Stug III ausf B
Posted: Wed Aug 31, 2016 8:53 pm
by Lysus
First GB, awesome! Welcome to the show that never ends.

Re: Steve's Stug III ausf B
Posted: Wed Aug 31, 2016 9:20 pm
by SteveAFV
Lysus wrote:First GB, awesome! Welcome to the show that never ends.
Thanks

Re: Steve's Stug III ausf B
Posted: Wed Aug 31, 2016 9:32 pm
by rodrant
Lovely kit !
Nice entry and good luck with your build !

Re: Steve's Stug III ausf B
Posted: Wed Aug 31, 2016 10:28 pm
by Rallychef
Good luck, my first GB on ISM too, although I tried to start the Wheely good build but failed to get off the start line.
regards Ian D
Re: Steve's Stug III ausf B
Posted: Wed Aug 31, 2016 11:27 pm
by Nev
You have picked a good kit PE and a metal barrel included and nice tracks to work with

Re: Steve's Stug III ausf B
Posted: Thu Sep 01, 2016 7:01 am
by SteveAFV
Thanks guys
Re: Steve's Stug III ausf B
Posted: Thu Sep 01, 2016 12:53 pm
by SteveAFV
Sturmgeschütz III
 StuG III Soviet Union 1941 (attrib http://www.wikimedia.org)
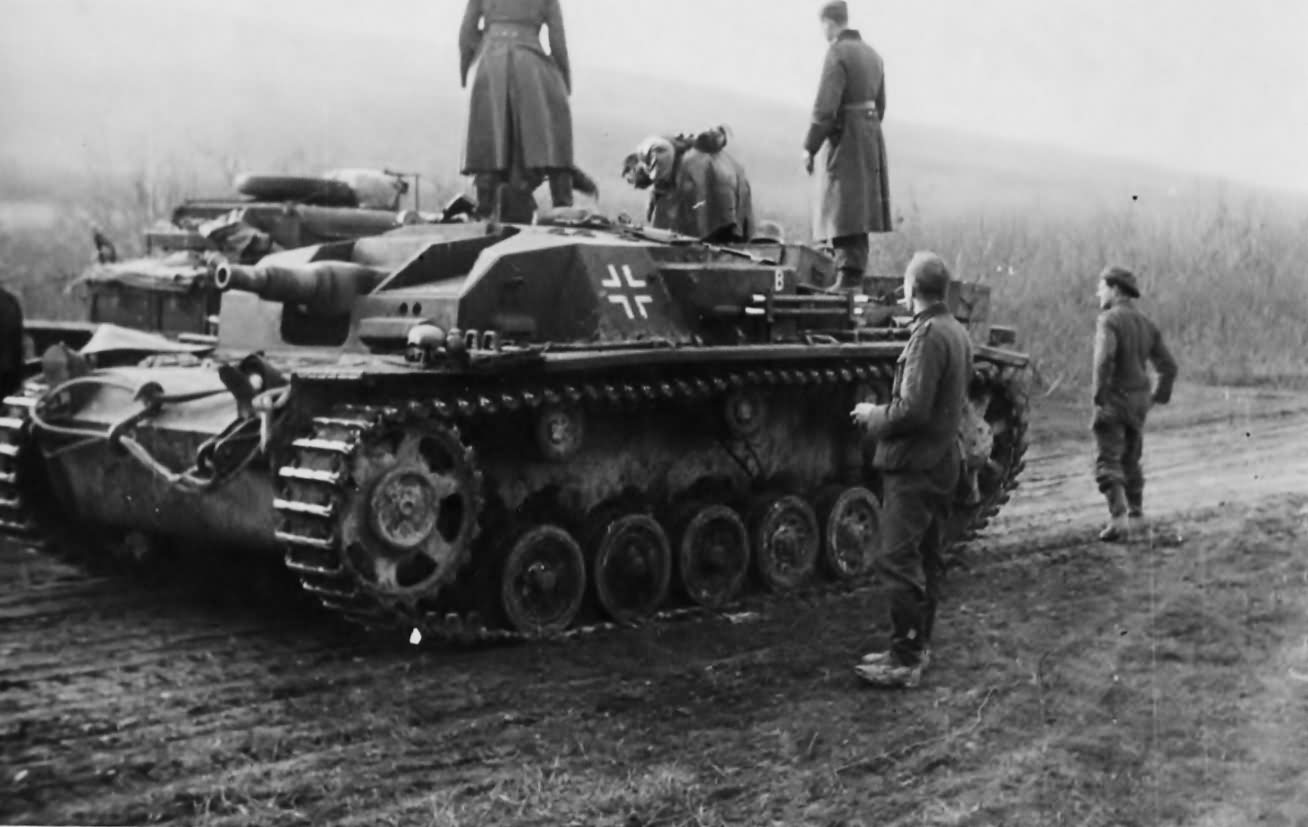 StuG III ausf B 1941 (attrib http://www.worldwarphotos.info)
Development
The Sturmgeschütz originated from German experiences in World War I when it was discovered that, during the offensives on the western front, the infantry lacked the means to effectively engage fortifications. The artillery of the time was heavy and not mobile enough to keep up with the advancing infantry to destroy bunkers, pillboxes, and other minor fortifications with direct fire. Although the problem was well known in the German army, it was General Erich von Manstein who is considered the father of the Sturmartillerie ("assault artillery"). This is because the initial proposal was from (then) Colonel Erich von Manstein and submitted to General Ludwig Beck in 1935, suggesting that Sturmartillerie units should be used in a direct-fire support role for infantry divisions. On June 15, 1936, Daimler-Benz AG received an order to develop an armoured infantry support vehicle capable of mounting a 75 mm (2.95 in) calibre artillery piece. The gun mount's fixed, fully integrated casemate superstructure was to allow a limited traverse of a minimum of 25°[4] and provide overhead protection for the crew. The height of the vehicle was not to exceed that of the average soldier.
Daimler-Benz AG used the chassis and running gear of its recently designed Panzer III medium tank as a basis for the new vehicle. Prototype manufacture was passed over to Alkett, which produced five prototypes in 1937 on Panzer III Ausf. B chassis. These prototypes featured a mild steel superstructure and Krupp’s short-barrelled, howitzer-like in appearance, 7.5 cm StuK 37 L/24 cannon. Production vehicles with this gun were known as Gepanzerter Selbstfahrlafette für Sturmgeschütz 7.5cm Kanone Ausführung A to D (Sd.Kfz.142).
While the StuG was considered self-propelled artillery, it was not initially clear which land combat arm of the Wehrmacht Heer would handle the new weapon. The Panzer arm, the natural user of tracked fighting vehicles, had no resources to spare for the formation of StuG units, and neither did the infantry branch. It was agreed, after a discussion, it would best be employed as part of the artillery arm.
The StuGs were organized into battalions (later renamed "brigades" for disinformation purposes) and followed their own specific doctrine. Infantry support using direct-fire was its intended role. Later there was also a strong emphasis on destroying enemy armour whenever encountered.
Overall, the Sturmgeschütz III series assault guns proved very successful and served on all fronts as assault guns and tank destroyers. Because of their low silhouette, StuG IIIs were easy to camouflage and a difficult target. As of April 10, 1945, there were 1,053 StuG IIIs and 277 StuH 42s in service.
The StuG assault guns were cost-effective compared to the heavier German tanks, though in the anti-tank role they were best used defensively, as the lack of a traversable turret was a severe disadvantage in the assault role. As the German military situation deteriorated later in the war, more StuG guns were built compared to tanks, to replace losses and bolster defences against the Allied forces.
StuG III prototypes (1937, 5 produced on Panzer III Ausf. B chassis): By December 1937, two vehicles were in service with Panzer Regiment 1 in Erfurt. Vehicles had eight road wheels per side with 360-millimetre (14 in) wide tracks, 14.5 mm thick soft steel superstructure and the 7.5 cm StuK 37 L/24 gun. Although not suitable for combat, they were used for training purposes as late as 1941.
Variants (to ausf B)
StuG III, Ausf. A
StuG III Ausf. A (Sd.Kfz. 142; January 1940-May 1940, 30+6 produced by Daimler-Benz): First used in the Battle of France, the StuG III Ausf. A used a modified 5./ZW chassis (Panzer III Ausf. F) with front armour strengthened to 50 mm. The last six vehicles were built on chassis diverted from Panzer III Ausf. G production.
StuG III Ausf. B: (Sd.Kfz 142; June 1940-May 1941, 300 produced by Alkett) Widened tracks (380 mm). Two Rubber tires on each roadwheel were accordingly widened from 520 × 79 mm to 520 × 95 mm each. Both types of roadwheels were interchangeable. The troublesome 10-speed transmission was changed to a 6-speed one. The forwardmost return rollers were re-positioned further forward, reducing the vertical movements of the tracks before they were fed to the forward drive sprocket, and so reduced the chance of tracks being thrown. In the middle of production of the Ausf. B model, the original drive sprocket with eight round holes was changed to a new cast drive sprocket with six pie slice-shaped slots. This new drive wheel could take either 380 mm tracks or 400 mm wide tracks. 380 mm tracks were not exclusive to new drive wheels. Vehicle number 90111 shows older drive wheel with wider 380 mm tracks.
Re: Steve's Stug III ausf B
Posted: Thu Sep 01, 2016 12:55 pm
by SteveAFV
Re: Steve's Stug III ausf B
Posted: Thu Sep 01, 2016 7:23 pm
by wavelet
A very nice and popular kit!
Re: Steve's Stug III ausf B
Posted: Thu Sep 01, 2016 7:38 pm
by AdamLuscombe
Great choice of a kit Steve, it looks to be very nice. Good luck with your first GB!

Re: Steve's Stug III ausf B
Posted: Sun Sep 04, 2016 10:07 pm
by SteveAFV
AdamLuscombe wrote:Great choice of a kit Steve, it looks to be very nice. Good luck with your first GB!
Thanks mate, it's tough keeping three kits on the go at the same time. I need to get some get go on this one.
Re: Steve's Stug III ausf B
Posted: Sun Sep 04, 2016 11:19 pm
by DarksideHobbies
Good choice, looking forward to seeing the end result!
Re: Steve's Stug III ausf B
Posted: Tue Sep 06, 2016 4:05 pm
by demarcation
Re: Steve's Stug III ausf B
Posted: Tue Sep 06, 2016 9:56 pm
by SteveAFV
Step 1 (finally).

I've left the muffler off as I'm going to paint it separately and glue it with PVA. I'm probably going to do the tools this way too. I find brush painting these things when already attached a real pain. Maybe I can just mask the body paint. I'll think about it.
One thing I wasn't sure about is there are two additional legs on part B9 which don't appear on the instructions. They were a bit long to just be the sprue attachments. I've left them on. Maybe you can see them on the back of the assembled rear grille in the photo below. Anyone know about these?

Re: Steve's Stug III ausf B
Posted: Fri Sep 09, 2016 7:47 pm
by SteveAFV
Step 2

Few awkward points. The suspension arms have a tiny moulding line over all the visible areas. Ok the wheels will no doubt hide it but still extra work.

Had a wee alignment issue on the plates that trap the moveable suspension. So one arm decided not to get trapped and fall out. Too late to readjust the plate so a small additional pierce of strip was added to it to stop it falling out.

On the other side I learned that pushing the lower hulk against a vertical surface ( I work off of a large wooden tray) held the suspension parts in and then using regular Tamiya cement gave a little time to give it a test shake and adjustment time to not repeat the issue.

Re: Steve's Stug III ausf B
Posted: Sun Sep 11, 2016 9:25 pm
by SteveAFV
Step 3 & 4 today


The rear grille doesn't have any positive positioning pegs or edges and on mine it wasn't exactly the same width as the tub so it needs careful positioning and gluing. What I did was take it on the cement one edge. Then when that was dry and strong I aligned the opposite side and cemented. It may need a little filler. I'm going to check reference photos to see how it appears on the real thing. It may appear bolted on in which case a joining edge would be appropriate.

Re: Steve's Stug III ausf B
Posted: Sun Sep 11, 2016 10:26 pm
by SteveAFV
Had this in my playlist and only just watched it.
[youtube]bdnpGgi-aVY[/youtube]
Re: Steve's Stug III ausf B
Posted: Mon Sep 12, 2016 1:02 am
by mincemeat
So many different camo options with the brush and grass! Who finds this footage and where? That story alone would be fascinating.
I commend you on actually following the instructions. I tend to skip around a lot depending on what I feel like. "Wheels today? I don't think so." Good progress Steve, keep it up!
Re: Steve's Stug III ausf B
Posted: Mon Sep 12, 2016 7:06 am
by SteveAFV
mincemeat wrote:So many different camo options with the brush and grass! Who finds this footage and where? That story alone would be fascinating.
I commend you on actually following the instructions. I tend to skip around a lot depending on what I feel like. "Wheels today? I don't think so." Good progress Steve, keep it up!
Rob what you don't see is where I don't follow instructions and nor do I work outbid my plan will work. The mufflers were left off to paint but the rear grille has s little leg that goes through a pipe U between the two mufflers do you have to put the mufflers on first it do surgery on it as I did.
Re: Steve's Stug III ausf B
Posted: Mon Sep 12, 2016 9:00 pm
by SteveAFV
Wheelie good day

Re: Steve's Stug III ausf B
Posted: Mon Sep 12, 2016 9:02 pm
by SteveAFV
Wheelie good day
Step 5

Lots of sanding of exactly the same part. At least I was using my wooden serving tray sofa workspace!
Re: Steve's Stug III ausf B
Posted: Tue Sep 13, 2016 1:24 am
by mincemeat
ugh. I typically figure out how many nubs I need to clean off which puts me off the task even further.
Re: Steve's Stug III ausf B
Posted: Tue Sep 13, 2016 7:10 am
by SteveAFV
mincemeat wrote:ugh. I typically figure out how many nubs I need to clean off which puts me off the task even further.
Consider it meditation and just do one at a time and then before you know it you're done. Or you've sanded a flat on a wheel......
Re: Steve's Stug III ausf B
Posted: Thu Sep 15, 2016 9:02 pm
by SteveAFV
Step 6. Just a small step today. The front towing hooks are very awkward to get together. I had to get them close then cement and quickly pick up and ensure the two sides were aligned.
The fighting compartment bulkhead was straightforward. It gets glued inside in the next step but I'm going to skip that and prepare the top and turret so I can see how I can paint the interior. I think I want to weather it a bit inside too so that'll all have to get masked up.

Will be my last post for two weeks as I'm off to Florida. May get a wee bit of work in tomorrow but unlikely. Catch you all soon!
Re: Steve's Stug III ausf B
Posted: Wed Oct 05, 2016 7:00 pm
by SteveAFV
Back from hols!
Step 7 has been delayed as I want to spray the interior parts before fitting them.
So Step 8. Bit fiddly for me especially the hatch doors. I hadn't expected them to be awkward but as I can't hold them in, flip over and cement from behind one handed I found I had to apply some extra thin cement to the hatch lip then flip the door in.


Re: Steve's Stug III ausf B
Posted: Wed Oct 05, 2016 7:02 pm
by Lysus
That's some great detail on that piece, eager to see what you do with it
Re: Steve's Stug III ausf B
Posted: Wed Oct 05, 2016 9:08 pm
by SteveAFV
Lysus wrote:That's some great detail on that piece, eager to see what you do with it
It is nicely detailed kit especially when the pz IV ausf D from the 70's is on the bench next to it.
I'll find some way of filling it all in when I over paint it. Lol
Re: Steve's Stug III ausf B
Posted: Thu Oct 06, 2016 12:41 am
by mincemeat
Lookin' good Steve. That glue method is a good one. Especially for little bits that won't stay while you glue them, also gives you a bit of stickage to get a part in the general vicinity and shove it into place. Welcome back to the grind!
Re: Steve's Stug III ausf B
Posted: Mon Oct 31, 2016 9:37 pm
by SteveAFV
Mojo back
Step 11

Here it is assembled and sprayed along with the fitted interior. Used the white Ultimate primer and had difficulties with it splattering and pooling in odd ways. Did I test with the gray primer and that was fine. Odd. Will add a thread elsewhere to ask advice. With Tamiya xf-2 over it it looks ok. Will be weathering it so it isn't so clean and pure....

Nice detail on the shell recovery basket. I think it's meant to be canvas or leather.

Above you can see I've masked it up as the rest is going to be dunklegrau.
Re: Steve's Stug III ausf B
Posted: Mon Oct 31, 2016 10:12 pm
by AdamLuscombe
Nice update Steve, looks good so far

Re: Steve's Stug III ausf B
Posted: Mon Oct 31, 2016 10:40 pm
by SteveAFV
AdamLuscombe wrote:Nice update Steve, looks good so far
Thanks Adam. It's getting there slowly!
Re: Steve's Stug III ausf B
Posted: Tue Nov 01, 2016 12:20 am
by mincemeat
Great work Steve! You're really making progress. The only thing that comes to mind on the primer front is that the surface may have had some residue from the release agent or just handling.
Re: Steve's Stug III ausf B
Posted: Tue Nov 01, 2016 8:16 am
by SteveAFV
mincemeat wrote:Great work Steve! You're really making progress. The only thing that comes to mind on the primer front is that the surface may have had some residue from the release agent or just handling.
Perhaps but I did a test on some plastic card and that did the same in patches even over existing gray Ultimate primer. I'll do another test and clean the surface before with dish detergent.
Here's how it looked.

Ignore the splattering I know what that is - wet paint on the nozzle cap. That's something I need to resolve and not sure why I'm getting so much of it and only white primer but also white Tamiya thinned with 20% Ultimate thinner. Probably user error but need to fix that.
Re: Steve's Stug III ausf B
Posted: Tue Nov 01, 2016 8:38 pm
by SteveAFV
Working two consecutive nights, unheard of!

Step ten was waiting for the interior to get painted. That done it was completed tonight. Wow looks kinda like a Stug now.

I'm quite happy with the interior. I need to weather it but better than I thought I'd do.


Mix of Tamiya airbrushed, AK and model color brushed.
First part of step 14 was done. The rear mud guards, lights and smoke candle holder were added.


The aerial holder plastic parts are assembled but I'm wait until the weekend to do all the PE together.
Re: Steve's Stug III ausf B
Posted: Wed Nov 02, 2016 11:51 pm
by Augustus
This is very nice! Have you figured out the problem with the white paint?
Re: Steve's Stug III ausf B
Posted: Thu Nov 03, 2016 7:13 am
by SteveAFV
Augustus wrote:This is very nice! Have you figured out the problem with the white paint?
Thanks. Perhaps. I followed some advice and had a successful test on some plastic card. White seems to be my nemesis though. I need to practice a lot more with the airbrush. I think I'm being a bit slack with my technique and it sometimes ends up random.
Re: Steve's Stug III ausf B
Posted: Thu Nov 03, 2016 5:01 pm
by AdamLuscombe
Very nice
Re: Steve's Stug III ausf B
Posted: Thu Nov 03, 2016 5:12 pm
by Davethepitch
There is something about the Stug that appeals to me as I have built two already.
Re: Steve's Stug III ausf B
Posted: Thu Nov 03, 2016 7:31 pm
by SteveAFV
Davethepitch wrote:There is something about the Stug that appeals to me as I have built two already.
Was it the Tamiya? Interested as I'd build another but maybe a different kit.
Re: Steve's Stug III ausf B
Posted: Thu Nov 03, 2016 7:43 pm
by Davethepitch
I cannot remember but I normally go for Tamiya if possible.
Re: Steve's Stug III ausf B
Posted: Sun Nov 06, 2016 10:27 pm
by SteveAFV
Re: Steve's Stug III ausf B
Posted: Sun Nov 06, 2016 11:44 pm
by Skullfish
Lookin great, love me a Stug! good luck on your first GB.
Jase
Re: Steve's Stug III ausf B
Posted: Mon Nov 07, 2016 9:22 pm
by SteveAFV
Skullfish wrote:Lookin great, love me a Stug! good luck on your first GB.
Jase
Thank you!
Re: Steve's Stug III ausf B
Posted: Wed Nov 09, 2016 3:16 am
by mincemeat
Great update Steve! Looks like you're making some fantastic progress.
Re: Steve's Stug III ausf B
Posted: Wed Nov 09, 2016 10:07 am
by SergioSolo
Nice progress on a nice kit
Re: Steve's Stug III ausf B
Posted: Sun Nov 20, 2016 6:13 pm
by SteveAFV
Painting!
At last I'm painting. UML Black primer on the body and gray on the tracks followed by AK dark tracks. I'm getting much more confident about airbrushing now but I accepts it's the primer doing most of the work here.


I'm going to put the base coat on the gun and mantle then assemble the interior before cementing the top on. The fit isn't that great and I dont want it looking like that so as previously mentioned it's getting fixed where I can cement it down for a better look.
I'm going to work on the wheels tonight on the sofa as I e decided I didn't do that good a job of getting rid of the seam lines.
I'm hoping to get time in the evenings this week to finish the airbrushing and get decals on and clear coat. Then I can do weathering next weekend.
I have an idea and materials for a very simple display base. More details later.
Re: Steve's Stug III ausf B
Posted: Sat Dec 03, 2016 6:06 pm
by SteveAFV
It's now looking like I may no finish this in time. Second weekend in a row that I've not been able to work. Friday I came down with a lung infection. During the week I'm getting little time or energy either so it's going to be touch and go. Still going to give it my best.
Re: Steve's Stug III ausf B
Posted: Sat Dec 03, 2016 6:09 pm
by Lysus
Sorry to hear that. Take care of yourself first. We'll be here to see it done whenever you get to it.
Re: Steve's Stug III ausf B
Posted: Sat Dec 03, 2016 7:24 pm
by privatepete
Hi Steve," watch though lungs if you spraying" I know, hope you get well so and try and finish because it looking really good.
Pete


