


Steve
Foxx's and ClaytonDJ's DeAgostini Millennium Falcon Builds WIP
Re: Foxx's and ClaytonDJ's DeAgostini Millennium Falcon Builds WIP
That looks very good, looking forward to the rest of the build 
Steve
Steve

Re: Foxx's and ClaytonDJ's DeAgostini Millennium Falcon Builds WIP
Thanks Steve - just following the steps and guidance of Mr Foxx - if a complete novice like me can do it then I'm sure anyone can!
Re: Foxx's and ClaytonDJ's DeAgostini Millennium Falcon Builds WIP
Issue 9 contains the battery box and advises testing the LED lights behind the cockpit....so who am I to ignore such valuable advice.
Even though the cockpit is only half finished (still lots of painting and weathering to do) it's beginning to look pretty cool (even if I do say so myself!)
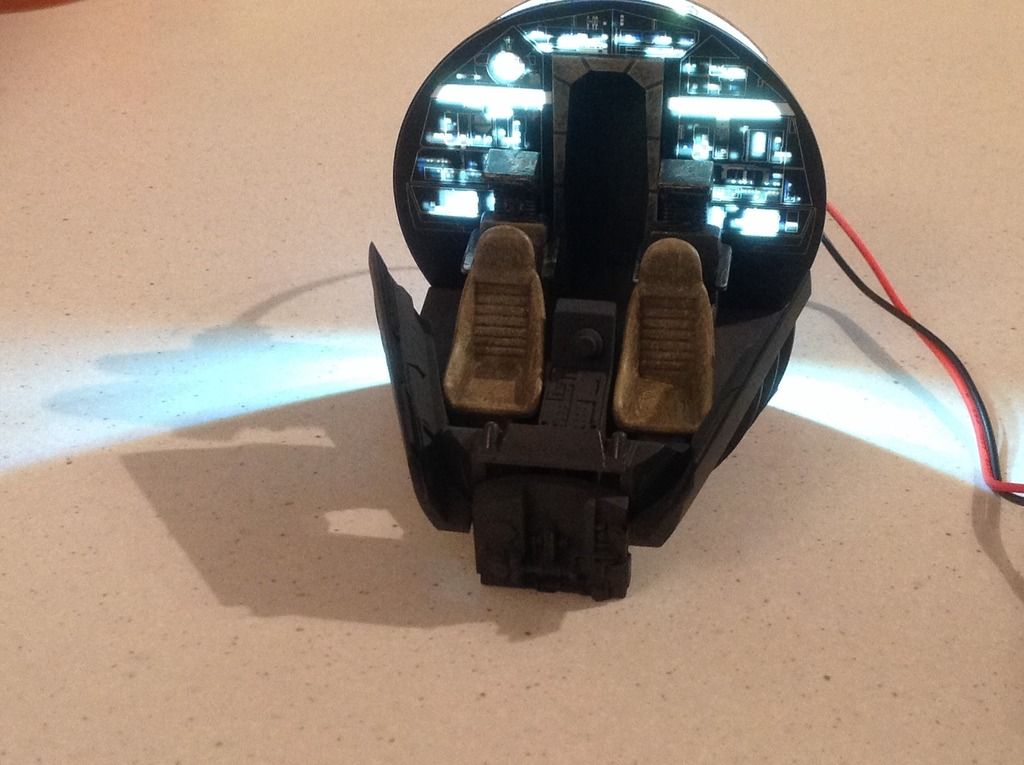
Even though the cockpit is only half finished (still lots of painting and weathering to do) it's beginning to look pretty cool (even if I do say so myself!)
-
ChubberLang
- Sergeant

- Posts: 159
- Joined: Wed Jun 12, 2013 6:25 pm
- Location: Blandford Forum, Dorset
Re: Foxx's and ClaytonDJ's DeAgostini Millennium Falcon Builds WIP
Absolutely fantastic work guys. A joy to read through and see how everyone's Falcon is taking shape.
I'm doing the Falcon myself and I wanna or I'm gonna try and follow Foxxx's build.
If so I'll post a picture or two.
I'm doing the Falcon myself and I wanna or I'm gonna try and follow Foxxx's build.
If so I'll post a picture or two.
Re: Foxx's and ClaytonDJ's DeAgostini Millennium Falcon Builds WIP
Welcome to the party ChubberLang 
Re: Foxx's and ClaytonDJ's DeAgostini Millennium Falcon Builds WIP
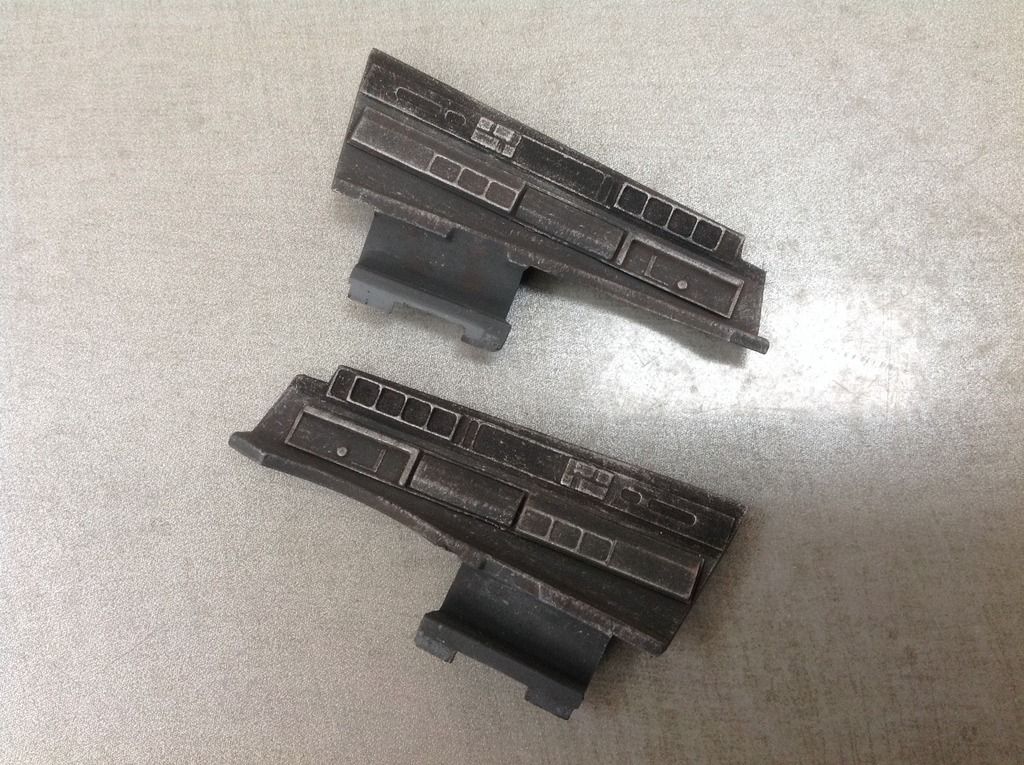
So while the Mr Foxx is otherwise engaged on his commission build I thought I'd try my hand at the dry brushing lark - starting with the pieces of the console that I've sprayed black and German grey. Dry brushed with flat aluminium then applied Ultimate dark dirt wash...cockpit side panels were first to get the treatment
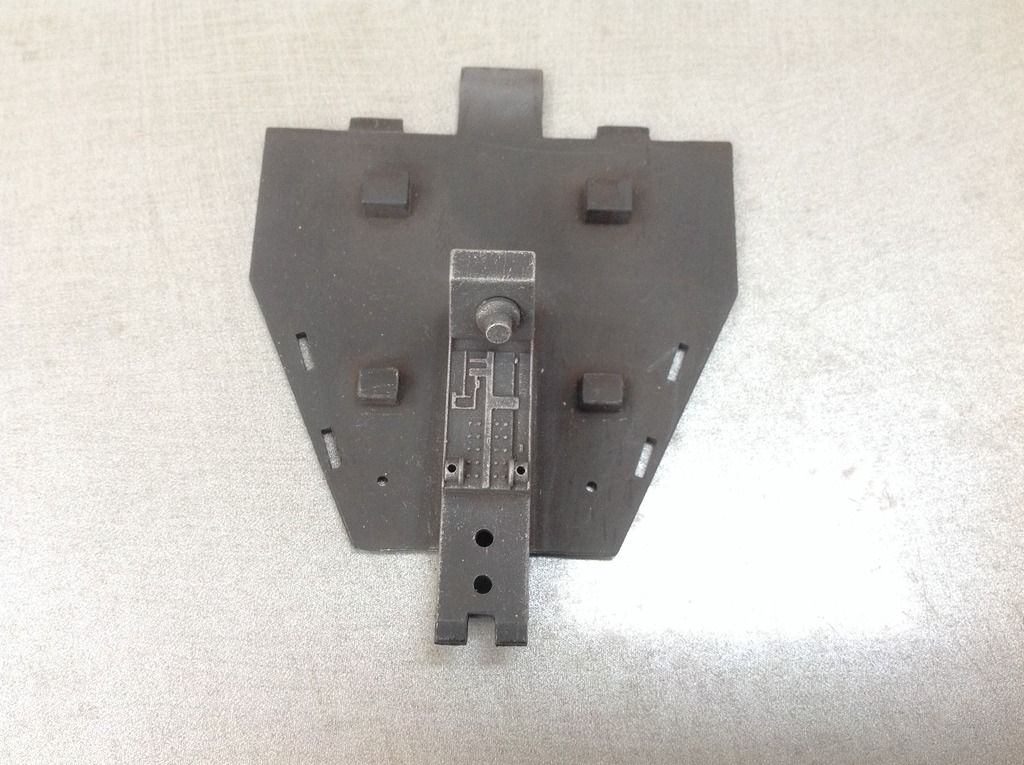
Then the main console centrepiece itself...
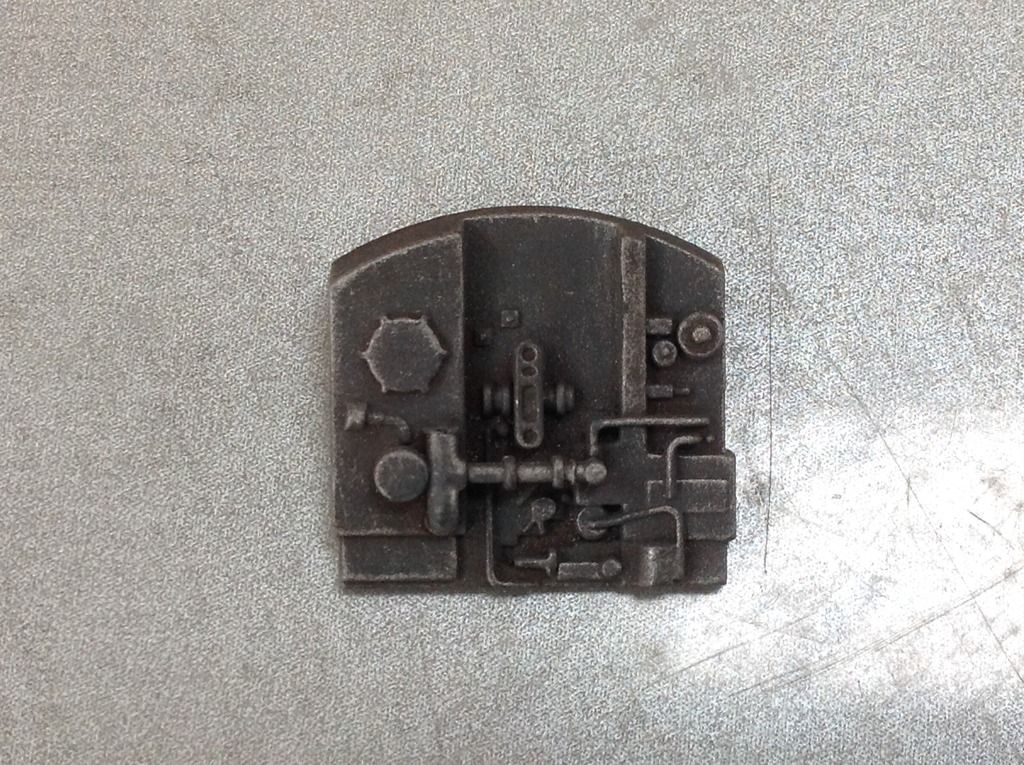
Followed by the front end bit!
I'll be interested in what Mr Foxx makes of these - may need further dry brushing to lighten the aluminium - or even colours to add to the panels?
Then the main console centrepiece itself...
Followed by the front end bit!
I'll be interested in what Mr Foxx makes of these - may need further dry brushing to lighten the aluminium - or even colours to add to the panels?
Re: Foxx's and ClaytonDJ's DeAgostini Millennium Falcon Builds WIP
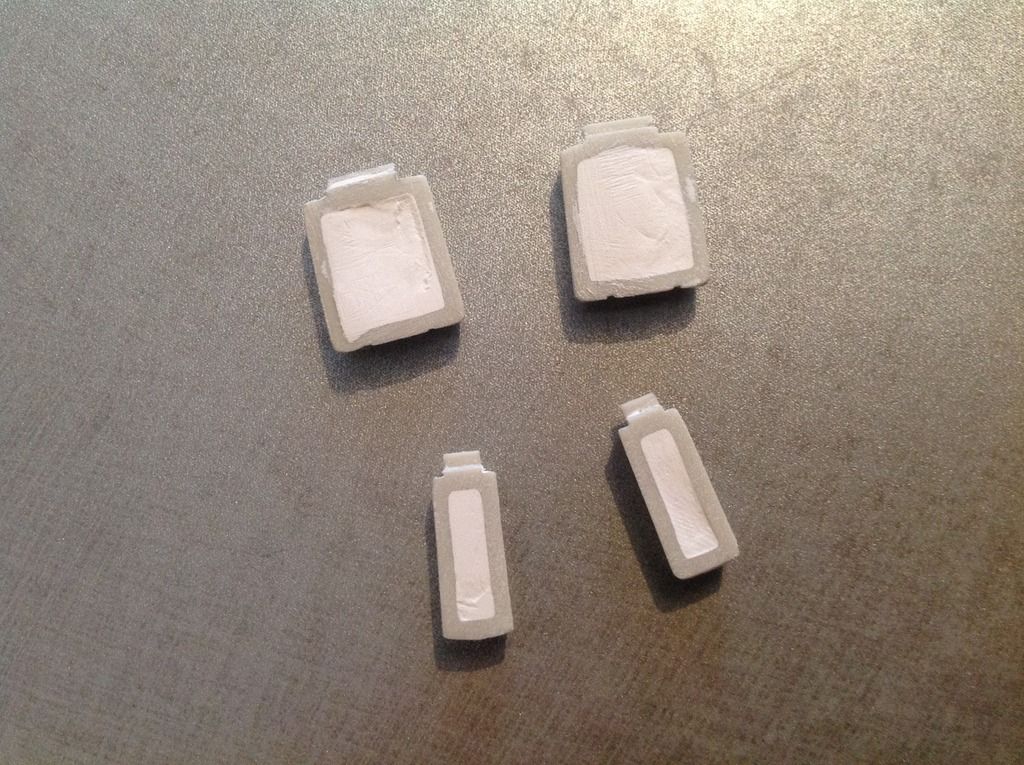
Also tried my hand at using milliput model putty to fill in the gaps in the backs of the 4 seats that will overhang the back unit and be visible. Not sure whether I've been a little too skimpy with the fill. I'll prime them and see what the finish looks like - after all cushions aren't meant to be perfectly flat! Can always add a bit more if needed..
Re: Foxx's and ClaytonDJ's DeAgostini Millennium Falcon Builds WIP
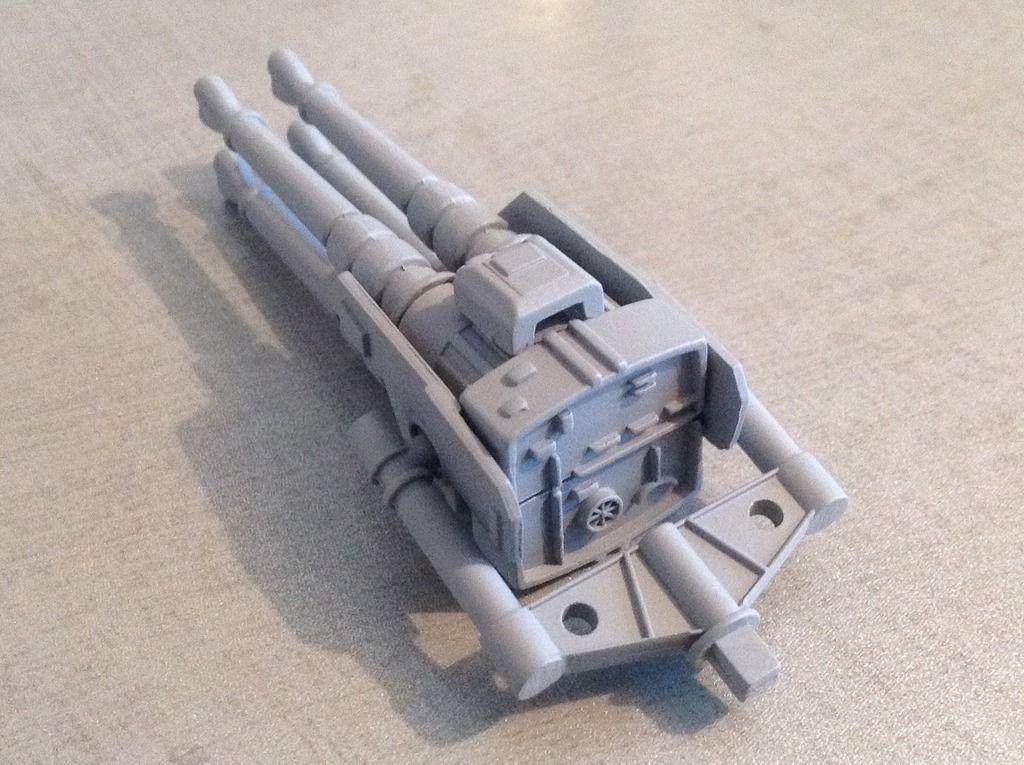
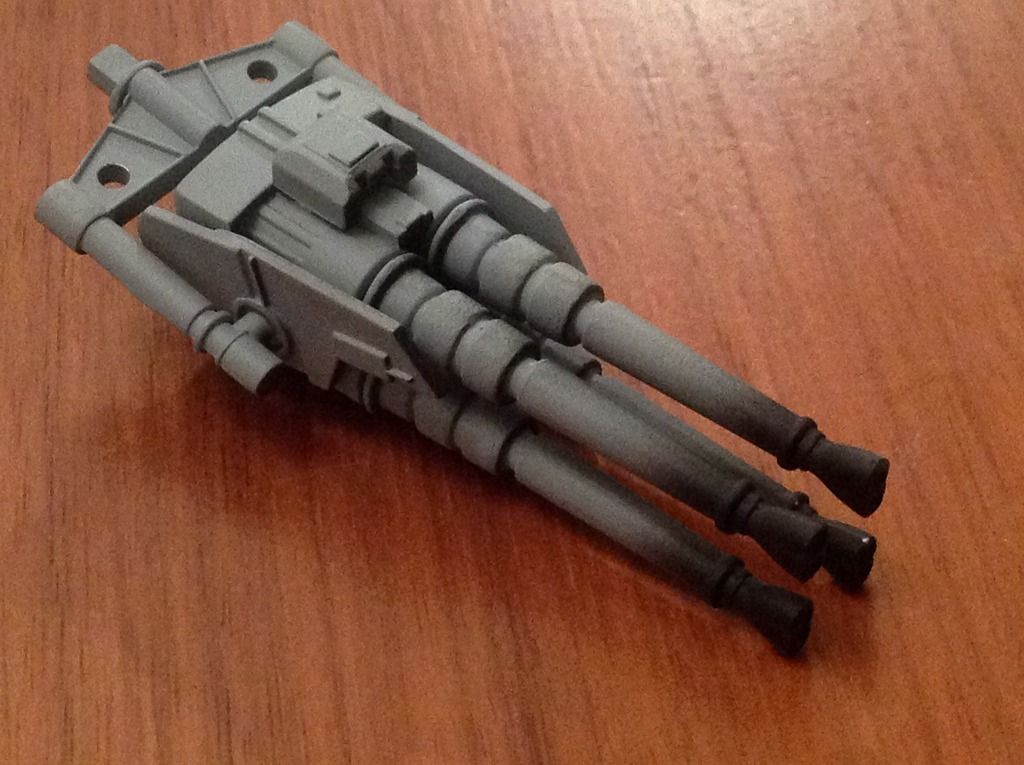
Then I primed the quad cannons ready for painting using a mix of grey and white Badger primer so that the finish is lighter - and loosely assembled them again to see what they look like.
-
ChubberLang
- Sergeant
- Posts: 159
- Joined: Wed Jun 12, 2013 6:25 pm
- Location: Blandford Forum, Dorset
Re: Foxx's and ClaytonDJ's DeAgostini Millennium Falcon Builds WIP
Looking very good Clayton. Your dry brushing looks superb.
I need to order some stuff and hopefully join in.
Keep it up Clayton.
I need to order some stuff and hopefully join in.
Keep it up Clayton.
-
Stefan8271
- Private

- Posts: 16
- Joined: Sat Feb 14, 2015 12:35 pm
Re: Foxx's and ClaytonDJ's DeAgostini Millennium Falcon Builds WIP
I have not posted in a while , I am still doing stuff, however I must admit I am becoming more disappointed with what we are being sent. The inside of the hall is so wrong, from The floor to the moon shape seats, to the bed !!!
I have binned the lot and bought the 3d printed stuff from Shapeways, it is bloody expensive but at least I am getting parts that look correct !!!
Even the cone on The cock pit is wrong !! The bottom window pannels on each side are to big with The Deago I have not made my mind up if I am going to change it and go with again the expensive Shapeways version which is correct or stick with it , but now I know it's not correct , it bugs the life out of me !!!
I have binned the lot and bought the 3d printed stuff from Shapeways, it is bloody expensive but at least I am getting parts that look correct !!!
Even the cone on The cock pit is wrong !! The bottom window pannels on each side are to big with The Deago
Re: Foxx's and ClaytonDJ's DeAgostini Millennium Falcon Builds WIP
Stefan,
I've seen some of the Shapeways replacement parts and some/most look to offer an improvement on the Deago parts. I agree - disappointing and not what you expect given the claims about accuracy made during the launch. I guess in the end this comes down to cost - and how much extra over and above the committed £900 for the Deag parts we are prepared to invest in?
I've seen some of the Shapeways replacement parts and some/most look to offer an improvement on the Deago parts. I agree - disappointing and not what you expect given the claims about accuracy made during the launch. I guess in the end this comes down to cost - and how much extra over and above the committed £900 for the Deag parts we are prepared to invest in?
Re: Foxx's and ClaytonDJ's DeAgostini Millennium Falcon Builds WIP
Thanks Chubberlang - dry brushing is new to me so only following the guidance in the vids.
On-line is the way to go for your materials. Great if you were to join us - the more minds working on this the better. We can probably all learn something from each other's experiences and ideas.
On-line is the way to go for your materials. Great if you were to join us - the more minds working on this the better. We can probably all learn something from each other's experiences and ideas.
-
Stefan8271
- Private
- Posts: 16
- Joined: Sat Feb 14, 2015 12:35 pm
Re: Foxx's and ClaytonDJ's DeAgostini Millennium Falcon Builds WIP
Yea, it does come down to cost, that's for sure and you would think forking out £900 on it would have been enough.
However I supose the hall is one they have made up as the MR model was more about outside accuracy.
However I supose the hall is one they have made up as the MR model was more about outside accuracy.
-
ChubberLang
- Sergeant
- Posts: 159
- Joined: Wed Jun 12, 2013 6:25 pm
- Location: Blandford Forum, Dorset
Re: Foxx's and ClaytonDJ's DeAgostini Millennium Falcon Builds WIP
Thanks Clayton. Doubt I'll have any new ideas to the mix. I'm proper beginner here. I'm just following along.ClaytonDJ wrote:Thanks Chubberlang - dry brushing is new to me so only following the guidance in the vids.
On-line is the way to go for your materials. Great if you were to join us - the more minds working on this the better. We can probably all learn something from each other's experiences and ideas.
On that note. I have ordered a load of stuff from Emodels today(shhh, don't tell the wife). But it might be a slow process due to having two kids and the boss. Also I havnt got a proper man cave or a extractor fan so I have to rely on nice weather.
Re: Foxx's and ClaytonDJ's DeAgostini Millennium Falcon Builds WIP
Chubberland,
But it will be your Falcon - built by your own fair hand - specific and unique to you alone.
No man cave, paint booth or extractor here either - simple desk near an open window! Will you be airbrushing? I've learnt a few things already!!
Dave
But it will be your Falcon - built by your own fair hand - specific and unique to you alone.
No man cave, paint booth or extractor here either - simple desk near an open window! Will you be airbrushing? I've learnt a few things already!!
Dave
Re: Foxx's and ClaytonDJ's DeAgostini Millennium Falcon Builds WIP
Have decided to re-prime the exterior panel pieces - threw some white Badger primer in with the (dark) grey in an attempt to produce a primed coat light enough to support pre-shading with the rubber black acrylic. Nice and light finish which will hopefully support pre-shading and not dampen down the top coat. All pieces re-primed ready for pre-shading

Re: Foxx's and ClaytonDJ's DeAgostini Millennium Falcon Builds WIP
Found that my cheap (free) air brush doesn't like me switching from primer to acrylic back to primer!!! Refused categorically to spray my Badger primer even when I thinned it a bit. Took the whole thing to bits - yet another learning curve - to find dried primer on the nozzle, needle and everywhere else in between! After a thorough clean with Ultimate airbrush cleaner (free ad!) and Wilko's own meths (another free ad!) it decided to start spraying again. I need an alternative strategy unless I want to spend light years taking the airbrush to pieces and cleaning it just to get it to spray primer for me
Re: Foxx's and ClaytonDJ's DeAgostini Millennium Falcon Builds WIP
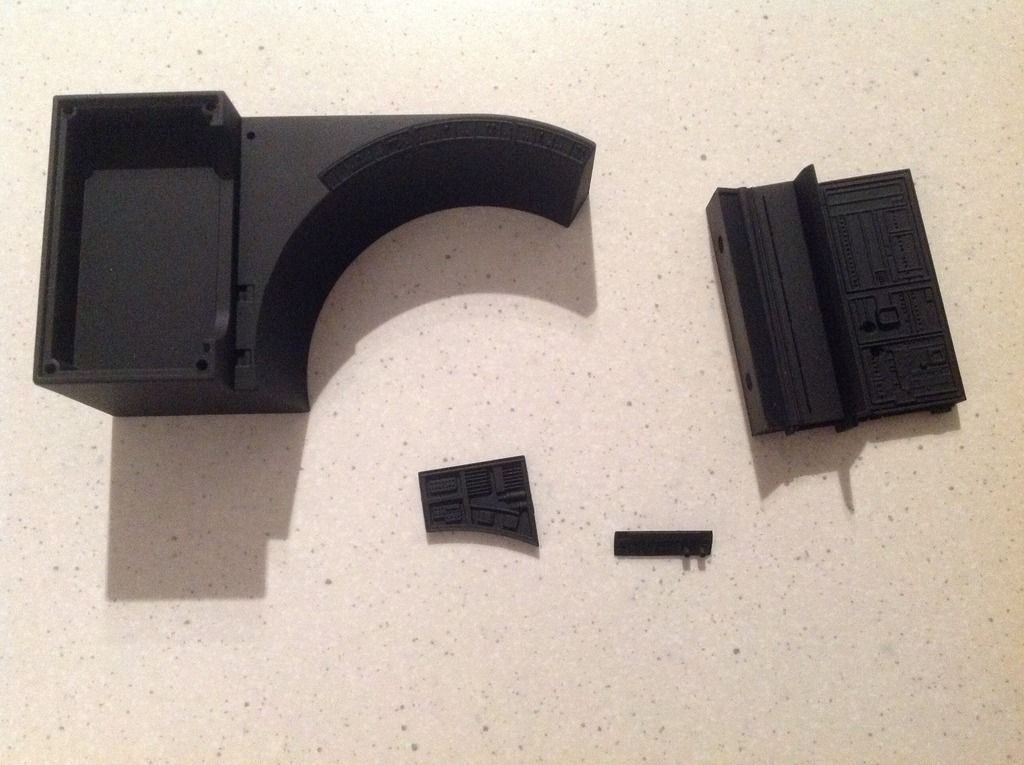
With the airbrush playing nicely again I've decided to bite the bullet and use black Badger primer to coat the inside bits!. Fllors, walls, seats, beds, technical station - nothing has been spared!!! It's only primer but I do like it!
Re: Foxx's and ClaytonDJ's DeAgostini Millennium Falcon Builds WIP
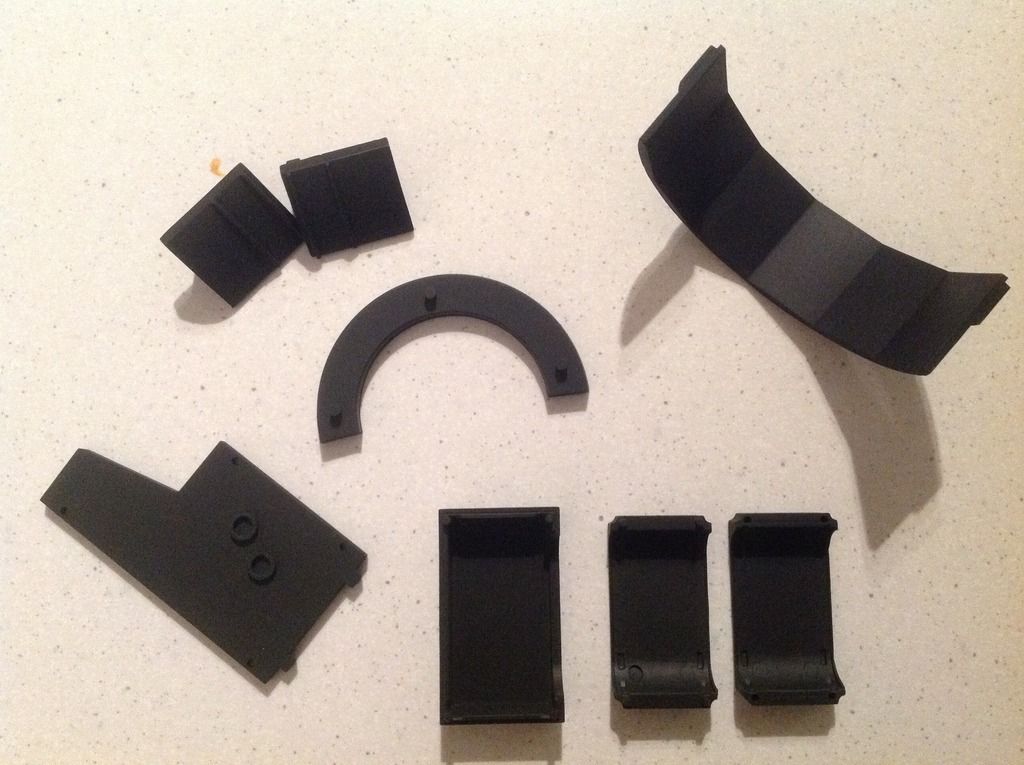
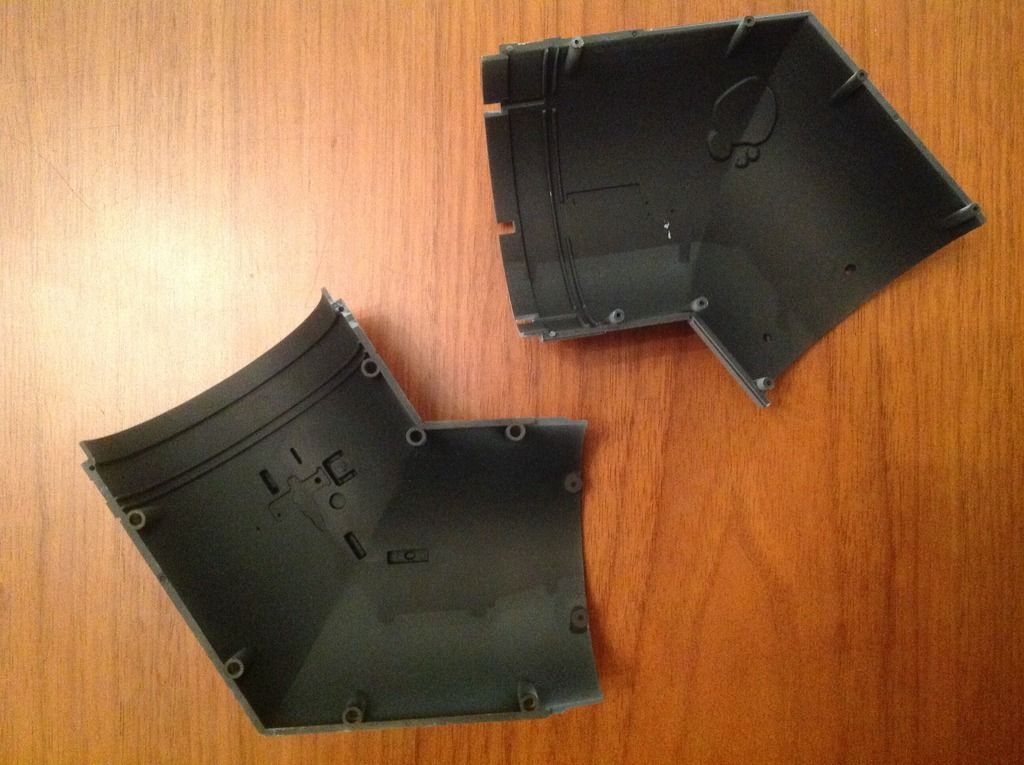
Now then - a little bit of info/tip I've picked up from elsewhere. Even though the kit includes a couple of dark sticky strips to apply in the cockpit tunnel - the LEDs are so bright that light is still visible at the joints and even through the tunnel hull itself (where the plastic is thinner). To help reduce this I've primed the inside of the tunnel pieces black...remains to be seen whether this will be enough or whether we'll need to put something else inside the tunnel to cancel out any light shining through.
Re: Foxx's and ClaytonDJ's DeAgostini Millennium Falcon Builds WIP
Still had some black primer left in the airbrush - waste not want not - so I added a touch to the end of the quad cannons (luckily the pets were elsewhere!_
Re: Foxx's and ClaytonDJ's DeAgostini Millennium Falcon Builds WIP
Not sure how far off MMG is off finishing his commission build but I'm running out of parts to prime black!
Would like to do the pre-shading and top coat on the external hull parts - but don't want to fall out with the airbrush again!
Would like to do the pre-shading and top coat on the external hull parts - but don't want to fall out with the airbrush again!
Re: Foxx's and ClaytonDJ's DeAgostini Millennium Falcon Builds WIP
Father - forgive me - for I have sinned
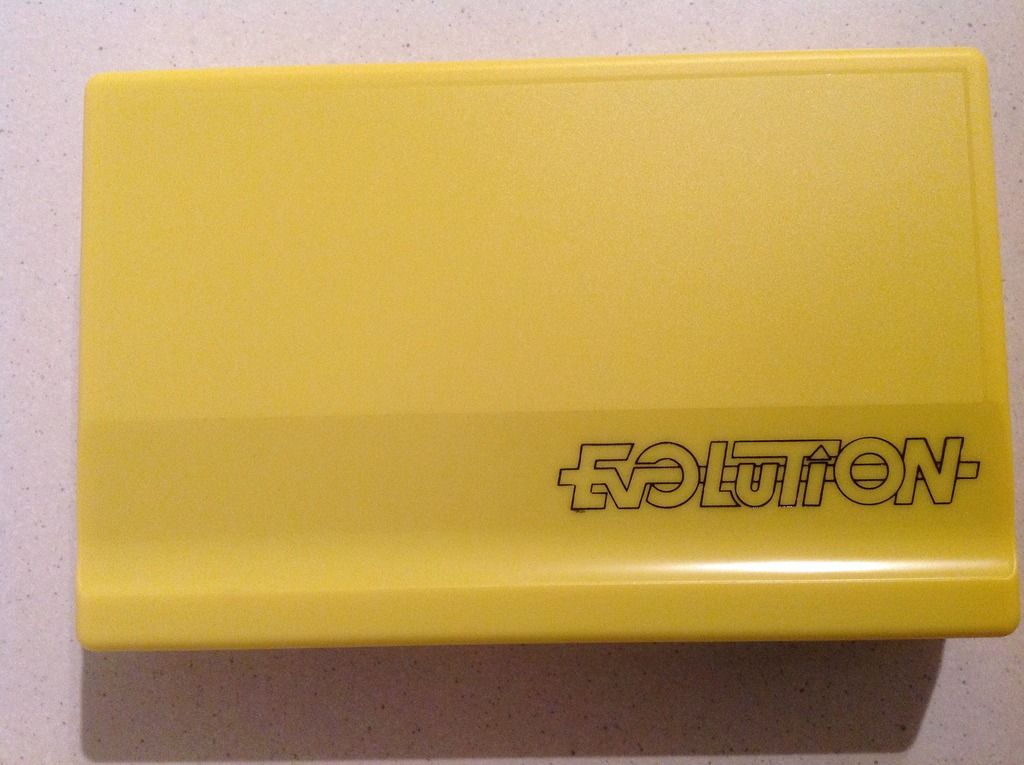
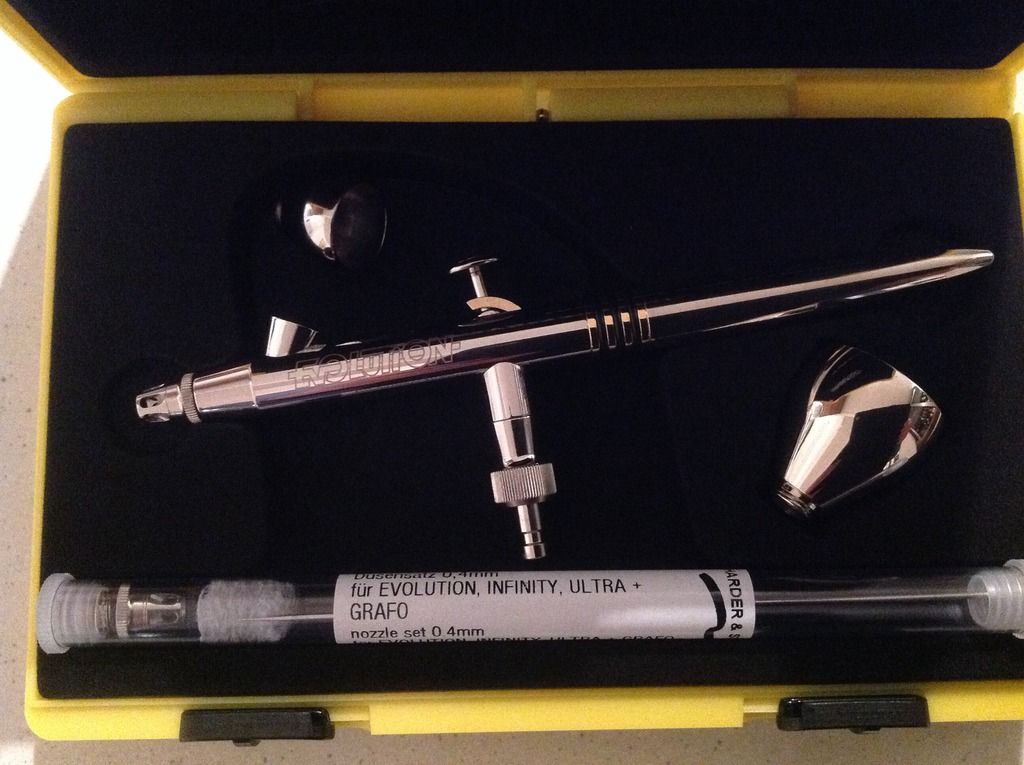
My logic being that I'm going to finish this model - and the cost warrants an investment in proper tools if I am going to do it justice (at least that's the story I'm going with!) It arrived today - she is indeed a thing of beauty - elegant but precise.
Now my cheap/free airbrush and I won't need to fall out again due to me switching between primer and acrylic paint - it can spray the primer and the Evo can spray the top coats.
-
ChubberLang
- Sergeant
- Posts: 159
- Joined: Wed Jun 12, 2013 6:25 pm
- Location: Blandford Forum, Dorset
Re: Foxx's and ClaytonDJ's DeAgostini Millennium Falcon Builds WIP
Good stuff Clayton. Airbrush looks mean.
I wanted to get started today with some priming but outside is windy where I am in Dorset so gonna be difficult.
One question.. I have the normal Tamiya gray primer but not the fine gray primer. Is that gonna be a problem?
Look forward to more updates.
I wanted to get started today with some priming but outside is windy where I am in Dorset so gonna be difficult.
One question.. I have the normal Tamiya gray primer but not the fine gray primer. Is that gonna be a problem?
Look forward to more updates.
Re: Foxx's and ClaytonDJ's DeAgostini Millennium Falcon Builds WIP
I've not used the Tamiya primer - though did buy 2 rattle cans on advice from MMG (and he does use the rattle cans for priming). I've bought some Badger primer and airbrushed it on. I'd have thought that the normal grey primer would be fine - but you might be wise to check with MMG beforehand.
My next activity will be to spray the walls and floor pieces German Grey, to pre-shade the hull parts now that I've lightened the primer colour then to mix/apply the top coat to them. Once top coat is applied I believe I'll need to apply a coat of matt varnish to protect the top coat and prevent chipping.
My next activity will be to spray the walls and floor pieces German Grey, to pre-shade the hull parts now that I've lightened the primer colour then to mix/apply the top coat to them. Once top coat is applied I believe I'll need to apply a coat of matt varnish to protect the top coat and prevent chipping.
Re: Foxx's and ClaytonDJ's DeAgostini Millennium Falcon Builds WIP
I note on FB that MMG has finished the model he's been commission building and is working on the base - so he should be back with us soon.
Re: Foxx's and ClaytonDJ's DeAgostini Millennium Falcon Builds WIP
MMG has posted Video 5 - more work on the cockpit to do! Also need to buy in some more paint and CA (and PVA) glue. Off to the shops again!
-
modelmakingguru

- Corporal

- Posts: 76
- Joined: Mon Jan 26, 2015 12:58 pm
- Contact:
Re: Foxx's and ClaytonDJ's DeAgostini Millennium Falcon Builds WIP
All right all right, quiet you rabble, I'm back ^_^
Wowee, some good work gone on here in my absence. See what happens when I leave you alone for five minutes? GOOD THINGS!
I've read through the last few pages and had lots of salient points to make but have already forgotten everything that I read, so nuts.
I can remember (aimed randomly to whoever said what):
1)cool airbrush, yellow is good
2)The Badger primers looks fine, although you might prefer the white primer on the hull - as you are spraying a light basecolour over the top, the darker primer will noticeably change the colour that the white/tan mix takes when it is applied (it will darken and bluen it). It's the same reason spraying white on top of black always ends up in a light grey colour rather than white - always be conscious of what colour a light paint is sprayed on top of as it will be affected. Similarly, if you were spraying, say, yellow, and wanted it to be bright, you would spray it on top of a white to brighten it. A lighter colour primer will help brighten the white/tan mix and not change its colour or temperature the wrong way
3) Something Something dark side
4) cockpit looks kick ass, good work. Also the pre shading looked fine, although you might also like to shadow around the bases of the engine vents for extra depth.
5) I need bacon
6) I'm Batman
Now, what's going on at camp MMG then, eh? Sorry I have been absent, been up to my ears in commissions, work and home stuff. I was also waiting A LIVING AGE for parts 6-9 to turn up which they did a few days ago But I had been sidetracked by this guy:

...and I'm not going to argue with a 42-foot long gatling
ANYWAY I set aside this weekend and blasted through the cockpit to get it finished off. I think I slept for about two hours AND the clocks changed which threw me for six, I can tell you. Although I do love the fact that every time the clocks change there is almost no commute traffic the following Monday - lots and lots of people race to work an hour late expecting a good old-fashioned Jack Meadows style telling-off when they get to work.
Anyhoo, the cockpit is now all painted up, assembled and the test lighting checked out. I've fitted the cockpit tube together but not glued anything - won't be doing that for quite a while yet.


Next up will be sorting out the light-leak in the cockpit tube and then I guess making a start on the cargo bay, which, I will admit, I would rather not bother with at all but I can't really not film that bit. I would go the Shapeways route but I am trying to keep this an out of the box build for newbies to follow along with, so I am kinda knackered on that front (plus, I don't have the time for that anyway).
Anyhoo, I posted up episode 5 (half of the cockpit work) and ep 6 (finishing the cockpit off) should be up later today, hopefully. Here's ep. 5 for your viewing pleasures! Lots of washes, oil paint, pastels and CA glue ahead!
Wowee, some good work gone on here in my absence. See what happens when I leave you alone for five minutes? GOOD THINGS!
I've read through the last few pages and had lots of salient points to make but have already forgotten everything that I read, so nuts.
I can remember (aimed randomly to whoever said what):
1)cool airbrush, yellow is good
2)The Badger primers looks fine, although you might prefer the white primer on the hull - as you are spraying a light basecolour over the top, the darker primer will noticeably change the colour that the white/tan mix takes when it is applied (it will darken and bluen it). It's the same reason spraying white on top of black always ends up in a light grey colour rather than white - always be conscious of what colour a light paint is sprayed on top of as it will be affected. Similarly, if you were spraying, say, yellow, and wanted it to be bright, you would spray it on top of a white to brighten it. A lighter colour primer will help brighten the white/tan mix and not change its colour or temperature the wrong way
3) Something Something dark side
4) cockpit looks kick ass, good work. Also the pre shading looked fine, although you might also like to shadow around the bases of the engine vents for extra depth.
5) I need bacon
6) I'm Batman
Now, what's going on at camp MMG then, eh? Sorry I have been absent, been up to my ears in commissions, work and home stuff. I was also waiting A LIVING AGE for parts 6-9 to turn up which they did a few days ago
...and I'm not going to argue with a 42-foot long gatling
ANYWAY I set aside this weekend and blasted through the cockpit to get it finished off. I think I slept for about two hours AND the clocks changed which threw me for six, I can tell you. Although I do love the fact that every time the clocks change there is almost no commute traffic the following Monday - lots and lots of people race to work an hour late expecting a good old-fashioned Jack Meadows style telling-off when they get to work.
Anyhoo, the cockpit is now all painted up, assembled and the test lighting checked out. I've fitted the cockpit tube together but not glued anything - won't be doing that for quite a while yet.
Next up will be sorting out the light-leak in the cockpit tube and then I guess making a start on the cargo bay, which, I will admit, I would rather not bother with at all but I can't really not film that bit. I would go the Shapeways route but I am trying to keep this an out of the box build for newbies to follow along with, so I am kinda knackered on that front (plus, I don't have the time for that anyway).
Anyhoo, I posted up episode 5 (half of the cockpit work) and ep 6 (finishing the cockpit off) should be up later today, hopefully. Here's ep. 5 for your viewing pleasures! Lots of washes, oil paint, pastels and CA glue ahead!
[youtube]gnvBIsMD-2A[/youtube]

Der Fuchs ist schlau und spielt dumm, aber Foxx ist einfach dumm.
-
modelmakingguru
- Corporal
- Posts: 76
- Joined: Mon Jan 26, 2015 12:58 pm
- Contact:
Re: Foxx's and ClaytonDJ's DeAgostini Millennium Falcon Builds WIP
Oh, one other thing I forgot - about spraying primer through an airbrush - if your brush has a very fine nozzle then it probably gunked up because the primer is too thick for it. I have the same problem spraying Tamiya metallic paints through my DeVilbis DAGR which I think is a .25 nozzle. I found spraying them through my cheaper Spraycraft brush easier because I think it has a slightly bigger nozzle. You might want to get either a bigger nozzle for your brush, or a cheapo second brush just for primer. Or even a cheap spray gun (not brush) would be fine because there is no finesse to primer. The auto repair spray guns we use at work cost several hundred quid (to spray paint cars) but when we lay down a coat of high-build primer on the metal bodywork we use a £10 primer gun we got off of eBay
Der Fuchs ist schlau und spielt dumm, aber Foxx ist einfach dumm.
Re: Foxx's and ClaytonDJ's DeAgostini Millennium Falcon Builds WIP
MMG - nice to see you back on form! You really need to invest in a notebook to capture your thoughts - your memory's clearly clouded by other things (bacon, batman, Gunga things!).
Fully understand the point re lighter prime coat delivering the best colour top coat....my original dark grey Badger primed pieces were much too dark - but I mixed white and grey Badger primer and re-did the outer pieces (shown on page 11 post dated Tues March 24 at 07:30pm). Would you say these are light enough to support the white/deck tan top coat or should I re-prime them with just the white badger primer?
Fully understand the point re lighter prime coat delivering the best colour top coat....my original dark grey Badger primed pieces were much too dark - but I mixed white and grey Badger primer and re-did the outer pieces (shown on page 11 post dated Tues March 24 at 07:30pm). Would you say these are light enough to support the white/deck tan top coat or should I re-prime them with just the white badger primer?
-
modelmakingguru
- Corporal
- Posts: 76
- Joined: Mon Jan 26, 2015 12:58 pm
- Contact:
Re: Foxx's and ClaytonDJ's DeAgostini Millennium Falcon Builds WIP
I would say maybe re-prime. I use the Tamiya primer (the light grey one, not the white one) so I would say no darker than that if you can.
I have a notebook. But A) it is propping something up - I forget what because I couldn't note that down anywhere - and B) I forget what B) is.
Also, PART 6, monkeyfluffers. I finish up the painting and weathering and get the cockpit assembled, and do SOME STICKING. Lots of advice about glue. Some dropping things. Many fade transitions and about an hour of stuff on the cutting room floor because I CAN'T SHUT UP.
Enjoy!
[youtube]Chgwd4P_ZYw[/youtube]
Der Fuchs ist schlau und spielt dumm, aber Foxx ist einfach dumm.
Re: Foxx's and ClaytonDJ's DeAgostini Millennium Falcon Builds WIP
MMG - just watched Episode 6 - the list of extra paints and oils I need just keeps growing.
But the cockpit looks really cool lit.
Now I've seen what you're doing with the cockpit and console pieces I've a shed load of work to do to varnish/weather/oil/highlight them before assembly.
Take your steer on the primer but would like to airbrush the Badger rather than switch to Tamiya rattle cans if possible. Think I'll ask Paul on ISM if he can suggest a proportionate mix of the Badger primers that will come close to the grey of the Tamiya rattle can (I know he uses and likes the Badger primers).
Like you not relishing the inner compartment/seats etc - but I'm sure youll make it look superb.
Catch you soon buddy
-
modelmakingguru
- Corporal
- Posts: 76
- Joined: Mon Jan 26, 2015 12:58 pm
- Contact:
Re: Foxx's and ClaytonDJ's DeAgostini Millennium Falcon Builds WIP
TBH amigo you should be fine with the white Badger primer, it shouldn't cause you any problems and at the end of the day stick with what you prefer And if your colours do come out a tiny bit too bright it will only be a tiny bit, and any over-lightness could be countered with an extra wash of Tamiya Smoke when we get to that stage. I'd say stick t the white primer and worry about adjusting the colours later on. Don't forget we're going to be weathering the living pants out of this puppy anyway, so as long as the colour is in the right ballpark, everything else is gravy.
There is much for you to do, but there's plenty of time - I'm really not sure what I will be filming when we get 75 issues of MOAR HULL PLATES (includes extra hull plates for your hull plates) because all the interior stuff I can paint is done. I don't really want to paint the hull in parts as they turn up as I'll end up with different amounts of wash and weathering and it'll look a bit patchwork (I would prefer to paint the hull all in one go). I realised today that I could get a week's worth of happy summer garden weathering out of just the cockpit tube alone o_O
There is much for you to do, but there's plenty of time - I'm really not sure what I will be filming when we get 75 issues of MOAR HULL PLATES (includes extra hull plates for your hull plates) because all the interior stuff I can paint is done. I don't really want to paint the hull in parts as they turn up as I'll end up with different amounts of wash and weathering and it'll look a bit patchwork (I would prefer to paint the hull all in one go). I realised today that I could get a week's worth of happy summer garden weathering out of just the cockpit tube alone o_O
Der Fuchs ist schlau und spielt dumm, aber Foxx ist einfach dumm.
-
Stefan8271
- Private
- Posts: 16
- Joined: Sat Feb 14, 2015 12:35 pm
Re: Foxx's and ClaytonDJ's DeAgostini Millennium Falcon Builds WIP
Good to see you back Foxx , I have been busy tbh I did not like what hallway parts we were getting and have done a bit of both, Deago and Shapeways , I will post some stuff up soon.
-
modelmakingguru
- Corporal
- Posts: 76
- Joined: Mon Jan 26, 2015 12:58 pm
- Contact:
Re: Foxx's and ClaytonDJ's DeAgostini Millennium Falcon Builds WIP
Yeah, the cargo bay seems a bit lame, but what the hey, I'll never have it on show anyway
Der Fuchs ist schlau und spielt dumm, aber Foxx ist einfach dumm.
-
ChubberLang
- Sergeant
- Posts: 159
- Joined: Wed Jun 12, 2013 6:25 pm
- Location: Blandford Forum, Dorset
Re: Foxx's and ClaytonDJ's DeAgostini Millennium Falcon Builds WIP
Blimey. I have spent 30 pounds already. Now I've added the rest up I need another 40 pounds plus. Yikes!
I'm itching to get started now after seeing foxx's vids and following this thread as well as looking at the Facebook builds.
Quick question for Foxx. Can I use the normal Tamiya grey primer or is it ideal for the fine grey primer?
I'm itching to get started now after seeing foxx's vids and following this thread as well as looking at the Facebook builds.
Quick question for Foxx. Can I use the normal Tamiya grey primer or is it ideal for the fine grey primer?
Re: Foxx's and ClaytonDJ's DeAgostini Millennium Falcon Builds WIP
Picked up Tamiya clear paints - blue, red and orange - applied small amounts to reverse of cockpit rear panel sticker. Not sure how many coats are needed - but looks quite nice

-
modelmakingguru
- Corporal
- Posts: 76
- Joined: Mon Jan 26, 2015 12:58 pm
- Contact:
Re: Foxx's and ClaytonDJ's DeAgostini Millennium Falcon Builds WIP
TBH either is good. The only place it matters is on the outer hull, where the lighter primer will have less of a effect changing the tone of the paint your spray over the top (but TBH using the grey primer won't make THAT much of a difference). The lighter primer will make your hull colour appear a smidge brighter, but again, TBH most people won't notice the difference and you're going to be covering up that paint with so much weathering anyway it's almost not something to worry aboutChubberLang wrote:Blimey. I have spent 30 pounds already. Now I've added the rest up I need another 40 pounds plus. Yikes!
I'm itching to get started now after seeing foxx's vids and following this thread as well as looking at the Facebook builds.
Quick question for Foxx. Can I use the normal Tamiya grey primer or is it ideal for the fine grey primer?
Der Fuchs ist schlau und spielt dumm, aber Foxx ist einfach dumm.
-
modelmakingguru
- Corporal
- Posts: 76
- Joined: Mon Jan 26, 2015 12:58 pm
- Contact:
Re: Foxx's and ClaytonDJ's DeAgostini Millennium Falcon Builds WIP
Probably only one or two, that should come out quite nicely. If you want to give a slightly shaded effect (i.e. darker around the edges, lighter in the middle to suggest a strip light behind plastic) ) you can always apply a little more more where you want it darker (or apply it thinly to start with so that you get more paint around edges and less in the middle of panels).ClaytonDJ wrote:Picked up Tamiya clear paints - blue, red and orange - applied small amounts to reverse of cockpit rear panel sticker. Not sure how many coats are needed - but looks quite nice
How did it come out with the light? Enquiring minds demand to know!
Der Fuchs ist schlau und spielt dumm, aber Foxx ist einfach dumm.
-
ChubberLang
- Sergeant
- Posts: 159
- Joined: Wed Jun 12, 2013 6:25 pm
- Location: Blandford Forum, Dorset
Re: Foxx's and ClaytonDJ's DeAgostini Millennium Falcon Builds WIP
Thanks for replying foxx. I have ordered the lighter one anyway so I'll save that for the outer bits.modelmakingguru wrote:TBH either is good. The only place it matters is on the outer hull, where the lighter primer will have less of a effect changing the tone of the paint your spray over the top (but TBH using the grey primer won't make THAT much of a difference). The lighter primer will make your hull colour appear a smidge brighter, but again, TBH most people won't notice the difference and you're going to be covering up that paint with so much weathering anyway it's almost not something to worry aboutChubberLang wrote:Blimey. I have spent 30 pounds already. Now I've added the rest up I need another 40 pounds plus. Yikes!
I'm itching to get started now after seeing foxx's vids and following this thread as well as looking at the Facebook builds.
Quick question for Foxx. Can I use the normal Tamiya grey primer or is it ideal for the fine grey primer?
Hopefully, hopefully start this weekend. I did start cutting off the greeblies and tidied them up the other evening. Quite proud I didn't break them as they're well fragile. Just need to glue them on with Mr Hobby Cement S and then were away.
Can't wait to start. I have to say Foxx thanks for your time to show us your technique, it's really appreciated and looking forward to more content in the future.
-
ChubberLang
- Sergeant
- Posts: 159
- Joined: Wed Jun 12, 2013 6:25 pm
- Location: Blandford Forum, Dorset
Re: Foxx's and ClaytonDJ's DeAgostini Millennium Falcon Builds WIP
Looking good Clayton. I have ordered the Tamiya clear paints too. If you can mate show us a picture with the end result lit up.ClaytonDJ wrote:Picked up Tamiya clear paints - blue, red and orange - applied small amounts to reverse of cockpit rear panel sticker. Not sure how many coats are needed - but looks quite nice
-
modelmakingguru
- Corporal
- Posts: 76
- Joined: Mon Jan 26, 2015 12:58 pm
- Contact:
Re: Foxx's and ClaytonDJ's DeAgostini Millennium Falcon Builds WIP
No worries, my pleasure!ChubberLang wrote:modelmakingguru wrote:ChubberLang wrote:
Can't wait to start. I have to say Foxx thanks for your time to show us your technique, it's really appreciated and looking forward to more content in the future.
Der Fuchs ist schlau und spielt dumm, aber Foxx ist einfach dumm.
-
Stefan8271
- Private
- Posts: 16
- Joined: Sat Feb 14, 2015 12:35 pm
Re: Foxx's and ClaytonDJ's DeAgostini Millennium Falcon Builds WIP
I have painted behind the cockpit with some clear stain glass paint and it does make a difference to the colour although this pic does not do it justice

-
Stefan8271
- Private
- Posts: 16
- Joined: Sat Feb 14, 2015 12:35 pm
Re: Foxx's and ClaytonDJ's DeAgostini Millennium Falcon Builds WIP
Had a little build and hated the floor

So I ordered the Shapeways

Not finished yet but looks better than the plane one

So I ordered the Shapeways

Not finished yet but looks better than the plane one
-
ChubberLang
- Sergeant
- Posts: 159
- Joined: Wed Jun 12, 2013 6:25 pm
- Location: Blandford Forum, Dorset
Re: Foxx's and ClaytonDJ's DeAgostini Millennium Falcon Builds WIP
Cracking work Stefan. The lights look awesome mate, can't wait to get mine.
Would love to go the Shapeways route but can't warrant spending over the odds for a bit of plastic. It's looking fantastic so far though and look forward to seeing the finished article.
Would love to go the Shapeways route but can't warrant spending over the odds for a bit of plastic. It's looking fantastic so far though and look forward to seeing the finished article.
Re: Foxx's and ClaytonDJ's DeAgostini Millennium Falcon Builds WIP
Looks really nice Stefan - the Shapeways stuff looks a lot better.
-
Stefan8271
- Private
- Posts: 16
- Joined: Sat Feb 14, 2015 12:35 pm
Re: Foxx's and ClaytonDJ's DeAgostini Millennium Falcon Builds WIP
A bit more Shapeways, new bed bunk, new computer console, and side wall attachment with beams.


Re: Foxx's and ClaytonDJ's DeAgostini Millennium Falcon Builds WIP
Stefan8271 wrote:A bit more Shapeways, new bed bunk, new computer console, and side wall attachment with beams.
You're doing awesome man! Really impressive work! I hope all that hard work will be visible in the final product.
Current Builds
Mk. A Whippet: http://www.intscalemodeller.com/viewtop ... 29&t=21073
Panzer IV Ausf D Buddy Build with SteveAFV: http://www.intscalemodeller.com/viewtop ... 29&t=19653
Mk. A Whippet: http://www.intscalemodeller.com/viewtop ... 29&t=21073
Panzer IV Ausf D Buddy Build with SteveAFV: http://www.intscalemodeller.com/viewtop ... 29&t=19653
-
Stefan8271
- Private
- Posts: 16
- Joined: Sat Feb 14, 2015 12:35 pm
Re: Foxx's and ClaytonDJ's DeAgostini Millennium Falcon Builds WIP
Thanks, once finished my falcon will always display the hall, as your right after the work put in , it needs to be seen.
Re: Foxx's and ClaytonDJ's DeAgostini Millennium Falcon Builds WIP
Hey Guys, have been reading all of the posts here and love the work everyone has been doing. I have just started on my build and it is killing me to get started right away but having to wait to get some paints and primer today and then ordering my airbrush set up this weekend(got to love pay days). Hope you guys don't mind me picking all of your brains for advice and info

Re: Foxx's and ClaytonDJ's DeAgostini Millennium Falcon Builds WIP
Looking awesome Stefan. 
Lynn
On the table cause I don't have a bench
What to start working on now???? SMCG Phantastic Phantom Buddy Build 2017
Metal Earth R2D2
On the table cause I don't have a bench
What to start working on now???? SMCG Phantastic Phantom Buddy Build 2017
Metal Earth R2D2
