Hi Guys,
Unfortunately my interior parts have not yet arrived, so I'm pretty limited on what I can start at the moment. I do have the Airwaves conversion kit for the PR.IG and I'll be walking you through that today.
Before we get started, in case there are any new people to the hobby watching this thread, always wear a mask and/or gloves when cutting or sanding resin. I like to put down a damp paper towel to catch the dust. I've heard resin dust described as; "microscopic shards in your lungs."
 Resin parts
 by
Iggy Pants, on Flickr
Here is the stock fuselage half from the kit. This will be my first time slicing and dicing into a fuselage for the sake of conversion.
 Resin parts
 by
Iggy Pants, on Flickr
With a sharp hobby knife, I sliced out the door. As you can see, the knife wandered a bit and I cut the bottom of the door frame. The first thing I did and I messed it up!

I put a touch of Extra Thin on the cut, gave the large cut a nudge, some light sanding and you hardly know it was ever there.
 Resin parts
 by
Iggy Pants, on Flickr
I took the dial calipers today, that I had to re-learn to read, and located the center of the panel for the oblique camera.
 Resin parts
 by
Iggy Pants, on Flickr
I indented the center of the panel with a hobby knife, so when I used the pin vise it wouldn't slip off the mark when I started drilling. I started with a small hole and worked my way up to the largest bit I have. Which unfortunately, was too small. The resin camera lens outside diameter is much bigger.
 Resin parts
 by
Iggy Pants, on Flickr
This is the next problem I ran into. Since I centered the hole on the panel, I was limited in the size I could make because of the fuel tank. If I didn't make it bigger you couldn't make out the camera lens, but if I made it too big you would see the fuel tank.
 Resin parts
 by
Iggy Pants, on Flickr
Time for some serious cuttin'!
 Resin parts
 by
Iggy Pants, on Flickr
I trimmed a little off the back end that no one will ever see....well, except for you guys....and the rest of the Interwebs....crap.
 Resin parts
 by
Iggy Pants, on Flickr
With that trim, I was able to make the camera hole quite a bit larger.
 Resin parts
 by
Iggy Pants, on Flickr
"Wait. You said that you used your largest bit!?" Yes, I did. But alas my skeptical friends, I used "More Power!"
 Resin parts
 by
Iggy Pants, on Flickr
It was not my preferred method and a lot could have gone wrong, but it didn't. If you ever need to resort to this, bear these things in mind. A fast drill will bore cleaner. Go from the outside in, that way the fraying and curling around the hole perimeter will occur on the inside.
Now at least the outside diameter of the camera lens is the same as the hole. I'm not sure how I will mount the camera yet, but here is a dry fit. Which is the wrong way according to the instructions.
 Resin parts
 by
Iggy Pants, on Flickr
I'm considering making the hole a touch bigger, but I'm not so sure. The current hole diameter is 0.123".
 Resin parts
 by
Iggy Pants, on Flickr
On to the underside cameras. There is a fair bit of cutting that needs to take place. Here I'm sizing up the wings for modification.
 Resin parts
 by
Iggy Pants, on Flickr
I made some initial cuts on the fuselage.
 Resin parts
 by
Iggy Pants, on Flickr
All cleaned out, just like a colonoscopy prep.
 Resin parts
 by
Iggy Pants, on Flickr
Dry fit. There are some gaps and things that will need to be addressed. I'm thinking about trying Milliput epoxy putty to fill the cracks and help shape the transition. If this is the wrong route, please let me know.
 Underside cameras
 by
Iggy Pants, on Flickr
 Underside cameras
 by
Iggy Pants, on Flickr
 Underside cameras
 by
Iggy Pants, on Flickr
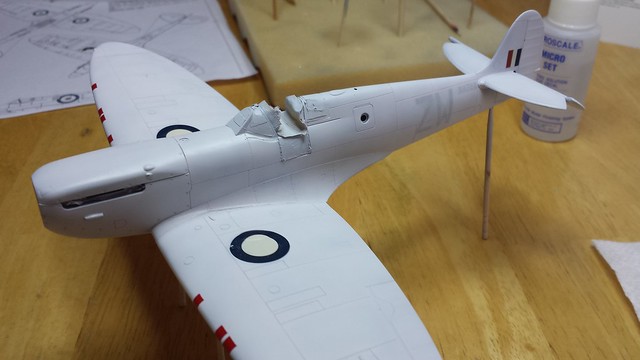
Here is where she sits at the moment. I can't do much more until the cockpit stuff comes in.
 Resin parts
 by
Iggy Pants, on Flickr
As an experiment I wanted to see if Kristal Klear would cover a whole this large, and you know what? It does! I rinsed it off as soon as I took the picture.
 Resin parts
 by
Iggy Pants, on Flickr
Of course I realized afterward that I had some extra pieces to test the Kristal Klear method. The top hole, was thickly applied. The bottom was more precise with a reasonable amount.
 Resin parts
 by
Iggy Pants, on Flickr
After about an hour, the bottom hole started to clear. Within three hours it was clear. It's been six hours and the top hole is still not clear yet.
 Resin parts
 by
Iggy Pants, on Flickr
Wasn't much of a post of anything exciting, but I definitely did some new stuff today. Thanks for looking in!


 Kit by Iggy Pants, on Flickr
 Kit by Iggy Pants, on Flickr
 Kit by Iggy Pants, on Flickr
 Kit by Iggy Pants, on Flickr