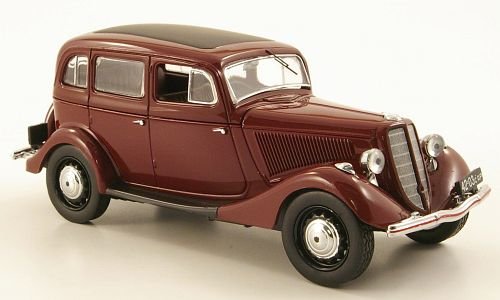
The GAZ M1 (“Эмка“/”Emka”) was a passenger car produced by the Russian automaker GAZ between 1936 and 1943, at their plant in Gorky in the former Soviet Union, present day Nizhny Novgorod (since 1990) in Russia.
Systematic production ended in 1941, but the factory was able to continue assembling cars from existing inventory of parts and components until 1943. In total, 62,888 GAZ M1 automobiles were produced.
Much of the car’s production period coincided with the Great Patriotic War (World War II), and many Emkas were used by the army as staff cars. Various special versions were produced such as the Gaz M - FAI and BA -20 armoured car models
The car has subsequently become an icon of its time in Russia, having been relatively popular, and featuring in film and photographic images of a defining period in the history of the Soviet Union.
-- Wikipedia --
https://en.wikipedia.org/wiki/GAZ-M1
Years of production: 1935 - 1943 (1942?)
Overall production: 62888 units
4x2 5-seater 4-door 6-light Saloon
Engine: 50hp/2800rpm, 4-cyl, 4-stroke, 3285cc
Bore/Stroke: 98.43/107.95 mm
Length: 4625mm, width: 1770mm, height: 1775mm
Base: 2845mm, rear axis clearance: 210mm
Frontwheels gauge: 1435mm
Rearwheels gauge: 1440mm
Turning radius: 6.35 m
Compression rate: 4.6
Clutch: single disk, dry
Gearbox: 3 speeds
Differential ratio: 4,44, pair of bevel gears with spiral tooth
Mechanical brakes on all wheels
Weight (without load): 1370kg
Maximal speed (loaded, highway): 100 km/h
Tyres: 7.00-16 inches
Fuel capacity: 60 L
Petrol consumption: 14.5 L/100km
This car was almost the only commander car during most difficult first year of the war. Later it was substituted by Willys MA and MB.
This car originates from 1933 Ford-V8-40. In 1936 GAZ had has name of these times foreign minister V.M.Molotov, who 3 years later signed famous peaceful "Molotov - Ribbentrop pakt" between Soviet Union and Germany. Letters M-1 means Molotov - model N:o 1. Among features of the car was rigid longeron frame with X-like cross-member, pushing strength have been transmitted to the frame by the pipe, contained cardan shaft. GAZ-M1 was the first soviet car with automatic ignition outstripping and back-forward adjstable front seats. This car is very famous and prevailing car of war times, it is mentioned even in this period songs. People called it "Emka" for letter M in its name. Normal production ceased in 1941, but assembling from warehouse details continued a bit longer. Most of M-1 were on government service and only part of them became private later. Trophy cars, on the contrary, were private from the very beginning. That is why now M-1 is more rare than Opels or Mercedeses
Modifications:
GAZ-M1 taxi, GAZ-M415 - pickup, GAZ-11-73 - 6-cylinder, GAZ-21 - 3-axle, GAZ-GL1 - racing (one of).
-- Oldtimer Gallery --
http://www.autogallery.org.ru/gazm1.htm
The kit itself is a really fresh one, released in 2015, therefore I have some high expectations on the quality.
In the box there are 2 big sprue and 2 smaller one, and one for the clear parts.
Sprue number one:

You can see clear edges, fine details everywhere. Here is a closer look of the chassis:

The second sprue contains the smaller parts:

And again some great details:

The two smaller ones are identical:

The clear parts are really nice, detailed, still crystal clear.

The decals seam to be a bit thick:

The instruction sheet is detailed, understandable:

And man! The full first page is about the undercarriage! I have to find a way to make it somehow visible! The interior, the doors, the engine and the engine deck... plenty of options!

I plan to add figures, don't know yet which ones, but thees seem to be fine: