
Tamiya 1/32 Supermarine Spitfire Mk.IXc
Moderator: T3hGuppy
-
ScaleModelJedi

- Master Sergeant

- Posts: 396
- Joined: Sun Dec 20, 2015 12:47 am
- Location: Birmingham, UK
- Contact:
Tamiya 1/32 Supermarine Spitfire Mk.IXc
This is what I will be attempting to build for this GB. I dont have many Tamiya kits in the stash and the ones I do have I thought are a bit to basic for an out of the box build so bought this  .
.

There are no failed builds only learning experiences.
MY Youtube channel : Scale Model Jedi
https://www.youtube.com/channel/UCSk5py ... taceCr3_3g
MY Youtube channel : Scale Model Jedi
https://www.youtube.com/channel/UCSk5py ... taceCr3_3g


Re: Tamiya 1/32 Supermarine Spitfire Mk.IXc
1/32 
Nice!
Nice!
Backlog Progress: |||||||||||||||-------|----------|----------| 26/80
On the bench: Hasegawa 1/72 Tatiana's Vanship
Last Completed: Bandai HGUC Geara Zulu // Hasegawa 1/48 J2M3Raiden Prisoner of War
On the bench: Hasegawa 1/72 Tatiana's Vanship
Last Completed: Bandai HGUC Geara Zulu // Hasegawa 1/48 J2M3Raiden Prisoner of War


-
ScaleModelJedi
- Master Sergeant
- Posts: 396
- Joined: Sun Dec 20, 2015 12:47 am
- Location: Birmingham, UK
- Contact:
Re: Tamiya 1/32 Supermarine Spitfire Mk.IXc
Lysus wrote:1/32
Nice!
There are no failed builds only learning experiences.
MY Youtube channel : Scale Model Jedi
https://www.youtube.com/channel/UCSk5py ... taceCr3_3g
MY Youtube channel : Scale Model Jedi
https://www.youtube.com/channel/UCSk5py ... taceCr3_3g
-
ScaleModelJedi
- Master Sergeant
- Posts: 396
- Joined: Sun Dec 20, 2015 12:47 am
- Location: Birmingham, UK
- Contact:
Re: Tamiya 1/32 Supermarine Spitfire Mk.IXc
Sprue shots and box contents.


Instructions and reference manual

Colour callout


Instructions and reference manual

Colour callout
There are no failed builds only learning experiences.
MY Youtube channel : Scale Model Jedi
https://www.youtube.com/channel/UCSk5py ... taceCr3_3g
MY Youtube channel : Scale Model Jedi
https://www.youtube.com/channel/UCSk5py ... taceCr3_3g
-
Twokidsnosleep

- General

- Posts: 18254
- Joined: Thu Aug 07, 2014 4:07 pm
- Location: BC,Canada

Re: Tamiya 1/32 Supermarine Spitfire Mk.IXc
Gorgeous kit, love the box art as well....Patrol on White Cliffs of Dover 
Scott
On, Under or near the desk
Brewster Buffalo ..buddy build
Rockford Firebird
1/72 Black Pearl Pirate Ship in dry dock
On, Under or near the desk
Brewster Buffalo ..buddy build
Rockford Firebird
1/72 Black Pearl Pirate Ship in dry dock
-
ScaleModelJedi
- Master Sergeant
- Posts: 396
- Joined: Sun Dec 20, 2015 12:47 am
- Location: Birmingham, UK
- Contact:
Re: Tamiya 1/32 Supermarine Spitfire Mk.IXc
C type
Also known as the "universal wing" the new design was standard on the majority of Spitfires built from mid 1942. This wing was structurally modified to reduce labour and manufacturing time and it was designed to allow mixed armament options: A type, B type, or four 20 mm Hispano cannon.
The undercarriage mountings were redesigned and the undercarriage doors were bowed in cross section allowing the legs to sit lower in the wells, eliminating the upper-wing blisters over the wheel wells and landing gear pivot points. Stronger undercarriage legs were raked 2 inches (5.08 cm) forward, making the Spitfire more stable on the ground and reducing the likelihood of the aircraft tipping onto its nose. During production of the Mk VIII and Mk IX a new undercarriage leg was introduced which had external v-shaped "scissor-links" fitted to the front of the leg; this also led to small changes in the shape of the undercarriage bay and leg fairings. Because the Spitfire was no longer to be used as a night fighter, the retractable landing lights were no longer fitted.
The Hispano Mk IIs were now belt fed from box magazines allowing for 120 rpg (the "Chattellerault" system). The fairings over the Hispano barrels were shorter and there was usually a short rubber stub covering the outer cannon port. Redesigned upper wing gun bay doors incorporated "teardrop" shaped blisters to clear the cannon feed motors, and the lower wings no longer had the gun bay heating vents outboard of the gunbays. The first series of Spitfire Mk IXs retained the bay doors first used on Spitfire VCs; these incorporated large blisters to clear the feed motors of two Hispano cannons. All later Spitfires had smaller, more streamlined blisters. In order to provide room for the belt feed system of the cannon, the inner machine gun bays were moved outboard to between ribs 13 and 14.
Several versions of the Spitfire, starting with the HF Mk VIIs had extra 13 gallon integral fuel tanks added to the wing leading edges between the wing-root and the inboard cannon bay.
Although many earlier Spitfires had been modified to carry bomb racks capable of carrying 250 lb (113 kg) bombs the first Spitfires to be specifically modified for the fighter-bomber role (known as Modification 1209) were those of the Second Tactical Air Force. The first Mk IX Spitfires started being used in the role in June 1944.
Features of late Merlin powered Spitfires
With the development of the Merlin 61/63/66 and 70 series engines, with a two-stage, two-speed supercharger requiring an intercooler, several important modifications were made to the basic airframe and applied to all aircraft powered by these engines. The longer Merlin 61 meant the nose forward of the engine/fuel tank bulkhead was 7 inches (17.8 cm) longer. An intercooler was mounted behind the engine, on the supercharger casing. A small rectangular air scoop for a "Heywood" air compressor was fitted on the starboard upper engine cowling.
The carburettor air intake on early to mid-production Spitfire IXs was a different shape from those of single-stage engined aircraft; they were shorter and had a wider air inlet. From 1943, an "Aero-Vee" tropical filter in a long, streamlined fairing was introduced for the carburettor air intake. This was fitted as standard to all Mk VIIs, VIIIs, PR Mk Xs and Mk XVIs, on mid to late production Mk IXs, and to most PR Mk XIs.
A new 10 ft 9 in (3.27 m) diameter four-bladed Rotol propeller was fitted, housed in a pointed spinner. The exhaust units were changed to six "fishtail" stacks per side. Under the nose, the three piece cowling was changed to a one piece layout. The oil tank was no longer a part of the cowling structure. Early Mk IXs had a teardrop shaped blister for a Coffman engine starter[nb 1]on the lower starboard side cowling, just behind the propeller. This was replaced by an improved electric starter on most two-stage Merlin powered Spitfires and, from late 1942 the blister was only seen on a few aircraft.
The Type C wing was fitted as standard. Some mid and most late production Spifire Mk IXs and all Mk XVI were fitted with the Type E wing. While Spitfire IXs converted from Mk VCs had the large teardrop fairings on the upper surfaces, on the majority of Mk VIIs, VIIIs, IXs and XVIs the teardrop shaped blisters covering the Hispano feed motors were reduced in size and more streamlined than those on the Mk VC. According to A.P 1565J P & L (Spitfire IX, XI and XVI Pilot's Notes) the red painted undercarriage indicator rods, which projected through the tops of the wings when the undercarriage was down, were used only on early production Mk IXs. When fitted these rods supplemented an "Electric visual indicator" mounted on the instrument panel. The indicator rods seemed to be fitted on all Mk VIIs and VIIs, supplementing the electric visual indicator. A light for the retractable tailwheel was mounted on the instrument panel, just below the main visual indicator.
Because the intercooler required a radiator, the radiator under the starboard wing was halved in size and the intercooler radiator housed alongside. Under the port wing a new radiator fairing housed a square oil cooler alongside the other half-radiator unit. When the engine was running at low speed, one radiator section provided enough coolant; a thermostatic switch turned off the starboard radiator section until more power was called for and extra engine cooling was required.
Other structural changes included flush riveting for the fuselage, introduced in mid-1943. A streamlined round rear-view mirror, with a bullet-shaped fairing replaced the rectangular version. On new production Mk IXs the small, teardrop shaped identification light behind the radio mast was removed.
While early Mk IXs converted from Mk VCs had the original (smaller) elevator horn mass-balances, most had the enlarged version with the straightened leading edge. A new rudder of greater area, which could be identified by a "pointed" tip, was fitted to many Mk VIIs, Mk VIIIs, and mid to late production Mk IXs and Mk XVIs.
All Mk VII and Mk VIII Spitfires had the following changes: The internal structure was strengthened and revised. On the wings the ailerons were reduced in span by 8.5 inches (220 mm) outboard of the outer hinges. There had been some instances of earlier models breaking up in the air in steep high speed dives, it was thought, because of aileron flutter.
The main fuselage fuel tanks were increased in capacity; 47 gal (213.7 l) for the upper tank and 49 gal (222.7 l) for the lower. In combination with the wing tanks this gave a total internal capacity of 122 gal (554.6 l), a near 50% increase over the 85 gal (386.4 l) carried by earlier Spitfire marks. In addition a 13 gal (64 l) fuel tank was fitted in each wing leading edge between the wingroot and the inner gun-bay.
The main undercarriage legs, for the first time in the Spitfire's life, were fitted with forward-facing torque links. In addition, the leg doors were slightly concave, allowing the undercarriage to sit lower in the wheel wells when retracted: this meant the upper wing skinning was free of the small bulge which had hitherto been necessary to clear the wheels. The wheels themselves were a new strengthened Dunlop AH10019 "four spoke" pattern, replacing the "five spoke" pattern used since the first Mk Is. This revised undercarriage was also fitted on some mid to late Mk IXs and all Mk XVIs. A retractable tailwheel (Dunlop 2184) was fitted, covered by small doors when in flight. This also applied to the PR Mk Xs and most PR Mk XIs.
Mk IX (type 361)
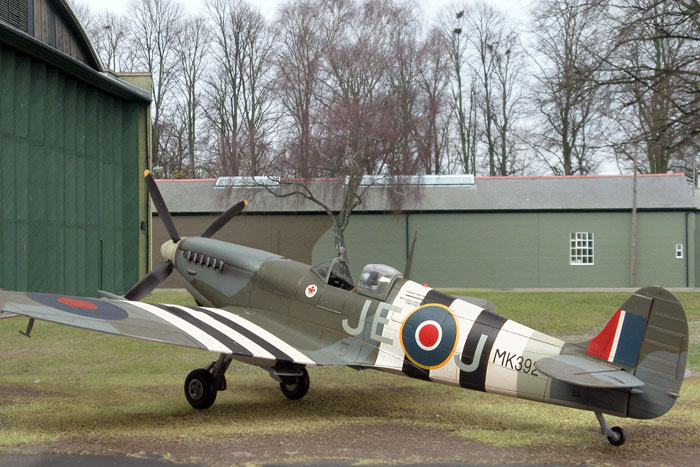
BS456 UZ-Z of 306(Polish) Toruński Squadron, RAF Northolt, November 1942. A Spitfire IX converted from a Mk VC airframe. A teardrop shaped blister for a Coffman cartridge starter can be seen just behind the propeller. This aircraft carries a 30-gallon "slipper" drop tank under the fuselage.
In the early months of 1942, with the clear superiority of the Focke Wulf Fw 190 over the Spitfire VB, there was much pressure to get Spitfires into production using the new two-stage supercharged Merlin 61 engine. In September 1941 the Spitfire Mk III prototype N3297 had been converted by Rolls-Royce at their Hucknall plant to take a Merlin 60, which had been specifically designed for use in the Wellington Mk VI high altitude bomber.
The performance increase was described[by whom?] as a "quantum leap" over that of the Mk VB and another Spitfire airframe, R6700 was modified to take the new engine. Although design work on the Mk VII and VIII series was under way, these would take over a year to get into production and a counter to the Fw 190 was urgently needed. The Air Ministry made the decision that Mk VC airframes should be converted to take the more powerful engine and, as a result, many of the early IXs were converted Mk VCs which did not have any of the refinements which later appeared. These could be identified by the Type C wing with the large double blisters over the inner cannon bays and the identification light on the fuselage spine, behind the aerial mast. The elevator horns were also smaller in size than that of most Mk IXs which had larger horn balances. The first IX was a modified VC AB505, which was tested by the Air Fighting Development Unit (AFDU) in April 1942. The report said;
The performance of the Spitfire IX is outstandingly better than the Spitfire V especially at heights above 20,000 feet. On the level the Spitfire is considerably faster and climb is exceptionally good. It will climb easily to 38,000 feet and when levelled off there can be made to climb in stages to above 40,000 feet by building up speed on the level and a slight zoom. Its manoeuvrability is as good as a Spitfire V up to 30,000 feet and above is very much better. At 38,000 feet it is capable of a true speed of 368mph and is still able to manoeuvre well for fighting.
Although the Mk IX's airframe did not have the aerodynamic and strength improvements, or the modified control surfaces of the Mk VII and VIII, the Mk IX still proved to be an effective counter to the Focke Wulf Fw 190 In September 1942, the "High Altitude Flight" was set up at RAF Northolt to counter the threat of the high altitude Junkers Ju 86 R bombers. Two Spitfire IXs converted from VCs were stripped of armour, the .303 Brownings and other equipment and repainted in a lightweight PRU blue finish. One of them intercepted a Ju 86R at over 40,000 feet (12,000 m).
Production of the Mk IX finished at Supermarine in June 1943, with production continuing exclusively at the Castle Bromwich factory. Several major and large numbers of minor improvements were progressively introduced to Mk IXs, some of which were used on other Spitfire variants.
The Merlin 61 was phased out early in 1943 in favour of the Merlin 63 and 63A.[31] The new engine had increased power resulting from engine improvements and engine limitations of +18 lbs./sq.in and 3,000 rpm (5 minute combat). During the second half of 1943, production of the Merlin 63 powered F Mk IX was discontinued in favour of the Merlin 66 powered LF Mk IX.[32] Early production Spitfire IXs suffered from vapour locks in the fuel lines resulting from fuel evaporating if the aircraft was parked in direct sunlight. As a result of this the gun-camera was moved from the port wingroot to the starboard wingroot and a fuel cooler, fed by a small round air-intake was fitted in its place. This fuel cooler was also fitted to early PR Mk XIs
Production of the LF Mk IXs, frequently referred to as the Spitfire IXB, initially ran in parallel with the Merlin 63 powered Marks. This version first became operational in March 1943 with the Biggin Hill Wing, comprised at the time of 611 and 341(Free French) Squadrons. This type was by far the most produced of the Spitfire IX variants, with over 4000 built. The maximum power of the Merlin 66 was 1,720 hp (1,280 kW) at 5,750 ft (1,283 kW at 1,752 m) and the maximum speed of the Spitfire LF IX was 404 mph (650 km/h) at 21,000 feet (6,400 m). The Merlin 66 introduced a new Bendix-Stromberg injection carburettor, which replaced the earlier S.U float carburettor.
The H.F IX was powered by the specialised high altitude Merlin 70 and entered service in the Spring of 1944. Serial listings show that the HF Mk IX was produced in relatively limited numbers when they were required, with priority being given to versions rated for low and medium altitudes[nb 6] Maximum power of the Merlin 70 was 1,710 hp (1,280 kW) at 11,000 ft (1,275 kW at 3,353 m): maximum speed of the Spitfire HF.IX was 405 mph (652 km/h) at 25,400 feet (7,700 m) at an all-up weight of 7,320 lbs (3,320 kg).
Also introduced in early 1944 was a new Mark II Gyro gunsight. This gunsight calculated the correct angle of deflection to use when leading the target. Its introduction doubled the effectiveness of RAF gunnery and was a major factor in Allied air superiority.
The capacity of the main fuel tanks was 48 gal for the upper tank and 37 gal for the lower, for a total internal capacity of 85 gal. Jettisonable "slipper tanks" of 30, 45 or 90 gal could be carried under the centre-section.[38] As an alternative a cylindrical 50 gal drop tank, adapted from those carried by long range Hawker Typhoons, could be carried on the fuselage bomb rack used on most Mk IXs of the Second Tactical Air Force. To further increase the combat radius some late production Mk IXs were fitted with additional internal self-sealing fuel tanks in the rear fuselage: the upper tank carried 41 gal and the lower 34 gal. When both were full this enabled a ferry range of over 1,200 miles (1,900 km), although they made the aircraft unstable in flight and only straight flight and gentle manoeuvres at low altitudes were recommended by the pilot's manual. The pilot was also warned to avoid instrument flying whenever possible.
Late production Mk IXs, in common with Mk XVIs introduced a new upper engine cowling which incorporated a distinct bulged top surface; this design was adopted for the Mk XVI to allow for the modified intercooler of the Packard Merlin 266, which had an integral header tank.
The cut-down rear fuselage and bubble canopy, trialled on a Spitfire Mk VIII, was incorporated into very late production Mk IXs. With the cut down fuselage the lower forward fuselage tank capacity was increased to 47 gallons, while the rear fuel tanks were decreased to a capacity of 66 gallons.[38] These were the rarest of the Mk IXs and many of them featured the "clipped" wings. The great majority of these saw postwar service with the SAAF, both in South Africa and in deployment in Korea during the 1950s.
During early 1945, some Spitfire IXEs and XVIEs of 74 Squadron were fitted with a single RP-3 rocket under each wing. This was believed to be the only RAF Spitfire unit to use rockets operationally during the Second World War.
[youtube]vCW-DMNcZeg[/youtube]
There are no failed builds only learning experiences.
MY Youtube channel : Scale Model Jedi
https://www.youtube.com/channel/UCSk5py ... taceCr3_3g
MY Youtube channel : Scale Model Jedi
https://www.youtube.com/channel/UCSk5py ... taceCr3_3g


-
ScaleModelJedi
- Master Sergeant
- Posts: 396
- Joined: Sun Dec 20, 2015 12:47 am
- Location: Birmingham, UK
- Contact:
Re: Tamiya 1/32 Supermarine Spitfire Mk.IXc
Thank youchief5437 wrote:Looks like an awesome kit!
There are no failed builds only learning experiences.
MY Youtube channel : Scale Model Jedi
https://www.youtube.com/channel/UCSk5py ... taceCr3_3g
MY Youtube channel : Scale Model Jedi
https://www.youtube.com/channel/UCSk5py ... taceCr3_3g
-
AdamLuscombe
- First Sergeant

- Posts: 523
- Joined: Mon Oct 13, 2014 6:57 pm
- Location: texas

Re: Tamiya 1/32 Supermarine Spitfire Mk.IXc
Awesomekit, good luck with the GB 
On the bench:
Dragon
1/35 Jagdpanzer IV L/48
Italeri
1/24 Ford Escort Mk. II
Dragon
1/35 Jagdpanzer IV L/48
Italeri
1/24 Ford Escort Mk. II
-
DarksideHobbies
- Corporal

- Posts: 68
- Joined: Fri Sep 02, 2016 1:15 am
Re: Tamiya 1/32 Supermarine Spitfire Mk.IXc
Awesome, been thinking about picking this one up. Can't wait to see it! 


Re: Tamiya 1/32 Supermarine Spitfire Mk.IXc
Nice one  i built one a while back and enjoyed every second of it !
Money is'nt everything but it sure keep's the kid's in touch.
-
ScaleModelJedi
- Master Sergeant
- Posts: 396
- Joined: Sun Dec 20, 2015 12:47 am
- Location: Birmingham, UK
- Contact:
Re: Tamiya 1/32 Supermarine Spitfire Mk.IXc
DarksideHobbies wrote:Awesome, been thinking about picking this one up. Can't wait to see it!
AdamLuscombe wrote:Awesomekit, good luck with the GB
Thank you guysJohnj wrote:Nice one
There are no failed builds only learning experiences.
MY Youtube channel : Scale Model Jedi
https://www.youtube.com/channel/UCSk5py ... taceCr3_3g
MY Youtube channel : Scale Model Jedi
https://www.youtube.com/channel/UCSk5py ... taceCr3_3g
-
ScaleModelJedi
- Master Sergeant
- Posts: 396
- Joined: Sun Dec 20, 2015 12:47 am
- Location: Birmingham, UK
- Contact:
Re: Tamiya 1/32 Supermarine Spitfire Mk.IXc
Got around to making a start on this last night after getting a few other projects finished.
Starting with the instructions for the first steps in making up the cockpit.
Step 1

Steps 2,3 & 4

Steps 5-10

Steps 11-15

The two fuselage halves cut from the sprue and cleaned up. Also fitted the two panels at the rear and some smaller parts on the sides of the cockpit as in steps 1 & 2. These are now ready for primer and paint on the insides.

The bulk head all built up. All the parts have minimal clean up and the fit is excellent. Still got the instrument panel to fit which I will do after painting.

The seat built up and fitted to the frame. Again minimal clean up and excellent fit on the parts.

The seat dry fitted in place on the cockpit frame. I will paint it separately and fit into place afterwards.

The cockpit side walls all cleaned up and all the parts fitted for option A as step 13 in the instructions.

One of the side walls dry fitted to the cockpit to check fit.

Both sidewalls dry fitted.

That's where I got upto last night with the build and so far this is an outstanding and I'm sure going to enjoy building it.
Next step is to get all the parts primed and painted. I will then do the weathering on the cockpit and insides of the fuselage before fitting them all together.
Thank you for looking
There are no failed builds only learning experiences.
MY Youtube channel : Scale Model Jedi
https://www.youtube.com/channel/UCSk5py ... taceCr3_3g
MY Youtube channel : Scale Model Jedi
https://www.youtube.com/channel/UCSk5py ... taceCr3_3g
-
Paul

- Site Admin

- Posts: 12622
- Joined: Thu May 23, 2013 4:47 pm
- Location: Merseyside, England, UK
- Contact:

Re: Tamiya 1/32 Supermarine Spitfire Mk.IXc
Great work so far mate, look forward to seeing it come together
Products I use in my builds viewtopic.php?f=192&t=27234
My Paul-Ism page https://www.facebook.com/thebenchwithpaul/
Friday Live show here https://www.facebook.com/groups/120548821977514/

My Paul-Ism page https://www.facebook.com/thebenchwithpaul/
Friday Live show here https://www.facebook.com/groups/120548821977514/
-
ScaleModelJedi
- Master Sergeant
- Posts: 396
- Joined: Sun Dec 20, 2015 12:47 am
- Location: Birmingham, UK
- Contact:
Re: Tamiya 1/32 Supermarine Spitfire Mk.IXc
Thank you PaulPaul wrote:Great work so far mate, look forward to seeing it come together
There are no failed builds only learning experiences.
MY Youtube channel : Scale Model Jedi
https://www.youtube.com/channel/UCSk5py ... taceCr3_3g
MY Youtube channel : Scale Model Jedi
https://www.youtube.com/channel/UCSk5py ... taceCr3_3g
-
ScaleModelJedi
- Master Sergeant
- Posts: 396
- Joined: Sun Dec 20, 2015 12:47 am
- Location: Birmingham, UK
- Contact:
Re: Tamiya 1/32 Supermarine Spitfire Mk.IXc
Got the cockpit and insides of the fuselage halves primed and painted. Next step is the detail painting and then weathering. I still have the seat belts and instrument panel to paint and fit aswell. I will not be adding the pilot.
The cockpit and sidewalls. I primed them with Ultimate grey primer and used Mig ammo A.MIG-219 interior green and Vallejo Aluminium metal colour.


The insides of the fuselage halves painted the same as the cockpit.

The cockpit and sidewalls. I primed them with Ultimate grey primer and used Mig ammo A.MIG-219 interior green and Vallejo Aluminium metal colour.


The insides of the fuselage halves painted the same as the cockpit.

There are no failed builds only learning experiences.
MY Youtube channel : Scale Model Jedi
https://www.youtube.com/channel/UCSk5py ... taceCr3_3g
MY Youtube channel : Scale Model Jedi
https://www.youtube.com/channel/UCSk5py ... taceCr3_3g
Re: Tamiya 1/32 Supermarine Spitfire Mk.IXc
Looking good
Money is'nt everything but it sure keep's the kid's in touch.
-
Twokidsnosleep
- General
- Posts: 18254
- Joined: Thu Aug 07, 2014 4:07 pm
- Location: BC,Canada
Re: Tamiya 1/32 Supermarine Spitfire Mk.IXc
Ya, your paintwork is stunning.
Inside of your plane looks better than the exteriors of any of mine!!
Inside of your plane looks better than the exteriors of any of mine!!
Scott
On, Under or near the desk
Brewster Buffalo ..buddy build
Rockford Firebird
1/72 Black Pearl Pirate Ship in dry dock
On, Under or near the desk
Brewster Buffalo ..buddy build
Rockford Firebird
1/72 Black Pearl Pirate Ship in dry dock
Re: Tamiya 1/32 Supermarine Spitfire Mk.IXc
I was thinking the same, i know it says to paint the silver at the back of the fusalage but i didnt as it's not seen but i think thats what sets us apart, mine was ok simon's will be a work of art, i have no doubtTwokidsnosleep wrote:Ya, your paintwork is stunning.
Inside of your plane looks better than the exteriors of any of mine!!
Money is'nt everything but it sure keep's the kid's in touch.
Re: Tamiya 1/32 Supermarine Spitfire Mk.IXc
Backlog Progress: |||||||||||||||-------|----------|----------| 26/80
On the bench: Hasegawa 1/72 Tatiana's Vanship
Last Completed: Bandai HGUC Geara Zulu // Hasegawa 1/48 J2M3Raiden Prisoner of War
On the bench: Hasegawa 1/72 Tatiana's Vanship
Last Completed: Bandai HGUC Geara Zulu // Hasegawa 1/48 J2M3Raiden Prisoner of War


Re: Tamiya 1/32 Supermarine Spitfire Mk.IXc
Looks great so far. Its such a BEAUTIFUL kit, its so great to see it being made well.
I have it in my stash but I have a load of aftermarket for it so I couldn't enter it in the SIG. I shall watch yours and take notes!
I have it in my stash but I have a load of aftermarket for it so I couldn't enter it in the SIG. I shall watch yours and take notes!
Its been tried and tested, it works! So don't blame the system if you're no good. 
-
ScaleModelJedi
- Master Sergeant
- Posts: 396
- Joined: Sun Dec 20, 2015 12:47 am
- Location: Birmingham, UK
- Contact:
Re: Tamiya 1/32 Supermarine Spitfire Mk.IXc
Twokidsnosleep wrote:Ya, your paintwork is stunning.
Inside of your plane looks better than the exteriors of any of mine!!
Johnj wrote:Looking good
Lysus wrote:
Thank you for the comments really appreciatedStokesy44 wrote:Looks great so far. Its such a BEAUTIFUL kit, its so great to see it being made well.
I have it in my stash but I have a load of aftermarket for it so I couldn't enter it in the SIG. I shall watch yours and take notes!
I'm really enjoying this build and glad I bought this kit for this GB. I'm still learning and always trying new techniques and products with each build and I'm really pleased with how it's turned out so far.
There are no failed builds only learning experiences.
MY Youtube channel : Scale Model Jedi
https://www.youtube.com/channel/UCSk5py ... taceCr3_3g
MY Youtube channel : Scale Model Jedi
https://www.youtube.com/channel/UCSk5py ... taceCr3_3g
-
ScaleModelJedi
- Master Sergeant
- Posts: 396
- Joined: Sun Dec 20, 2015 12:47 am
- Location: Birmingham, UK
- Contact:
Re: Tamiya 1/32 Supermarine Spitfire Mk.IXc
Started on the detail painting in the cockpit. I used Vallejo Model colour in the equivalent colours that the instructions state.
I still have a couple of bits to pick out and then I can do some weathering.


I need to get the instrument panelevation built up and fit the harnesses to the seat aswelLeon then I can get it all fixed together and make a start on putting the fuselage halves together.
I still have a couple of bits to pick out and then I can do some weathering.


I need to get the instrument panelevation built up and fit the harnesses to the seat aswelLeon then I can get it all fixed together and make a start on putting the fuselage halves together.
There are no failed builds only learning experiences.
MY Youtube channel : Scale Model Jedi
https://www.youtube.com/channel/UCSk5py ... taceCr3_3g
MY Youtube channel : Scale Model Jedi
https://www.youtube.com/channel/UCSk5py ... taceCr3_3g
Re: Tamiya 1/32 Supermarine Spitfire Mk.IXc
Lovely, just lovely. Stunning kit as well !
Money is'nt everything but it sure keep's the kid's in touch.


Re: Tamiya 1/32 Supermarine Spitfire Mk.IXc
Beautiful clean building on this
A pleasure to see Simon
A pleasure to see Simon
Minster aka James
"On the bench" Tamiya 1/12 Suzuki RGV-R XR89)
Stash (ATM)
Tamiya 1/12 Kawasaki H2R
Tamiya Team Lotus Type 49B 1/12th scale (on hold)
Tamiya 1/12th scale Motorbikes x4
Tamiya Mini Rally Car
Tamiya 1/32 Spitfire Mk XV1
Tamiya 1/48 Ilyushin IL-2 Shturmovik
"On the bench" Tamiya 1/12 Suzuki RGV-R XR89)
Stash (ATM)
Tamiya 1/12 Kawasaki H2R
Tamiya Team Lotus Type 49B 1/12th scale (on hold)
Tamiya 1/12th scale Motorbikes x4
Tamiya Mini Rally Car
Tamiya 1/32 Spitfire Mk XV1
Tamiya 1/48 Ilyushin IL-2 Shturmovik
-
ScaleModelJedi
- Master Sergeant
- Posts: 396
- Joined: Sun Dec 20, 2015 12:47 am
- Location: Birmingham, UK
- Contact:
Re: Tamiya 1/32 Supermarine Spitfire Mk.IXc
Johnj wrote:Lovely, just lovely. Stunning kit as well !
Thank youminster wrote:Beautiful clean building on this
A pleasure to see Simon
There are no failed builds only learning experiences.
MY Youtube channel : Scale Model Jedi
https://www.youtube.com/channel/UCSk5py ... taceCr3_3g
MY Youtube channel : Scale Model Jedi
https://www.youtube.com/channel/UCSk5py ... taceCr3_3g
-
ScaleModelJedi
- Master Sergeant
- Posts: 396
- Joined: Sun Dec 20, 2015 12:47 am
- Location: Birmingham, UK
- Contact:
Re: Tamiya 1/32 Supermarine Spitfire Mk.IXc
More work on the cockpit and almost got it all done and ready to be fitted in place. I followed the article in the latest Weathering magazine Interiors which shows the cockpit from the same kit being done. I didn't follow it fully just used it more of a guide and having not done anything like this before it certainly helped.
The cockpit was dry brushed with some of the Interior green colour that was lightened with a drop of white to highlight the raised detail. I then applied a wash of Mig ammo interiors wash which was applied all over then removed using a cotton bud and odourless thinners leaving in all the recesses. I then applied some chipping using Mig ammo chipping colour with a small paintbrush.


The instrument panel is built up from two parts which have three clear parts fitted from the rear and then decals applied to those. The main parts were painted with Vallejo model air nato black and dry brushed with some Vallejo model colour dark grey. The detail painting was done with the equivalent Vallejo model colour paints.
I then gave this a wash with some Mig ammo interiors wash before assembly.

The harness was built up from the PE parts and painted with some AK interactive Khaki. I then painted the metal buckles with some AK interactive metal colour from there leather and buckles set of paints. This was fixed in place with a drop of superglue.

The cockpit weathered and dry fitted together to see how it all looks.


That's where I'm upto with the build. Next step is to get the cockpit in place and the fuselage halves together.
Thank you for looking
There are no failed builds only learning experiences.
MY Youtube channel : Scale Model Jedi
https://www.youtube.com/channel/UCSk5py ... taceCr3_3g
MY Youtube channel : Scale Model Jedi
https://www.youtube.com/channel/UCSk5py ... taceCr3_3g
Re: Tamiya 1/32 Supermarine Spitfire Mk.IXc
It looks so clean it's almost a shame that it has to be weathered Simon.
Very nice
Very nice
Minster aka James
"On the bench" Tamiya 1/12 Suzuki RGV-R XR89)
Stash (ATM)
Tamiya 1/12 Kawasaki H2R
Tamiya Team Lotus Type 49B 1/12th scale (on hold)
Tamiya 1/12th scale Motorbikes x4
Tamiya Mini Rally Car
Tamiya 1/32 Spitfire Mk XV1
Tamiya 1/48 Ilyushin IL-2 Shturmovik
"On the bench" Tamiya 1/12 Suzuki RGV-R XR89)
Stash (ATM)
Tamiya 1/12 Kawasaki H2R
Tamiya Team Lotus Type 49B 1/12th scale (on hold)
Tamiya 1/12th scale Motorbikes x4
Tamiya Mini Rally Car
Tamiya 1/32 Spitfire Mk XV1
Tamiya 1/48 Ilyushin IL-2 Shturmovik
Re: Tamiya 1/32 Supermarine Spitfire Mk.IXc
Looks awesome. Beautiful restraint shown with the weathering and washing. 
Its been tried and tested, it works! So don't blame the system if you're no good.
-
ScaleModelJedi
- Master Sergeant
- Posts: 396
- Joined: Sun Dec 20, 2015 12:47 am
- Location: Birmingham, UK
- Contact:
Re: Tamiya 1/32 Supermarine Spitfire Mk.IXc
minster wrote:It looks so clean it's almost a shame that it has to be weathered Simon.
Very nice
Thank you guysStokesy44 wrote:Looks awesome. Beautiful restraint shown with the weathering and washing.
There are no failed builds only learning experiences.
MY Youtube channel : Scale Model Jedi
https://www.youtube.com/channel/UCSk5py ... taceCr3_3g
MY Youtube channel : Scale Model Jedi
https://www.youtube.com/channel/UCSk5py ... taceCr3_3g
-
ScaleModelJedi
- Master Sergeant
- Posts: 396
- Joined: Sun Dec 20, 2015 12:47 am
- Location: Birmingham, UK
- Contact:
Re: Tamiya 1/32 Supermarine Spitfire Mk.IXc
Forgot I had not added the gun sight on the previous pics and also did a little bit of weathering to the harness just to tone it down a little.


I got the cockpit in place and the two fuselage halves together last night. I will put this to one side to cure for a day or two.
While waiting I thought i woukd make a start on the wings and try and get those all built up and ready to be fitted in place.

Upper wing sections all cleaned up.

The lower wing section. There are some parts to remove or holes to drill out depending which version you are building. As I'm doing version A I had to remove to small sections, This was easy to do using a sharp craft knife.

The parts for the wheel Wells built up and ready to be fitted to the lower wing section. All parts fitted together really well and have excellent detail on them.

The wheel well section in place.

That's where I'm currently up to on the build. Going together really well. Hopefully get some more done over the next week and get the wings all built up and fitted to the fuselage.
Thank you for looking
There are no failed builds only learning experiences.
MY Youtube channel : Scale Model Jedi
https://www.youtube.com/channel/UCSk5py ... taceCr3_3g
MY Youtube channel : Scale Model Jedi
https://www.youtube.com/channel/UCSk5py ... taceCr3_3g
Re: Tamiya 1/32 Supermarine Spitfire Mk.IXc
Looking very nice simon i was having a look at some old build pictures of my own spit and noticed the year was 2010 ! Looking at your pics it only seems like yesterday !
Money is'nt everything but it sure keep's the kid's in touch.
-
ScaleModelJedi
- Master Sergeant
- Posts: 396
- Joined: Sun Dec 20, 2015 12:47 am
- Location: Birmingham, UK
- Contact:
Re: Tamiya 1/32 Supermarine Spitfire Mk.IXc
Thank youJohnj wrote:Looking very nice simon
There are no failed builds only learning experiences.
MY Youtube channel : Scale Model Jedi
https://www.youtube.com/channel/UCSk5py ... taceCr3_3g
MY Youtube channel : Scale Model Jedi
https://www.youtube.com/channel/UCSk5py ... taceCr3_3g
Re: Tamiya 1/32 Supermarine Spitfire Mk.IXc
Those wings are looking good mate. I remember when I made this about 5 years ago. I was daunted by all the open panels on the wings but the Tamiya engineering was so good, the covers went down beautifully.
She really is a modeller's dream. Cannot wait to see what you do with the engine and then the exterior.
She really is a modeller's dream. Cannot wait to see what you do with the engine and then the exterior.
Its been tried and tested, it works! So don't blame the system if you're no good.


Re: Tamiya 1/32 Supermarine Spitfire Mk.IXc
Very very nice work there so far mate
