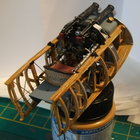
Talking of impatience, I'm looking forward to getting the interior wrapped up so I can start putting it all together - I'm starting to forget that this thing is actually a helicopter. So, got some primer on the inner walls.

Some nice detail on the rear section and once the wiring is painted in that should be quite visible with the rear loading door down.

Time to get the other details added to the cockpit.#

Some primer

And the first coat. Not too happy with the grey that is recommended, so I'm probably going to change that, but will probably leave it until they are installed and take a view on it then.


Really not happy with that colour, the grey looks really "heavy", so will have to tone that down. Plus, should have really filled those injector marks, but looking at where they will be positioned, you really only going to see the tops of these bits - I hope!
Also got the PE in place on the centre console - these are pre-painted, which is a nice touch and the first time I used anything other the brass PE.

Once I got the sticks etc into place, I was even less happy with the colour, so definitely going to have to sort that out!


Had a bit of a tinker and after a play around with a couple of colours and came up with the this, which is better, but still not quite right. I need to press on as this taking me longer than anticipated - oh, and did I mention that I was an impatient sod!


Now on to the main control panel and the PE for it


In order for it to fit, it's going to need those lugs taking off.


The PE is actually in two parts with the instruments dials on the first sheet, then the top part being the housing for the dials and panels - which means you have to get them to line up just so. Now, for all of you metal-bird-in-the-sky builders, this is probably old hat, but it's a first for me. After years of boxing and martial arts, which has involved countless broken digits (I've broken one finger so many times it's not only bent, but it twists in slightly like a corkscrew!!), I don't have a great deal of feeling in my fingers, so detail work like this is a challenge to say the least. But, with more luck than judgement, they kinda line up.

Not a spectacular update, but it took me while to get all this done and progress is progress. Just need to get that console painted up and detailed, fix in the back wall of the cockpit and I'll be about there for the interior - yahay!!
Thanks again for checking in - I must admit to feeling quite out of my depth with this being my first GB. Plus, there are so many great modelers on this great forum, I almost chickened out. But, not being someone to walk away from a challenge, I thought, the only way I'm going to learn is to get stuck in.
Anyway, I'm having great fun and my wife says it keeps me out of trouble - now, how am I going to hide that big patch of CA that I dropped on her favourite rug!!!