Page 1 of 1
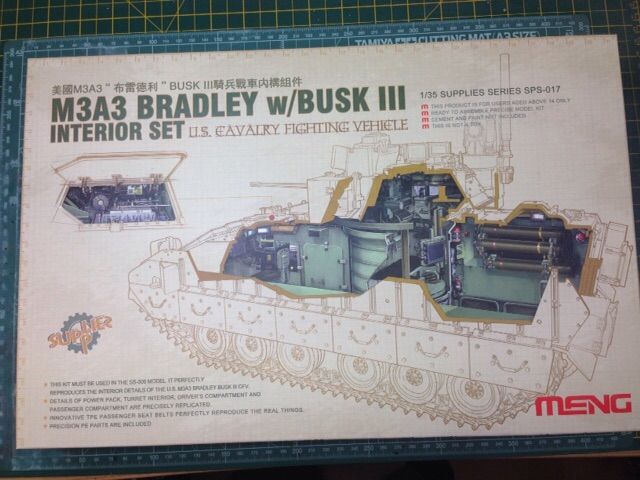
Meng 1:35 Bradley w/BUSK III & interior
Posted: Thu Jan 22, 2015 12:47 pm
by alextheblue
Bit late joining this one, but I've been concentrating on my Tiger for the Coen Tribute SiG and wanted to get that well underway first. But, it's no good, this one keeps shouting at me from the corner of the room, "start us now, or we're sending ourselves back to the shop!" It was only when I had all the boxes pilled on top of each other that it dawned on me that I may have just taken on a bit much - but, I'll give it my best go!
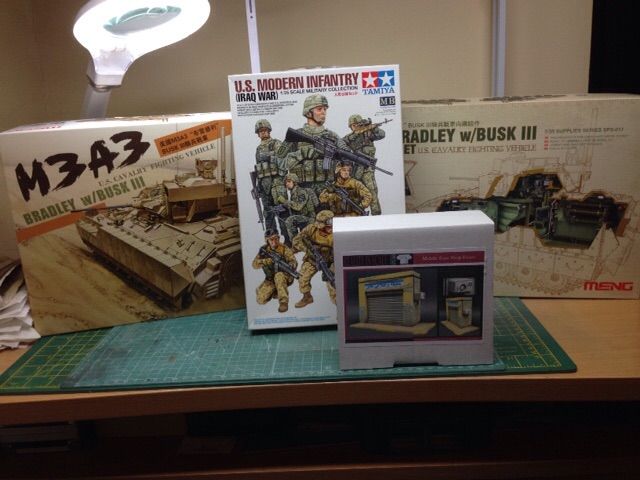
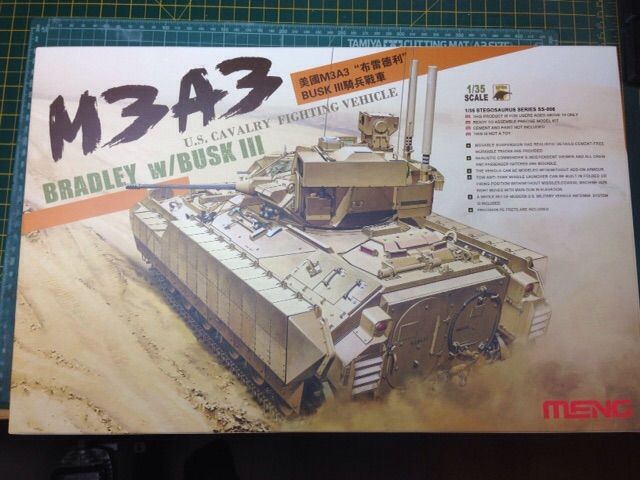
First up is the Bradley itself and the quality of this kit screams at you before you even open the box. I've built one other Meng kit and I was very impressed with that (the Merk 3D early), the quality and fit was just first class. Just the quality of the box itself gives you a clue of what you have in store - can't wait!

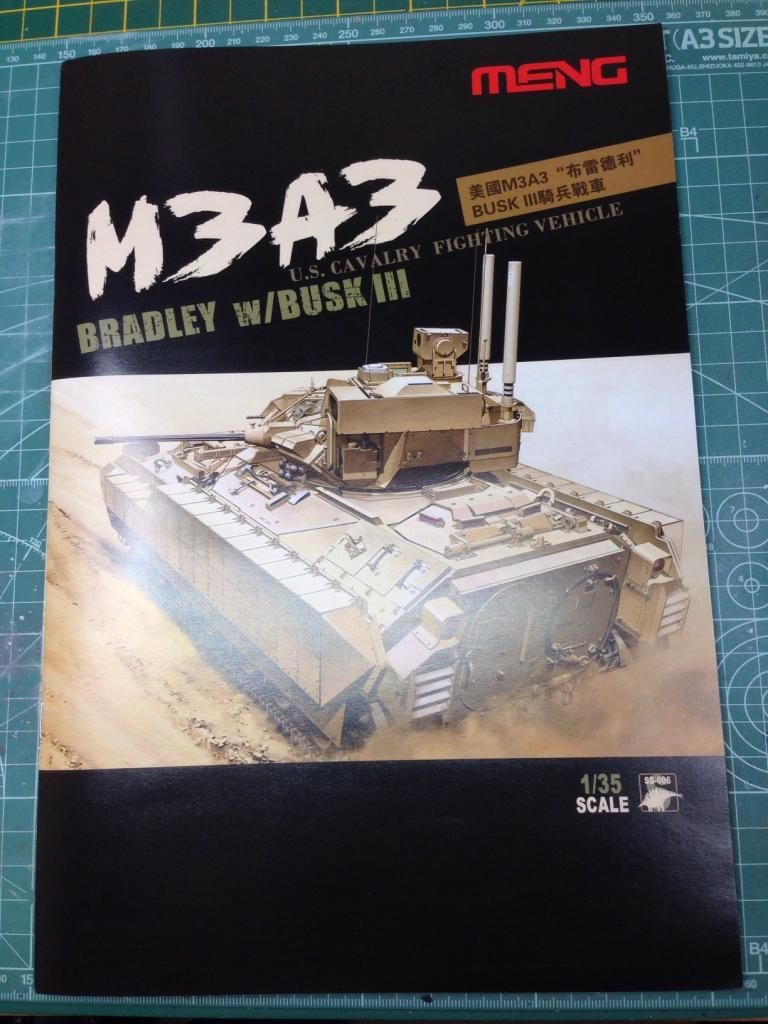
Box art
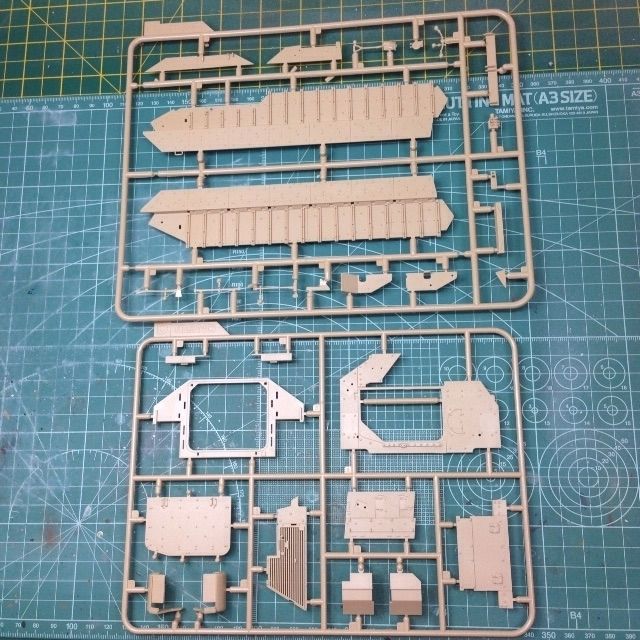
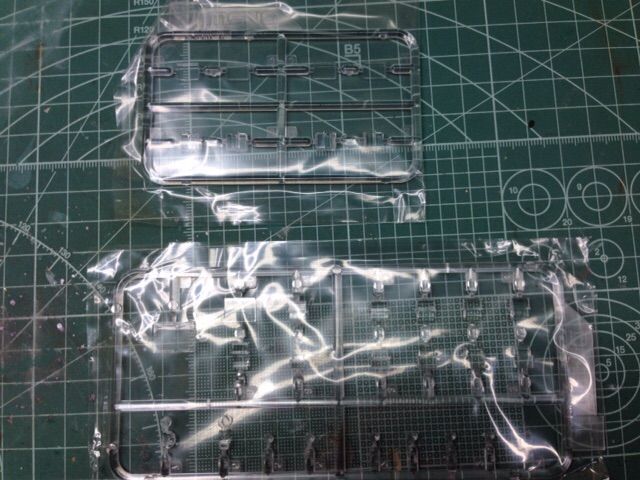
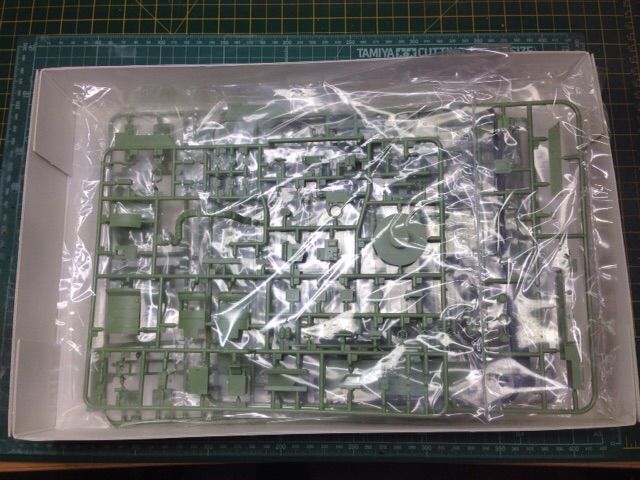
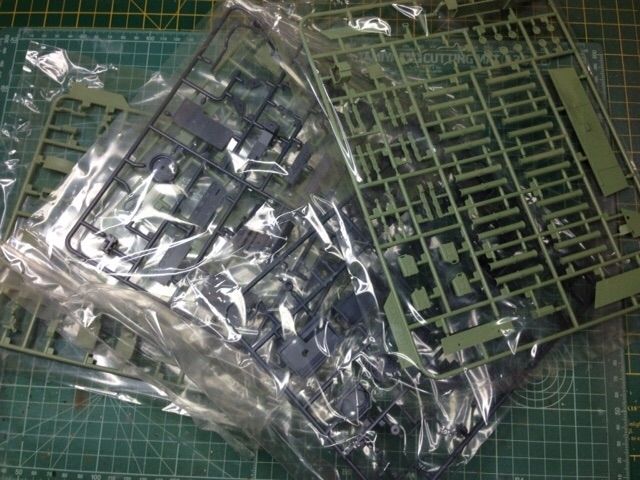
Lots of plastic!
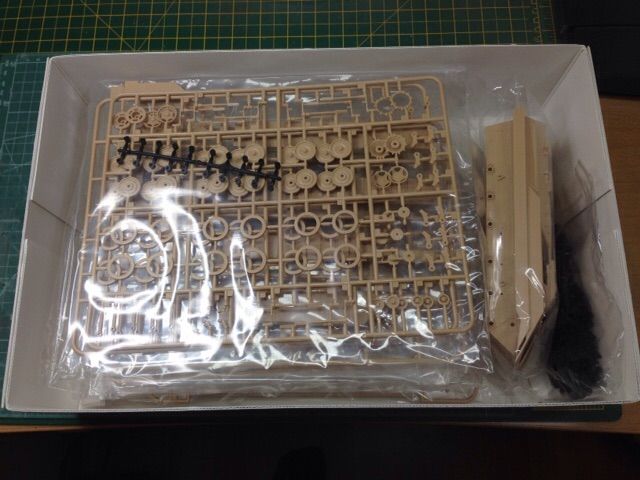
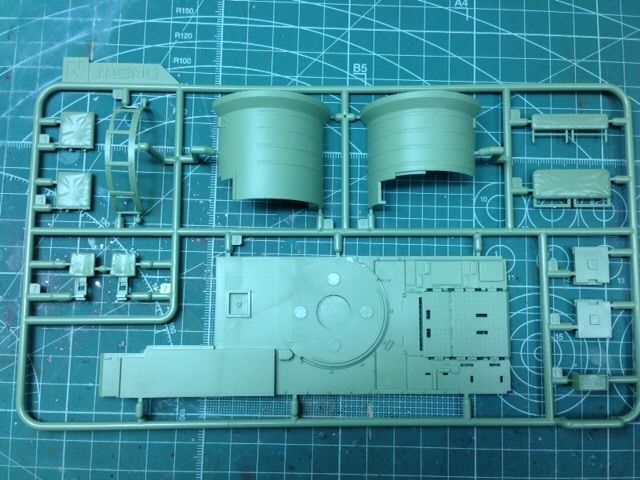
The tub and upper hull

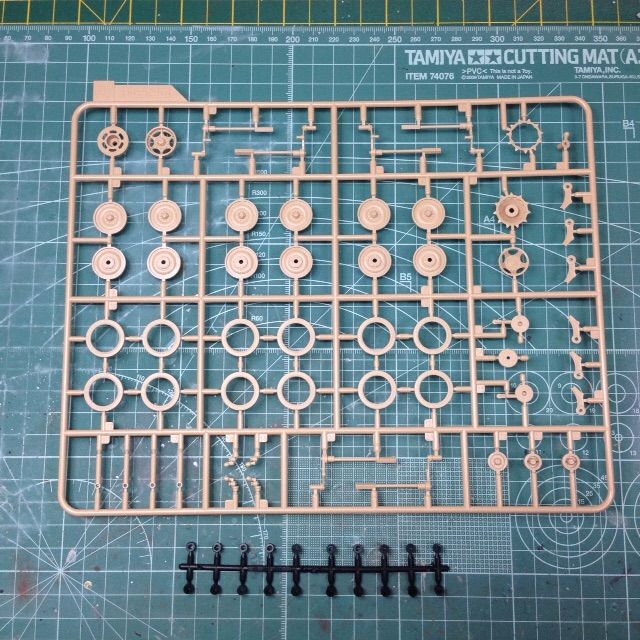
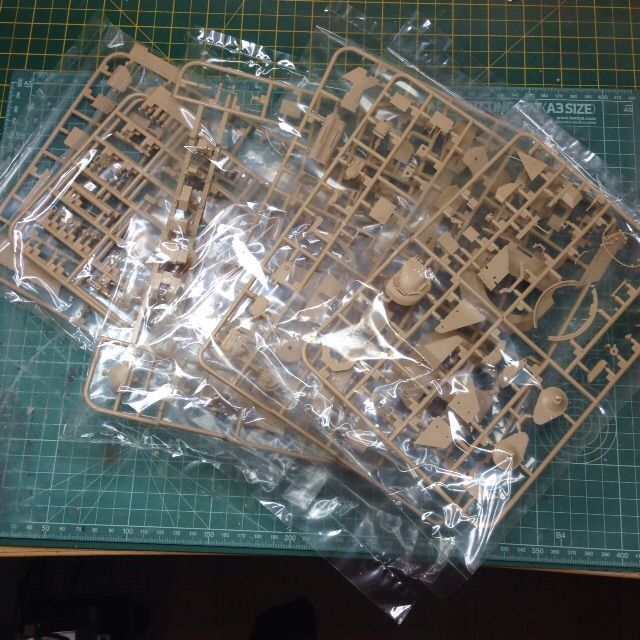
Just a couple of pics of random sprues as there's just so many and I've a lot to get through!!

And the rest.....
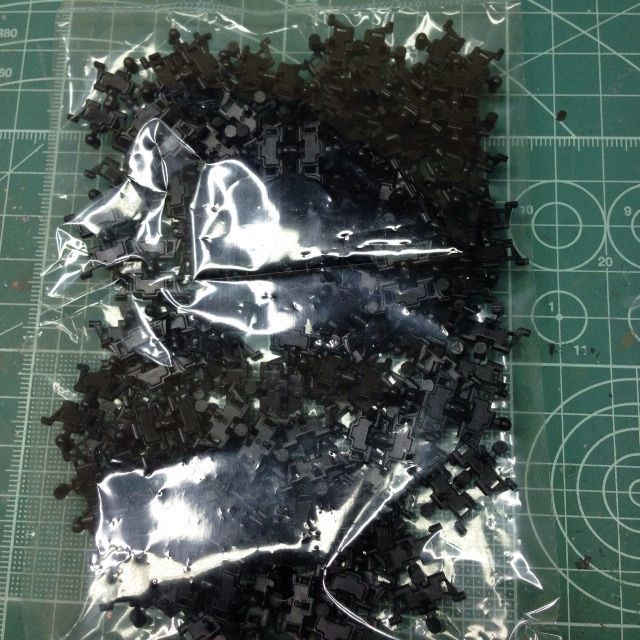
Individual track links - not normally a fan, but I hear these are very good.
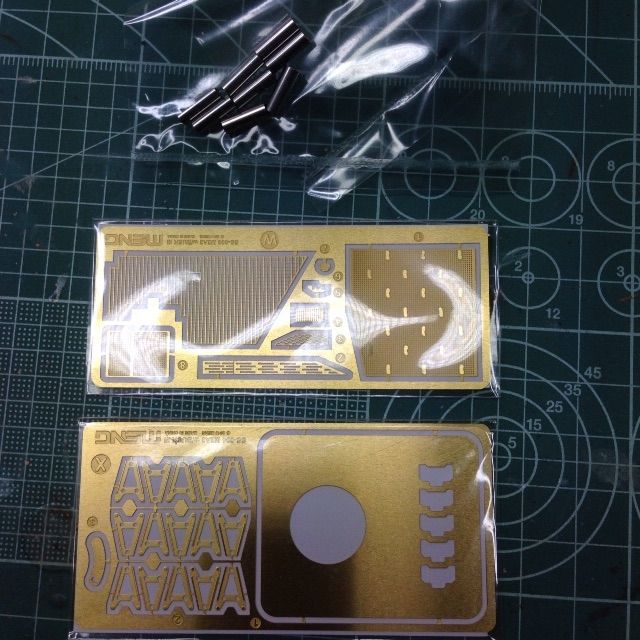
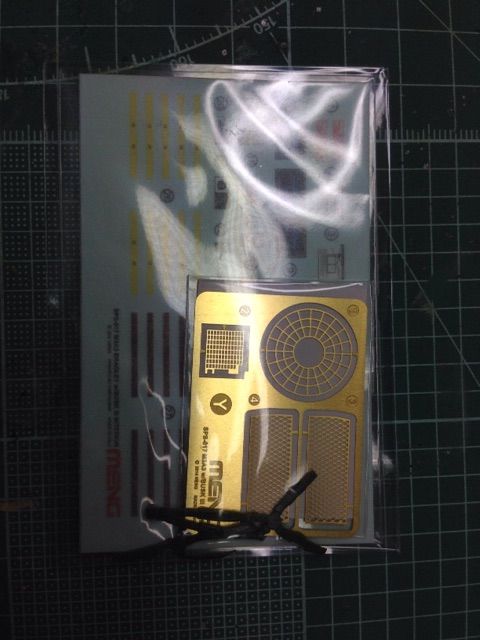
Couple of frets of PE.
Clear parts
And decals - the plane builders amongst you need to take note at this point, this is the kind of decalling hell that we AFV builders are subjected to.
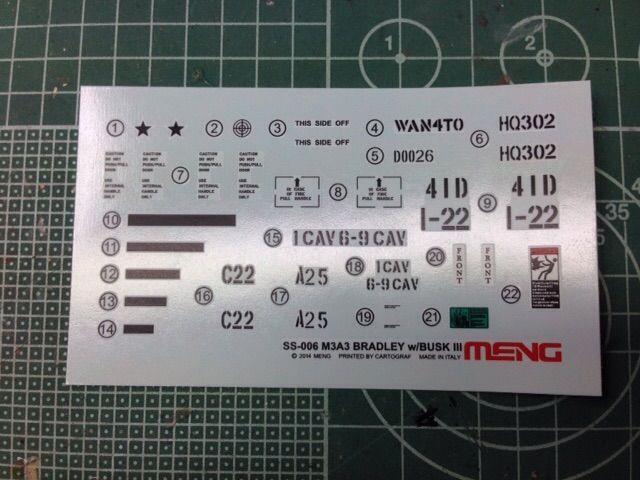
Only kidding!! That's ten minutes of work right there!!

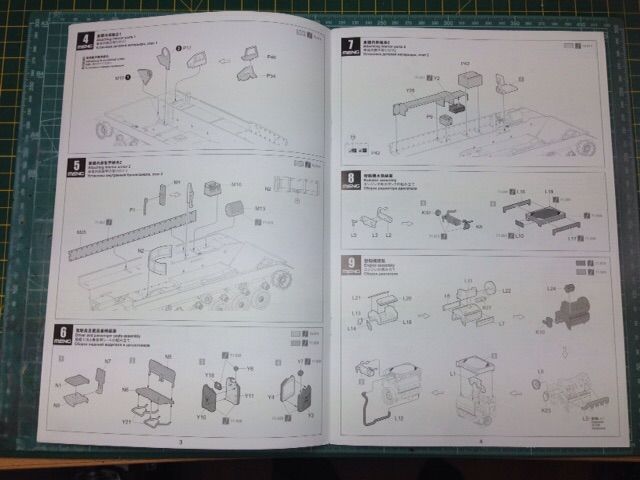
And now my favourite part, the instructions. Meng instructions are just soooooo good - in booklet form, lots of info and real easy to understand.
And colour for the paint schemes - even if there is only one option.

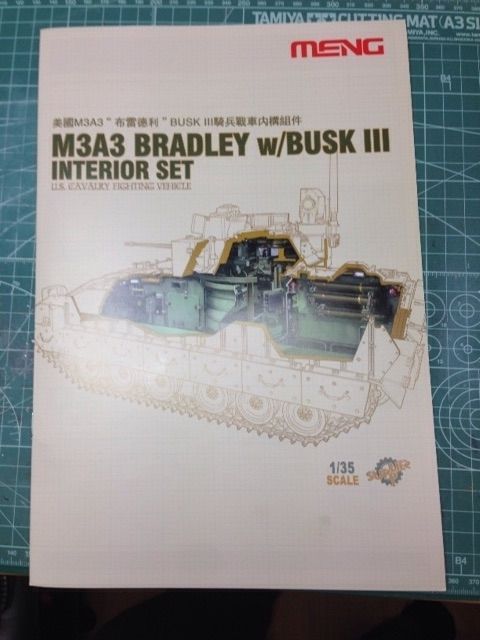
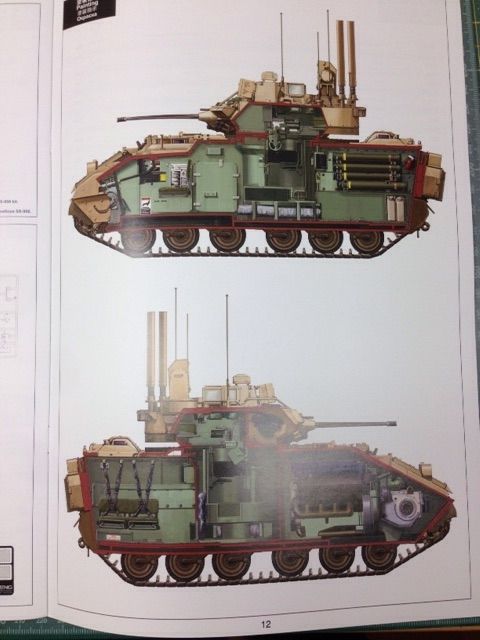
And the same again with the interior - box art.
Box full of plastic
Couple of sprues and another box full of plastic.
Small bag full of goodies - even get PE and decals with the interior!
More of those scrummy instructions
Planning a fairly simple dio for this one and picked up some nice figures and a really nice resin shop front.
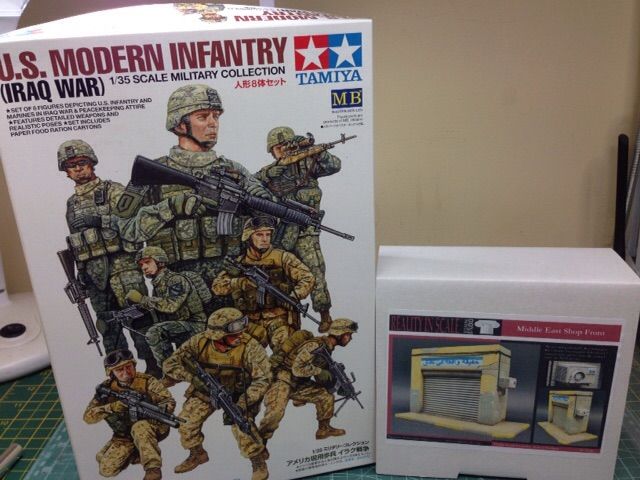
Liked the look of the poses for the figures and was very pleasantly surprised to learn that they are actually Masterbox figures when they arrived - bonus!!
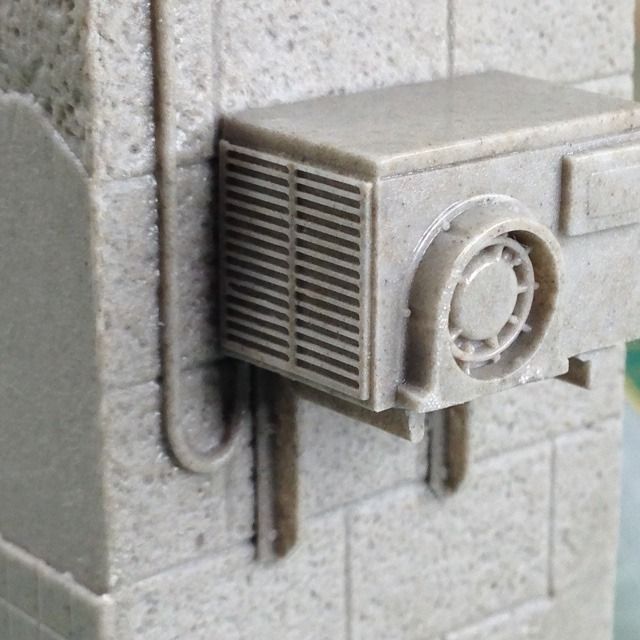
The shop front is from Reality in Scale and I took a peek at their website after Paul did a review of some of their products. Liked the look of a lot of their stuff and especially this one - some really nice detail, including the air-con unit and some decals for the signage.

That'll do me for the first post, I'll get up some pictures and some info on this beast on my next post as I don't want to bog you down with too much bilge all in one go!!
Thanks for taking a look!

Re: Meng 1:35 Bradley w/BUSK III & interior
Posted: Thu Jan 22, 2015 2:28 pm
by Hillbilly
WOW this is going to be an involved build

but it will stunning when you are done
Re: Meng 1:35 Bradley w/BUSK III & interior
Posted: Fri Jan 23, 2015 7:18 am
by zeekodadi
Hi I also have this kit and had meng send me instructions for the m2a3, has all the interior and kit in one instruction booklet if your interested let me know send me an pm and ill e-mail it to you
Re: Meng 1:35 Bradley w/BUSK III & interior
Posted: Fri Jan 23, 2015 10:09 am
by alextheblue
Hillbilly wrote:WOW this is going to be an involved build
but it will stunning when you are done
Thanks Steve!
I'll just be pleased to get it finished!
Re: Meng 1:35 Bradley w/BUSK III & interior
Posted: Fri Jan 23, 2015 10:10 am
by alextheblue
zeekodadi wrote:Hi I also have this kit and had meng send me instructions for the m2a3, has all the interior and kit in one instruction booklet if your interested let me know send me an pm and ill e-mail it to you
Zeek, your an absolute star bud, PM coming over!
Re: Meng 1:35 Bradley w/BUSK III & interior
Posted: Fri Jan 23, 2015 11:31 pm
by AlkaSeltzer
GULP

I can't even image how cool this is gonna be. I will sit back

and enjoy this. Nice choice!

Re: Meng 1:35 Bradley w/BUSK III & interior
Posted: Mon Jan 26, 2015 11:10 am
by alextheblue
AlkaSeltzer wrote:GULP
I can't even image how cool this is gonna be. I will sit back
and enjoy this. Nice choice!
Thanks AS, managed to get a bit done over the weekend!
Re: Meng 1:35 Bradley w/BUSK III & interior
Posted: Mon Jan 26, 2015 11:38 am
by alextheblue
Update One - dedicated to zeekodadi
Before I get to the nitty-gritty, I just wanted to say a big thank you to Zee. He had previously contacted Meng to get a copy of the instructions for the M2A3 kit as this one came complete with the interior and as a result the complete build was all in one instruction booklet - which he very kindly sent to me!!
Thanks again Zee.
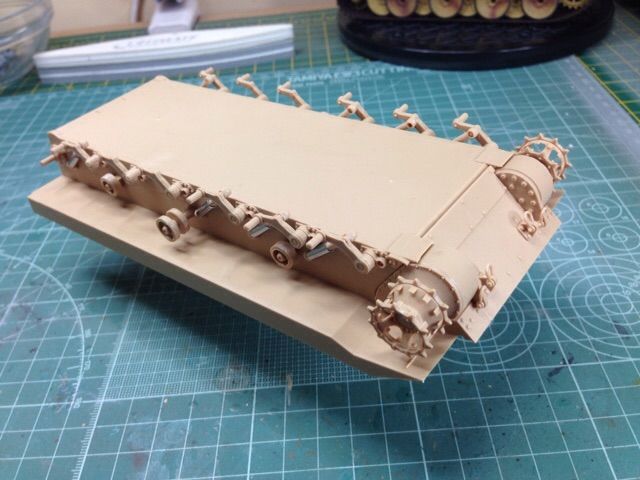
I was pretty keen to get stuck into the interior, but was also mindful to keep to the instructions due to the complexity of the build. As with most AFV builds,, this means cleaning up and assembling a pile of wheels, sprockets and idlers and being a Meng kit, this was all very straightforward.

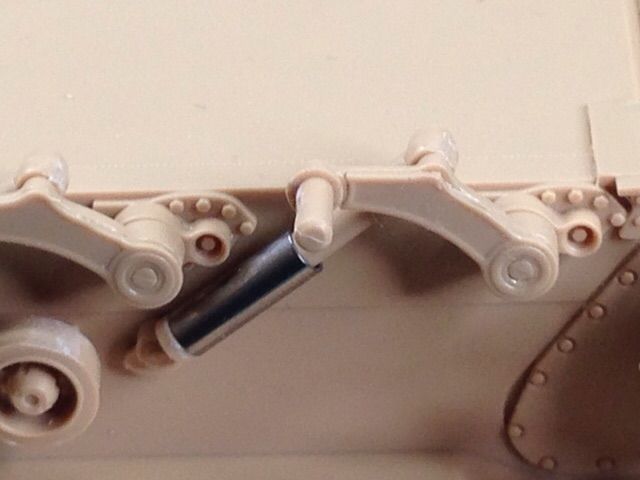
Next up was the suspension, drive shafts and running gear. The suspension is fully workable and fits together like a dream. The part of the suspension strut that attaches to the lower hull, "pops" into a locating hole and doesn't require any glue. Having said that, the fit on this kit is soooooo good, you could pretty much friction fit the whole darn thing!
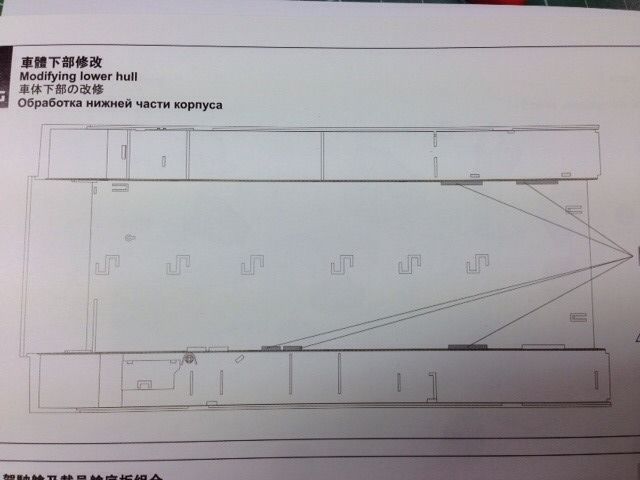
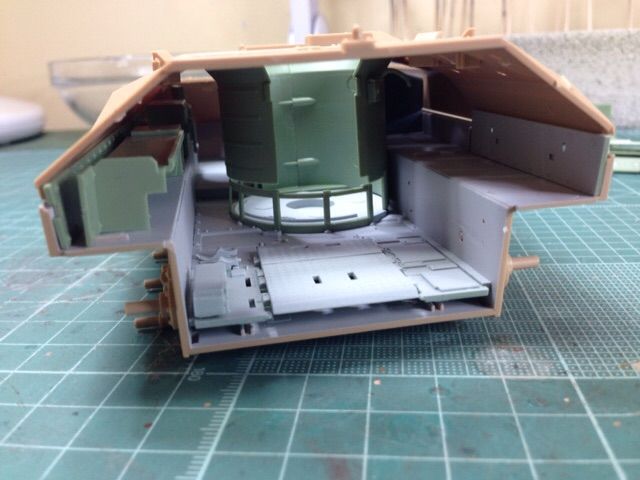
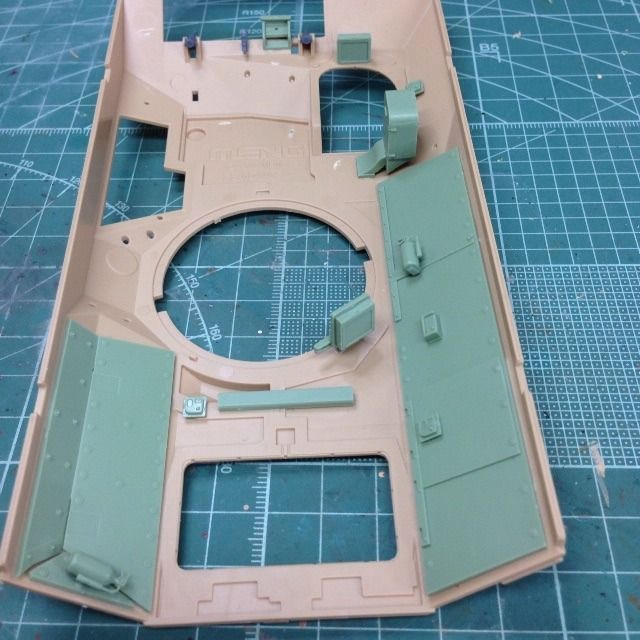
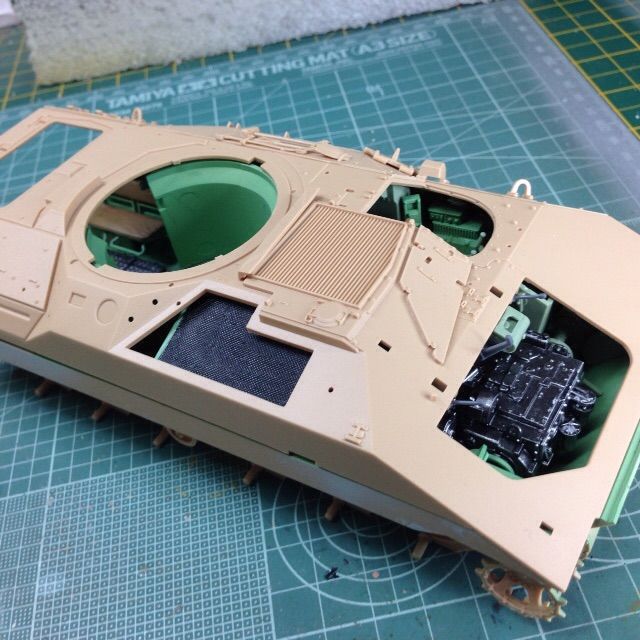
And now onto the interior and first up, there's some very small mods need doing to the interior of the lower hull - namely shaving some lugs off of the interior wall. There's a couple of lugs that need to stay and in my enthusiasm I almost shaved these off, but realised just in time.
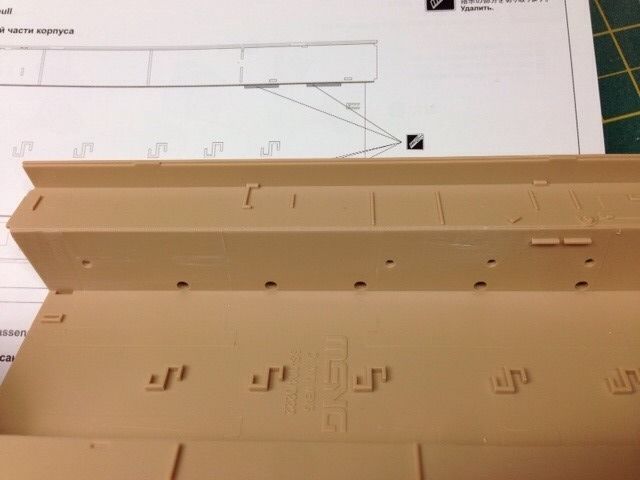
Again, everything just "snaps" together as the fit is superb.
That's about as far as I can go with the interior as I need to start painting it up and there's a couple of decals need adding before anything else is added. Couldn't resist just dry-fitting the upper hull and part of the rear-section to give me an idea of the size of this thing.
Thoroughly enjoying this build so far and in my opinion, Meng are just about as good as it gets in terms of quality and fit.
Thanks for taking a look!
Re: Meng 1:35 Bradley w/BUSK III & interior
Posted: Wed Jan 28, 2015 12:11 am
by zeekodadi
Thank you for the kind words, anything i can do to help a fellow modler and the community I'm there
Re: Meng 1:35 Bradley w/BUSK III & interior
Posted: Wed Jan 28, 2015 12:32 am
by schweinhund227
Still resisting buying this one....
but it is getting to me....
Keep up the good work!

Re: Meng 1:35 Bradley w/BUSK III & interior
Posted: Wed Jan 28, 2015 9:03 am
by alextheblue
zeekodadi wrote:Thank you for the kind words, anything i can do to help a fellow modler and the community I'm there
Re: Meng 1:35 Bradley w/BUSK III & interior
Posted: Wed Jan 28, 2015 9:04 am
by alextheblue
schweinhund227 wrote:Still resisting buying this one....
but it is getting to me....
Keep up the good work!
It's a beautiful kit - resistance is futile!!
Re: Meng 1:35 Bradley w/BUSK III & interior
Posted: Fri Jan 30, 2015 9:07 am
by alextheblue
Update Two
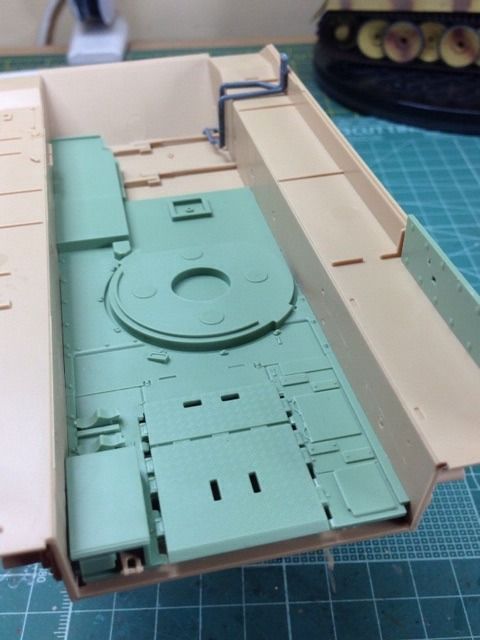
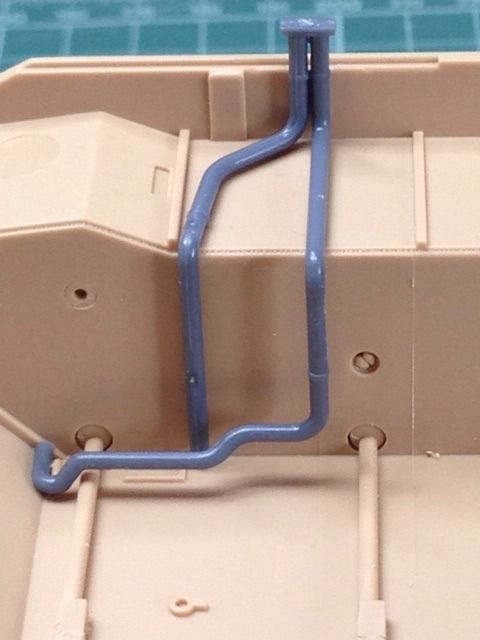
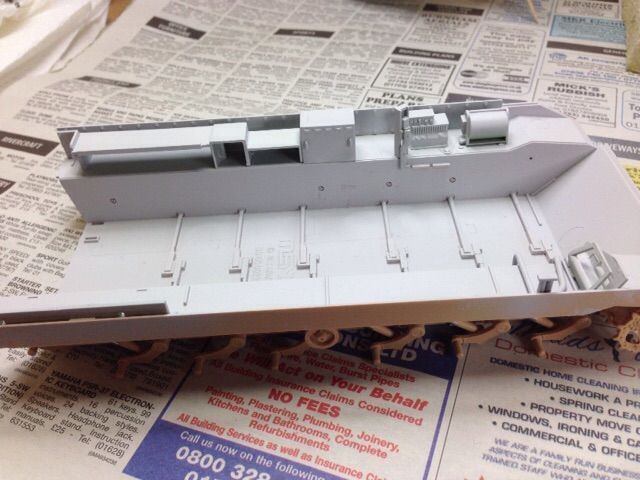
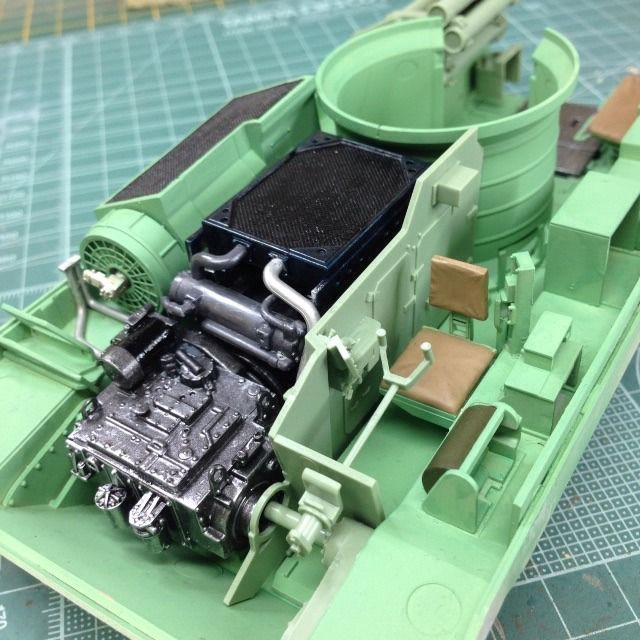
Time to turn my attention back to the interior now the running gear is done. Theres some more bits of the infrastructure and gubbings to put in and then its onto the engine, gearbox etc. Looking ahead in the instructions, this will be about it until these bits have some paint on.
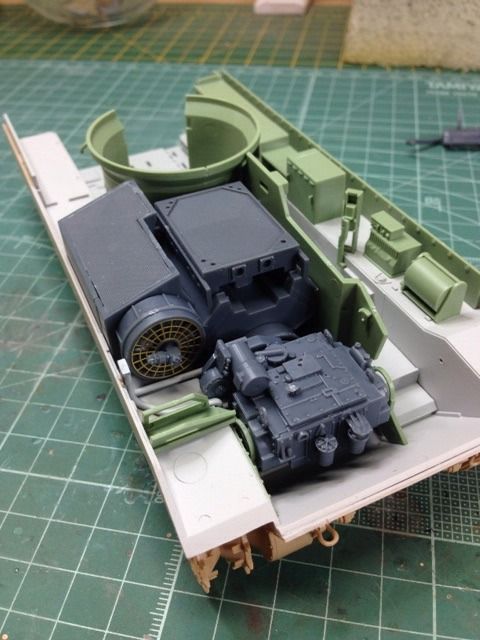
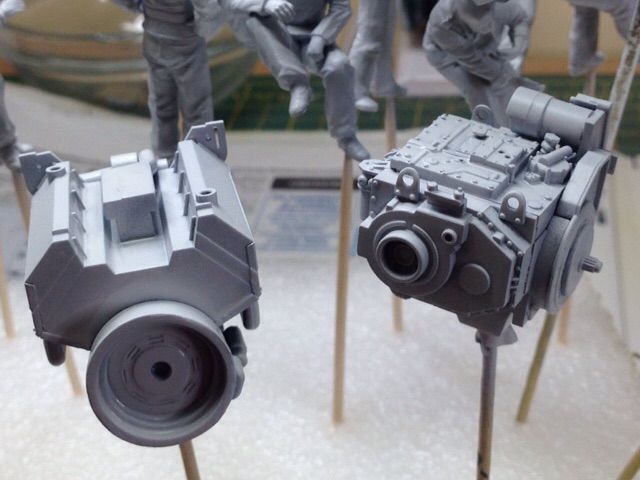
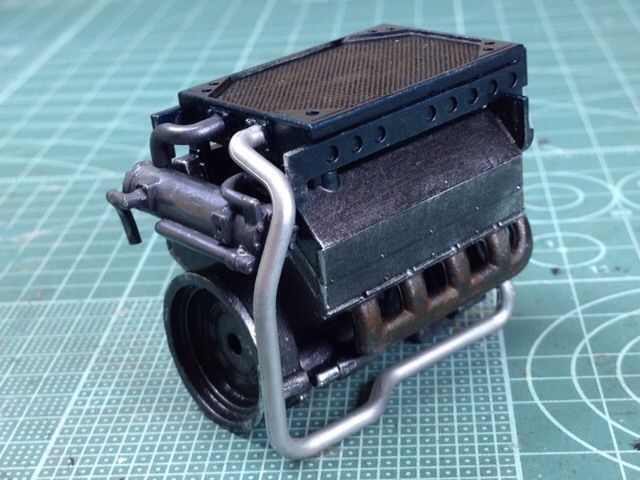
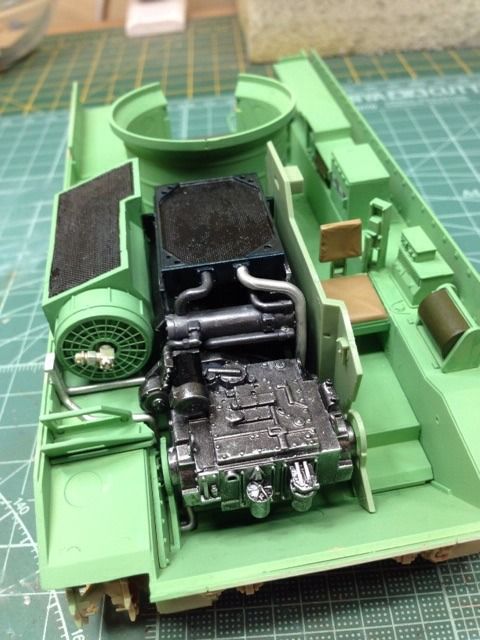
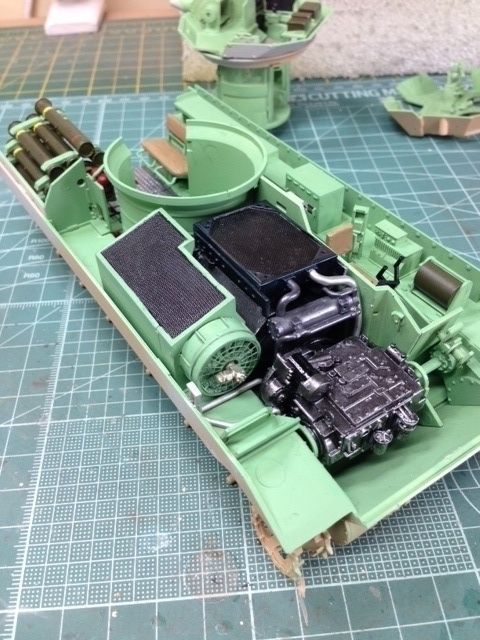
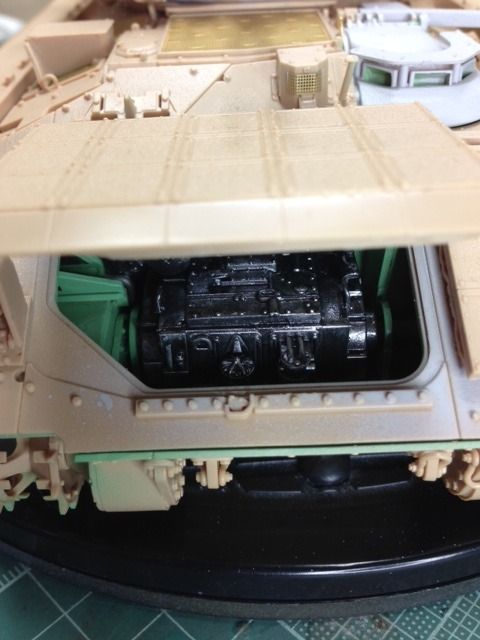
The engine is a Cummins VT903 I believe and is very well detailed. Like everything else so far, the quality is top notch and these bits just fall together, to use a well worn cliche.
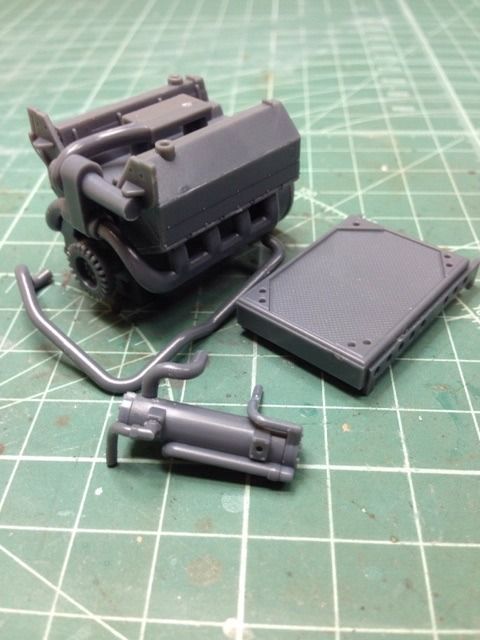
Gearbox and bulkhead.
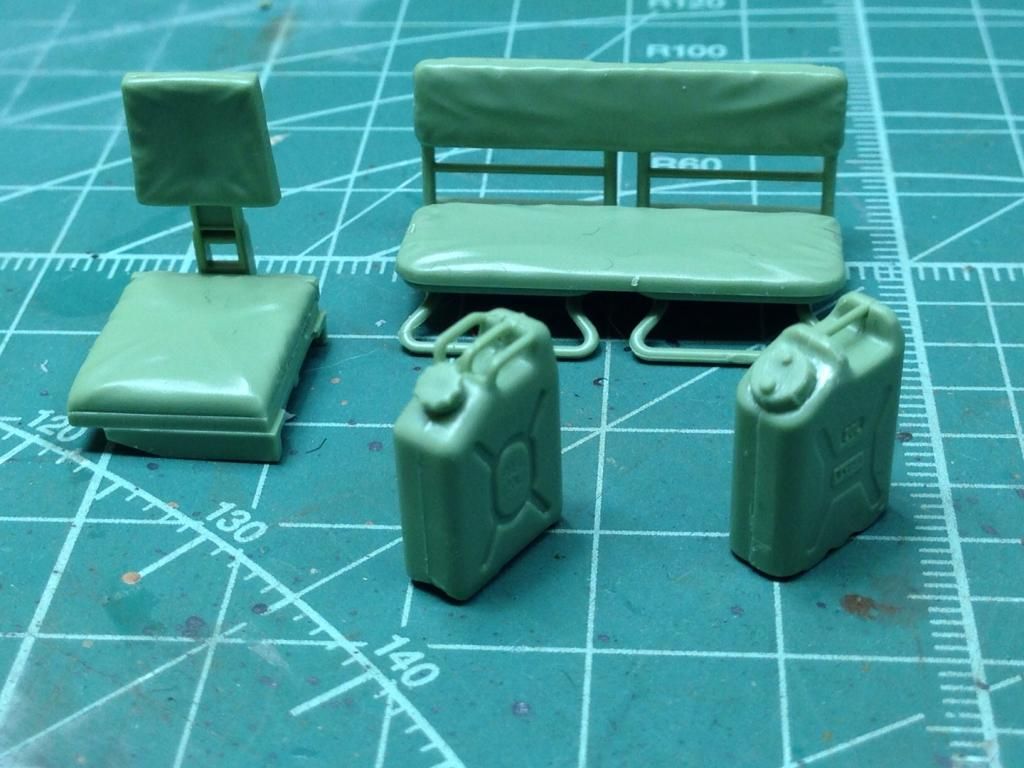
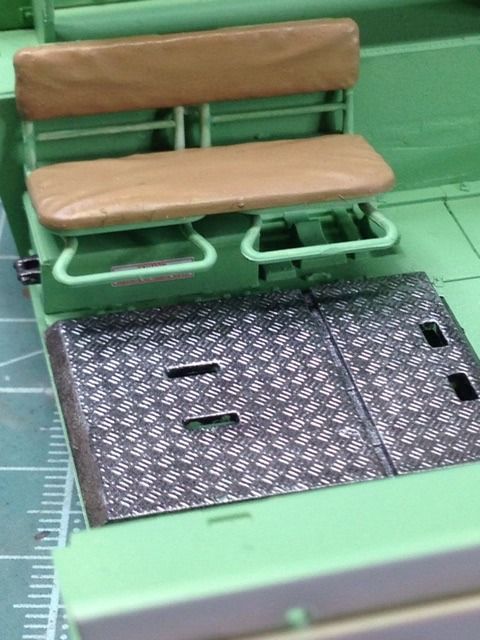
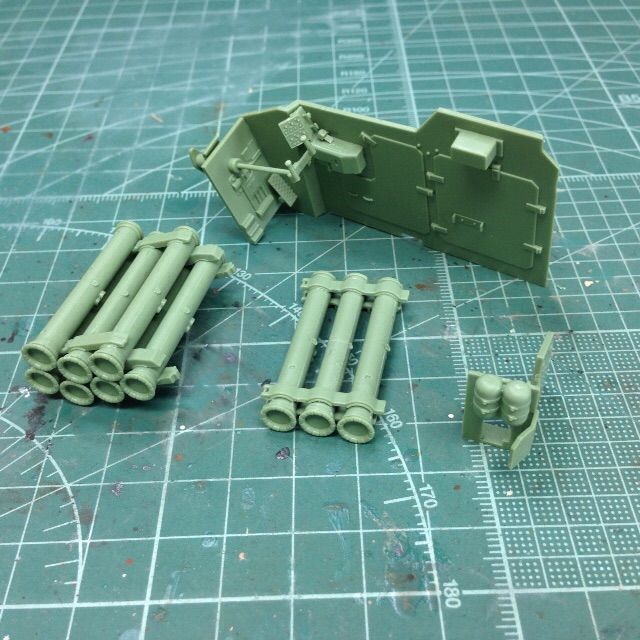
Seats and jerry cans
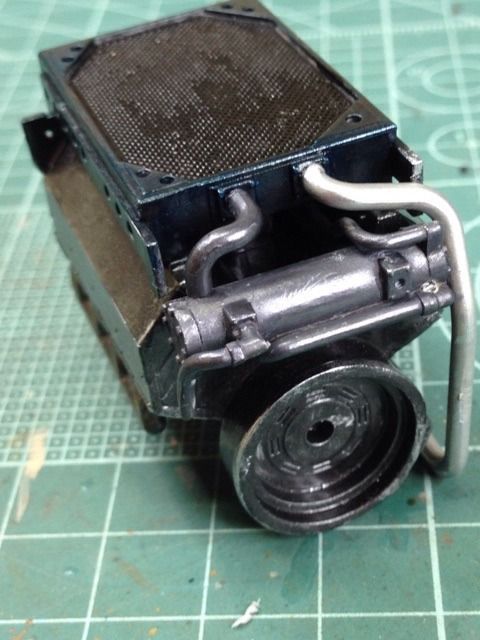
And a quick dry-fit to make sure there's no fit issues antwhere - lot easier to rectify those now rather than wait until everything is painted up. Believe me, I've done that before!

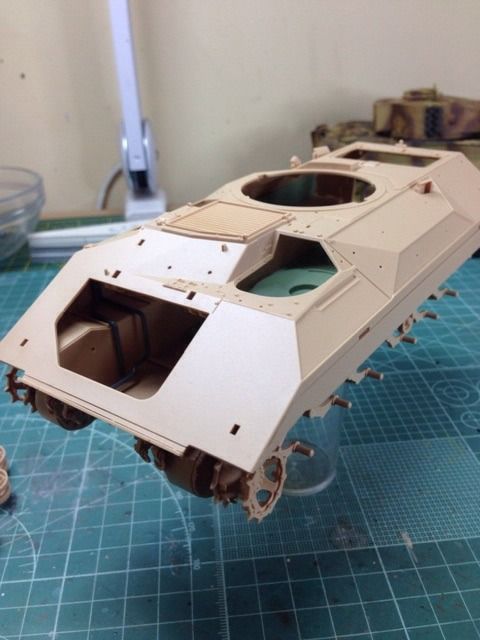
Might as well pop the top on and see how well that fits. I'm hoping that this will fit together well enough without having to cement it place and then it can be removed to display the interior - and initial signs look quite promising.
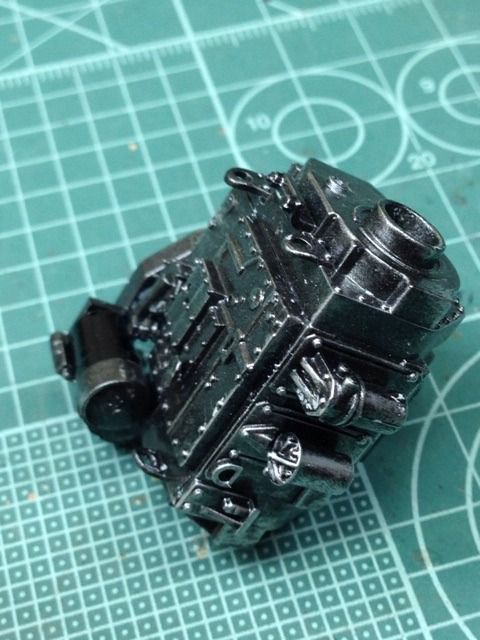
With that all done, its onto the primer and I still use Vallejo grey polyurethane surface primer. I must be one of the rare individuals who has tried AKi primer and didn't like it. Maybe I was just having a bad day, but after trying both the black and grey, my bottles of AK have been consigned to the "spares" box.
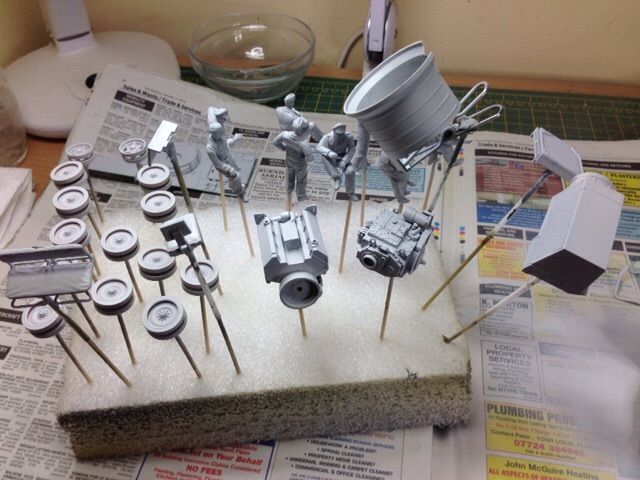
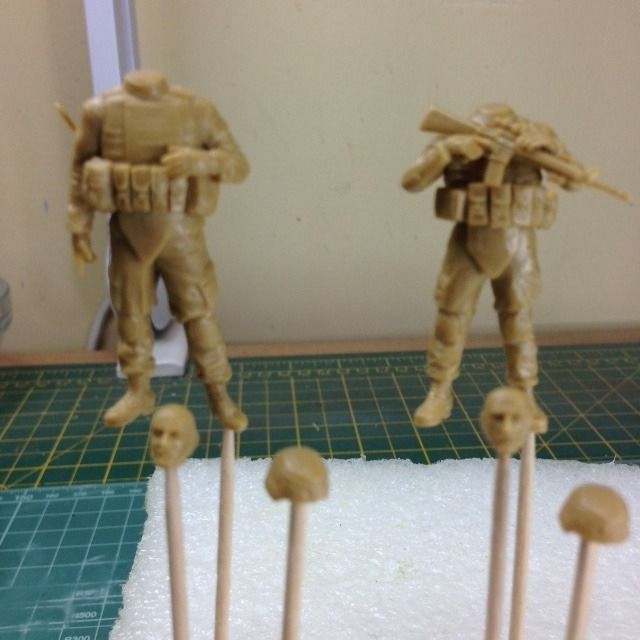
And the obligatory "bits on sticks" shot Please ignore the figures, they are just some fellas from a WW2 re-enactment group who just happened to stumble by!

And thats me, just a short update this time - hooray, just get on with it I hear you cry!!
Thanks for taking a look!
Re: Meng 1:35 Bradley w/BUSK III & interior
Posted: Fri Jan 30, 2015 10:33 am
by amsvkng
WOW
This model is really fantastic with all the details and interior.
/Karim
Re: Meng 1:35 Bradley w/BUSK III & interior
Posted: Thu Feb 26, 2015 9:59 am
by alextheblue
amsvkng wrote:WOW
This model is really fantastic with all the details and interior.
/Karim
Thanks for the kind words Karim and apologies for the delay in replying, been rather distracted with a certain Tiger 1 SiG!
Re: Meng 1:35 Bradley w/BUSK III & interior
Posted: Thu Feb 26, 2015 10:20 am
by alextheblue
Update Three
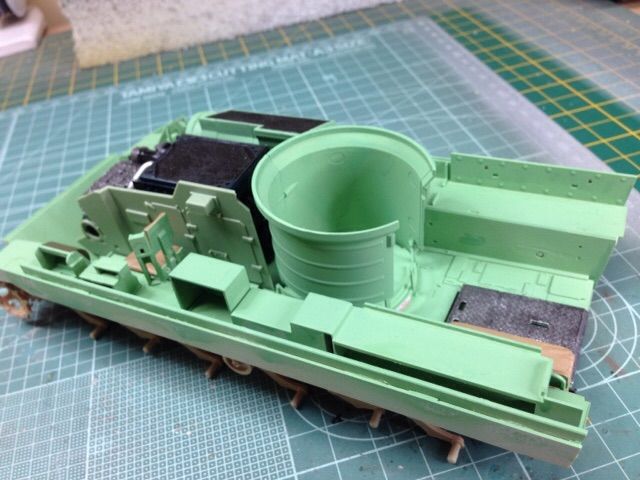
As mentioned in my above post, I've been a little distracted with the Tiger 1 SiG in honour of Coen, but with the bulk of it done, I thought I'd better turn my attention back to this one. With as much of the interior done as possible and with it all primed and ready, it's time to get some base colour down. The colour call-out in the instructions suggests Green Sky 974 from Vallejo Model Colour.
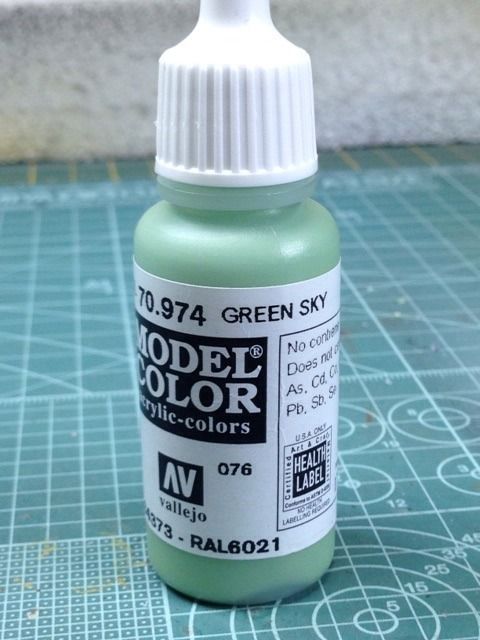
These are great paints for brush painting, but I've never airbrushed them before and bearing in mind how thick they are I'm not looking forward to this. However, armed with a couple of Ultimate's Thinner, I start adding about 5 drops of thinner for every drop of VMC and this seems to turn the paint from treacle to something that resembles sprayable paint.
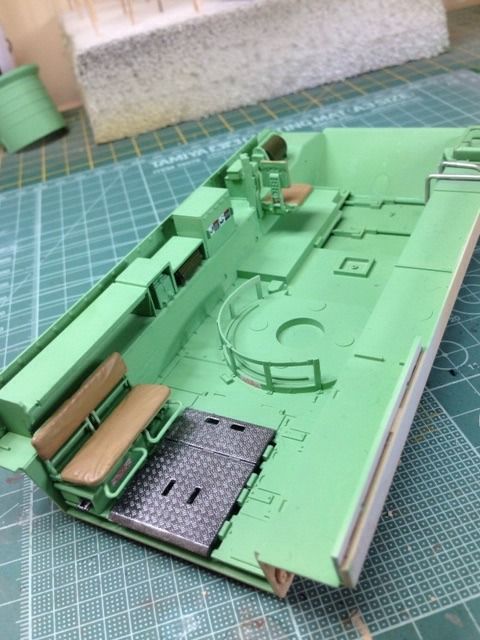

For the diamond plate I used Steel from Mr Hobby (H018 I think) dry-brushed with an aluminium colour.
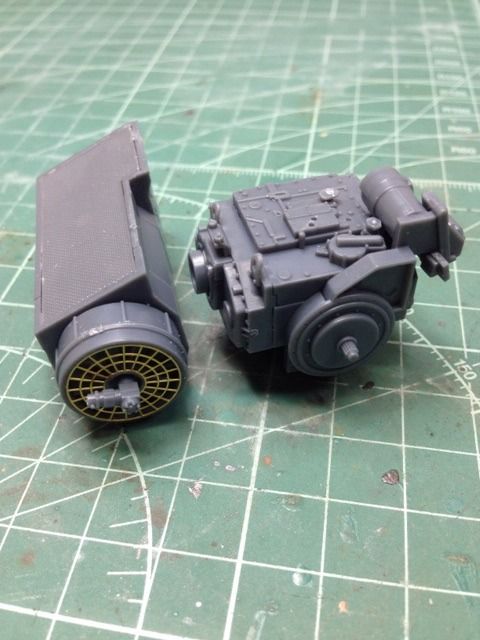
And onto the engine and transmission
All looks shiny and factory fresh, but I'll weather it up once it's all in place. Quick dry fit.
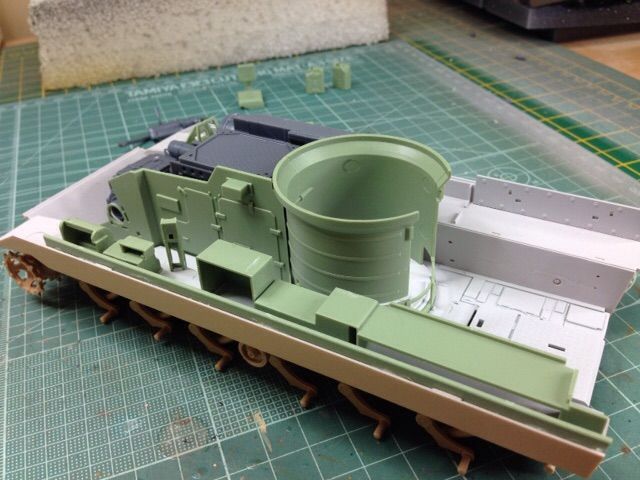
Next up, building some more of the widgets that go in the interior as well as the details on the interior wall.
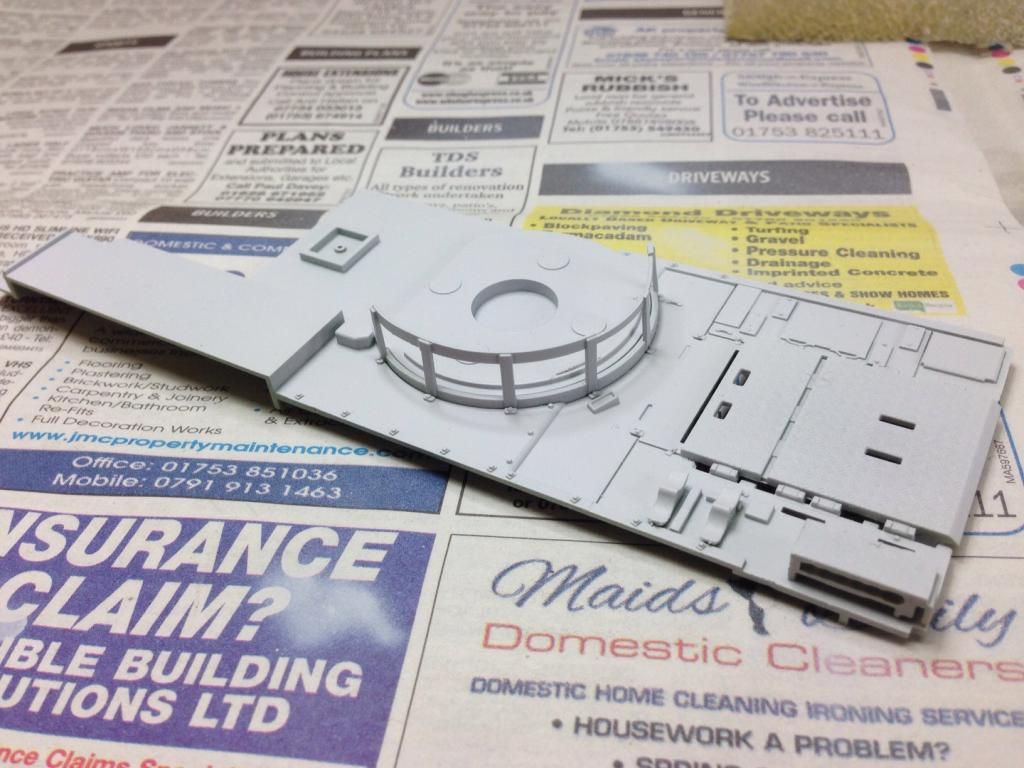
Now onto the "roof" of the interior.
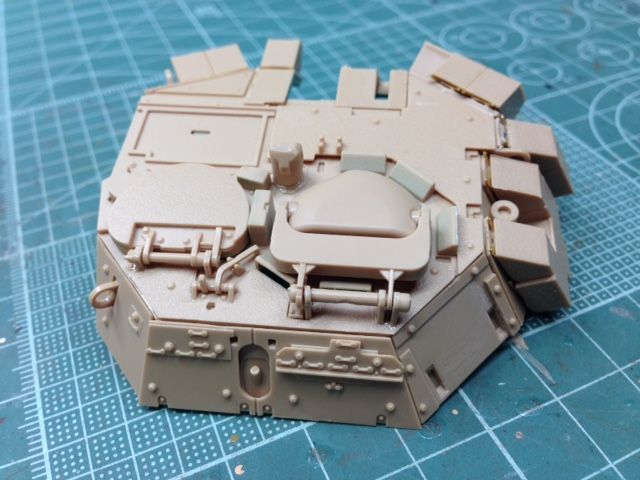
Time to add some armour plating and ordinance to the upper hull.
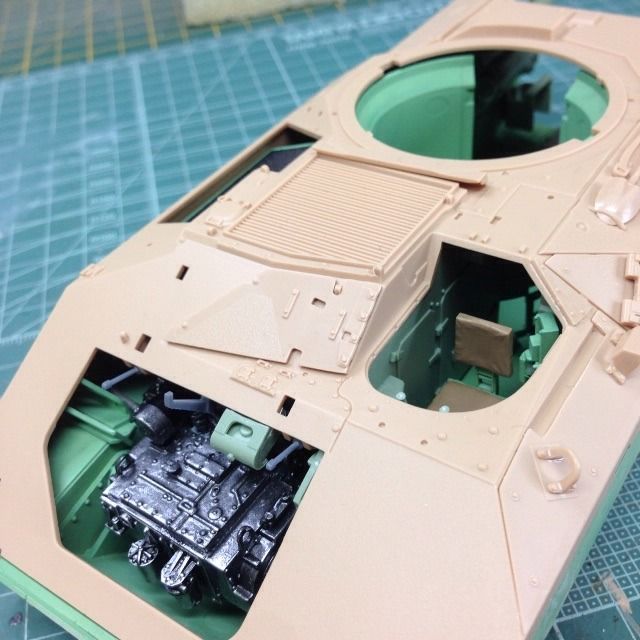
Theres some nice texture to the armour, but I'm not sure if it's a little bit too "soft" and will be lost once it's primed and painted.
Looking at several pictures, this seems quite accurate, so I'm loathed to add any of my own anti-slip effects (and relieved as well if I'm to be honest!).
So, another dry fit, pop the "lid" on and I think the next step is to get all this lot painted up and attached.
Still got a mountain of stuff to do, but hey, you makes your bed, you lie in it I guess!
Thanks for taking a look!
Re: Meng 1:35 Bradley w/BUSK III & interior
Posted: Thu Feb 26, 2015 12:59 pm
by Goose
Nice work so far,
I'm sure that once you'll have applied a bit of weathering on it it will be awesome.
Keep in touch with this thread
See you
Goose
Re: Meng 1:35 Bradley w/BUSK III & interior
Posted: Thu Feb 26, 2015 6:13 pm
by PaulAyrey
Wow, this is looking great Alex!
Re: Meng 1:35 Bradley w/BUSK III & interior
Posted: Fri Feb 27, 2015 5:53 am
by timtamtung
Very very cool build.
Re: Meng 1:35 Bradley w/BUSK III & interior
Posted: Sat Feb 28, 2015 12:43 am
by Panzermeister36
Re: Meng 1:35 Bradley w/BUSK III & interior
Posted: Sat Feb 28, 2015 6:08 am
by gustavlekstal
happy days! Great build to watch. Great work!

Re: Meng 1:35 Bradley w/BUSK III & interior
Posted: Mon Mar 02, 2015 9:23 am
by alextheblue
Goose wrote:Nice work so far,
I'm sure that once you'll have applied a bit of weathering on it it will be awesome.
Keep in touch with this thread
See you
Goose
Thanks Goose, I can't wait to "dirty" it up a bit, it's making me a bit nervous being this clean!
Re: Meng 1:35 Bradley w/BUSK III & interior
Posted: Mon Mar 02, 2015 9:24 am
by alextheblue
PaulAyrey wrote:Wow, this is looking great Alex!
Thanks Paul!
Re: Meng 1:35 Bradley w/BUSK III & interior
Posted: Mon Mar 02, 2015 9:24 am
by alextheblue
timtamtung wrote:Very very cool build.
Appreciate that Tungy!
Re: Meng 1:35 Bradley w/BUSK III & interior
Posted: Mon Mar 02, 2015 9:26 am
by alextheblue
Thanks PM, I'm not too sure how I'm going to go about making the upper hull removable without it looking odd, but I'll give it a go.
That would be interesting to add those figures, but they've already legged it off in pursuit of a Tiger ! that went rolling by earlier!!
Re: Meng 1:35 Bradley w/BUSK III & interior
Posted: Mon Mar 02, 2015 9:27 am
by alextheblue
gustavlekstal wrote: happy days! Great build to watch. Great work!
Thanks Gustav!
Re: Meng 1:35 Bradley w/BUSK III & interior
Posted: Tue Mar 10, 2015 11:06 am
by alextheblue
Update Four
Not a huge update, although I have managed to get a fair bit of the interior painted up and fitted - just haven't taken pics of it yet!
I must confess, I'm not a great fan of, paint a bit, build a bit, paint a bit, build a bit...and that probably explains why I've only attempted one plane and that's nowhere near finished! Personally, I think that glue and paint should never be on your workbench at the same time. Once I've painted something, I prefer not to have glue anywhere near it and that's why I always try and paint things in situ. However, there were a couple of bits on this build that proved to be very problematic and I wish I had painted them first and then CA'ed them in place!
Still that's for the next update, here's what I got done and actually managed to photograph!

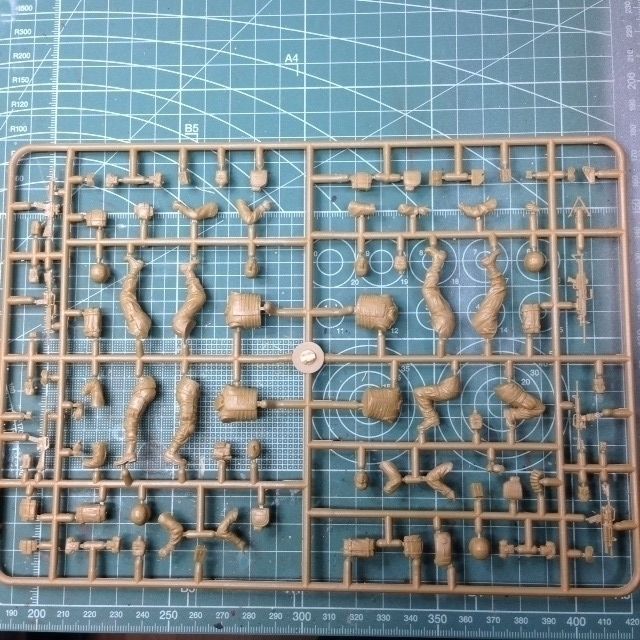
Made a start on the figures. Quite a bit of work needed to remove the seams, but nothing too time consuming. The detail is fairly good and they should paint up ok.
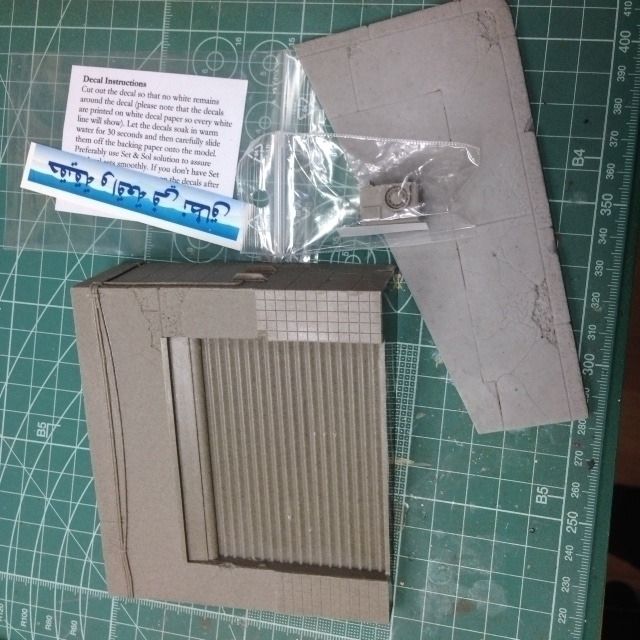
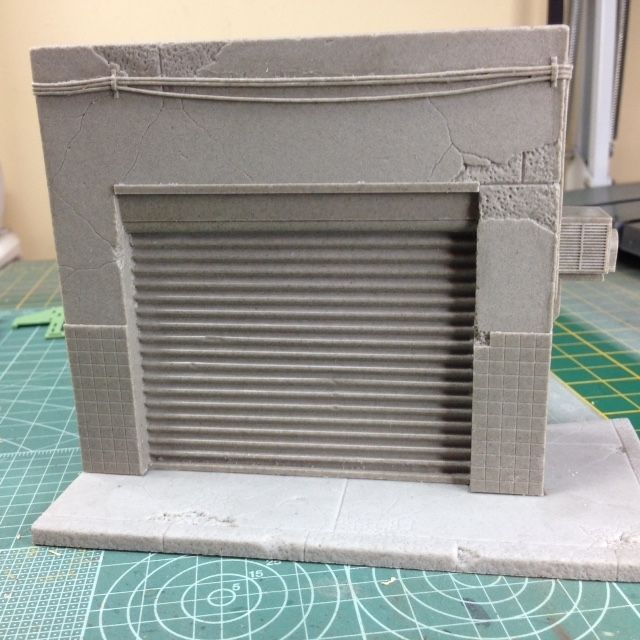
Next up was the bit that I'm really looking forward to tackling, the shop-front from Reality in Scale. I checked out their website after seeing Paul's review on some of their stuff and I saw this little beauty. The molding is really nice and the textures on the walls, pavement, shutter etc is very nicely done and they should hold a wash nicely.
You may well notice that a couple of pics appear to be a bit askew and for this I make no apology. I'm not sure if other people have a similar problem, but when uploading pics from my iPhone to Photobucket. I regularly have problems in getting the pictures the right way up. I've found a little "system" of tricking Photobucket in getting them the right way, but this time round there were two pictures that just wouldn't play ball. After much ranting, swearing and gnashing of teeth, I found out that there's a bug between the EXIF file and Photobuckets API - apparently there's an anomaly between the orientation values that each uses. So I had a choice, go in and change the orientation via html coding, or leave it. Obviously I chose the latter - even if I lived to be 250, my life is just toooooo short to bother about this shite!
Anywho, rant over (nurse, nurse, my medication!!). Time to get back to the interior and I will try to remember to take photos this time!
Thanks for taking a look!
Re: Meng 1:35 Bradley w/BUSK III & interior
Posted: Thu Mar 12, 2015 10:15 am
by alextheblue
Update Five
This really should be an addendum to Update Four, as these are the pictures that I should have taken and put up previously. Hey-ho, they're done now, plus I got a little bit more done last night. I knew I was going to have a lot of work with this build, but I think I've underestimated just how much there is to do. I think I'll concentrate on the Bradley and fit in a bit of work on the figures, base and dio as and when I have any spare time - spare time, right!!!
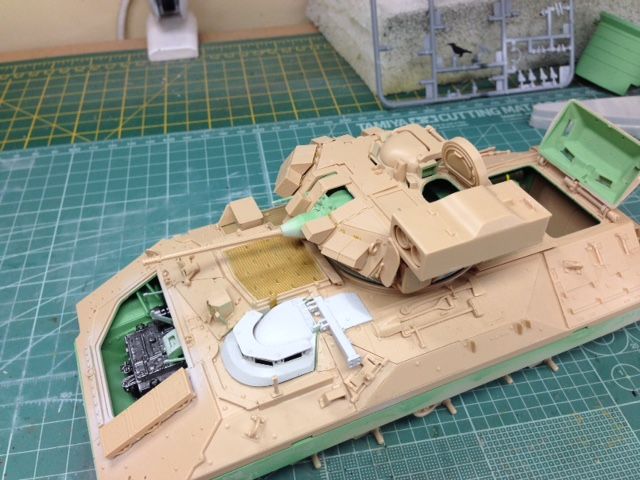
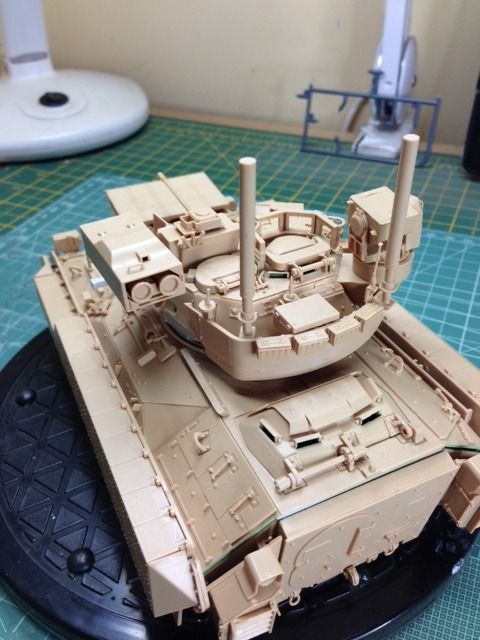
As I may have mentioned on the odd occasion in this thread, the fit on these Meng kits is really rather good and there has been no issues at all with the kit. There's been a couple of times where I've almost screwed up and there's a couple of places in the instructions where you have to really study them to make sure that you're putting things in the right place, but I have to say, I'm definitely a big Meng fan!
The upper hull has had all of it's blingy bits put on. Now don't shoot me down in flames for the next comment, but I'm not a huge fan of PE, so the bits that are included with the Bradley are just fine with me. Don't get me wrong, I love seeing PE on other peoples builds and the skill needed is just immense (just check out any of Frans and John's work), but I value my eyesight (not to mention my sanity!) too much to fiddle about with the sub-atomic scaled stuff!
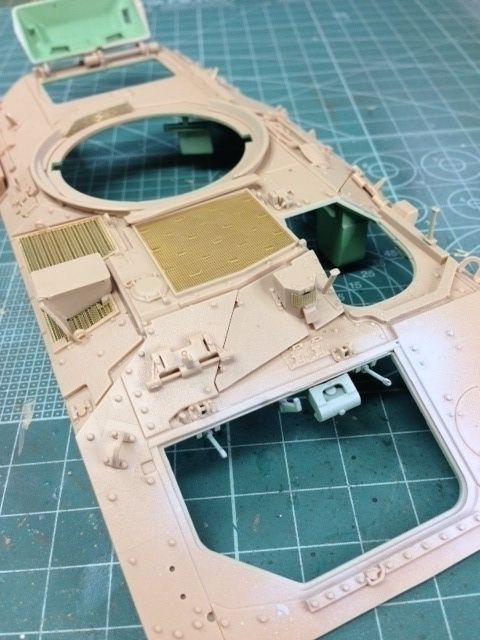
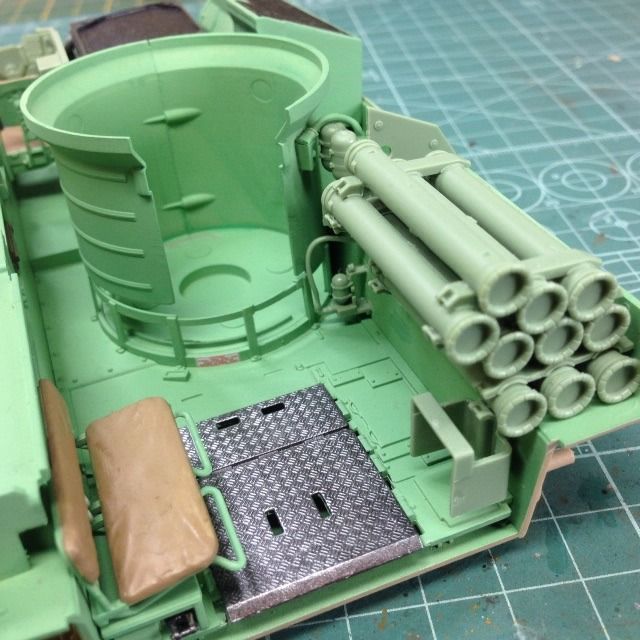
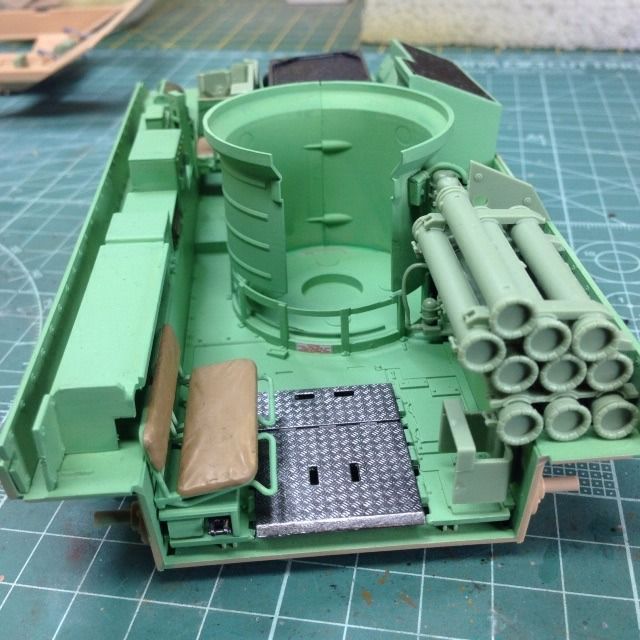
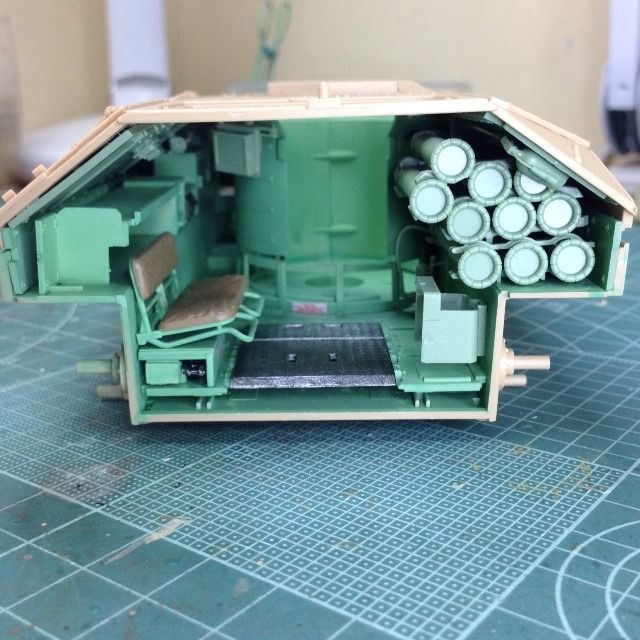
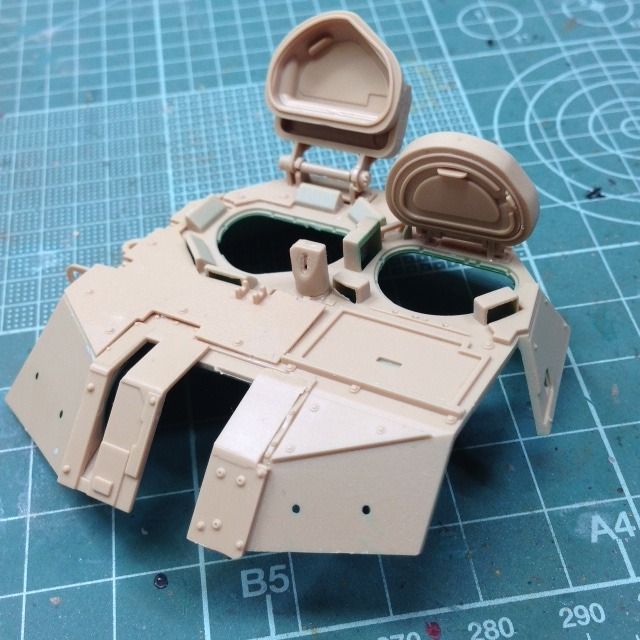
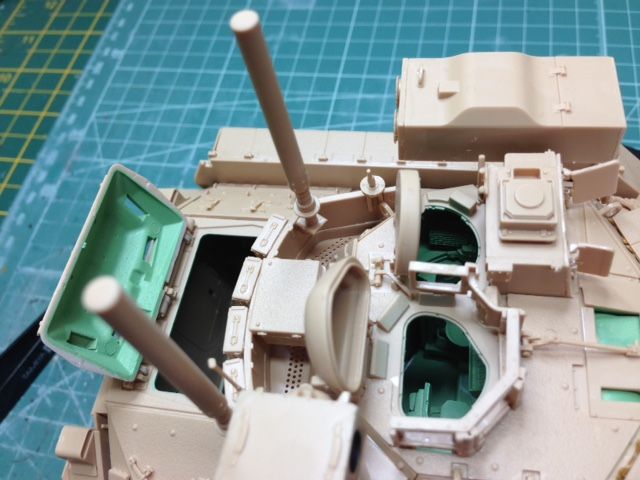
Couple of little details on the interior roof.
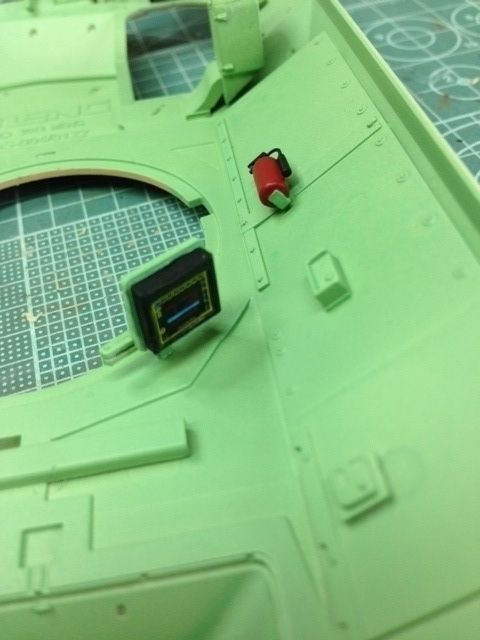
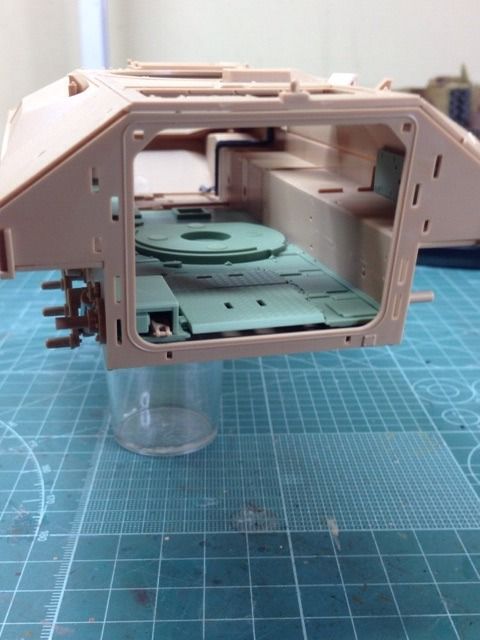
And the turret interior
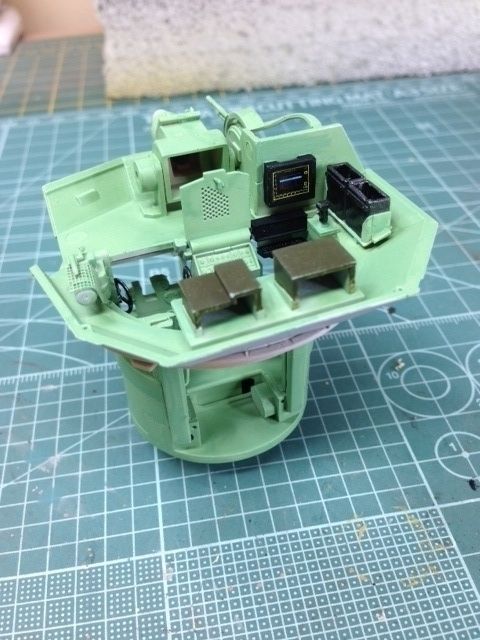
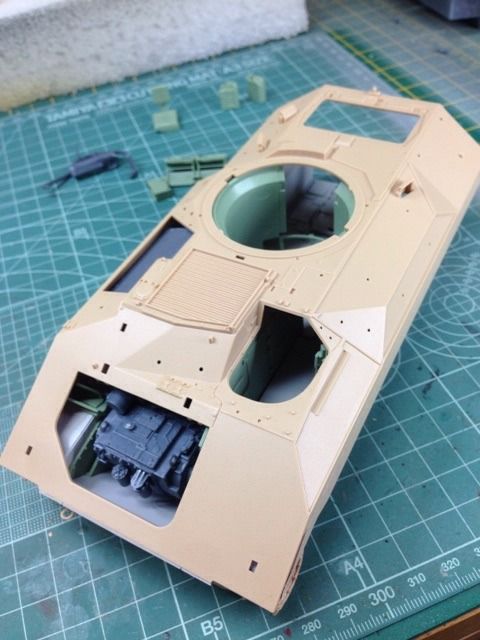
The main gubbins are all painted for the interior and this allows me to finally fix in the engine, transmission etc.
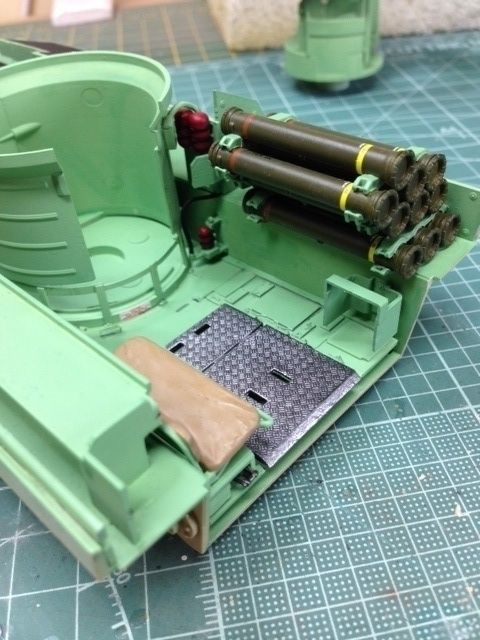
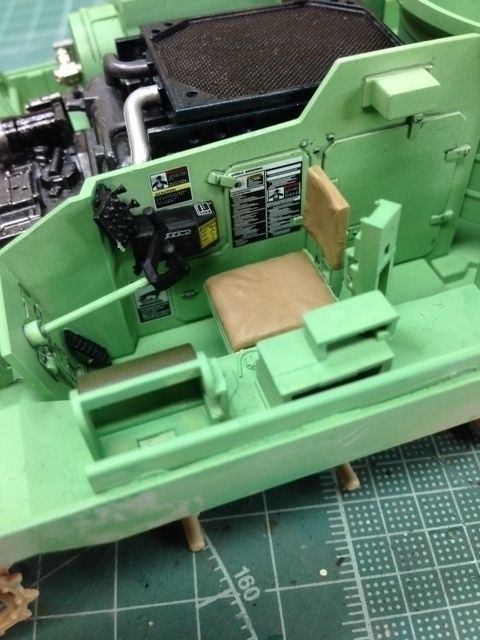
Quick trial fit to make sure that everything still fits together as it should.
A few more things to finish off and some more decals to add here and there, but I feel as though I'm on the finishing strait as far as the interior is concerned. I do like the look of it on the whole, even though all of the monitor screens seem to be tuned into 1980's Teletext and I can't seem to find the mini-fridge anywhere!
I'm not sure that I'm going to be able to stick to my original plan and build this without actually fixing the lower and upper hulls as I think it will be too noticeable. I'll get a better idea once all the armour starts going on as I'm hoping this might hide some of the joins. Oh well, if not I'll just have to make sure I get plenty of pics before buttoning it up, plus you can still see plenty through the hatches etc.
Thanks for taking a look!
Re: Meng 1:35 Bradley w/BUSK III & interior
Posted: Thu Mar 12, 2015 8:44 pm
by JediBoer
Coming along nicely and looking pretty damn awesome!
Re: Meng 1:35 Bradley w/BUSK III & interior
Posted: Fri Mar 13, 2015 12:32 pm
by gaz45
very nice work mate coming along really well
Re: Meng 1:35 Bradley w/BUSK III & interior
Posted: Wed Mar 18, 2015 8:51 am
by alextheblue
Thanks JediBoer & Gaz, appreciate the comments fellas!
 Update Six
Another small update as I've been concentrating on getting the Tiger finished for the Coen Tribute build and out of the two, that is the one that I really want to finish if it comes down to an either/or situation. I should at least get the Bradley finished though, so I should hopefully have something to haul over the finish line and then I can always finish up the figures and dio later and post those pics on a normal thread.
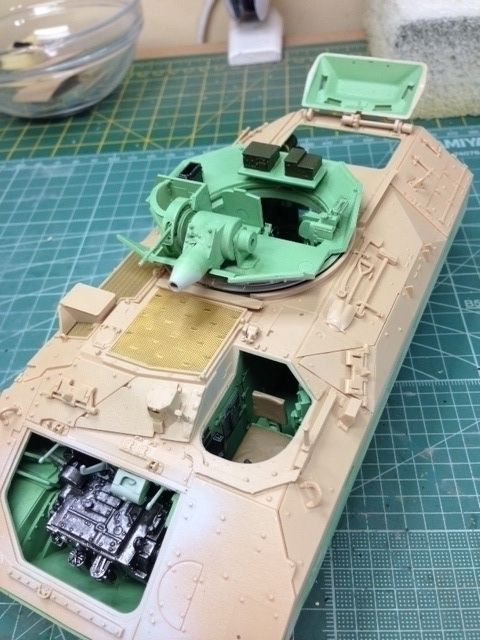
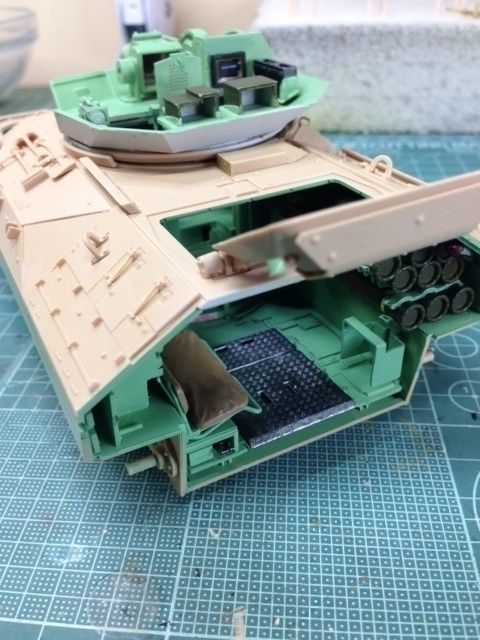
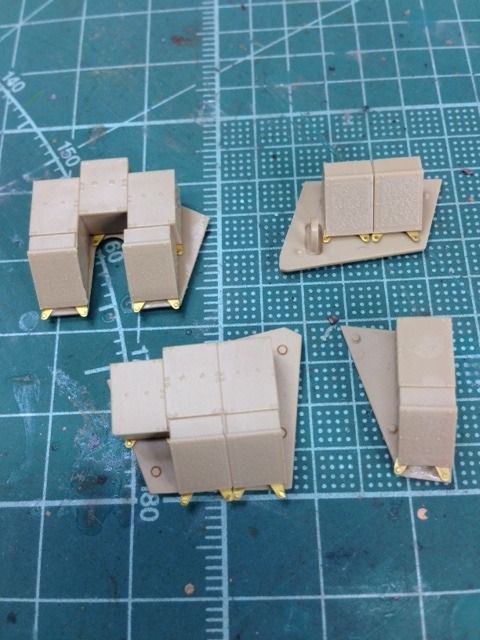
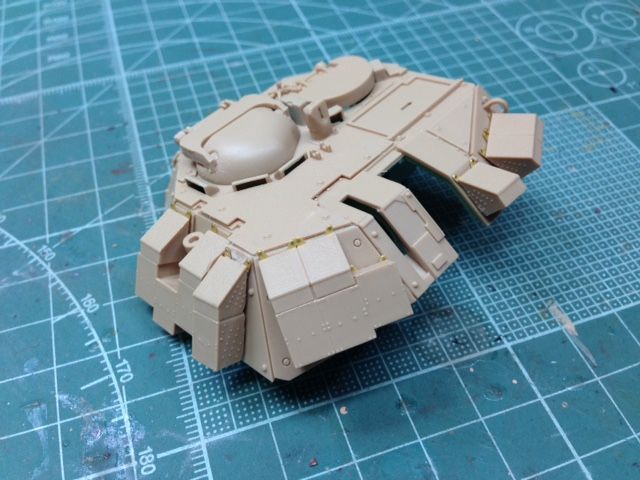
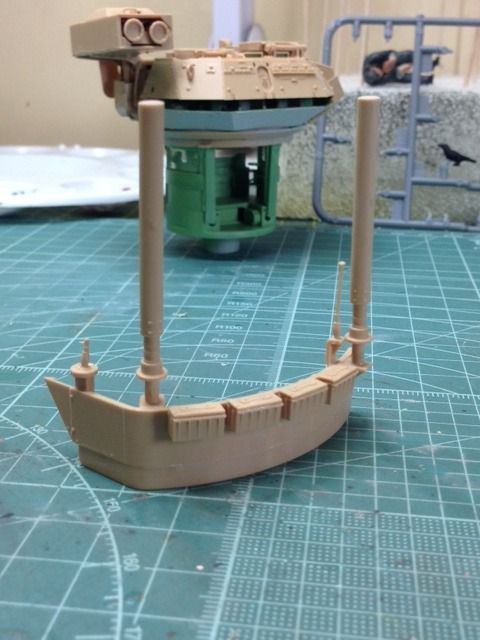
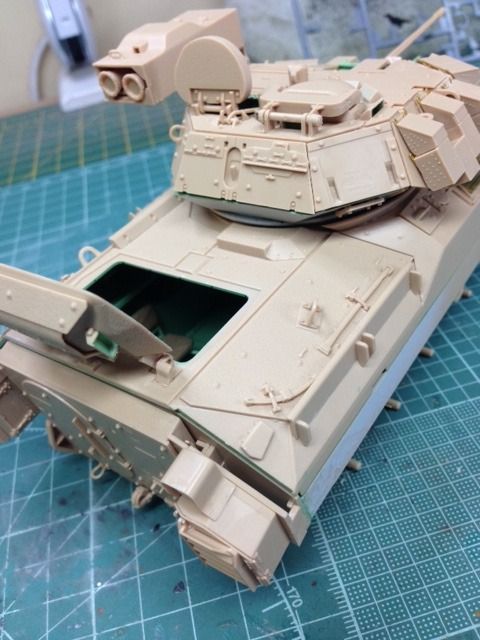
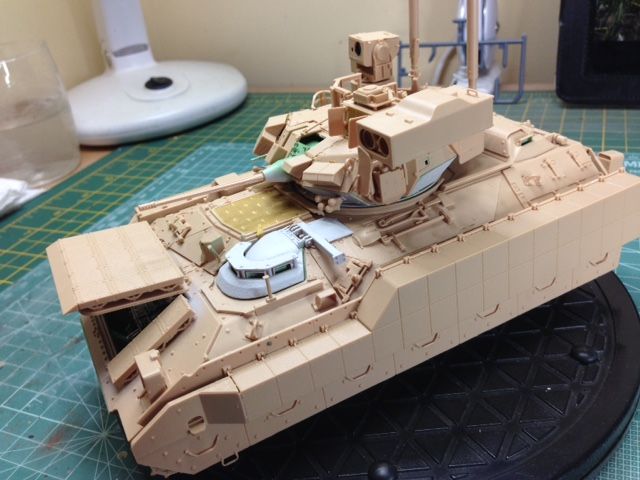
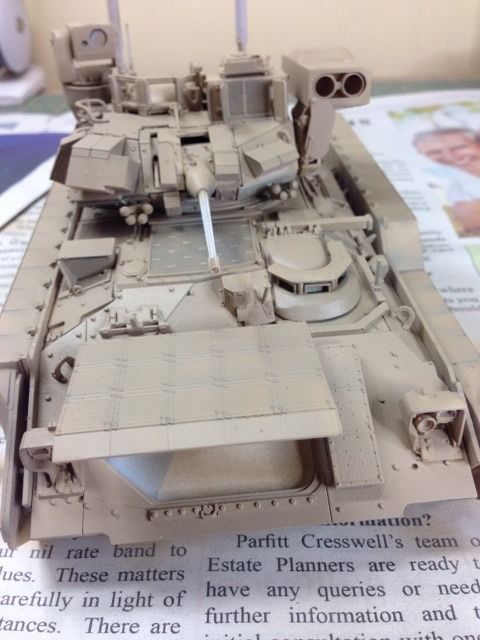
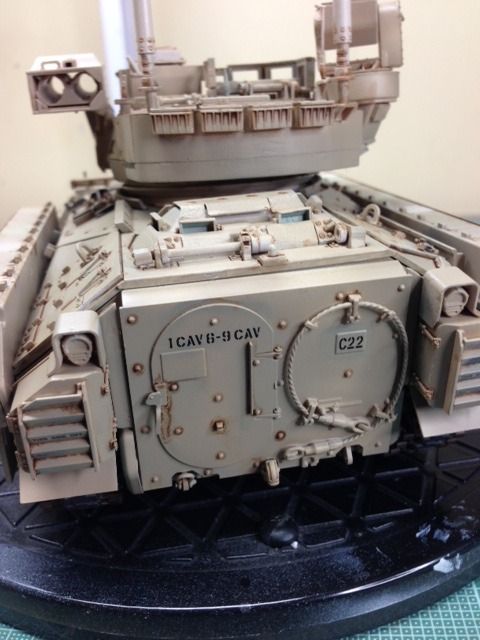
With the interior all but finished with the exception of a couple of bits and some weathering, it's time to turn my attention back to the exterior. First up is side armour plates. I've jumped ahead a little in the instructions as I wanted to see if it is possible to attach these plates just to the upper hull. My reasoning behind this is to see if the upper and lower hulls can be just dry fitted, enabling the model to be split to show the interior. It does look as though this may be possible and this side armour should hide any small gaps. My only concern is the relatively small area of contact between the plates and the upper hull. It will require a bit of dexterity and plenty of care when assembling and removing these bits - both of which I am severley lacking!!

The rear plate and door are next.
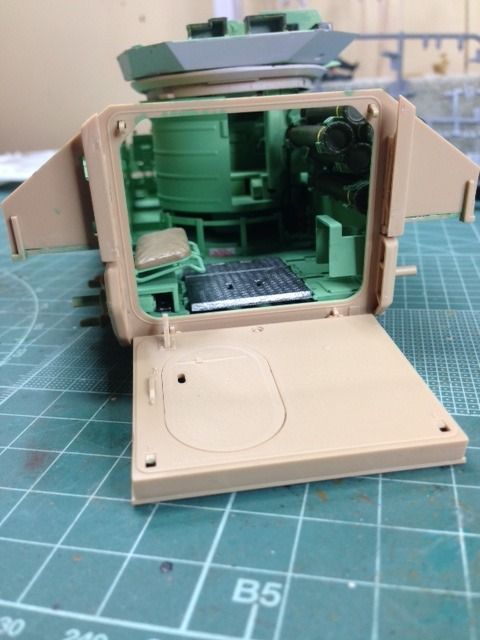
This is where my lack of dexterity and care came into play as I managed to snap both retainers that house the hinges for the rear plate. You are not required to use any cement as this part is meant to be fully moveable. A light "click" is all that is needed to locate the hinges, but unfortunately my boxing gloves of hands had other ideas and I must have pressed a little too hard.
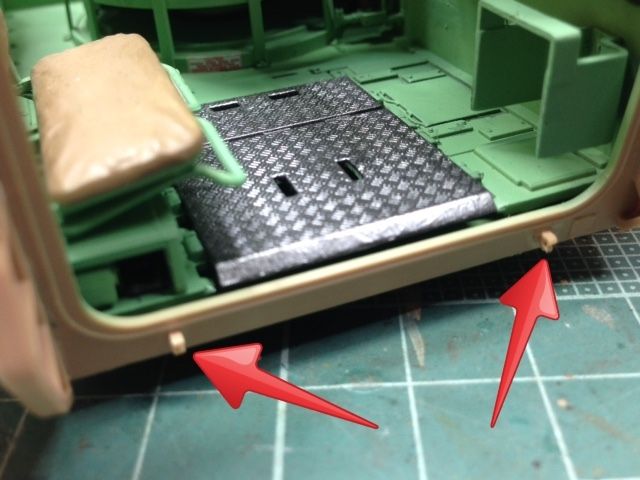
Not a major problem if you are displaying the model with the rear doors shut as you can just glue it in place. I'll have to fix it in the open position, which isn't ideal, but once it's on the dio, it's probably not going to be moved anyway.
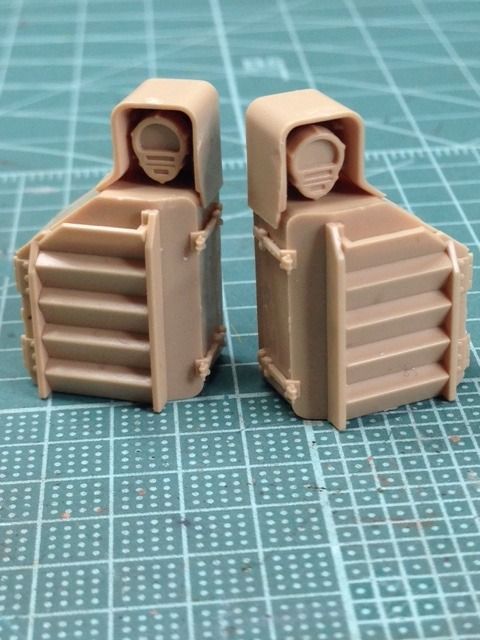
And finally the rear stowage bins and light clusters. You'll notice that I haven't added any of the clear parts yet and that's because I prefer to add them once everything is painted up, where possible. I always struggle with masking (did I mention, I have boxing gloves for hands!
), so if I can avoid it I will!
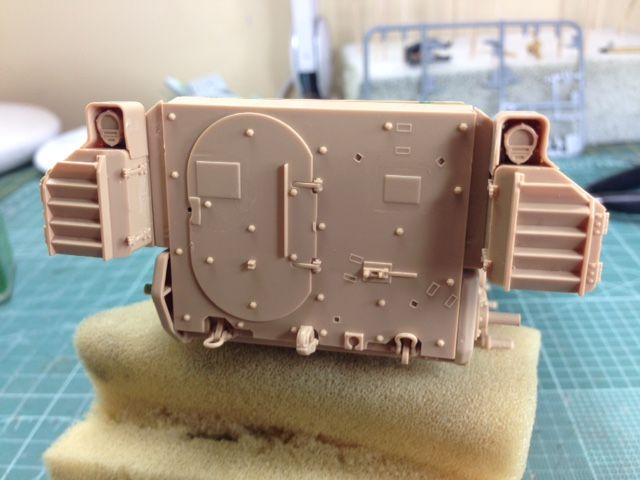
Not a huge amount left to do really, but it's all the fiddly bits like the turret details and additional armour etc. Still, I'll keep motoring on and as I mentioned, hopefully I should at least get the Bradley done in time.
Thanks for taking a look!
Re: Meng 1:35 Bradley w/BUSK III & interior
Posted: Thu Mar 19, 2015 10:15 am
by alextheblue
Update Seven
I found myself with a spare afternoon yesterday, thanks largely to a banging toothache
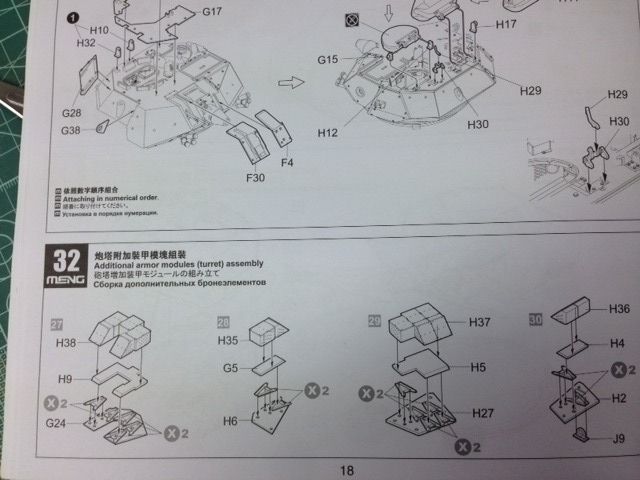
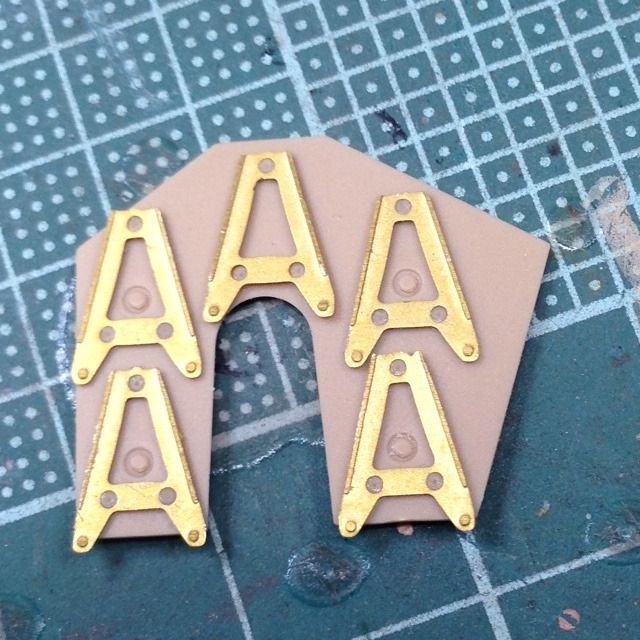
So I decided to crack on with the Bradley in an effort to zone out the pain in a Zen-like state of meditation that is scale modelling! The next step is the additional armour modules for the turret and this involves a small bit pf PE - not my favourite element of modelling, but it's gotta be done.
I should digress a little here and confess that my PE "tool-kit" isn't the greatest in the world, but it works for me.
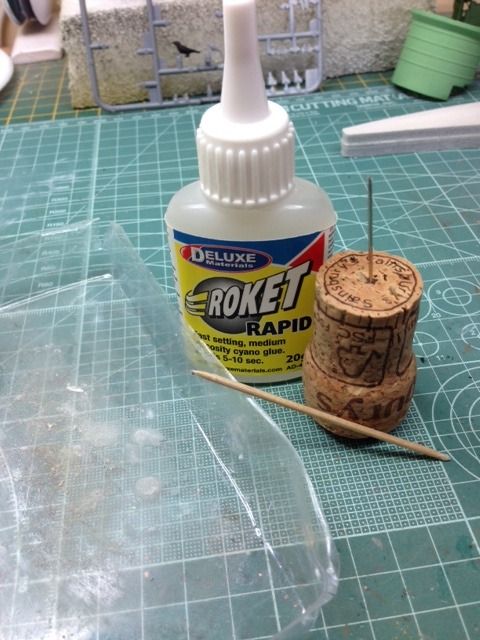
Yup, a broken needle stuffed into a cork and an old cocktail stick. The ratty looking plastic tray is for the drops of CA - no fancy ceramic tiles for me my friend, oh no! It hasn't always been this way - I do also own some more exoctic tools, usually bought on the recommendations of fellow ISMers, such as the following.........
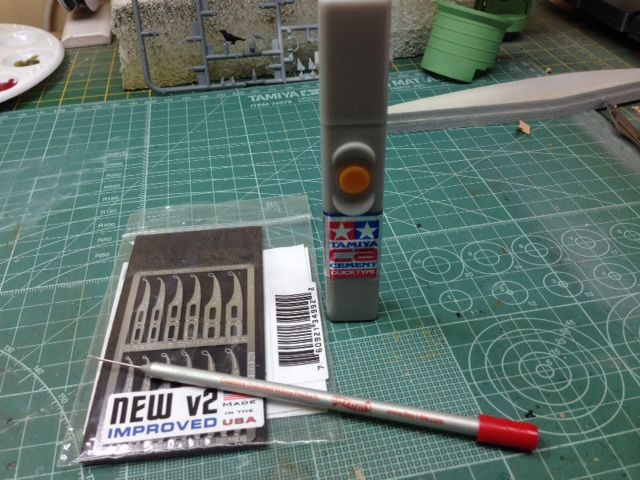
As you can see, the packet of "loopers" hasn't been opened and whilst the Flexi-file CA dropper is a fine tool, it's just a broken needle at the end of the day!!

Anyhoo, it probably explains why I'm crap at anything PE related - you know the saying, a bad workmen is a right tool - or something like that!!
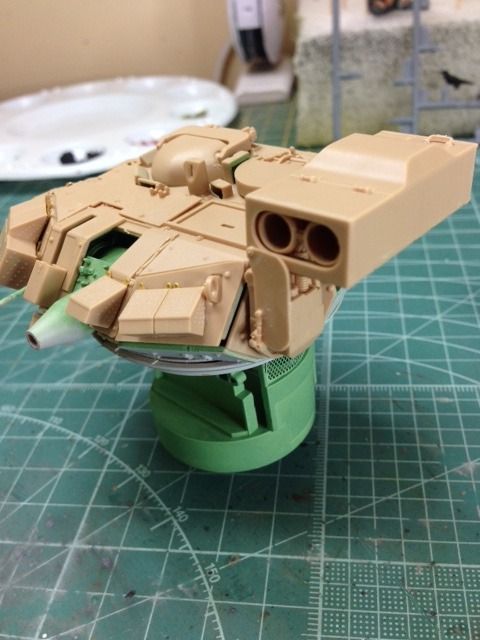
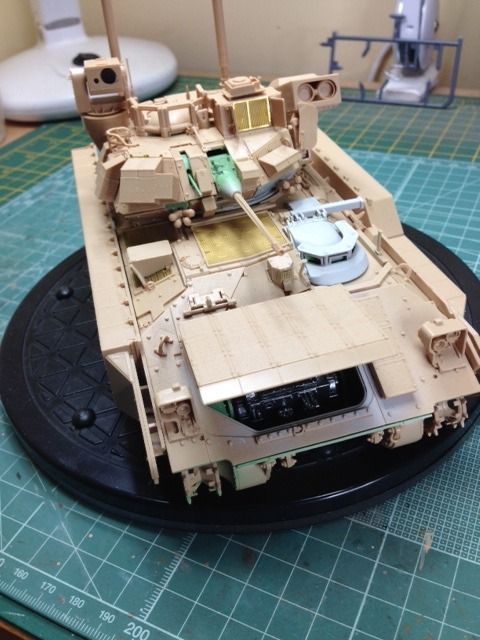
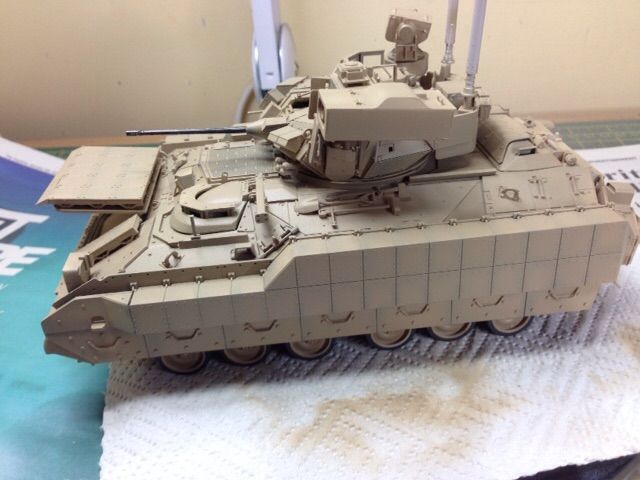
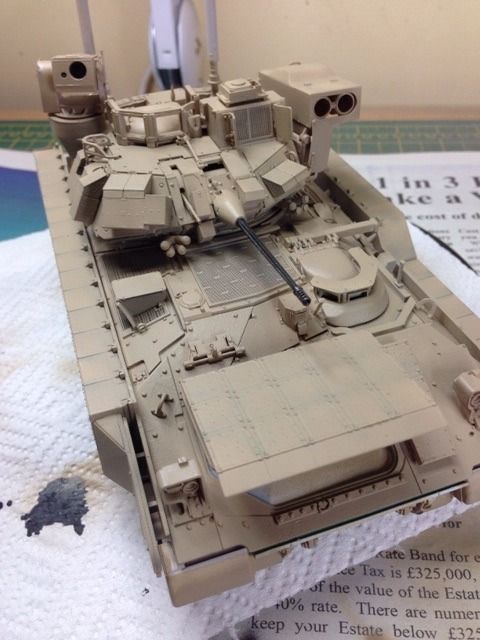
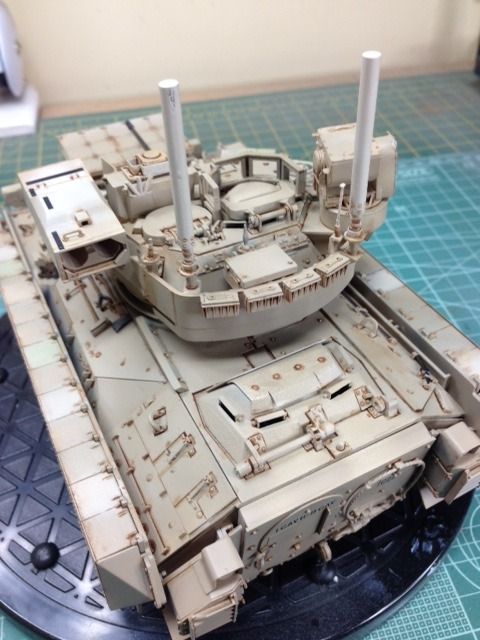
PE in place.
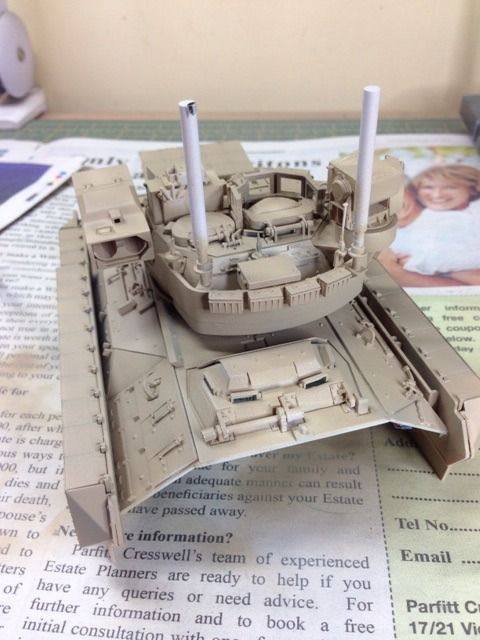
All armour finished.
Onto the hatches before attaching the armour modules.
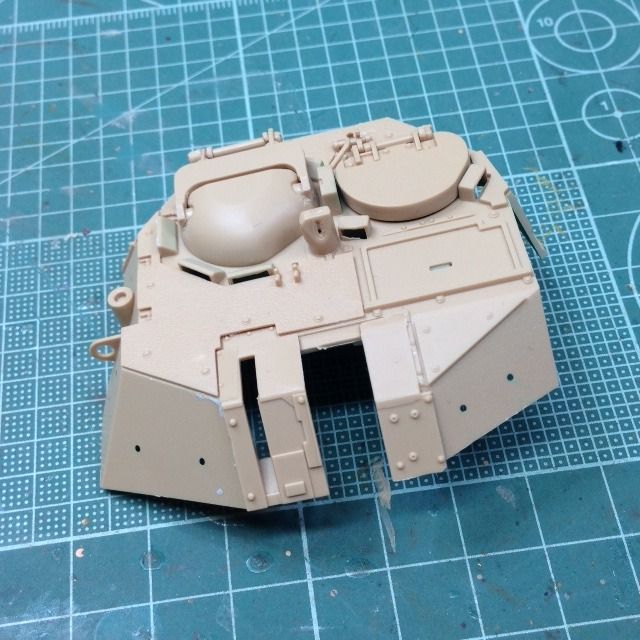
And now with the armour on.
Missile launcher and rear turret basket.
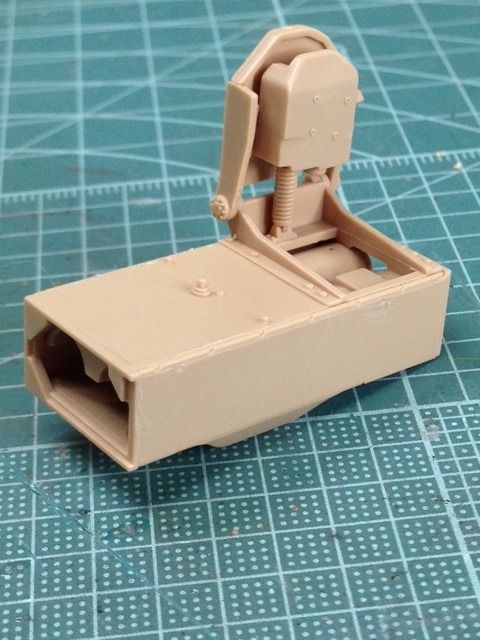
I won't fit the turret basket until the rest of the turret detailing is finished, but the missile launcher is fully movable thanks to a rubber poly cap so it can easily be removed etc.
The two halves of the turret still aren't joined, but I want to see how everything fits together at this stage.
Everything is still fitting together really nicely and there doesn't appear to be any problems anywhere.

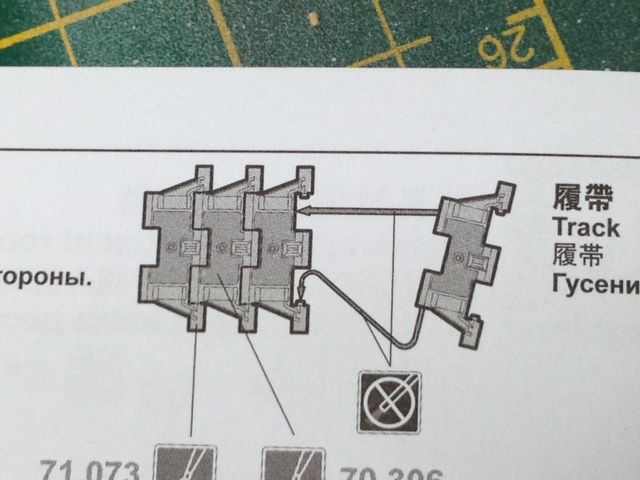
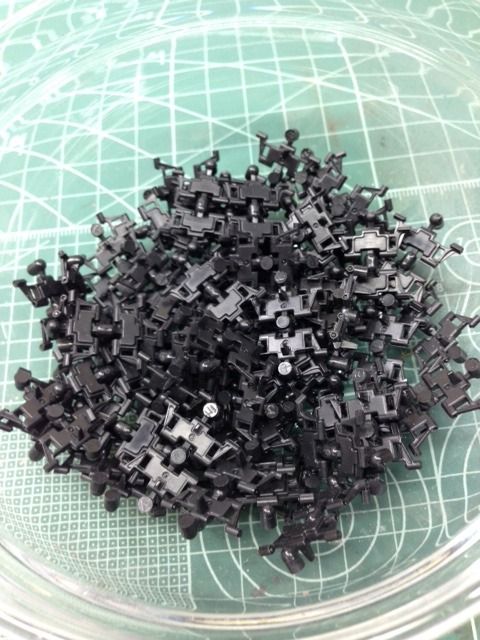
Whilst the quality of the work may be nothing to shout out about, I was very pleased with the sheer volume of it - got loads done. I've really only got a couple of bits to put together and thats the build pretty much done. I've taken a look at the tracks and whilst there's a little bit of cleaning up to do, they are "snap fit" and they seem very easy to put together. Anyways, thats for the next up-date.
Thanks as always for taking a look!
Re: Meng 1:35 Bradley w/BUSK III & interior
Posted: Thu Mar 19, 2015 11:47 am
by Lego
Nice work.
Re: Meng 1:35 Bradley w/BUSK III & interior
Posted: Thu Mar 26, 2015 9:55 am
by alextheblue
Cheers Lego!
Update Eight
Well, with the Tiger finished, I can concentrate on this one now, but I've resigned myself to the fact that the complete dio won't get done. I just don't have enough time to finish the Bradley, get the figures painted up and construct the base as well. Hell, just finishing the Bradley in time is going to be a stretch, but I'll give it my best go. If I'm going down, I'm going down swinging........by that, I mean fighting, not going to one of those parties where you all put you car keys in a bowl. I tried that once and came home with a Skoda!!
I have managed to find time to squeeze in some work on this one whilst I was waiting for other bits to dry/cure etc and the construction is all complete.
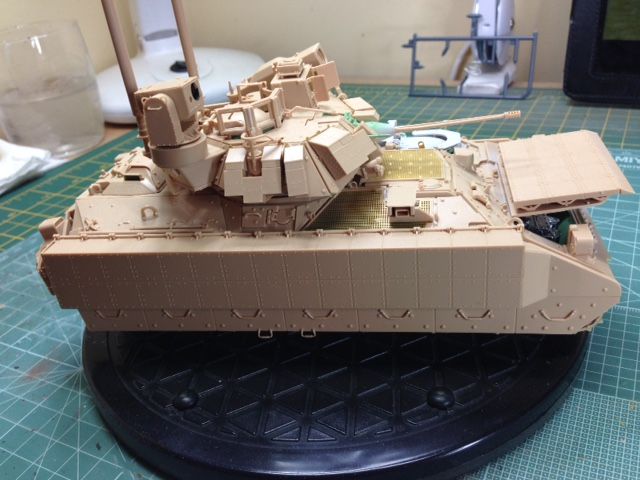
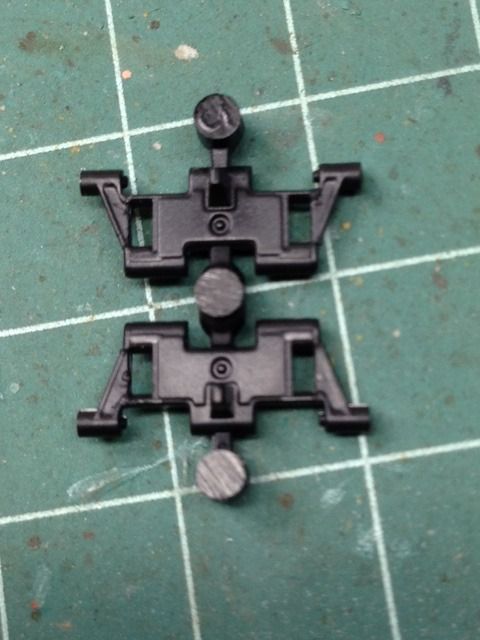
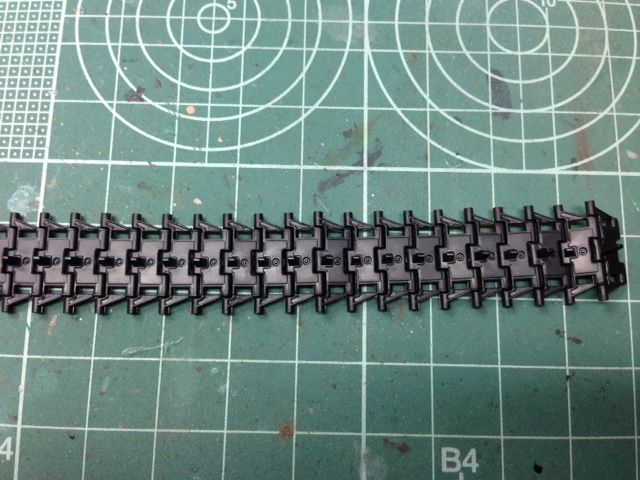
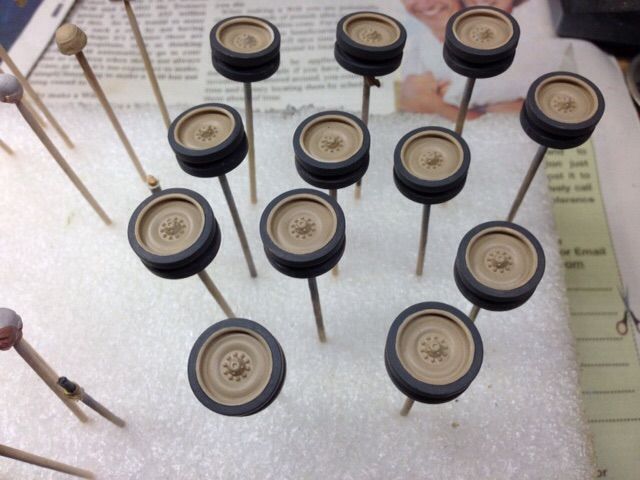
I was quite keen to rush ahead and get some primer down straight away, but that sensible voice in my head screamed at me to leave it all to cure properly and for once I listened. So, I might as well get on with the tracks and these could be a major deciding factor on whether I'll finish on time or not. As I mentioned previously, they look fairly straightforward, with a little bit of clean-up and then they snap fit together. My biggest concern was with the "snap" part of snap-fit as the locating lugs are only tiny and I was worried that they would either sheer right off, or would stretch slightly meaning that the tracks would keep popping apart. I needn't have worried, as the tracks are made of quite hard plastic and so far, touch wood, I've had no breakages and everything is holding up nicely.
In an hour I managed to get the whole of one track done and half of the other (the instructions recommends 80 links per set) and thats about enough for me in one go. After a quick prod here and there I decide that I can wait no longer, so I decide to break-out the airbrush and get spraying!! I didn't bother with any pics as it was just priming with Vallejo grey surface primer and then once this was dry I sprayed in pre-shading with Vallejo's black primer. After a break for a couple of hours in order to get some grub in the cake-hole, I decided I had enough time to get the wheels painted up.
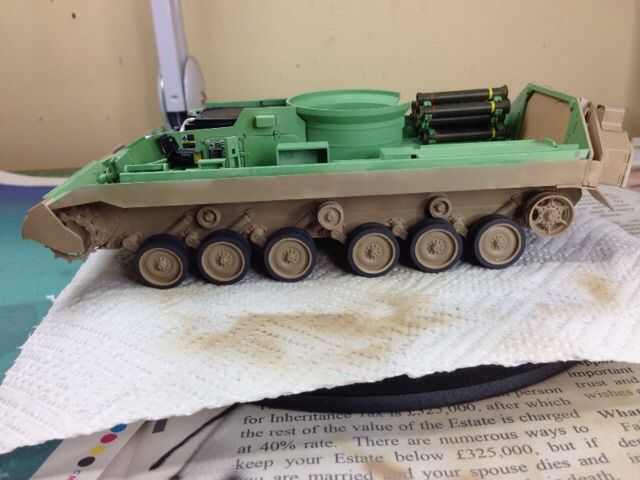
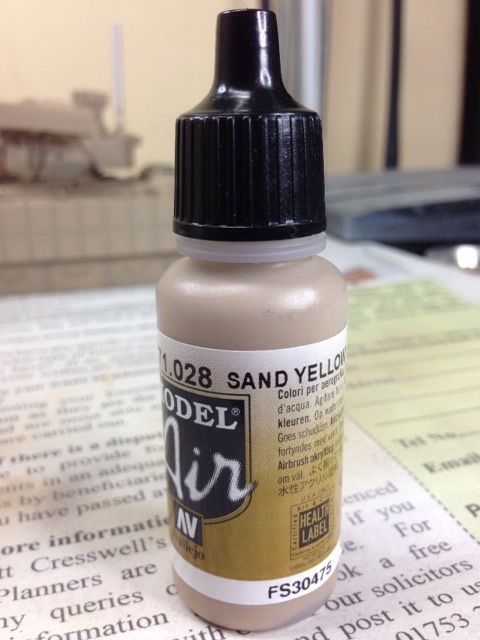
Meng colour call-out recommends Vallejo Model Air's sandy brown and after a trial spray on the wheels, it looks pretty good to me, so I decide to go with this. I've always quite liked VMA, but I have found that it can be easily over-thinned and this can lead to problems with tip drying etc. If possible I always try and use it neat from the bottle, but always go with the old tried and tested "skimmed milk" test. If it tastes nice in a cup of tea, then it must be okay - or something like that!!
It does vary from colour to colour, but this one looks like it should be okay neat, so after a couple of test runs on a sheet of kitchen roll (paper towel for all the non-Brits), I managed to get the first base coat down.

Exhausted, I slump back on my stool like Bob Cratchit on Christmas Eve and its at this point that I decide that I should really call it day. I need to let this base coat dry and asses whether more of the pre-shading will need covering, as it's quite hard to tell when the paint is still wet. At the moment it kinda looks ok-ish, but I daren't push it as these types of colour tend to lighten as they dry.
Still got a lot to do and with only a few days to get it all done it, I'm probably fighting a losing battle - but you've got to give it a go, right!
Thanks for taking a look!
Re: Meng 1:35 Bradley w/BUSK III & interior
Posted: Thu Mar 26, 2015 9:59 am
by Tiger131
Stunning looking bud and a real nice build thread will be keeping up with your work on this
Re: Meng 1:35 Bradley w/BUSK III & interior
Posted: Thu Mar 26, 2015 11:41 am
by countzero99uk
This looks really good, starting to wish id picked this up rather than the terminator. Nice to know im not the only one with hands that only do half of what i tell them


Keep it up
Re: Meng 1:35 Bradley w/BUSK III & interior
Posted: Thu Mar 26, 2015 12:19 pm
by schweinhund227
Nice work.... the interior is a added bonus...
MENG did their homework on that one for sure...
Keep up the good work.
Re: Meng 1:35 Bradley w/BUSK III & interior
Posted: Fri Mar 27, 2015 8:49 pm
by JediBoer
Looking awesome!
Re: Meng 1:35 Bradley w/BUSK III & interior
Posted: Mon Mar 30, 2015 9:38 am
by alextheblue
Tiger131 wrote:Stunning looking bud and a real nice build thread will be keeping up with your work on this
Thanks Tiger, although I think I might struggle to get it finished.
countzero99uk wrote:This looks really good, starting to wish id picked this up rather than the terminator. Nice to know im not the only one with hands that only do half of what i tell them
Keep it up
Thanks CZ! I blame my useless hands on getting older, but if the truth be known, I've always been a clumsy bugga!
schweinhund227 wrote:Nice work.... the interior is a added bonus...
MENG did their homework on that one for sure...
Keep up the good work.
Thanks Norm, it's a great kit and no mistake!
Now, if I could only weather it half as good as your War Pig piece!
JediBoer wrote:Looking awesome!
Thanks JB, appreciate the comment!
Re: Meng 1:35 Bradley w/BUSK III & interior
Posted: Mon Mar 30, 2015 9:51 am
by alextheblue
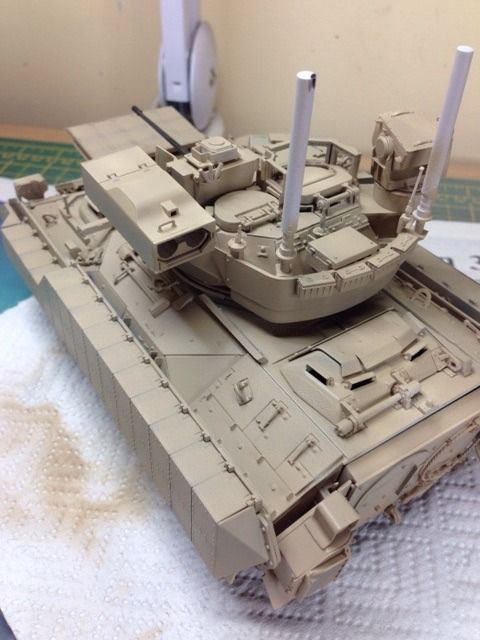
Update Nine
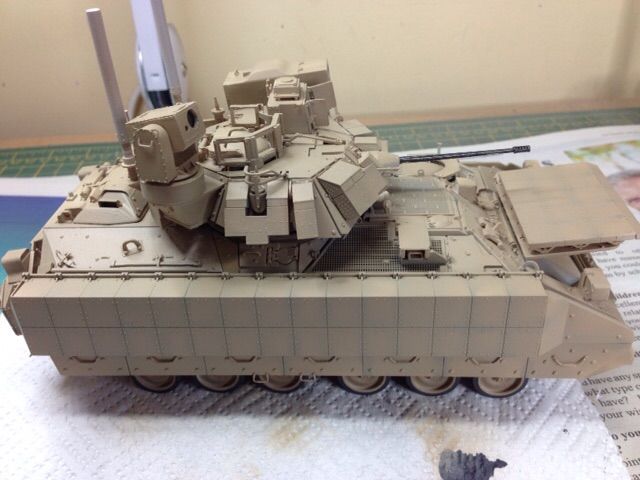
I managed to put quite a bit of time into this over the weekend, but alas, I fear I am facing the inevitable and that is that I just won't have enough time to finish it. I painted in all the highlights and also airbrushed in some miss-matched coloured panels. I'm not sure that this is entirely accurate, but I just wanted to break up the large expanse of side armour and try to add some more "interest". Next I picked out a lot of the panel/bolt features with oils, using a sort of a slightly thicker version of a pin-wash. I tackled all the side-armour first and then whilst this was drying I chucked on the decals.
I've been concentrating on the exterior, with the plan of getting this finished so I could at least take some reveal pics. I could cut some corners and miss out a couple of the weathering processes, but I had a very specific "look" in mind. As I fully intend on finishing the complete dio, I'm not happy on cutting corners, so I'll take a view tomorrow evening and if I'm happy that it looks "finished" enough then I'll pop up some reveal pics.
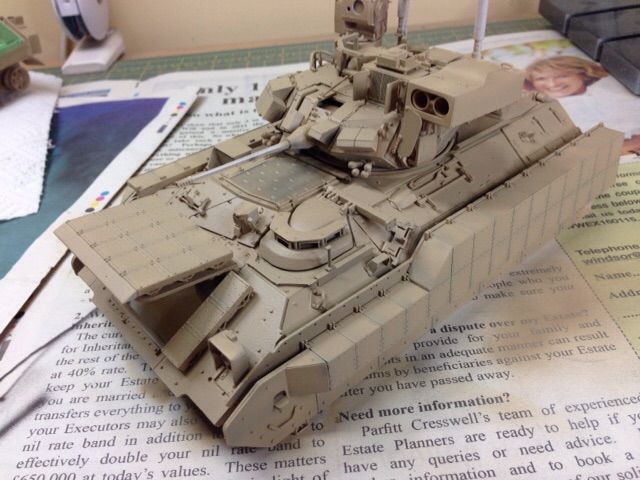
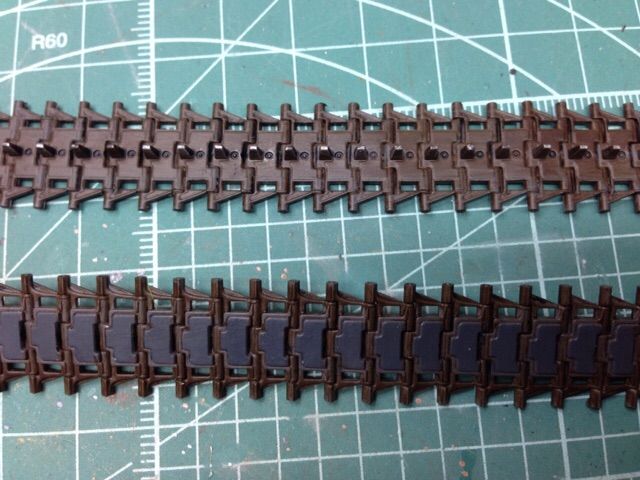
Here it is as it stands currently, firstly the finished tracks, pre-weathering.......
And the Bradley......
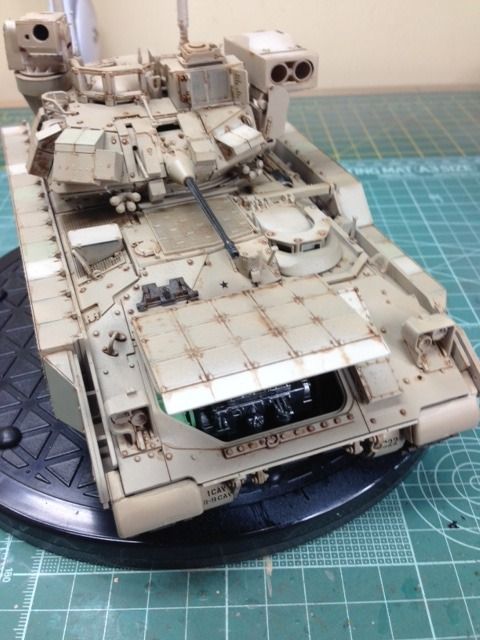
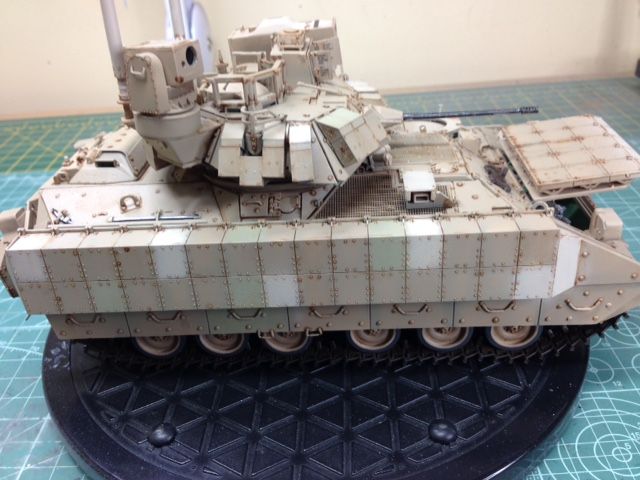
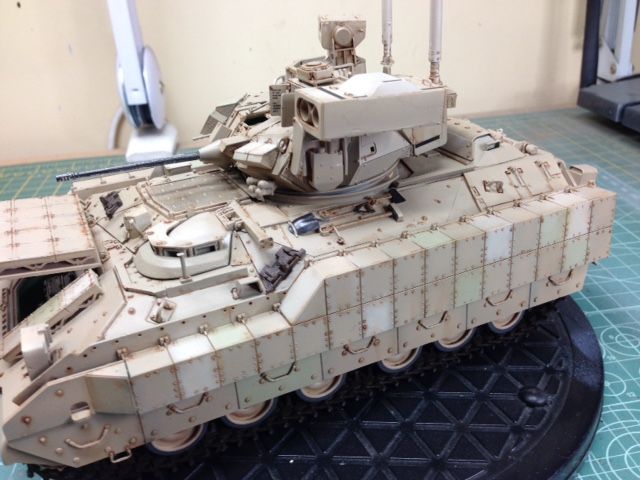
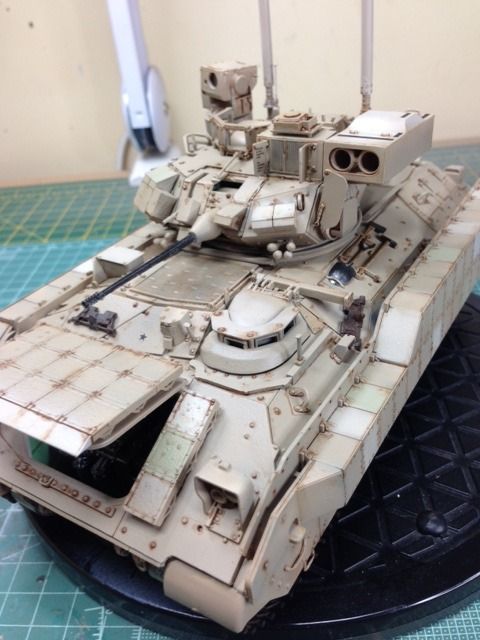
It really is only a job of painting up the clear parts and attaching them and then finishing up the weathering, but as we all know, it's those 5 minute jobs that end up taking hours!
Thanks for taking a look!
Re: Meng 1:35 Bradley w/BUSK III & interior
Posted: Mon Mar 30, 2015 11:14 am
by schweinhund227
When it comes to weathering! Just remember!
Less is more!
The paint job is amazing.... Keep up the good work!
Re: Meng 1:35 Bradley w/BUSK III & interior
Posted: Thu Apr 02, 2015 1:45 pm
by alextheblue
schweinhund227 wrote:When it comes to weathering! Just remember!
Less is more!
The paint job is amazing.... Keep up the good work!
Thanks Norm and you're absolutely right!
This is where I always struggle, as I'm a bit of fan of the heavily weathered look - you can get away with it on some WW2 vehicles, but not so much with the modern stuff. And as I've missed the deadline now, I have plenty of time to make sure I get it right.


