Page 1 of 2
1/48 Tamiya Mitsubishi G4M1 Betty
Posted: Wed Jan 22, 2014 8:59 pm
by wally
Hello Everyone
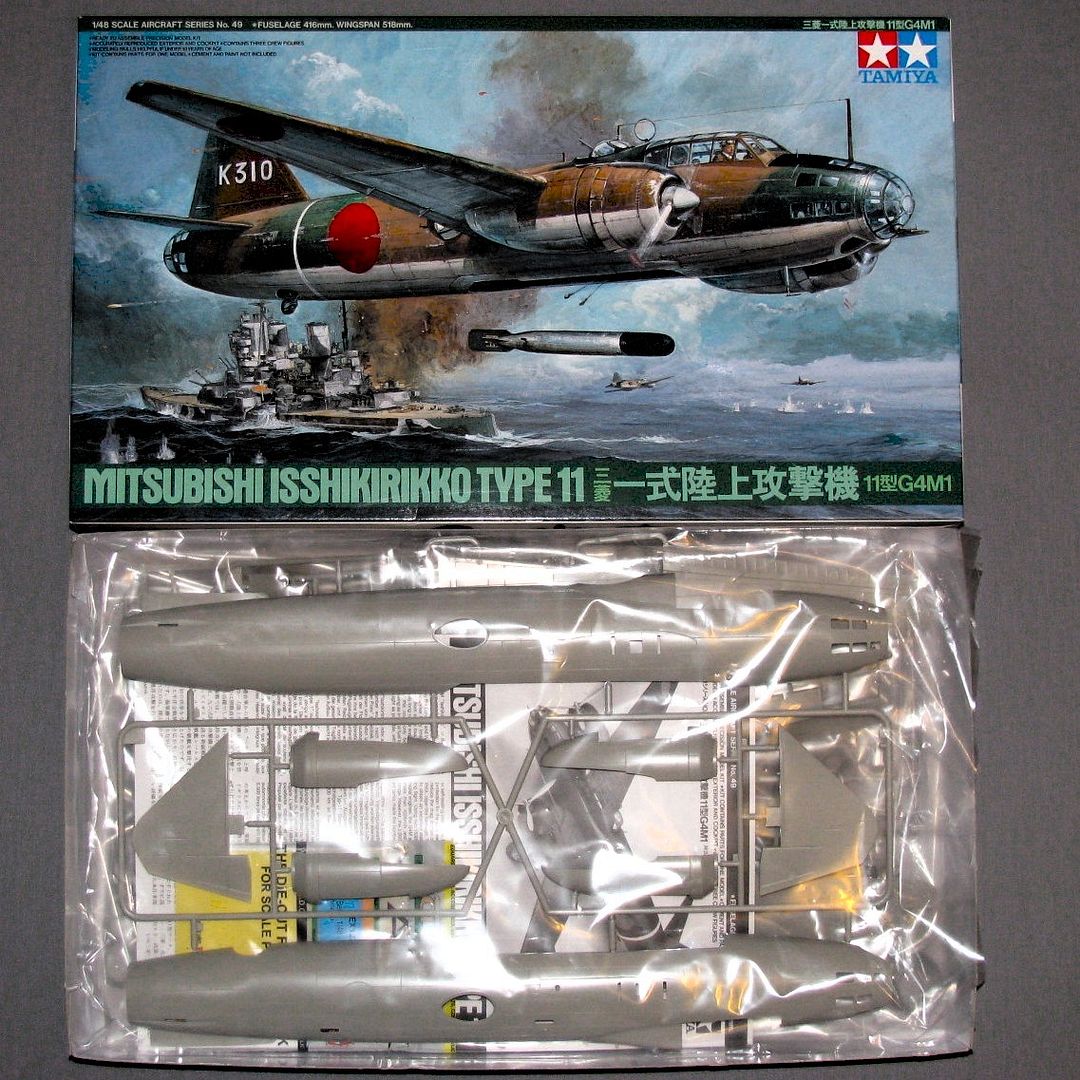
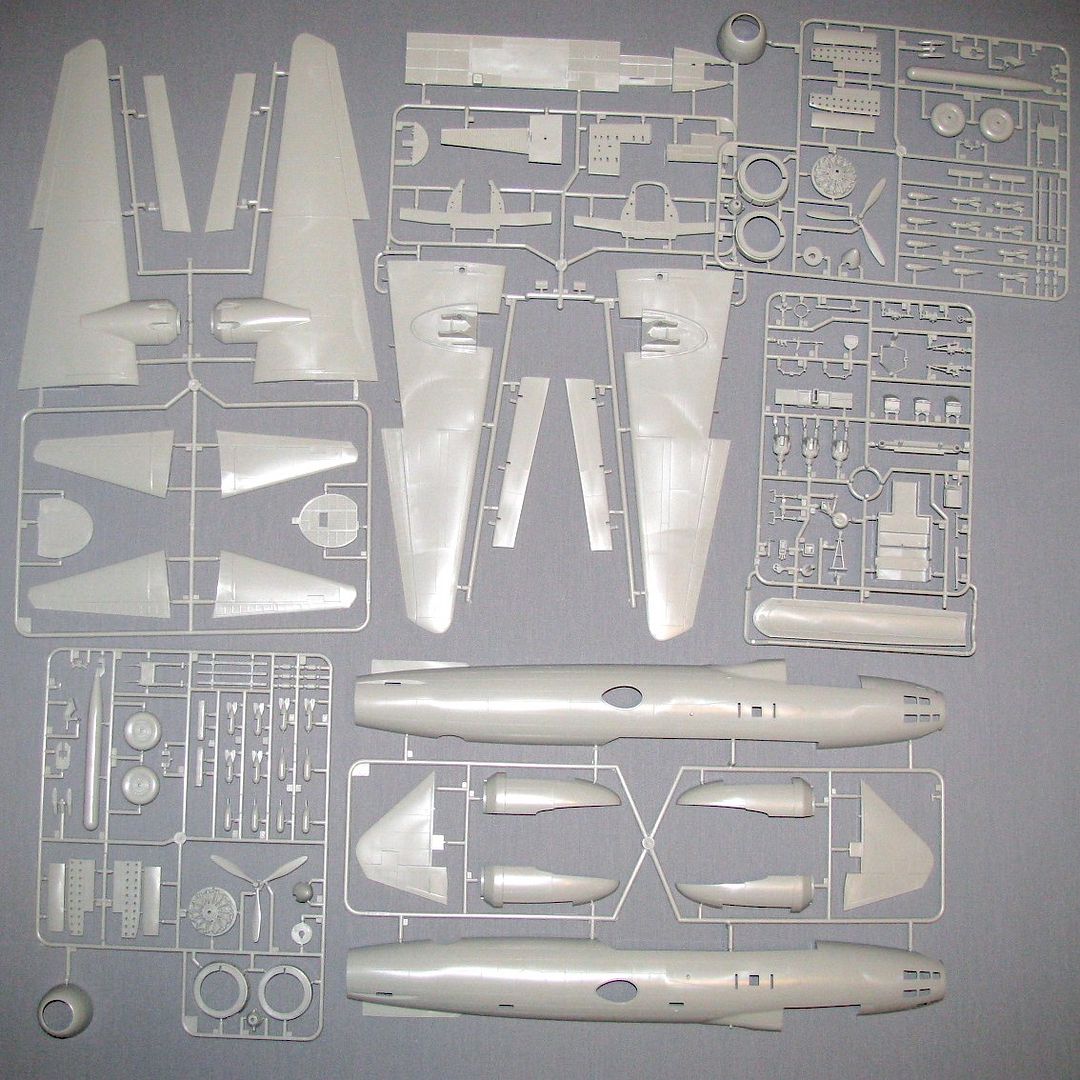
I would like to join to this group build with G4M1 torpedo bomber from Tamiya in 1/48. This will be my first entry to the build in this ISM forum and If I completed the model the largest kit in my collection. I measured the dimensions of the wing span and fuselage length and it will tie fit to my display self.
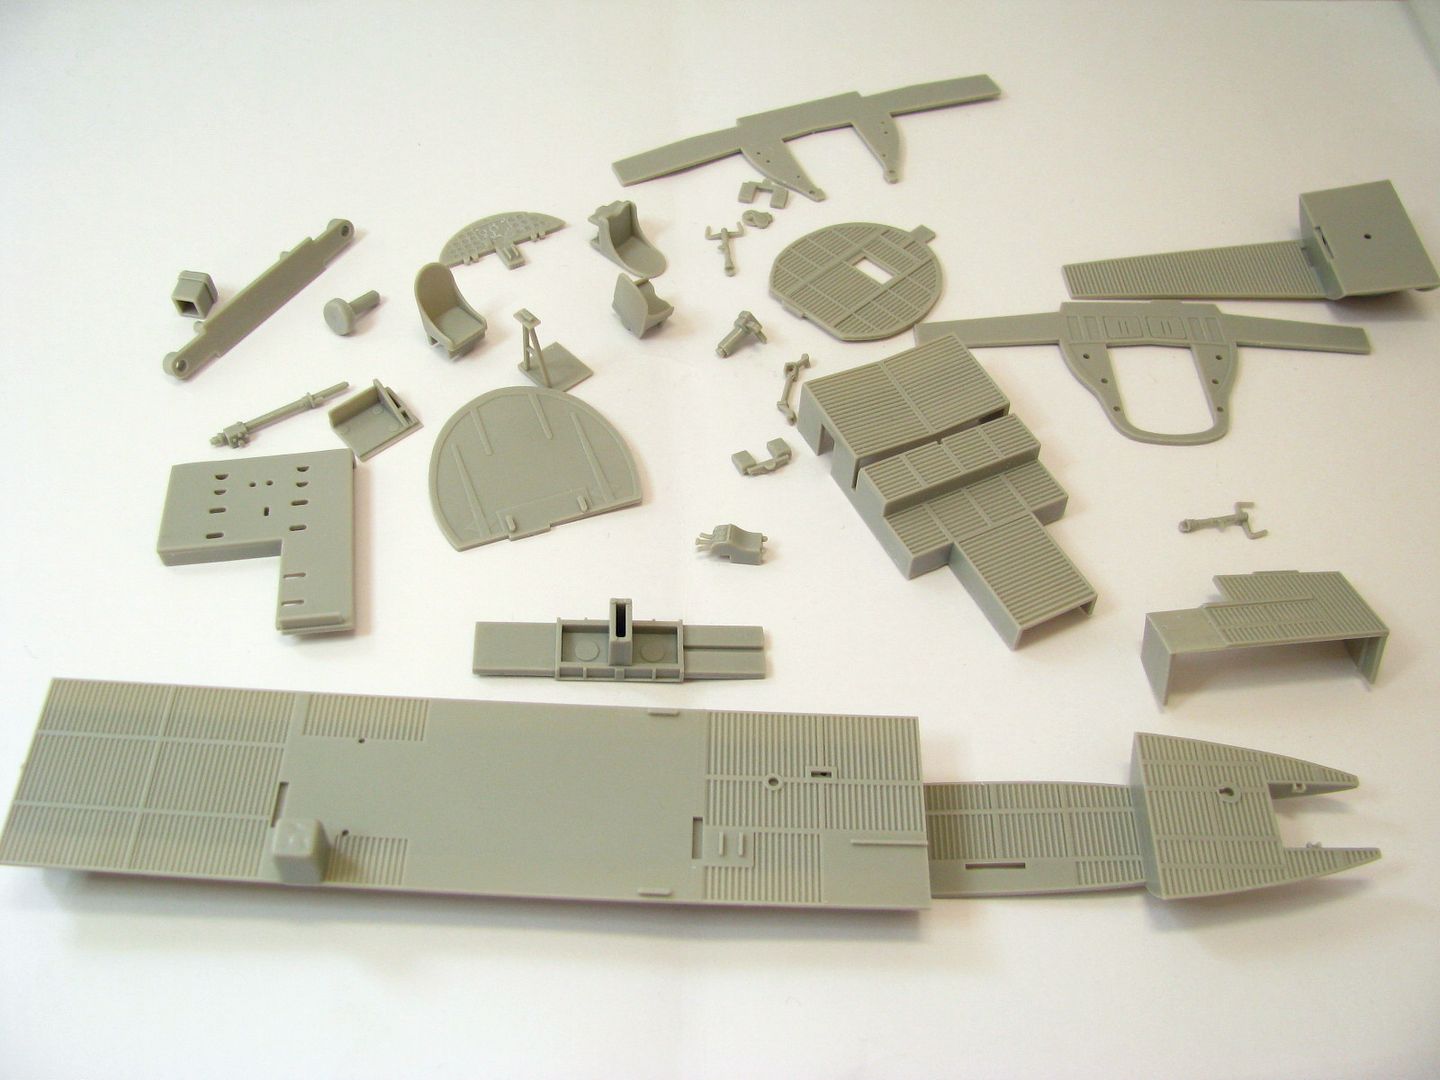
For this build I will be using PE parts for the cockpit from Eduard and also canopy masks from the same company.
Here are some sprue shots of the kit itself:
I will start working on this kit after returning from the business trip aprox. two weeks from now.

Cheers
Re: 1/48 Tamiya Mitsubishi G4M1 Betty
Posted: Wed Jan 22, 2014 9:06 pm
by ModelingMatt
Looks awesome Wally, can't wait to see it underway.

Re: 1/48 Tamiya Mitsubishi G4M1 Betty
Posted: Wed Jan 22, 2014 10:25 pm
by 5Craven
Nice choice of subject.
Somthing a bit different from everything else in the GB so far. Looking forward to what you do with it.
Re: 1/48 Tamiya Mitsubishi G4M1 Betty
Posted: Wed Jan 22, 2014 10:57 pm
by Radzy
Wow... Betty . I love that box art from Tamiya with
HMS Prince of Wales.
Good luck Wally, can't wait to see her turn into masterpiece in your hands

Cheers,
Radek
Re: 1/48 Tamiya Mitsubishi G4M1 Betty
Posted: Wed Jan 22, 2014 11:57 pm
by Tamiyasnob
Nice choice of subject, be fun doing all the weathering and paint chipping. Good luck with it.
Re: 1/48 Tamiya Mitsubishi G4M1 Betty
Posted: Thu Jan 23, 2014 11:19 pm
by generalgrog
Very nice Wally!!
GG
Re: 1/48 Tamiya Mitsubishi G4M1 Betty
Posted: Fri Jan 24, 2014 4:24 am
by timmyw
This looks really interesting.
I don't know much about Japanese equipment in general during WWII so I guess I am going to be doing even more reading tonight hehe.
The aircraft looks brilliant so it will be nice to see it all done up and painted.
Re: 1/48 Tamiya Mitsubishi G4M1 Betty
Posted: Fri Jan 24, 2014 6:07 pm
by mademodeller
here some thing may help you Mr Color 126 cockpit green ww11 for Mitsubish. hope it helps
Re: 1/48 Tamiya Mitsubishi G4M1 Betty
Posted: Sat Jan 25, 2014 7:44 pm
by wally
Thanks for advice. I have color that match pretty close to japanse interior color this is Tamiya XF-71 Cockpit green. I have plan to used it with Gunze meltalic blue color in some places.
Cheers
Re: 1/48 Tamiya Mitsubishi G4M1 Betty
Posted: Sun Jan 26, 2014 12:45 am
by ludicrusmaximus
The seldom modelled flying cigar! That's a great choice; look forward to see the end result
Re: 1/48 Tamiya Mitsubishi G4M1 Betty
Posted: Sun Jan 26, 2014 2:24 am
by Mike00
Nice choice, I will be watching this build.
Re: 1/48 Tamiya Mitsubishi G4M1 Betty
Posted: Sun Jan 26, 2014 10:18 am
by T3hGuppy
nice to see the Japanese being represented.
Great stuff
Re: 1/48 Tamiya Mitsubishi G4M1 Betty
Posted: Sun Jan 26, 2014 5:33 pm
by wally
Thanks Guys for such really warm welcome. I'm also looking forward to start working on this kit, but right now I'm abroad far from home so it will be starting after my return approx 8th February. Stay tunned
Cheers
Re: 1/48 Tamiya Mitsubishi G4M1 Betty
Posted: Sun Jan 26, 2014 5:40 pm
by Jamesday1998
looks like a great kit! good choice
Re: 1/48 Tamiya Mitsubishi G4M1 Betty
Posted: Sun Jan 26, 2014 6:40 pm
by MakingModelsAgain
Hmmm...very envious of your plastic.
Re: 1/48 Tamiya Mitsubishi G4M1 Betty
Posted: Sat Feb 01, 2014 7:36 pm
by wally
Hello Dear Modellers
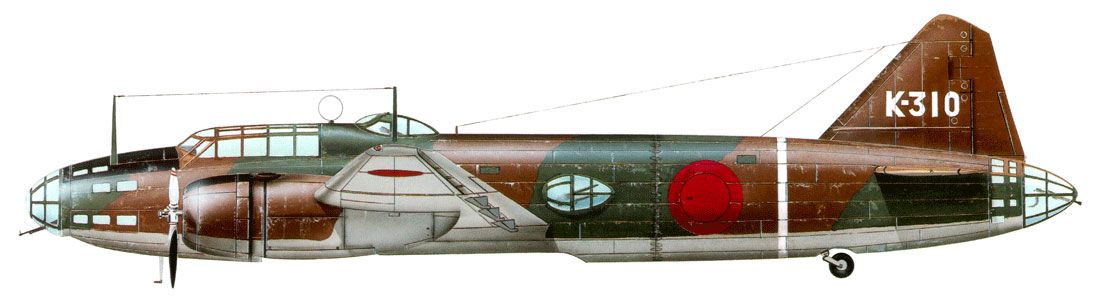
Having some time to prepare to actual build I decide to build the plane with the marking of Kanoya Naval Fighter Group flown by Lt. Haruki Iki from December 1941.
According this source: Unit: 3rd chutai, Kanyo kokutai. Crew CO: CO of Kanoya kokutai Tai-i (Lt.) Haruki Iki (he was buntaicho). He piloted this aircraft during attack on battleships British HMS Prince of Wales and HMS Repulse. This aircraft was got from the 1st chutai. Note: lack of doors of the bombs bay.
The color scheme of the aircraft look like this:
Here are some information about the attack:
In September 1941, Kanoya Ku deploy half of its forces in Indo-China (27 aircrafts) to deal with the arrival in Singapore of the HMS Repulse and Prince of Wales. December 10, at dawn, 26 G4M1 "Betty" armed with torpedos take-off of Saigon, followed by 57 G3M "Nell" armed with bombs to intercept and run the British convoy "Forces Z", made up of battleship HMS Prince of Wales and the cruiser of battle HMS Repulse, accompanied by four destroyers.
Whereas the G3M occupy of the destroyers, towards 13h30, 17 Betty of 1st and 2e chutai attacks Prince of Wales, while the 3e chutai of Tai-i Iki attacks Repulse. A first wave of six Rikko puts four blows at the goal on Prince of Wales, the others being turned over on Repulse which is touched first once. Six planes of the 3e chutai approach by starboard while Tai-i Iki flying K-301 leads two aircrafts to port side, his plane and its wingmen are touched and dives in flame so close to the battleship that the others pilot think that they struck it. The attack will be conclusive since Repulse touched fifth once by three dart on port side will sink in 11 minutes, followed at 14h50 by the Prince of Wales.
And also decide about the strategy of the building itself. Beacuse the kit itself is very large (largest in my collection so far) I decide to do fuselage and wings separate and then put them together.
So the construction will be divided into couple of subassemblies.
First part will be fuselage itself, 2nd will be construction of the wings and engine cowlings. 3rd will be painting fuselage and wings and then finnaly 4th part will be putting everything together and do weathering.
Next weekend I should be able to start working on this kit, so stay tunned.
Cheers
Re: 1/48 Tamiya Mitsubishi G4M1 Betty
Posted: Tue Feb 04, 2014 11:40 am
by T3hGuppy
Some really interesting information their dude.
Re: 1/48 Tamiya Mitsubishi G4M1 Betty
Posted: Thu Feb 06, 2014 12:39 am
by conradschmid99
Great info.
looking forward to the build

Re: 1/48 Tamiya Mitsubishi G4M1 Betty
Posted: Sun Feb 09, 2014 7:24 pm
by wally
Hello Folks
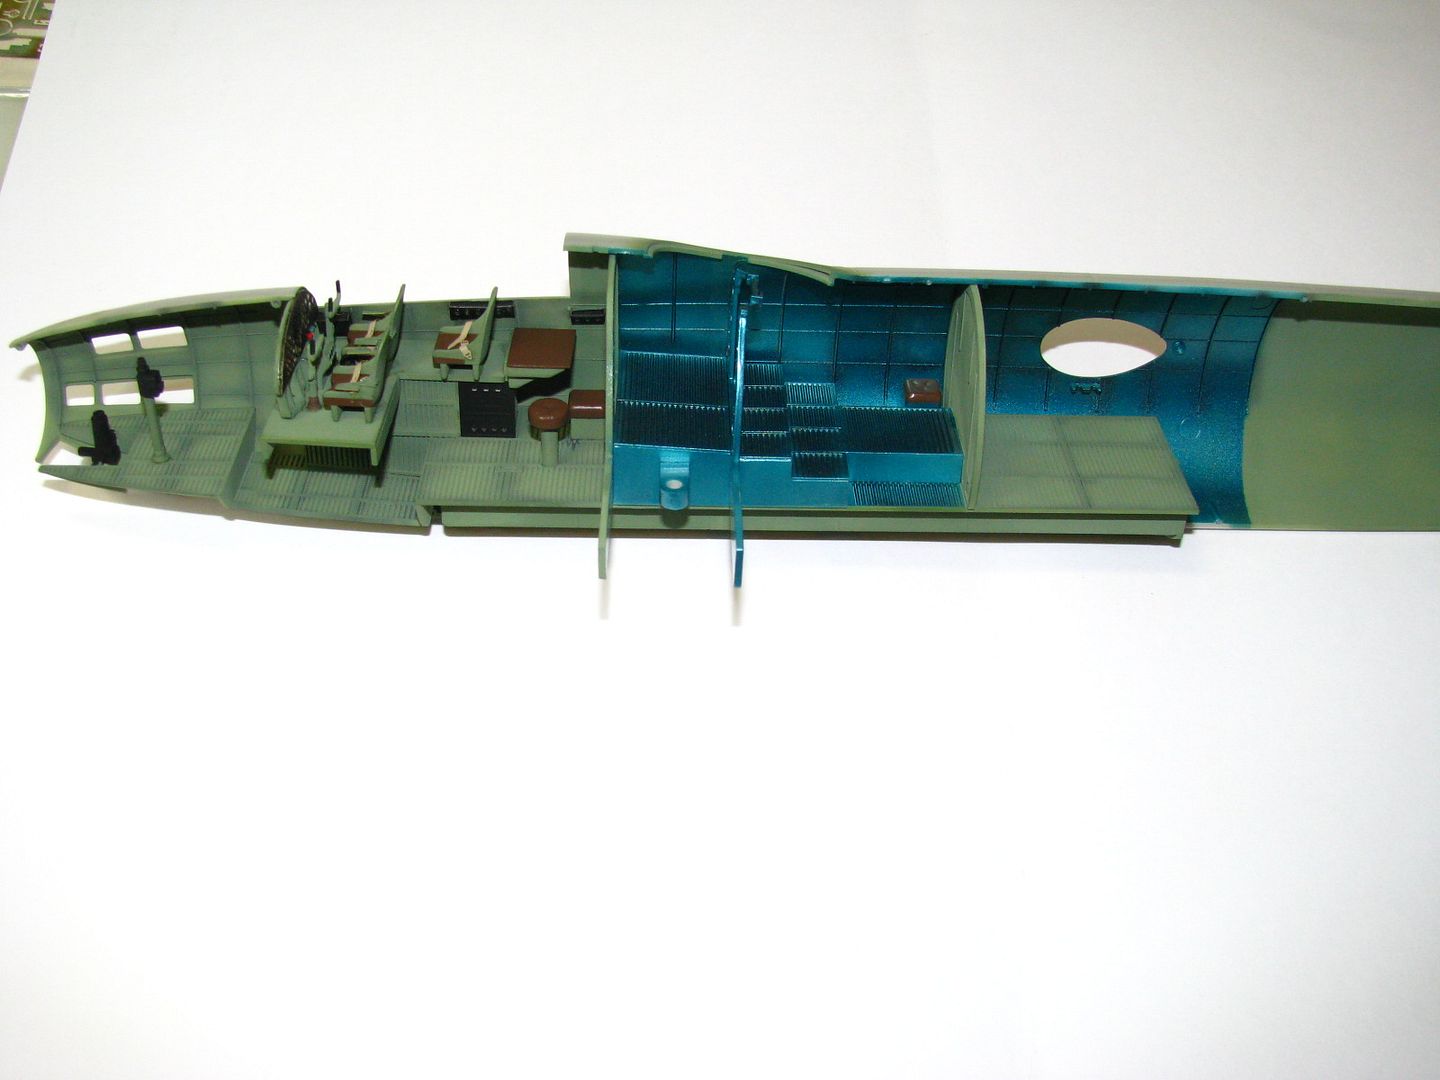
Part 1a - Cockpit
I finally returned from my trip and start working right away on my G4M1 Betty. Yesterday I have time only to cut from the sprue's all the parts for the cockpit. I have to clean some of them and sand the ejection pin marks in the fuselage that will be visible after cockpit will be finished.
Today I have more time to work on my bomber. I start painting the cockpit. First of all I pre-shading the fuselage cockpit interior structure using XF-1 flat black to add some grime and depth to the interior.
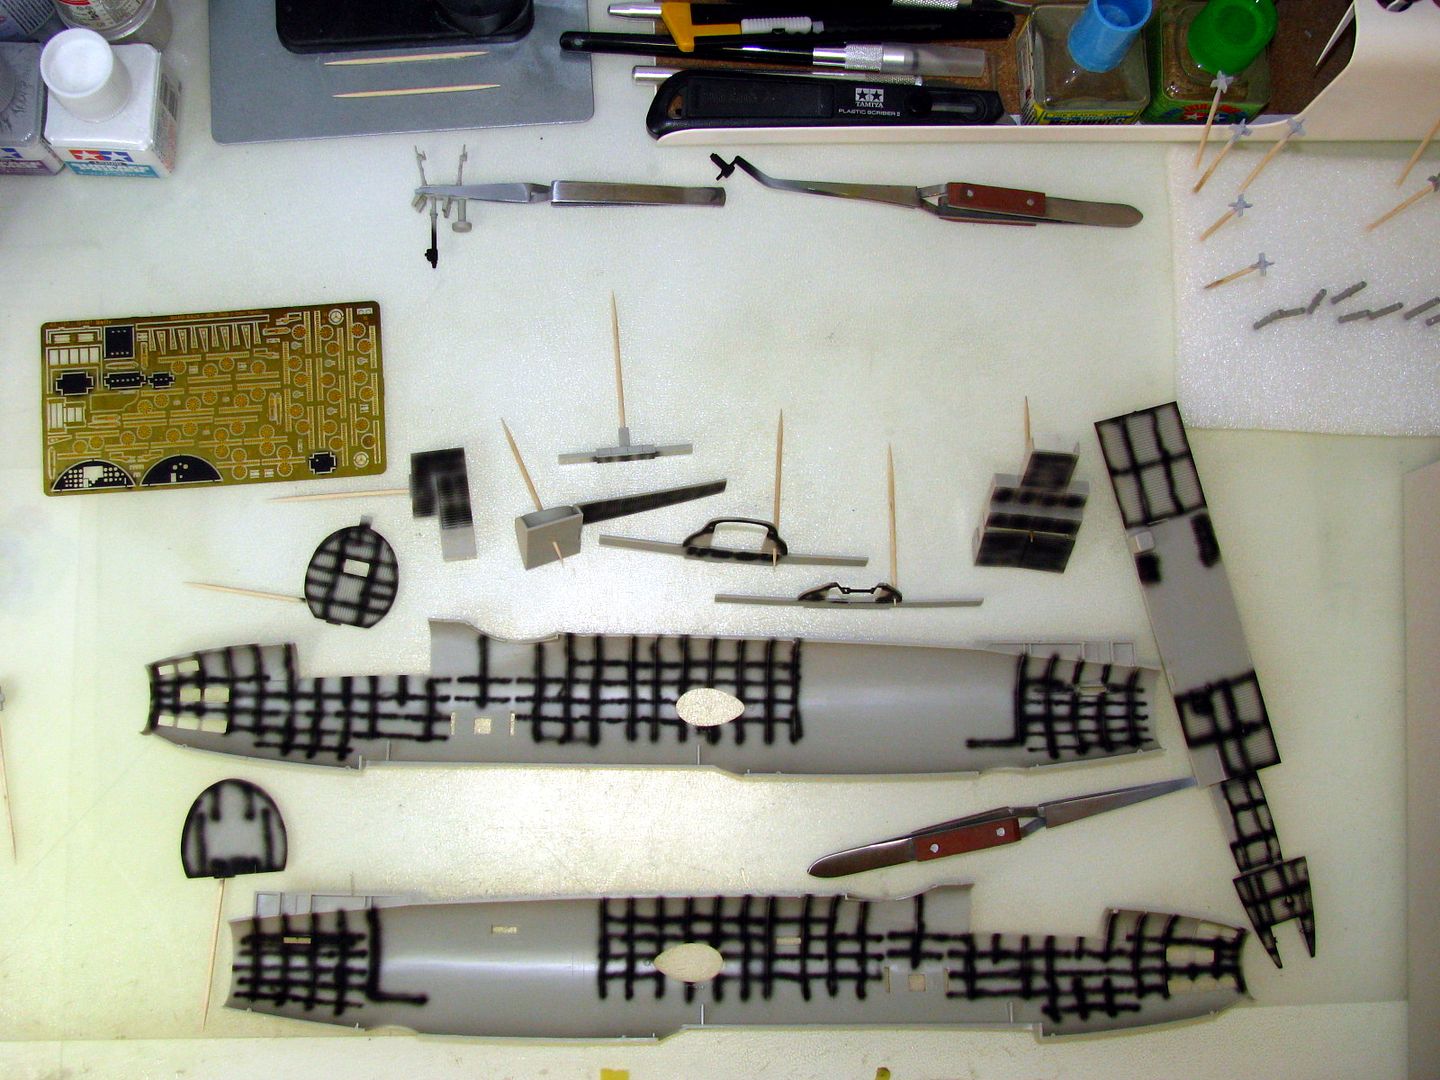
After that I start painting the cockpit using XF-71 Interior Green and Gunze Metalic Blue color. Tamiya instruction suggested to use XF-22 RLM Grey but I
think this is I think not correct. I do some search in my References books and in the Internet and I choose the Interior green as main cockpit color. I also paint middle part of the cockpit using Metallic blue color. Here are some pictures of my progress so far:

I think the pre-shading looks very nice this is first phase of the weathering.
And that's it for now tomorrow I will brush paint some small bits and add some PE parts for the instrument panel and then dry-brushed all parts in the cocpkit. Finally I have plan to add some weathering using oil wash.
Re: 1/48 Tamiya Mitsubishi G4M1 Betty
Posted: Sun Feb 09, 2014 9:04 pm
by generalgrog
looking really nice, can't wait to see your PE go on that model!
GG
Re: 1/48 Tamiya Mitsubishi G4M1 Betty
Posted: Sun Feb 09, 2014 10:42 pm
by Paul
Off to a great start, interesting subject too

Re: 1/48 Tamiya Mitsubishi G4M1 Betty
Posted: Mon Feb 10, 2014 12:23 am
by conradschmid99
yay it's started

Re: 1/48 Tamiya Mitsubishi G4M1 Betty
Posted: Tue Feb 11, 2014 5:08 pm
by rip1978
nice one. ill be watching this build
Re: 1/48 Tamiya Mitsubishi G4M1 Betty
Posted: Tue Feb 11, 2014 8:25 pm
by patrickroos
Yes yes me likey!
Very nice job on the painting there dude!

Jap warbirds have some crazy but Beautiful colors.
Re: 1/48 Tamiya Mitsubishi G4M1 Betty
Posted: Wed Feb 12, 2014 9:32 pm
by wally
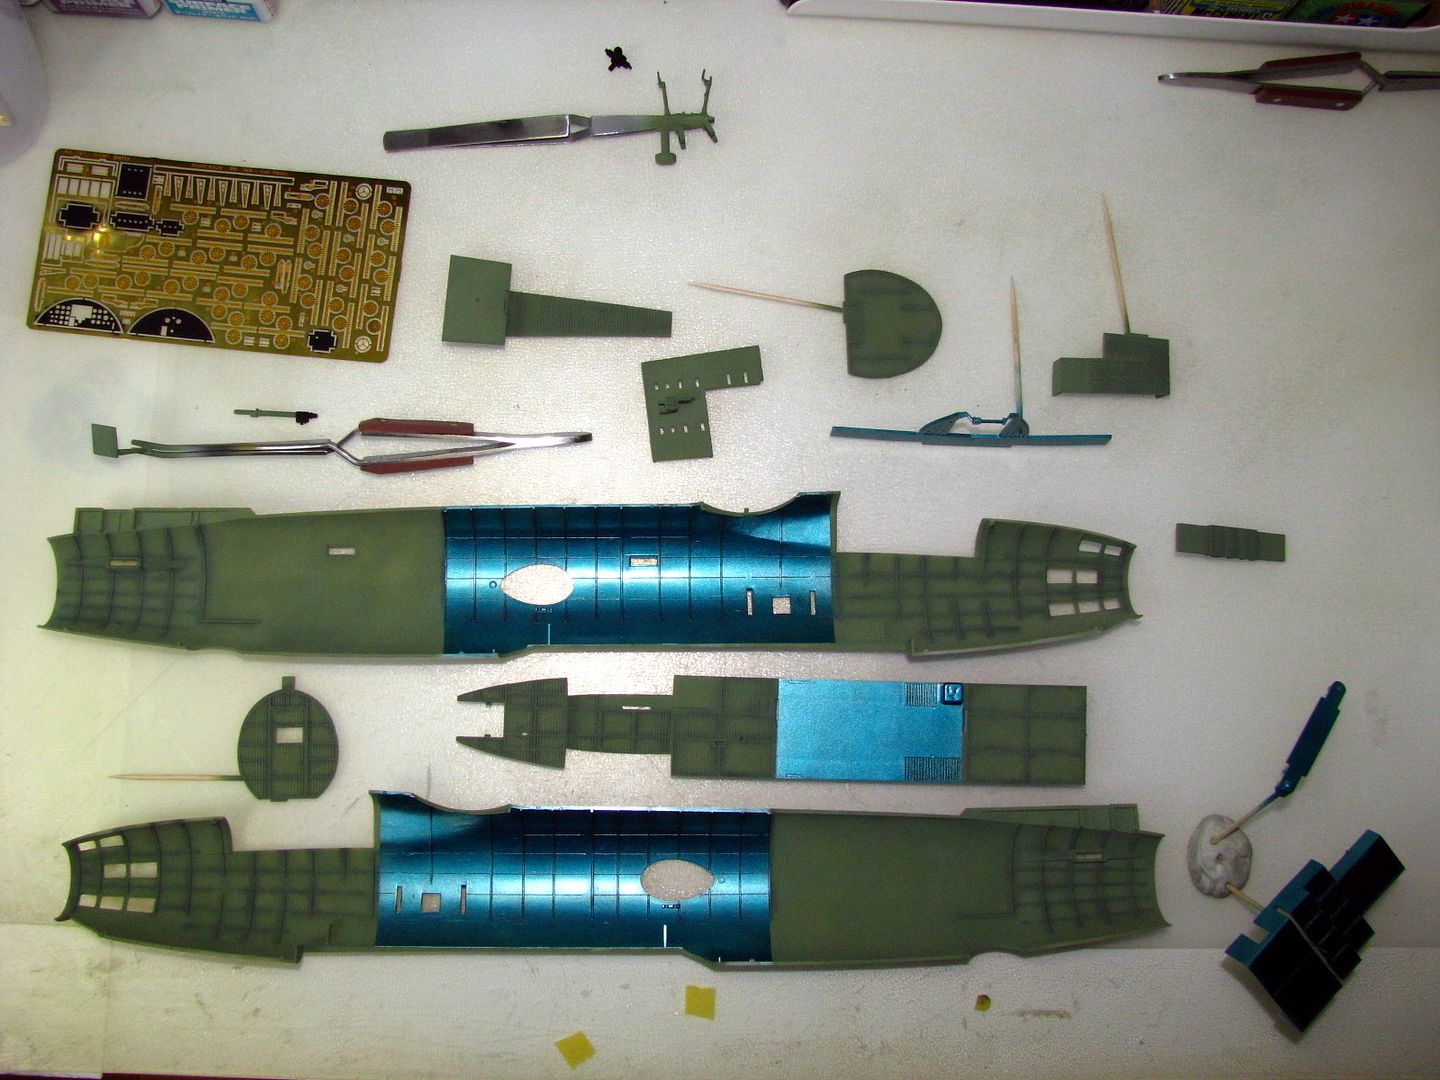
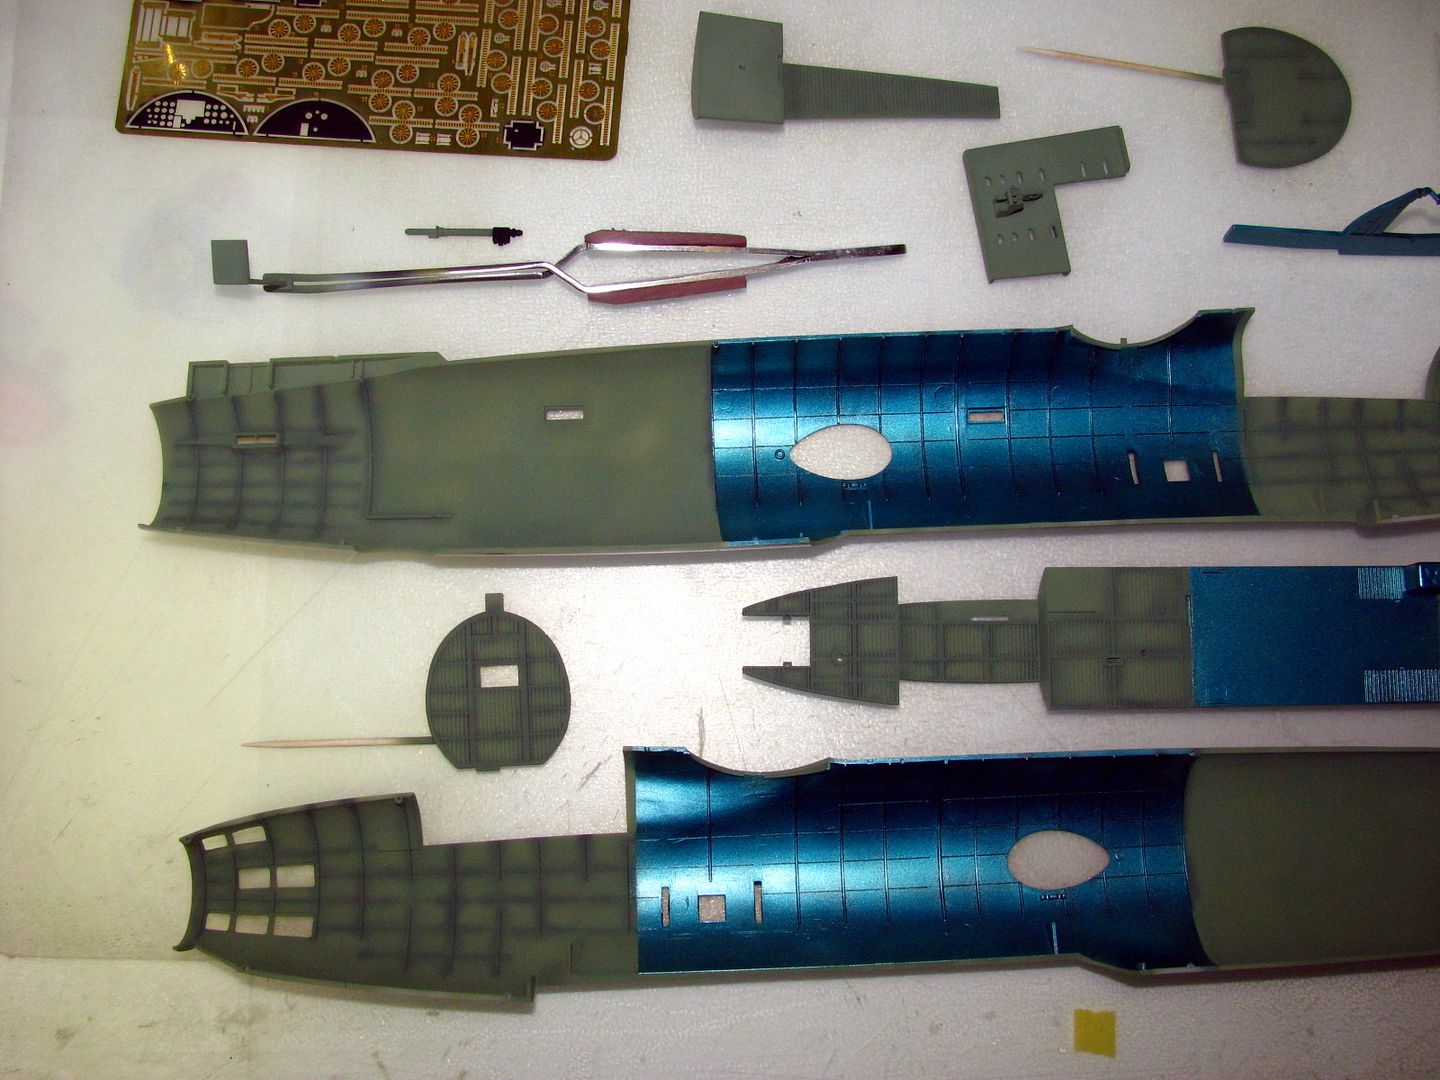
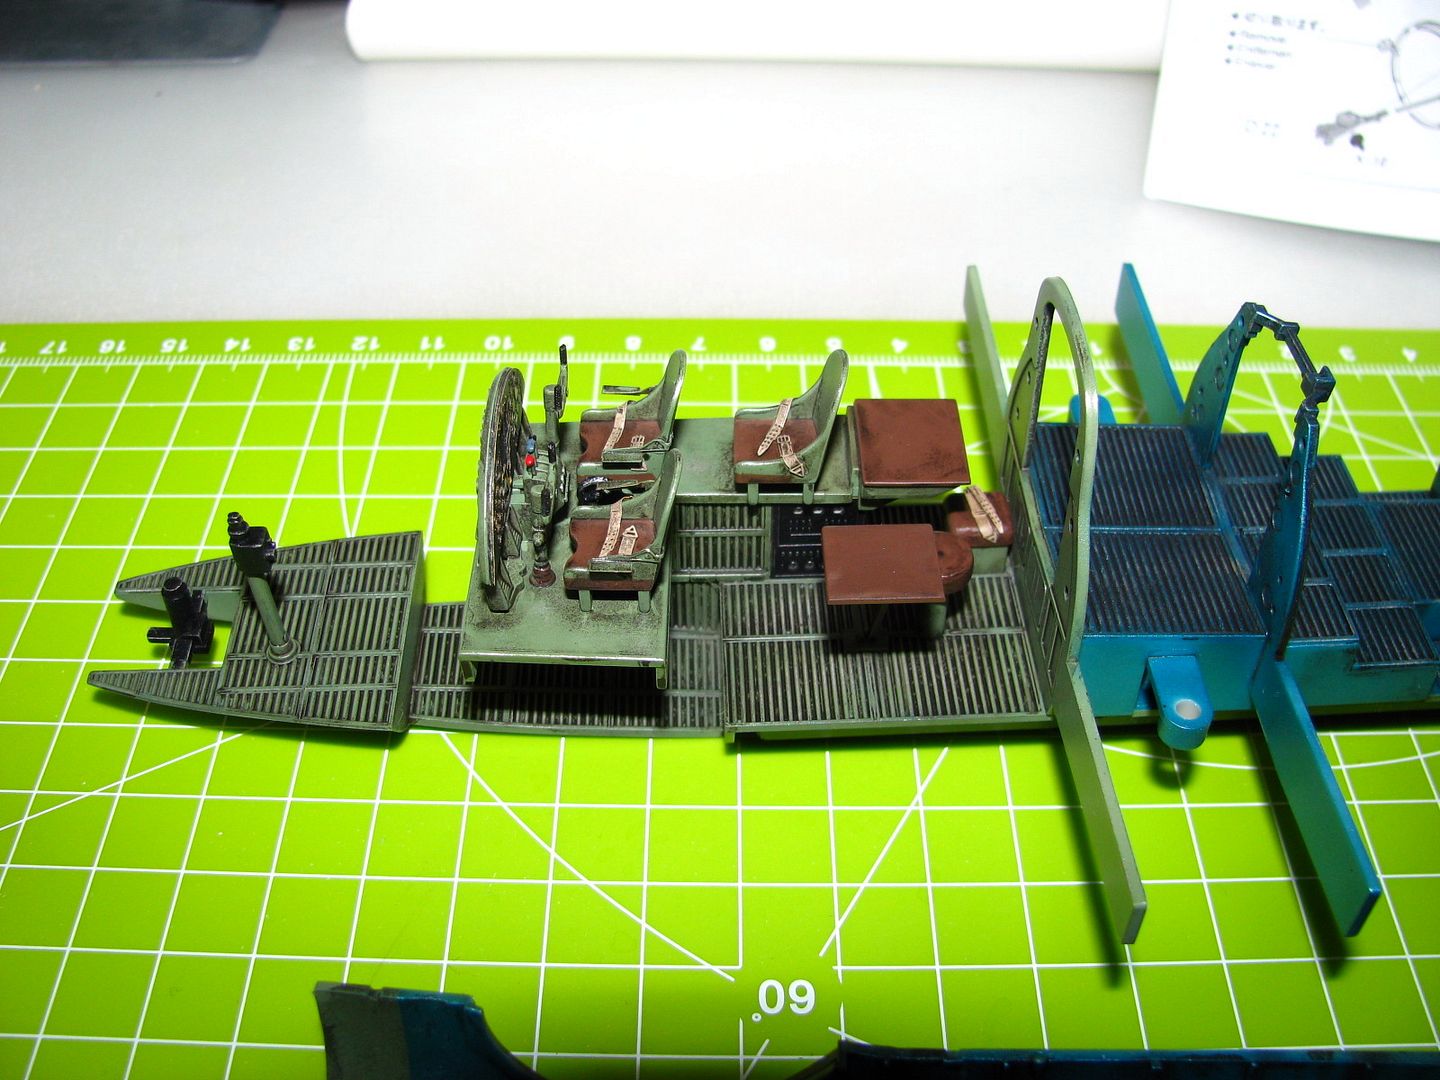
Part1b - Cockpit
Hello Folks
Thanks for such warm welcome of my build. Today I would like you to present my progress so far for the cockpit. I add PE seat belts and instrument panel as well as some radio console. Glue all parts together and this is ti.

I also dry fit the fuselage half's together to see how it fit. Perfect fit so far:)
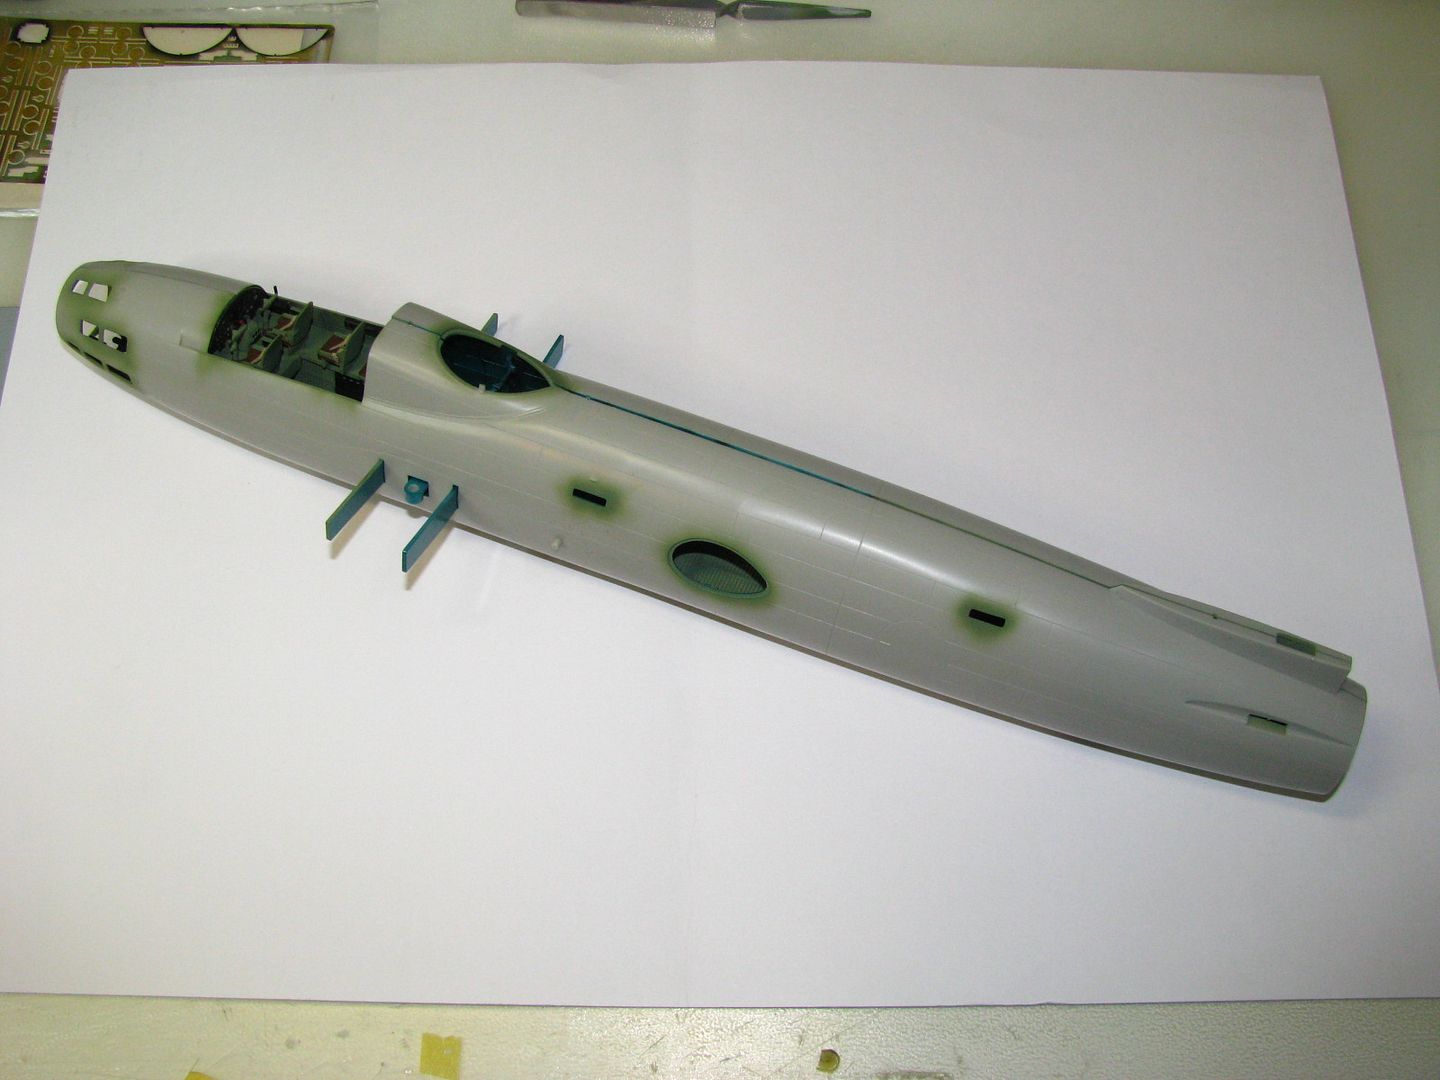
I still need dry brushed entire fuselage interior using silver paint and do weathering using oil wash.
So stay tunned next update will be soon.
Cheers
Re: 1/48 Tamiya Mitsubishi G4M1 Betty
Posted: Wed Feb 12, 2014 10:20 pm
by T3hGuppy
Loving your work on this one dude.
Always liked the metallic blue on the Japanese planes.
Anyone know why they chose that colour?
Re: 1/48 Tamiya Mitsubishi G4M1 Betty
Posted: Thu Feb 13, 2014 11:18 am
by pedrofernandes
Great model!! Great Work !!
Re: 1/48 Tamiya Mitsubishi G4M1 Betty
Posted: Fri Feb 14, 2014 6:51 pm
by patrickroos
Crisp, Clean and very nice!!!
Re: 1/48 Tamiya Mitsubishi G4M1 Betty
Posted: Fri Feb 14, 2014 6:59 pm
by patrickroos
T3hGuppy wrote:Loving your work on this one dude.
Always liked the metallic blue on the Japanese planes.
Anyone know why they chose that colour?
It was actually a laquer used to protect the bare metal with added dye in blue or green (still transparent) just to aid when applying it.
(To check coverage)
Re: 1/48 Tamiya Mitsubishi G4M1 Betty
Posted: Mon Feb 17, 2014 7:28 am
by T3hGuppy
patrickroos wrote:T3hGuppy wrote:Loving your work on this one dude.
Always liked the metallic blue on the Japanese planes.
Anyone know why they chose that colour?
It was actually a laquer used to protect the bare metal with added dye in blue or green (still transparent) just to aid when applying it.
(To check coverage)
Cheers dude. It really does sett them apart from other interiors.
Re: 1/48 Tamiya Mitsubishi G4M1 Betty
Posted: Thu Mar 13, 2014 10:05 pm
by wally
Part 1c - Cockpit
Hello Guys once again
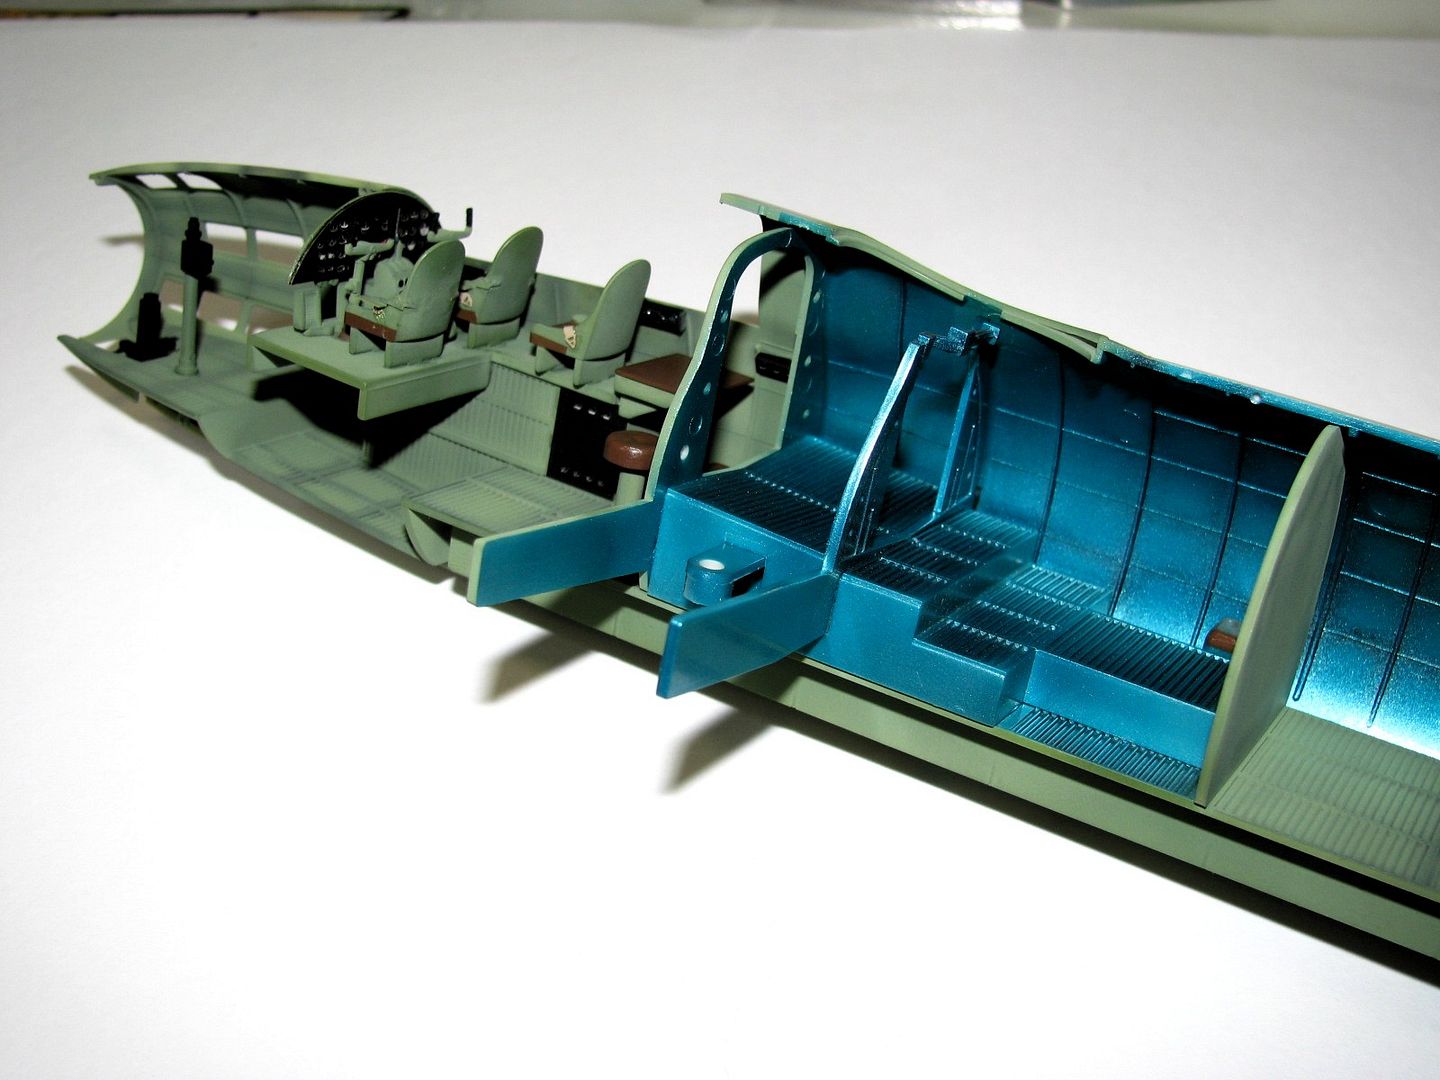
Next update on my site. After painting cockpit I decide to add a little bit of the weathering to the interior. So I brushed entire cockpit and fuselage sides using oil wash and the wait couple days to dry them off. After that I wipe the excess of the wash using dump in the white spirit cotton Q-tips. I try to leave the wash close to the ribs and in other cockpit areas to simulate pretty dirty plane:). This complete the painting and weathering processes for the inside of the plane. Here are some pictures how it's looks like after that:
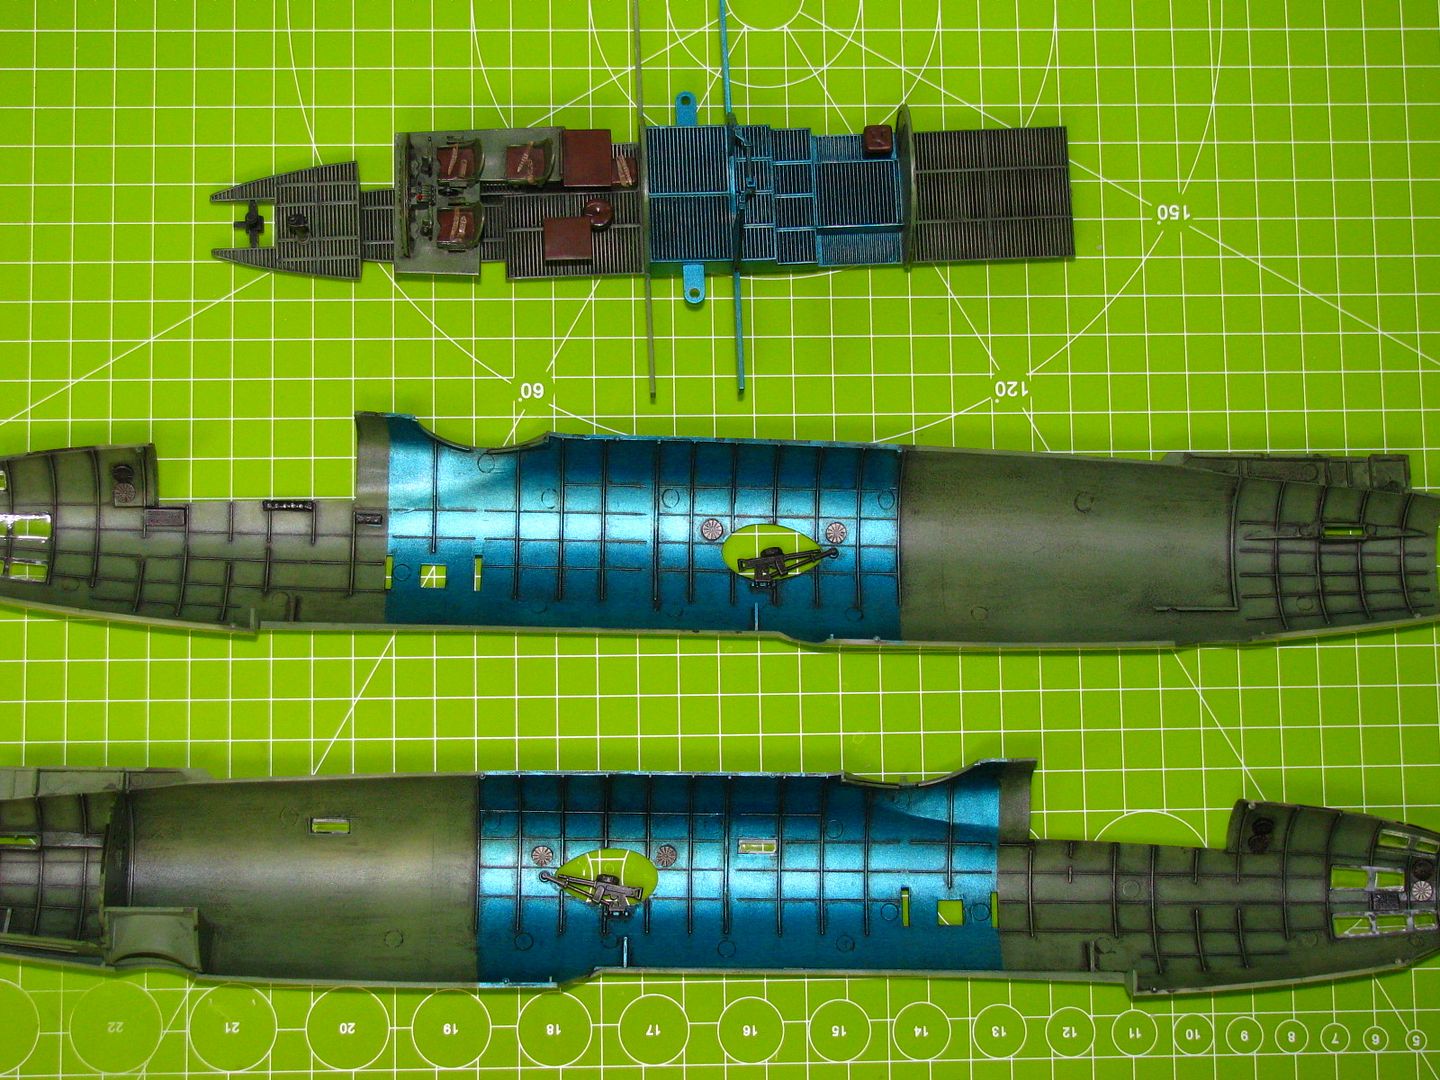
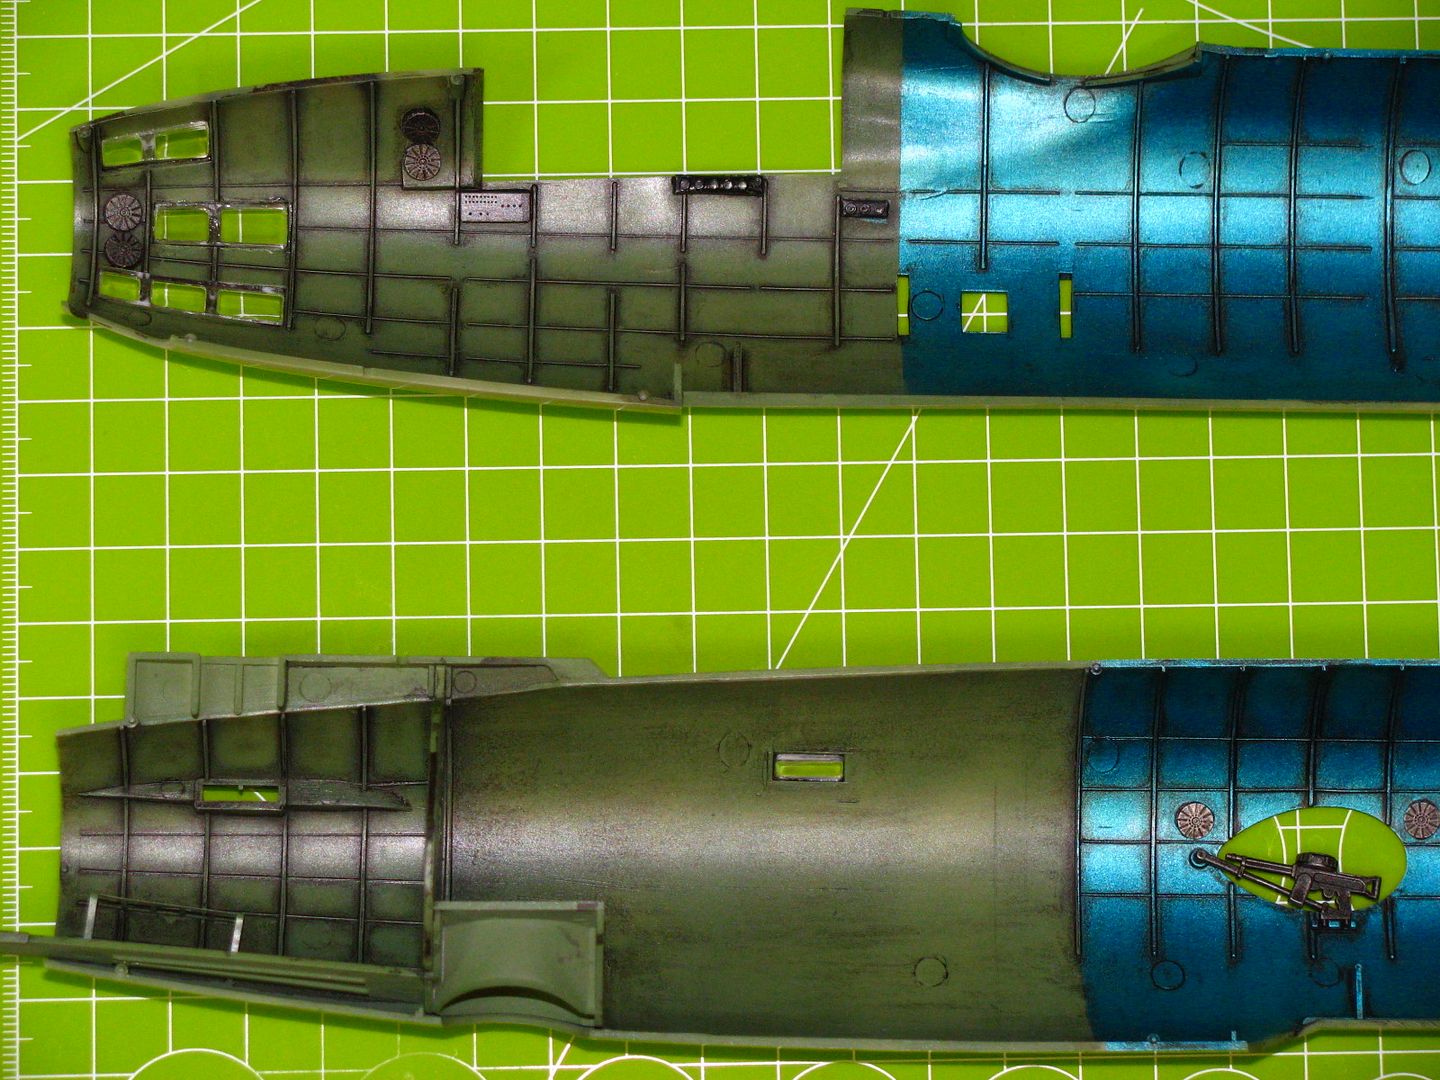
Next step was to glue some small windows inside the fuselage and then glue together two fuselage half's. For this I used first Tamiya Extra Thin and after that to add more strength and in the same time to fill all seam lines I used CA glue. Then I start process of sanding and filling once again some small seams using CA glue and sand them once again. After finished I achieve smooth and seamless fuselage. I only need re-scribe some panel lines that was removed in the sanding process. I also add horizontal and vertical stabilizers. I need add some small amount of the putty to the ruder to remove small gap.
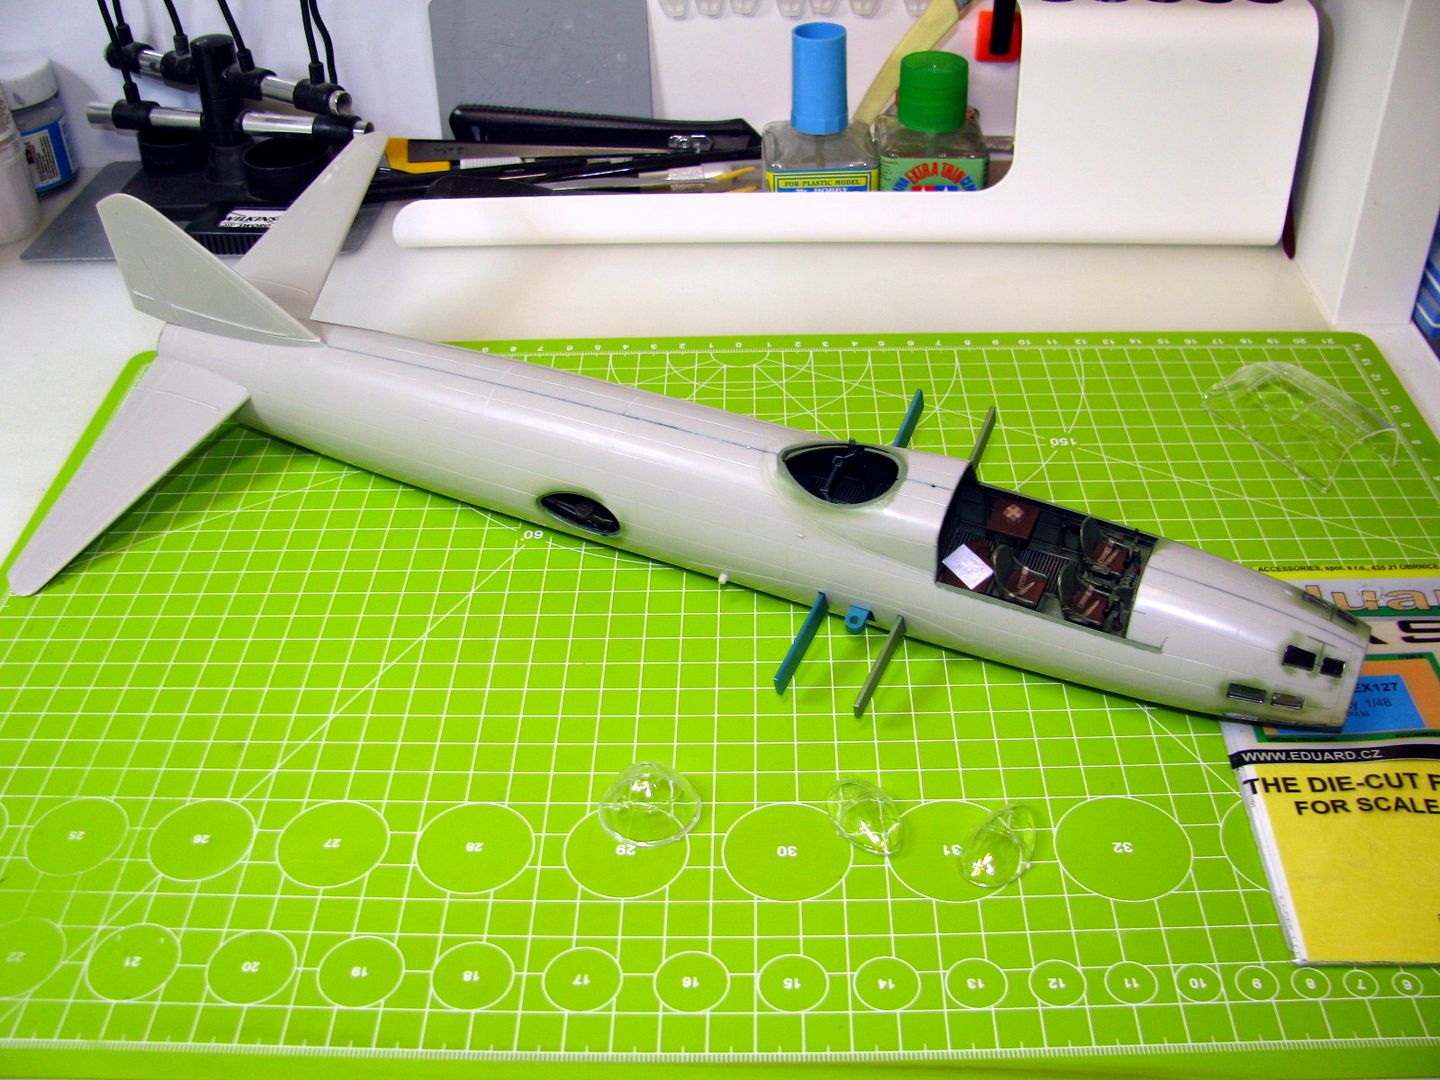
In the same time I decide to add some live in the cockpit on this real big two tables inside. I add some small pocket from scratch sprue and print on my printer map for the Malaya islands scaled down two the size of the cockpit. Here is the picture of my effort that I think look very nice and unusual.

That's it for now till next time. Plan for the future is two mask all the windows and canopies for the monster
Cheers
Re: 1/48 Tamiya Mitsubishi G4M1 Betty
Posted: Fri Mar 14, 2014 10:32 am
by eoinfinnegan
Very impressive, your doing a cracking job
Re: 1/48 Tamiya Mitsubishi G4M1 Betty
Posted: Fri Mar 14, 2014 10:41 am
by UKscalemodeller
stunning work.
really like the addition of the map.
Re: 1/48 Tamiya Mitsubishi G4M1 Betty
Posted: Fri Mar 14, 2014 10:53 am
by cib2265
Looks great! Will try the oil based weathering next, only done drybrushing and some slushwash so far, novice level....
Re: 1/48 Tamiya Mitsubishi G4M1 Betty
Posted: Wed Mar 19, 2014 7:32 pm
by patrickroos
Great weathering!! When doing it in steps (as You did here) first in the paint stage and then with wash it really looks the part.
Creates a nice depth. You really get nice Control with oil.
I Think the level of weathering turned out perfect, keep it coming dude!!!
Re: 1/48 Tamiya Mitsubishi G4M1 Betty
Posted: Thu Mar 20, 2014 7:41 pm
by wally
Hello Folks
Part 2 - Wings and Engines
Next Update on my site: start working on the wings itself gluing them together and add flaps. Then I paint the inside of the wheel bays using interior green and metallic blue. No problems what so ever with that. I need to weather them in the same manner as fuselage interior. This is how it looks like right now:
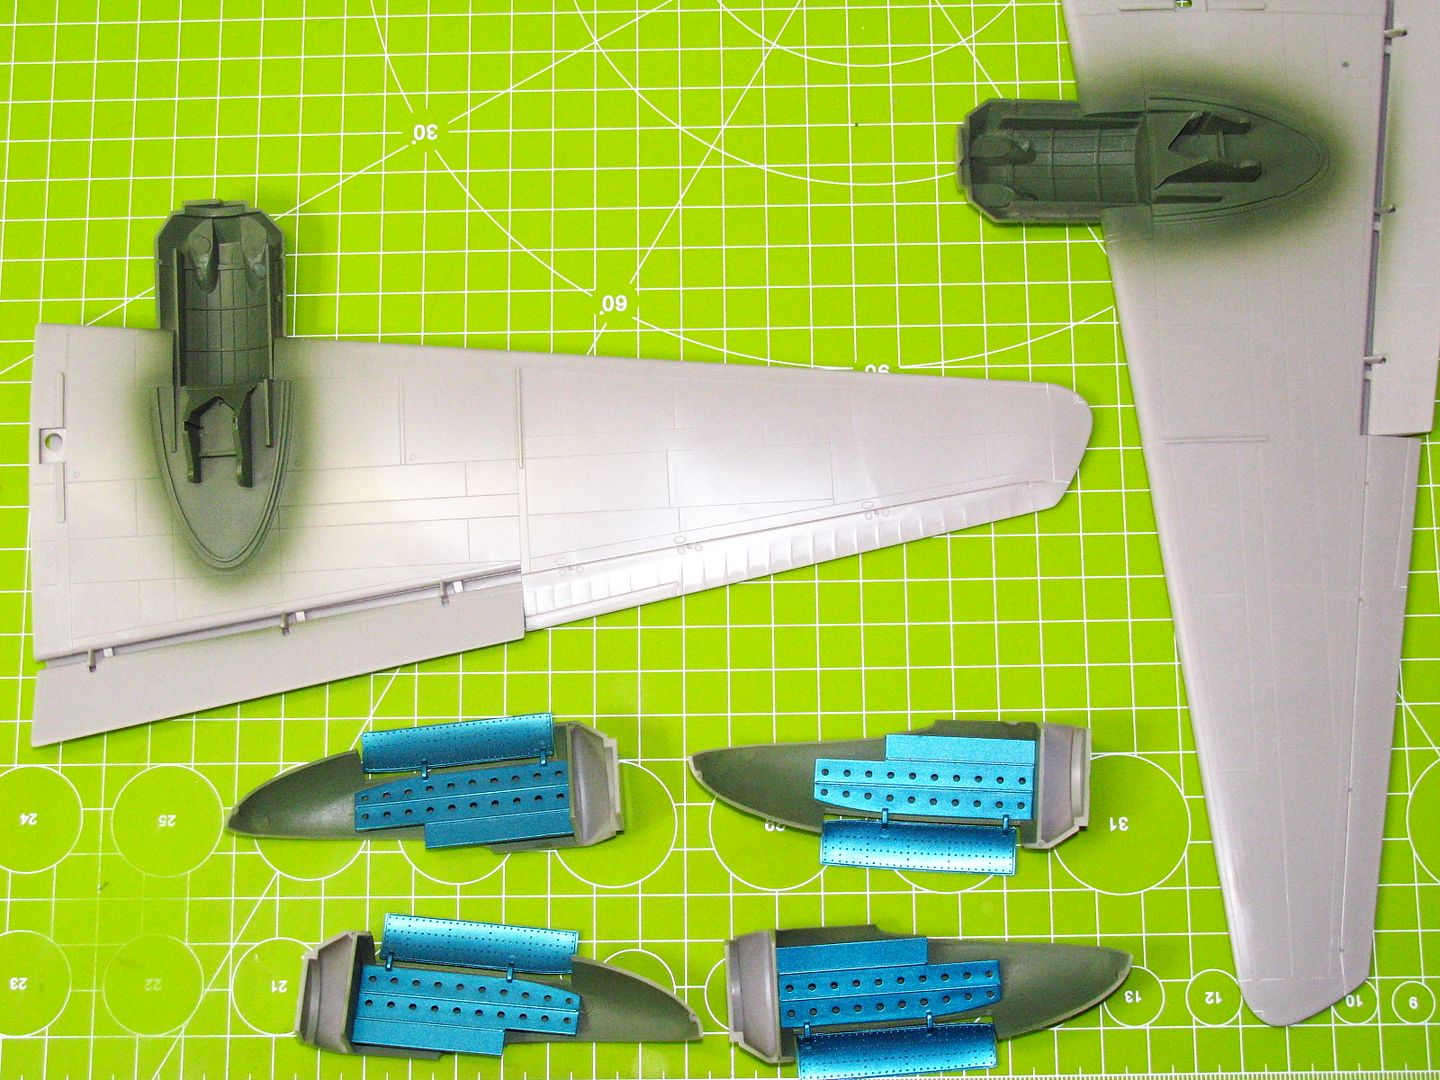
And I also start working on the engines by spraying the using silver for citadel. Then I spray satin coat on them to protect paint before weathering.
This is how they looks like right now:
That's it for now next update after weathering.
Cheers
Re: 1/48 Tamiya Mitsubishi G4M1 Betty
Posted: Thu Mar 20, 2014 8:46 pm
by DBMiller
Very nice work here!
Re: 1/48 Tamiya Mitsubishi G4M1 Betty
Posted: Thu Mar 20, 2014 9:54 pm
by patrickroos
Nice!
What silver did you use? How did You thin it, water?
Re: 1/48 Tamiya Mitsubishi G4M1 Betty
Posted: Fri Mar 21, 2014 11:03 am
by wally
I used Citadel Mithril Silver and thinn this paint using X-20A thinner from Tamiya. Hope it helps.
Re: 1/48 Tamiya Mitsubishi G4M1 Betty
Posted: Fri Mar 21, 2014 6:52 pm
by patrickroos
wally wrote:I used Citadel Mithril Silver and thinn this paint using X-20A thinner from Tamiya. Hope it helps.
Ok, just got it and will soon try it out (spraying it), its called Runefang Steel now. Pigment Count is extremely high.
X20A, check!
Thanks mate!
Re: 1/48 Tamiya Mitsubishi G4M1 Betty
Posted: Sat Mar 22, 2014 3:46 pm
by longlance67
wonderful work mate,
the interior looks stunning
keep it up
Shane
Re: 1/48 Tamiya Mitsubishi G4M1 Betty
Posted: Sun Mar 23, 2014 7:31 pm
by wally
Hello Again
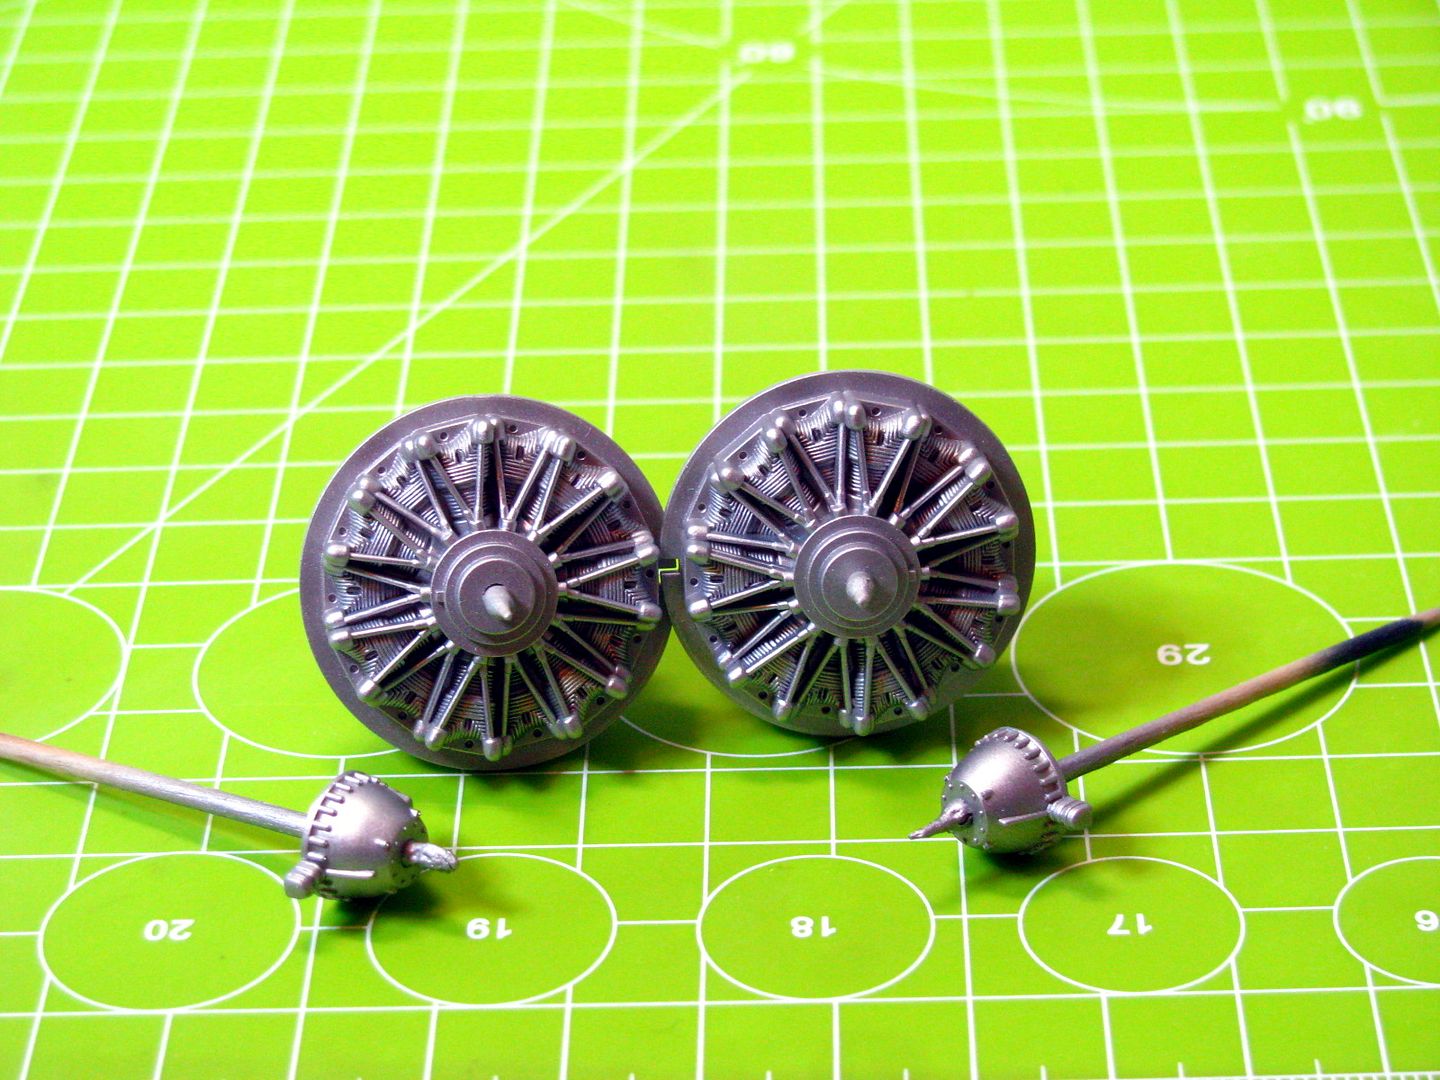
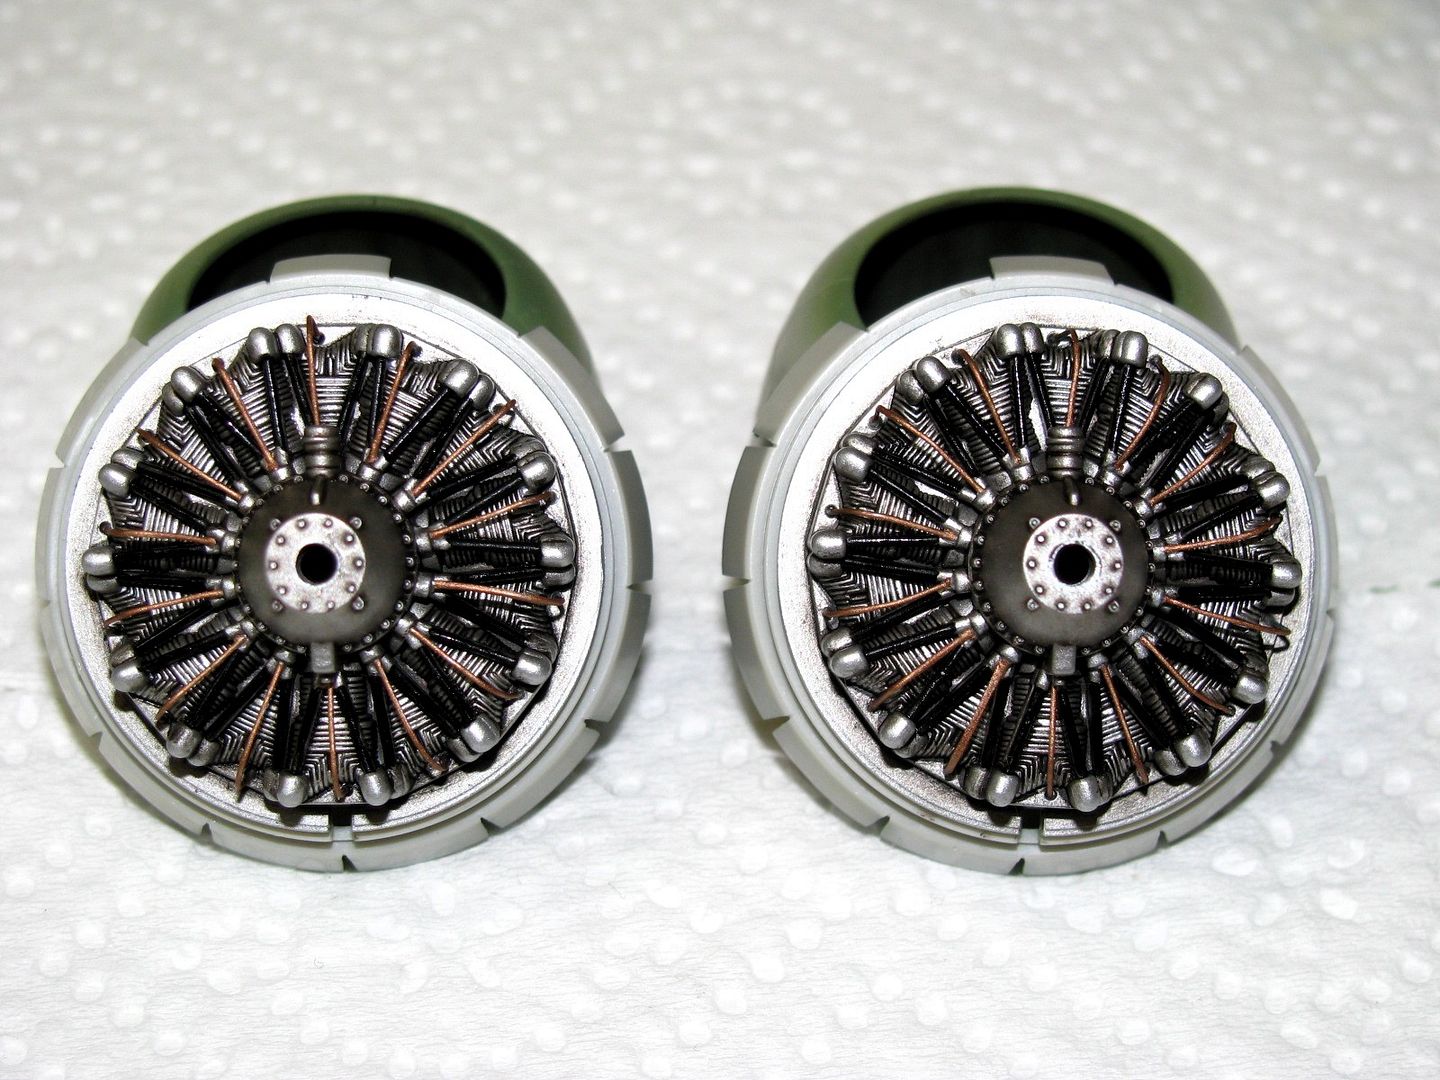
Part 2b - Wings and engine cowling
Next short update o my site. I finished working on the engines and wheels bays. For the engine after spraying silver from Citadel I put satin coat on it to protect the paint and after that I add oil wash from MIG production. To live them a little bit I add wires to each cylinder and paint them using Tamiya dark copper. Here are the engines after finished
For the wheel bays I used the same technique as for the interior so I protect the paint using satin coat and then brush entire area using oil dark wash. Then after it dries I wipe the exes using Q-tip dump in the white spirit. I also finished re-scribing all panel lines on the fuselage itself as well as in the wings.
I complete masking all glass and spray them using interior green color. So entire plane is ready for priming and painting

Next update after priming and pre-shading stage.
Re: 1/48 Tamiya Mitsubishi G4M1 Betty
Posted: Thu Mar 27, 2014 10:04 pm
by eoinfinnegan
Those engines looks sharp, well done. cracking job so far
Re: 1/48 Tamiya Mitsubishi G4M1 Betty
Posted: Tue Apr 08, 2014 10:49 am
by patrickroos
The engines turned out just beautiful mate!
How is it going?
Re: 1/48 Tamiya Mitsubishi G4M1 Betty
Posted: Tue Apr 08, 2014 11:52 am
by UKscalemodeller
loving the engines.
Re: 1/48 Tamiya Mitsubishi G4M1 Betty
Posted: Wed Apr 09, 2014 11:52 am
by wally
Hello All
Unfortunately no progress on my build from the last post and I think I will not be able to finished this build on time to the end of the GB. Only one mount left only and have to many projects that I'm working currently so I don't have time to work on Betty at the moment. I definitely will finished this build in the future, but right now I decide to focus on another builds and complete them before the Night Fighter SIG will start on ISM. I decided to start in this SIG with another Japanese plane and I will start my build on the beginning of the SIG to have enough time to finished it. Sorry Guys and we will see o the Night Fighter SIG.
Re: 1/48 Tamiya Mitsubishi G4M1 Betty
Posted: Wed Apr 09, 2014 2:12 pm
by patrickroos
Ok, we do this because we love it and as recreation and make our own priorities.
Just hope to see this build finished further on, considering the great start!
See You in the Night Fighter SiG!!!
Re: 1/48 Tamiya Mitsubishi G4M1 Betty
Posted: Wed Jun 18, 2014 8:12 pm
by wally
Hello Folks
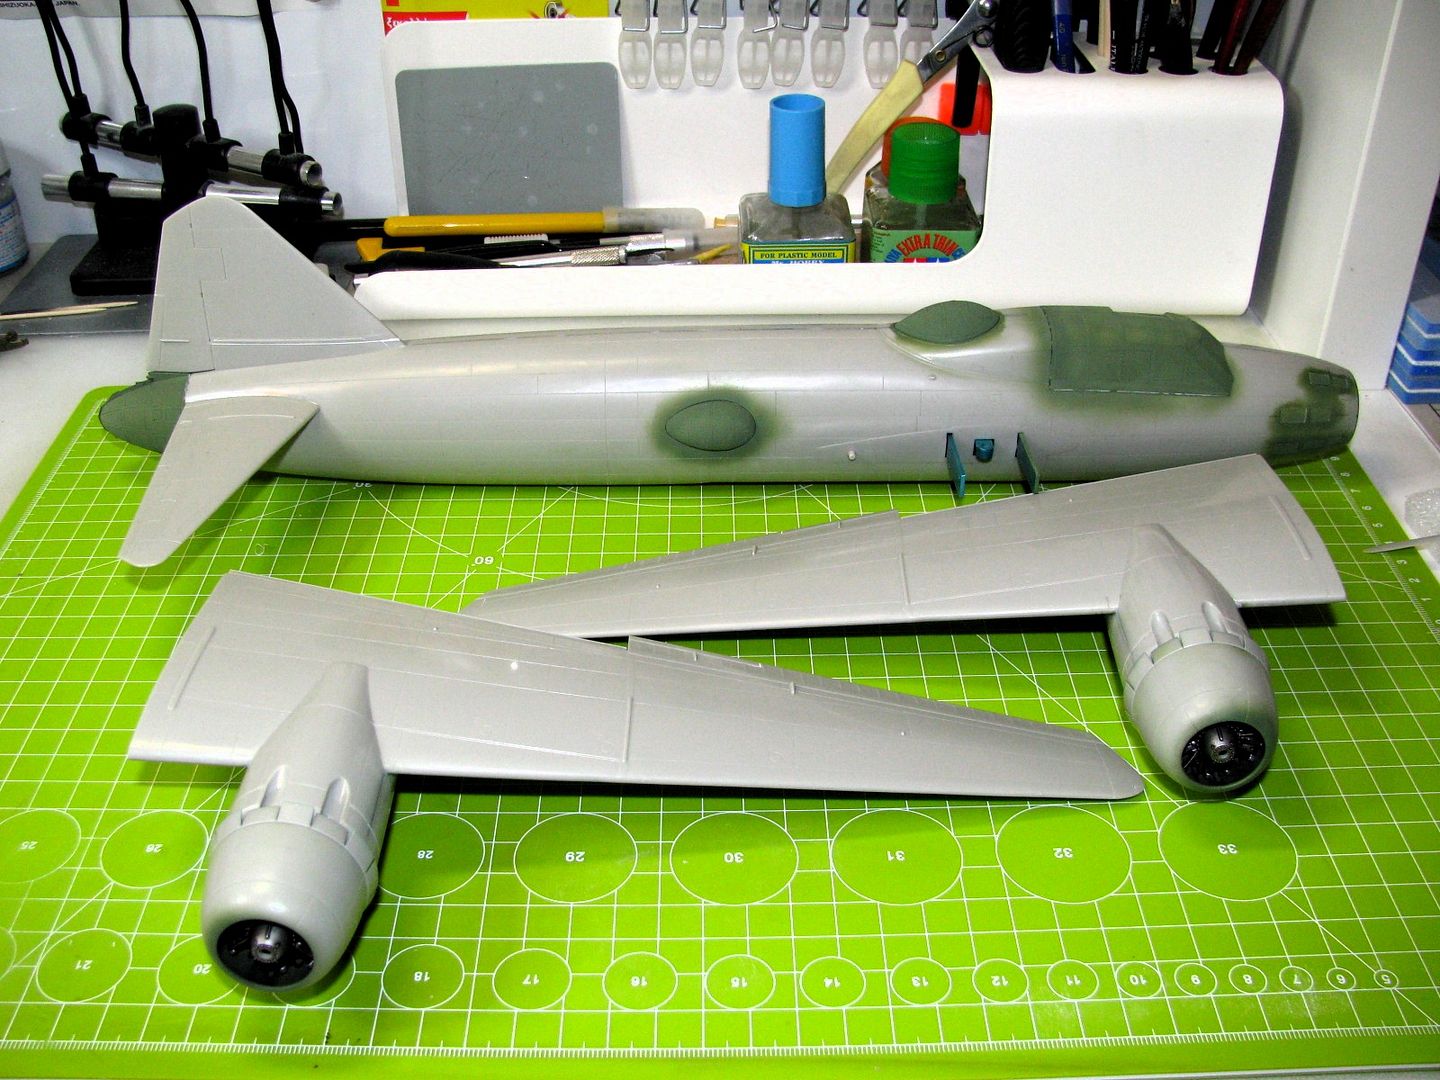
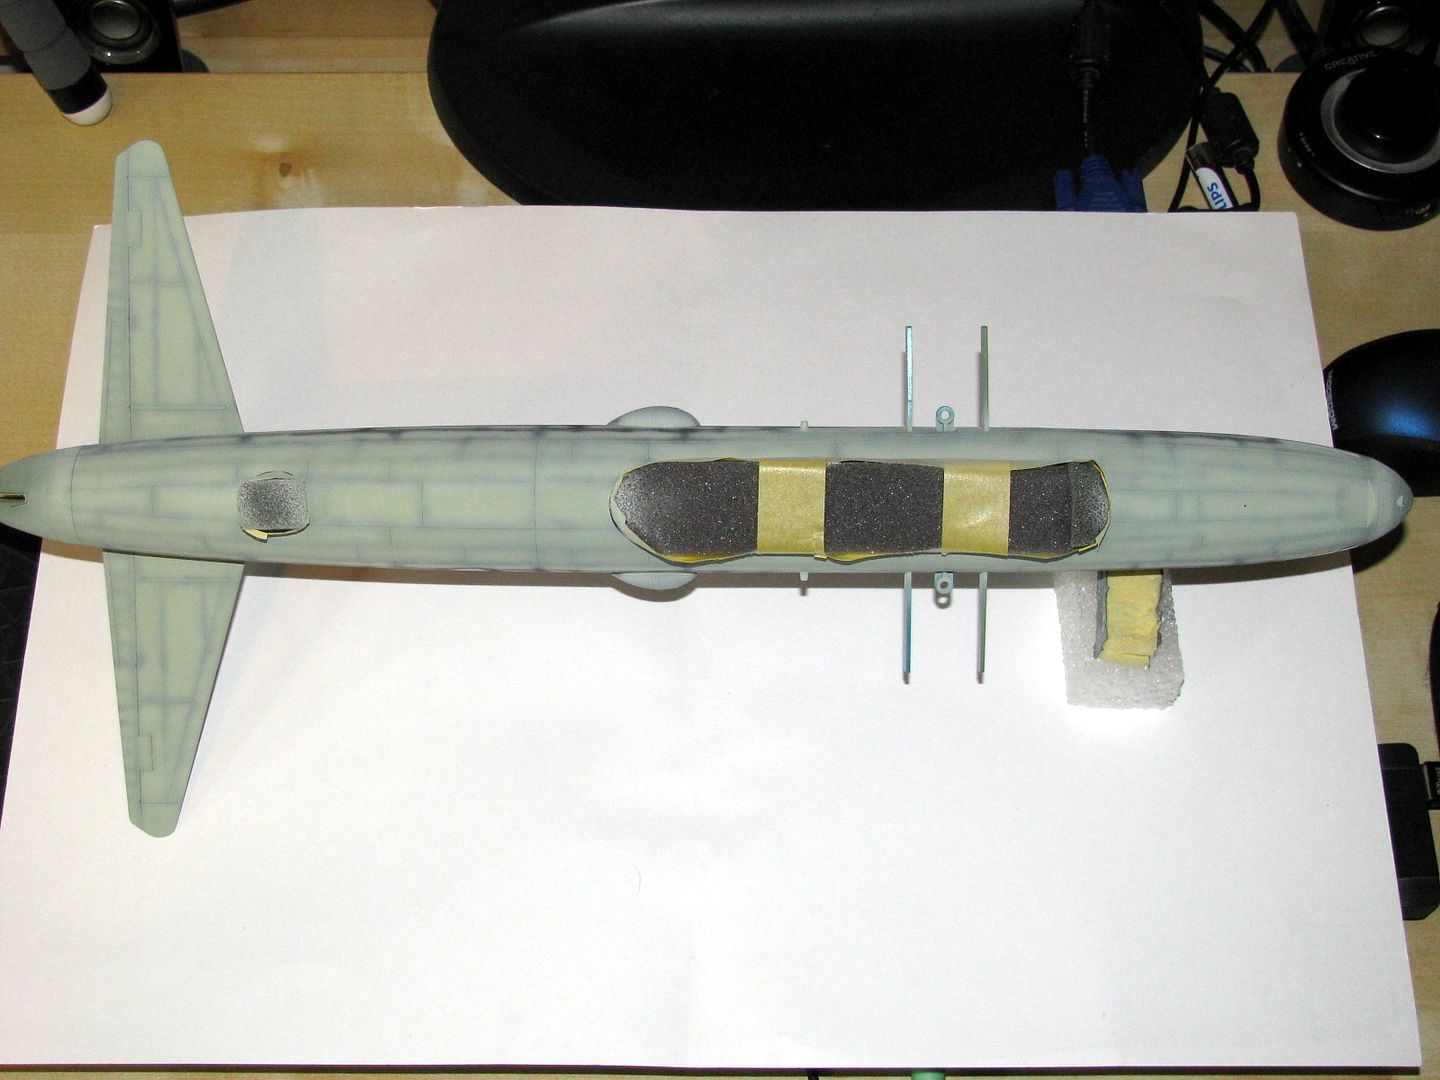
After long long very long brake I return to build this kit. I finally sand and take care of any seam lines, re-scribe all panel lines and the spray Tamiya surface primer on the wings and the fuselage as well as flaps. Happy how it turns out, after that I start the pre-shading of the entire kit. Here are the results so far:
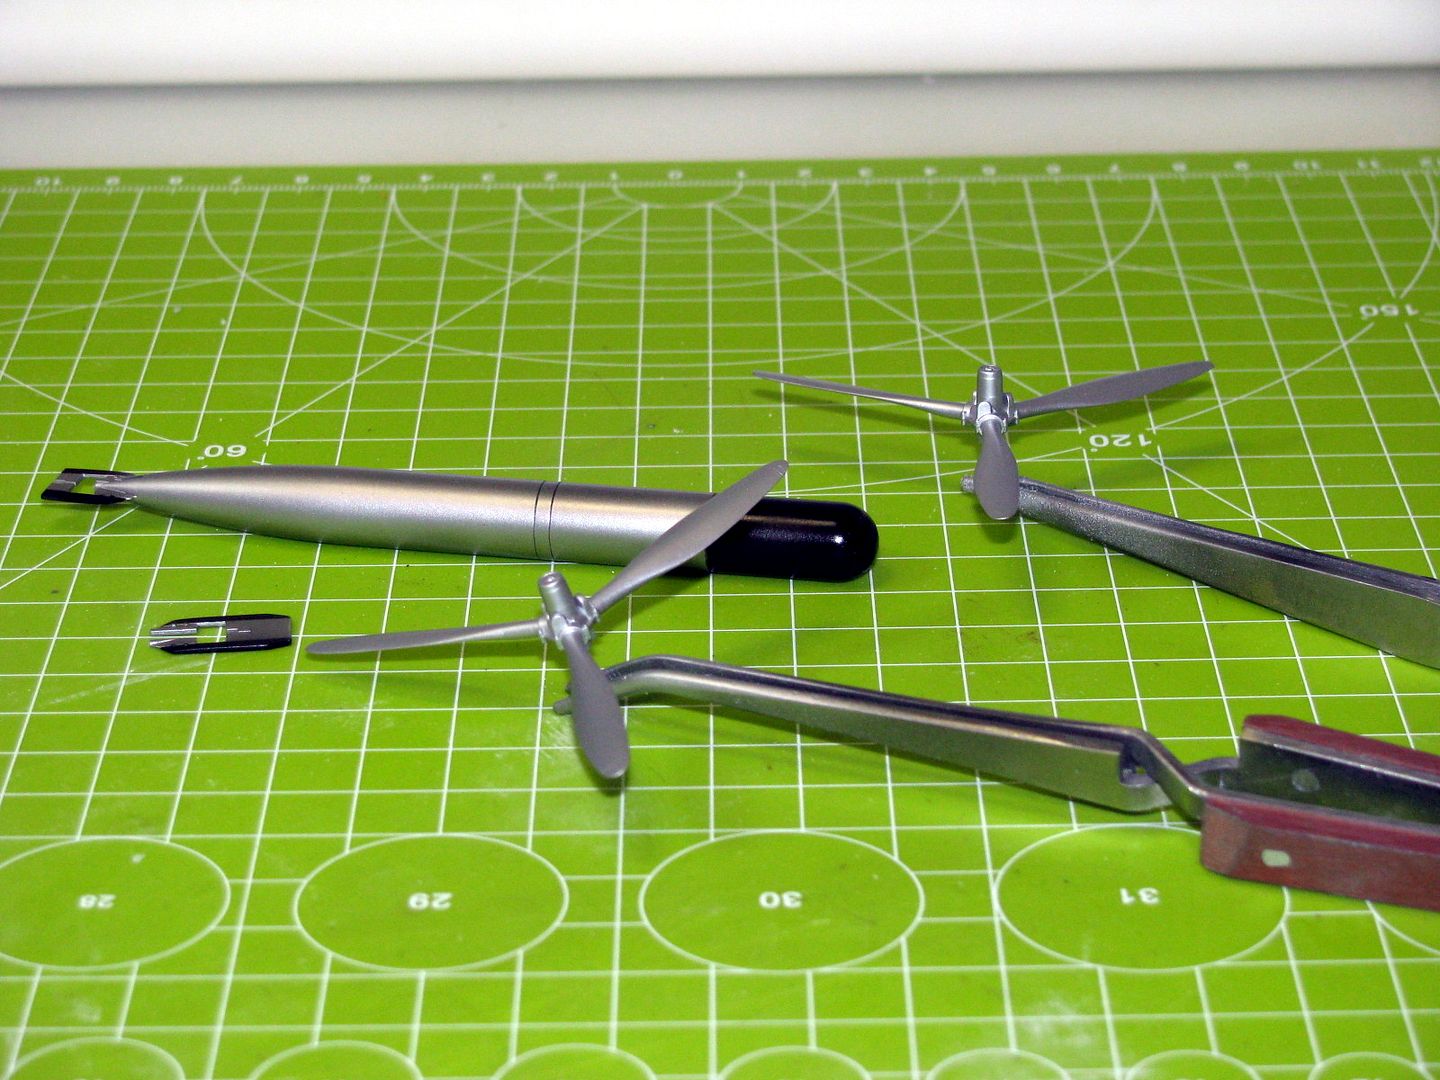
In the mean time I was worked also on the small bits. I paint the props using Tamiya AS-12 silver and also using Gunze Mr. Metallic steel paint I paint the torpedo. The wheels are also done.
Tomorrow there is day off work in Poland so I plan to paint entire underside of the plane using Tamiya JA Grey color so stay tunned.
Cheers
Re: 1/48 Tamiya Mitsubishi G4M1 Betty
Posted: Wed Jun 18, 2014 8:25 pm
by Willem
I missed this thread, just caught up and read through. Very enjoyable. Stunning work as always Wally.
Re: 1/48 Tamiya Mitsubishi G4M1 Betty
Posted: Thu Jun 19, 2014 8:35 pm
by wally
Hello Again
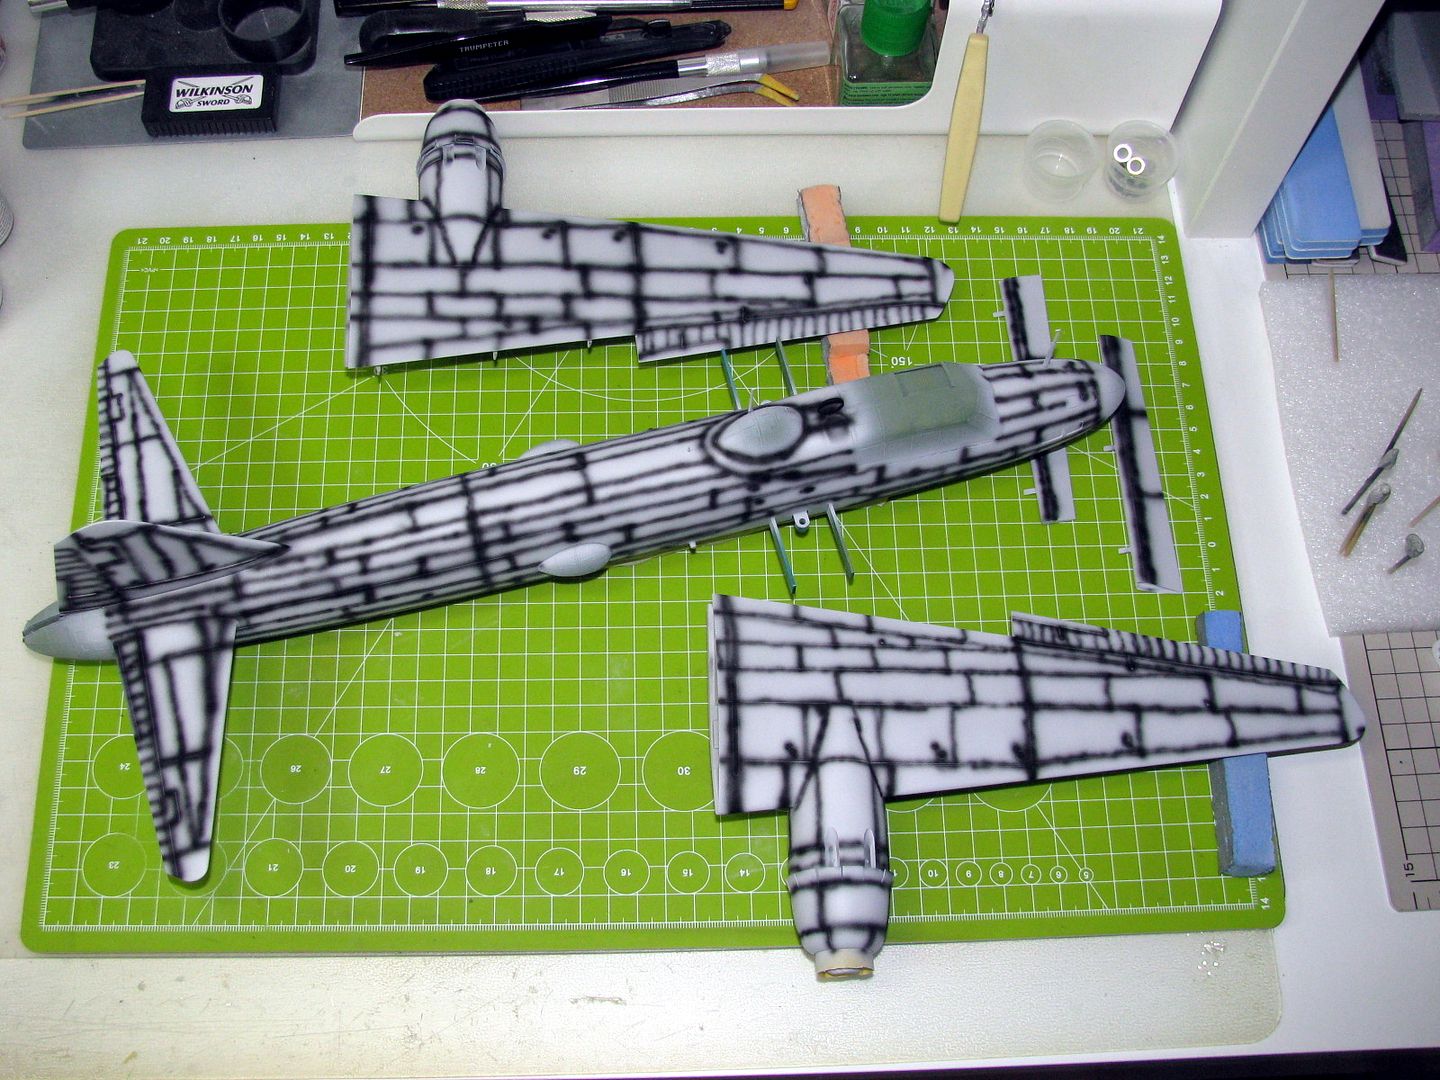
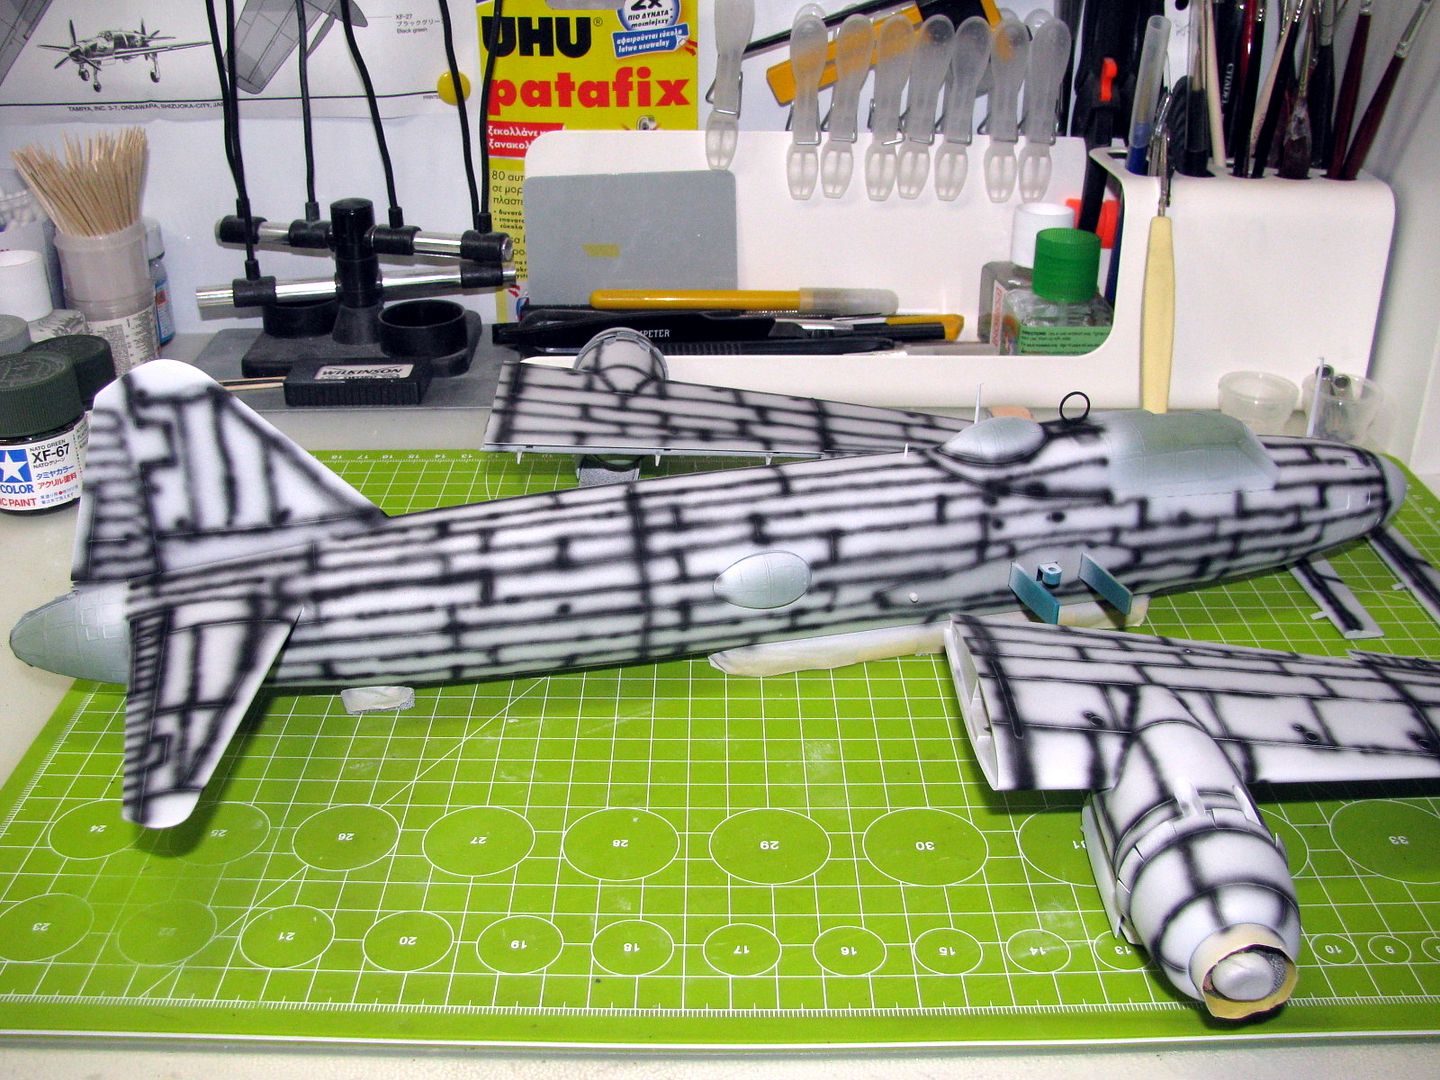
Next update on my site. Today I start painting stage of the build. Start from underside and spray XF-12 IJN Grey color. I manged to paint entire underside of the wings and the fuselage. Here are some pictures after the painting. In the weekend I have plan to put the camo pattern on this bomber.

Cheers