Dragon 1/35 Sexton II - 90th Field Regiment Royal Artillery

User avatar
Gav0909
Chief Warrant Officer 5
Posts: 2927
Joined: Tue May 28, 2013 11:56 am
Location: Fife, Scotland
Contact:

Dragon 1/35 Sexton II - 90th Field Regiment Royal Artillery

Post by Gav0909 »

Image


:welcome: to my newest project log. For this Group Build I will be building Dragons 1/35 Sexton II kit. I had to order this kit in from Korea as it seems to be out of stock everywhere in the UK, and anywhere I could see it for sale it was daft expensive.

So why the Sexton. Basically I love self propelled artillery. There is something pretty cool about putting a howitzer on a tank chassis. With this being the D-Day GB there was a few options for SPGs. But out of the two common Allied ones, the M7 Priest and the Sexton II, I think the Sexton is the cooler of the two tanks.

History Lesson

Introducing the Sexton II. In simple terms its a Canadian-built Sherman M4A1 lower hull with an open topped superstructure for the crew compartment. The vehicle was armed with the British OQF 25-pounder artillery piece and a few .303 Bren guns for close defence.
Image

Early Sextons (Mark I's) were based on the Canadian Ram tank chassis, which in turn was a Canadian version of the M3 Lee chassis. These were inferior to the M4 design and so production shifted to the Sexton II when it was realised that US production of the M4 would be satisfactory to meet demand. The design was considered very successful and the Sexton II proved itself well in combat with both the Canadian and British Armies during WW2, as well as other Commonwealth forces.

The Sexton was powered by a Wright-Continental R975-C1 9 cylinder gasoline engine producing 400hp. This gave the Sexton a top speed of 39km/h. The vehicle required a crew of 6 and could carry 105 rounds for the main gun internally.

By the end of the war the British had ordered over 2000 vehicles.

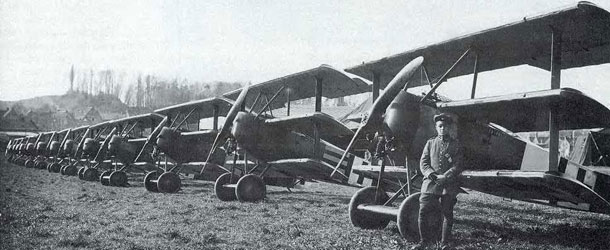
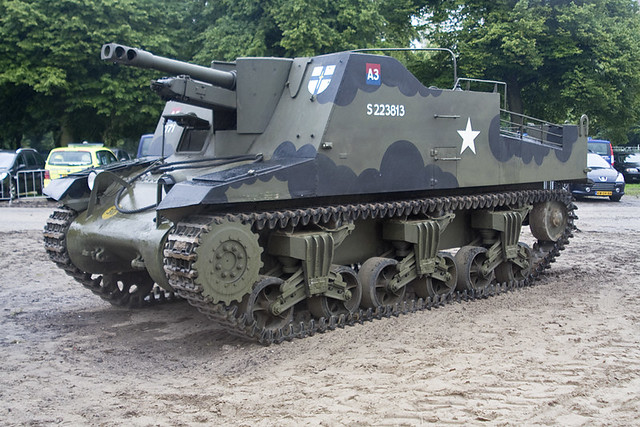
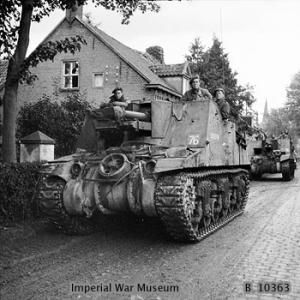
There is numerous discussions around about the "correct" combination of suspension and track types used on the Sexton. Its commonly accepted that they used VVSS suspension, and there are many pictures online of vehicles with most types of Sherman track, and either open spoke or solid roadwheels. Most models had 17 tooth drive sprockets compared to the 13 tooth ones common to Shermans. The Dragon kit comes with both open and closed spoke roadwheels, and two types of bogies. However the sprockets are all the M4 13 tooth type. However there are pictures online which prove Sextons were sometimes fitted with more common M4 tracks/sprockets than Sexton ones. The picture above shows a vehicle with the 17 tooth sprocket and Canadian Dry Pin tracks. Below is an example more like what I will be building.
Image

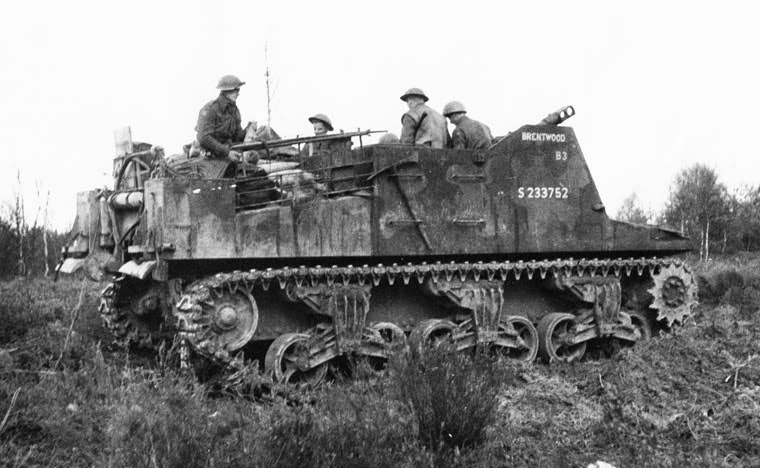
This vehicle has the rubber padded T41 M4 style tracks, whereas I will be using the DS tracks in the kit which depict steel chevroned T54E1 tracks. This picture shows a Sexton with these tracks fitted (clearly the steel chevrons, not the rubber ones due to the "clean" surface of the chevrons).

Image

Here are some more reference pics for the Sexton II.
Image
Image
Image
Image
Image

And here is the colourscheme I will be painting mine in.
Image

The Kit

The kit from Dragon was released in 2012, but seems to be OOP now. I think that Dragon is releasing a Canadian Army Sexton soon and so they may be using this new kit as their standard Sexton, replacing this kit. Hence me having to order it from Asia.

Box art and sprue pics.

Image
Image
Image
Image
Image
Image
Image
Image
Image
Image
Image
Image
Image
Image

General plans at this moment include getting some crew for this model, probably the Bronco North West Europe 25 pdr crew. And I plan a simple diorama of the Sexton driving up a beach area, or perhaps along some bocage/Normandy country lane. I believe the Sextons of the unit I will depict didn't land until 60 hours after H hour, so probably not until the 7th or 8th June.

I plan to model a vehicle from the 147th Essex Yeomanry RHA, but more on that unit and their history in another post.

I am off to make a start to the kit, so laters!

Ciao for now :hi:
User avatar
Willem
Warrant Officer
Warrant Officer
Posts: 1556
Joined: Sun Apr 13, 2014 1:39 pm
Location: Leicestershire, UK.
Great Britain

Re: Dragon 1/35 Sexton II - 147th Essex Yeomanry RHA

Post by Willem »

Looks like a very cool kit.

Great intro and reference pics.

Another cool build to follow. :banana:
Will

"A thing of orchestrated hell- a terrible symphony of light and flame."

Edward R Murrow
User avatar
Paul
Site Admin
Site Admin
Posts: 12622
Joined: Thu May 23, 2013 4:47 pm
Location: Merseyside, England, UK
Contact:
England

Re: Dragon 1/35 Sexton II - 147th Essex Yeomanry RHA

Post by Paul »

Nice entry gav :thumb2:

Needs more breast though :thumb2:
User avatar
Nige201980
Captain
Captain
Posts: 4095
Joined: Wed Jun 05, 2013 9:30 am
Location: Doncaster South Yorkshire UK
Contact:

Re: Dragon 1/35 Sexton II - 147th Essex Yeomanry RHA

Post by Nige201980 »

Looks great mate.
http://www.youtube.com/channel/UCy-TGcs5u_ZXSZ9kObNfsPg


On the go at the Mo

Quite a few :banana:
User avatar
AchtungPanzer
Chief Warrant Officer 3
Posts: 2299
Joined: Mon Oct 07, 2013 7:59 am
Location: Cracow PL

Re: Dragon 1/35 Sexton II - 147th Essex Yeomanry RHA

Post by AchtungPanzer »

Very nice parts and some PE . Good luck mate :th:
User avatar
DC87
Chief Warrant Officer 2
Posts: 1799
Joined: Wed Jun 05, 2013 7:16 pm
Location: Exeter, Devon, UK
England

Re: Dragon 1/35 Sexton II - 147th Essex Yeomanry RHA

Post by DC87 »

Great stuff Gav, can't wait to watch you work that magic.
Dan C

Filling the workbench with:
Sopwith Snipe late post war
WW1 RFC SE5a

WW1-1/32 Snipe
Workbench gets full with models being built - Buys another workbench!

Image
User avatar
Gav0909
Chief Warrant Officer 5
Posts: 2927
Joined: Tue May 28, 2013 11:56 am
Location: Fife, Scotland
Contact:

Re: Dragon 1/35 Sexton II - 147th Essex Yeomanry RHA

Post by Gav0909 »

Image

First of all thanks for the comments. Much appreciated. :cheers2:

Between work shifts I have managed to make a start to the Sexton. As with most armour kits the build starts with the suspension. As I mentioned in my first post there seems to be some controversy as to whether the bogies/wheels/tracks etc inlcuded in this kit are ones that were used by Sextons. Some poking about online would suggest that Sextons wore a range of track types, and used both the open and closed spoke wheels. Some vehicles did indeed have the solid 17 tooth sprocket, but there are pics of them using both the open and closed 13 tooth sprockets as seen on Shermans as well. The kit includes both open and closed spoke roadwheels and ilders, as well as open and closed 13 tooth sprockets. I am going to use open roadwheels, closed idler and closed sprockets on my build, as seen in this pic.

Image

So without further ado, lets see some pics of plastic!

Sprockets made up
Image
Image

Building up a bogie
Image
Image
Image

Small seam on the top and side of the bogie housing needs filled. This is mostly hidden by the track guard bit which goes on top, but I like to be thorough.
Image

Early (left) and later (right) types of bogie track gaurd (not sure on the correct terminology. This part basically stops the track from hitting off the bogie housing I believe). I am using the later type as I have seen in some reference pics.
Image

Two bogies built up
Image


Detail on the lower hull. Nice bolt heads and weld beads as well.
Image
Image

Next steps are to build the three bogies for the other side, the idler wheels and then put the bogie mounting plates onto the lower hull. Bogies will stay separate for painting I think. Will look back through my pics and see how I did it for the M10.

Small side note, anyone ever noticed that the Sherman bogies look a little like small motorbikes....

Anyway that's all for just now.

Comments and criticism is welcome.

Ciao for now :hi:
User avatar
Paul
Site Admin
Site Admin
Posts: 12622
Joined: Thu May 23, 2013 4:47 pm
Location: Merseyside, England, UK
Contact:
England

Re: Dragon 1/35 Sexton II - 147th Essex Yeomanry RHA

Post by Paul »

Looking good Gav :cheers2:
User avatar
Gav0909
Chief Warrant Officer 5
Posts: 2927
Joined: Tue May 28, 2013 11:56 am
Location: Fife, Scotland
Contact:

Re: Dragon 1/35 Sexton II - 147th Essex Yeomanry RHA

Post by Gav0909 »

Image

If you read back to my last instalment I said the next step was to build up the other 3 bogies. I have indeed managed to get that done. 'Ere, have some proof!

Image
Image

After that I had to install the mounting points on the hull for the bogies. The fit here left a little to be desired. But a rough tidy up is enough as they are hidden by the bogies anyway. To ensure a strong bond I first tacked the part in with extra thin cement, then used Revell Contacta to fill in the gap more or less. A quick bit of filler on the outside sanded flush with the hull side completed the job.

Image
Image
Image
Image

The instructions then call for you to start building the front of the interior. So the gearbox, control levers, pedals seat, stowage box etc. Here are the main components for this build up and ready to install in the hull.

Image

In place
Image

Drivers seat, pedals and levers installed. The seat is just placed in for now so I can ensure I paint everywhere inside.
Image

Transmission housing. This has some nice casting texture and numbers on it.

Image
Image
Note the holes are for the headlights

Installed on the hull with the headlights and guards also in place.
Image
Image

Next step is the rear hull plate. I have put the plate in place, but now have to add all the detail parts to it. That's the next job.
Image

Cheers for looking. I am doing some more reading on the 147th Essex Yeomanry so will put up a history post in the near future.

Ciao for now :hi: :hi:
User avatar
T3hGuppy
Second Lieutenant
Second Lieutenant
Posts: 3467
Joined: Wed Jun 12, 2013 11:20 pm
Location: Bournemouth, UK
Contact:
Great Britain

Re: Dragon 1/35 Sexton II - 147th Essex Yeomanry RHA

Post by T3hGuppy »

Really nice interior detail on this one.

Been looking at this kit. :th:
On the bench

Too much to list. !!


Youtube channel:https://www.youtube.com/user/bnealuk
User avatar
Rob
Chief Warrant Officer 2
Posts: 1892
Joined: Thu Aug 29, 2013 5:02 pm
Location: Kent, UK

Re: Dragon 1/35 Sexton II - 147th Essex Yeomanry RHA

Post by Rob »

Well I think it's a looker - a rugged, functional, beautiful beastie! Great stuff Gav. Looking forward to seeing your choice of crew. :th:
User avatar
MarkVerploeg
Major
Major
Posts: 4837
Joined: Wed Oct 16, 2013 12:21 am
Location: Oss, Noord Braband The Netherlands
Netherlands

Re: Dragon 1/35 Sexton II - 147th Essex Yeomanry RHA

Post by MarkVerploeg »

Looks like a nice kit
And there is some good progress already
correct me if i'm wrong but isn't the sexton a modified Priest used by the US Army
Atleast to me the 2 vehicles look very similar with the big difference of the cannon
Cheers Mark
On the bench
GB builds
1/35 Trumpeter M1132 ESV

Personal builds
1/35 Hobby Boss M1070 tractor with M1000 semi trailer and Meng M1A2 TUSK II Abrams
1/35 Takom V2 rocket with the Meillerwagen and SS100 tractor
User avatar
Nige99
Command Sergeant Major
Posts: 751
Joined: Sun May 26, 2013 2:53 pm
Location: Wrexham North Wales

Re: Dragon 1/35 Sexton II - 147th Essex Yeomanry RHA

Post by Nige99 »

Wow never knew this kit existed. Cracking info Gav and looking good so far! Looks like it does need a fair bit of filling tho.
You can run, but you'll only die tired!
User avatar
Gav0909
Chief Warrant Officer 5
Posts: 2927
Joined: Tue May 28, 2013 11:56 am
Location: Fife, Scotland
Contact:

Re: Dragon 1/35 Sexton II - 147th Essex Yeomanry RHA

Post by Gav0909 »

MarkVerploeg wrote:Looks like a nice kit
And there is some good progress already
correct me if i'm wrong but isn't the sexton a modified Priest used by the US Army
Atleast to me the 2 vehicles look very similar with the big difference of the cannon
Cheers Mark

No the Sexton is in fact an entirely different vehicle. The Priest was converted from a US made M4, mounting the US 105mm gun. The Sexton was produced in Canada using their domestically produced Ram tank chassis as the base. This was due to the fact that Canada was no longer required to supplement US production of the M4. It also mounted the British 25 pounder. There are huge similarities and indeed common components between the Sexton, Priest, M10 Wolverine and the M4 Sherman.

Nige99 - Cheers. I think the only filling this should need is just though bogie mounts. I could have left them unfilled though as they are hidden by the bogie mounting plate which is part of each bogie.

Thanks
User avatar
MarkVerploeg
Major
Major
Posts: 4837
Joined: Wed Oct 16, 2013 12:21 am
Location: Oss, Noord Braband The Netherlands
Netherlands

Re: Dragon 1/35 Sexton II - 147th Essex Yeomanry RHA

Post by MarkVerploeg »

Thanks mate
It looks like you did your homework on this vehicle :th:
Cheers Mark
On the bench
GB builds
1/35 Trumpeter M1132 ESV

Personal builds
1/35 Hobby Boss M1070 tractor with M1000 semi trailer and Meng M1A2 TUSK II Abrams
1/35 Takom V2 rocket with the Meillerwagen and SS100 tractor
User avatar
Nige201980
Captain
Captain
Posts: 4095
Joined: Wed Jun 05, 2013 9:30 am
Location: Doncaster South Yorkshire UK
Contact:

Re: Dragon 1/35 Sexton II - 147th Essex Yeomanry RHA

Post by Nige201980 »

Looking great mate.
http://www.youtube.com/channel/UCy-TGcs5u_ZXSZ9kObNfsPg


On the go at the Mo

Quite a few :banana:
Russ72
Sergeant Major
Sergeant Major
Posts: 666
Joined: Tue Jan 21, 2014 12:30 pm
Location: Brisbane, Australia

Re: Dragon 1/35 Sexton II - 147th Essex Yeomanry RHA

Post by Russ72 »

Looking good Gav. Love the read to. :cheers2:
User avatar
Gav0909
Chief Warrant Officer 5
Posts: 2927
Joined: Tue May 28, 2013 11:56 am
Location: Fife, Scotland
Contact:

Re: Dragon 1/35 Sexton II - 147th Essex Yeomanry RHA

Post by Gav0909 »

Image

First of all thanks to everyone for the comments so far.

I got some more bench time put in this evening. I was able to finish off the rear hull plate on the Sexton, and make a start on the rest of the interior. Let me show you this progress.

Rear hull plate details. Including exhausts, towing hooks and engine bay doors.
Image
Image
Image
Image

Large stowage box mounted to the sponson.
Image

Fighting compartment floor, with more stowage lockers and a seat.
Image

Floor in place for the picture.
Image

Next job then is to build the radio "cupboard" and install that. As well as the beam structure which supports the 25 pdr itself. I may start painting the interior before I fully put all this in, as with the beam structure in place, access to the drivers compartment is severely lacking. So once the radio cupboard is done, I think this wee lady will see her first paint.

Cheers and ciao for now

:hi:
User avatar
alextheblue
Chief Warrant Officer 5
Posts: 2679
Joined: Mon Jul 15, 2013 11:30 am
Location: Slough, United Kingdom
Contact:
Scotland

Re: Dragon 1/35 Sexton II - 147th Essex Yeomanry RHA

Post by alextheblue »

That's looking real nice so far Gav, great progress!! :th: :th:

And you're right, the bogies do look like little motorbikes - the pic where you've got all six built looks like the starting grid of a MotoGP race!!
"Courage is feeling fear and acting anyway."

www.alextheblue.com
User avatar
Gav0909
Chief Warrant Officer 5
Posts: 2927
Joined: Tue May 28, 2013 11:56 am
Location: Fife, Scotland
Contact:

Re: Dragon 1/35 Sexton II - 147th Essex Yeomanry RHA

Post by Gav0909 »

Hendrik, it ain't any uglier than your mug! lol :eeek:

Alex, cheers dude. Yeah they do look like a race grid haha. Perhaps I should paint each one up as a MotoGP bike...
User avatar
Nige99
Command Sergeant Major
Posts: 751
Joined: Sun May 26, 2013 2:53 pm
Location: Wrexham North Wales

Re: Dragon 1/35 Sexton II - 147th Essex Yeomanry RHA

Post by Nige99 »

Looking forward to seeing some paint on it Gav.
You can run, but you'll only die tired!
User avatar
wappynutter
Chief Warrant Officer 3
Posts: 2256
Joined: Mon Jun 17, 2013 11:39 pm
Location: Sutton in Ashfield, Nottinghamshire. UK
Great Britain

Re: Dragon 1/35 Sexton II - 147th Essex Yeomanry RHA

Post by wappynutter »

:eeek: Coming together real nice Gav... :thumb1:

Looking forward to seeing more of this kit...So much detail..Gotta love Dragon for that!
Good luck matey..
:pop: " Munch...munch...munch..."
:cheers2:
Regards Andy...Image
YouTube Channel..... http://www.youtube.com/channel/UCRdZFBjr6oO-T-2ydSB4HIg
User avatar
Gav0909
Chief Warrant Officer 5
Posts: 2927
Joined: Tue May 28, 2013 11:56 am
Location: Fife, Scotland
Contact:

Re: Dragon 1/35 Sexton II - 147th Essex Yeomanry RHA

Post by Gav0909 »

Image

Welcome to the next update fellas. :welcome:

First of all thanks for the comments so far.

Secondly, the meat of the update. Last time I was ready to start building the radio and its little "cupboard". Here are some pics of that.

The parts needed
Image

I decided to prime the interior just now, as I think it might be hard to paint if I stick it all together just now. I primed with Vallejo Black primer.
Image
Image
Image

Next I had to build the gun support. This in real life consists of a plate and several cross beams which are welded into the hull over the drivers position. He sits between the cross members (another reason I wanted to paint the interior now, as adding this structure would hinder painting later).
Image
Image

I then decided to get the rear hull deck built up. Basically this consists of adding a load of tools, fuel filler caps and some boxes.
Image
Image
Image
Image

As you can see this is the first bit of PE for this model. There isn't much, literally this bit of mesh, some straps (some of which need to go on the boxes on the rear deck, but it was late last night and I wasn't bending PE at that time of night!) and the radio cupboard grate.

That's all for this update. I need to do some research on the interior colour of Sextons. I think the fighting comparment at least was painted in the same colour as the vehicle itself. But not sure if this carried down into the drivers compartment too. I also need to have a think about the best order to do things in such that everything gets painted, but that I don't paint one bit, then realise I need to mask it all off to paint a bit nearby or something.

Cheers for looking. Comments are most welcome!

Ciao for now :hi:
User avatar
Gav0909
Chief Warrant Officer 5
Posts: 2927
Joined: Tue May 28, 2013 11:56 am
Location: Fife, Scotland
Contact:

Re: Dragon 1/35 Sexton II - 147th Essex Yeomanry RHA

Post by Gav0909 »

I was in the process of writing up my big and impressive history/background post with regards to the 147th RHA. But after some further research it would seem that Dragon have made a big boo boo in their colour call outs.

As you can see from the picture below, the top call out is for the 147th Essex Yeomanry. However some research online would suggest that the markings included for this scheme are for a vehicle from the 90th Field Regiment RA, 50th Division. No real biggy other than I was writing a load of history for the 147th!
Image

Image
This it the Flickr image that showed me Dragons mistake. This model was apparently made by the son in law of one of the crewmen from the vehicle depicted in the Dragon call out. So, I assume his information is correct since there is a pic of the guy in front of this particular vehicle. As such this is what I will be modelling.

The two units landed at the same place and near enough in time so its all still relevant.

Cheers.
User avatar
fly1ngdutchm4n
First Lieutenant
First Lieutenant
Posts: 3554
Joined: Fri Aug 09, 2013 11:17 pm
Location: Hoogerheide The Netherlands
Netherlands

Re: Dragon 1/35 Sexton II - 90th Field Regiment Royal Artill

Post by fly1ngdutchm4n »

Great progress Gav, coming together nicely :thumb2:
Build what you love, Love what you build
User avatar
UKguyInUSA
Second Lieutenant
Second Lieutenant
Posts: 3429
Joined: Sun Mar 30, 2014 10:19 pm
Location: New Hampshire, USA formerly Palm Beach, Florida, USA and Leicestershire, UK (until 1999)
Contact:

Re: Dragon 1/35 Sexton II - 90th Field Regiment Royal Artill

Post by UKguyInUSA »

Looking good so far....even though it's not an attractive vehicle! :thumb1:
WIP:: Tamiya 1/48 F4U-1A Corsair

Non-WIP::Eduard 1/48 Fokker DVII, Revell 1/32 Arado AR196 and 1/32 BF109G10 Erla,
User avatar
felisbarcinonensis
Command Sergeant Major
Posts: 860
Joined: Tue Jun 10, 2014 9:42 pm
Location: BCN

Re: Dragon 1/35 Sexton II - 90th Field Regiment Royal Artill

Post by felisbarcinonensis »

Great progress Gav! :thumb1: Finding the right colours is a tough job! Many imprecise references... in the end looks like sometimes it depended on somebody's circumstancial whim!

Real beauty is inside :lol:
User avatar
Paul
Site Admin
Site Admin
Posts: 12622
Joined: Thu May 23, 2013 4:47 pm
Location: Merseyside, England, UK
Contact:
England

Re: Dragon 1/35 Sexton II - 90th Field Regiment Royal Artill

Post by Paul »

Nice progress gav :thumb2: It is a an ugly thing though :eeek:
User avatar
Gav0909
Chief Warrant Officer 5
Posts: 2927
Joined: Tue May 28, 2013 11:56 am
Location: Fife, Scotland
Contact:

Re: Dragon 1/35 Sexton II - 90th Field Regiment Royal Artill

Post by Gav0909 »

Alright I get it! lol! You all think the Sexton is ugly :cry:

No progress recently due to work and thesis commitments, but I am taking the morning to myself today before work and so I might get something done, but probably not haha.
User avatar
Willem
Warrant Officer
Warrant Officer
Posts: 1556
Joined: Sun Apr 13, 2014 1:39 pm
Location: Leicestershire, UK.
Great Britain

Re: Dragon 1/35 Sexton II - 90th Field Regiment Royal Artill

Post by Willem »

Beauty is in the eye of the beholder, Gav or so my dear old Granny used to say. Mind you, she should know- she had a glass eye, wooden teeth and her warts had a wart problem.
:nena:
Looking good mate.

:cheers2:
Will

"A thing of orchestrated hell- a terrible symphony of light and flame."

Edward R Murrow
User avatar
Gav0909
Chief Warrant Officer 5
Posts: 2927
Joined: Tue May 28, 2013 11:56 am
Location: Fife, Scotland
Contact:

Re: Dragon 1/35 Sexton II - 90th Field Regiment Royal Artill

Post by Gav0909 »

Alas work and thesis corrections are still taking up all my time just now. But I may try and get some done later on this, even if its to do something to get some pics up on this thread.

Cheers
User avatar
wappynutter
Chief Warrant Officer 3
Posts: 2256
Joined: Mon Jun 17, 2013 11:39 pm
Location: Sutton in Ashfield, Nottinghamshire. UK
Great Britain

Re: Dragon 1/35 Sexton II - 90th Field Regiment Royal Artill

Post by wappynutter »

Good luck Gav, hope you find some time for the Sexton soon bud.... :thumb1:
All the best mate..
:cheers2:
Regards Andy...Image
YouTube Channel..... http://www.youtube.com/channel/UCRdZFBjr6oO-T-2ydSB4HIg
User avatar
Navcom
Sergeant First Class
Posts: 276
Joined: Sun Apr 20, 2014 5:07 pm
Location: MN USA
Contact:
United States of America

Re: Dragon 1/35 Sexton II - 90th Field Regiment Royal Artill

Post by Navcom »

I think she's a fine looking machine! Mind you, I'm not a tanker, but some of the best machines are not pretty. The A-10 comes to mind.

Nice work! Looking forward to seeing it complete. I might just have to try one of these tracked thingies some day!
Jeff
My scale model photography book...
http://www.scalephotography.com

MN Scale Modeler Virtual Museum
http://www.mnscalemodeler.net
User avatar
Gav0909
Chief Warrant Officer 5
Posts: 2927
Joined: Tue May 28, 2013 11:56 am
Location: Fife, Scotland
Contact:

Re: Dragon 1/35 Sexton II - 90th Field Regiment Royal Artill

Post by Gav0909 »

Image

I have recently managed to get a little bit more done on the Sexton between work and thesis. I have been a little put out recently as I got to a stage with this kit where it started fighting me a little. I am not adverse to a bit of a challenge in my modelling, but frankly I don't think there should be an excuse for ill fitting parts on a kit, especially a modern one (this is a 2012 tooling) and one you pay this kind of pricetag for. However I diverge.

The problem area has been in the fitment of the main vehicle sides and the rear deck. In fact its not the sides themselves, but the "boxes" on the rear of the hull. If I had known this would cause issues I may have altered the build steps somewhat to negate this, but I didn't.

A bit of fettling and tape later and it fits as good as I can get it! Any gaps left I may disguise with some camo netting or a tarp later on, depending how bad they look.

So lets have a look shall we at the progress so far.

Comm cable reel. I may find some thin wire to wrap around the spool to cover up the slightly boring looking plastic bit.
Image
Image

Inside of the left hand side vehicle wall.
Image

Hull rear with the Brengun stowage boxes in place (these, and the other boxes on the rear deck still need their PE straps added).
Image

Side in place. You can see a few sink marks which will need filled as well.
Image
Image

2nd side in place and the front plate and lower hull plate are just sat in place for now. I am in two minds as to whether I add these just now or not. I think if I do it will restrict painting of the interior, and I also need to paint that before I can add the gun mount, which needs to be in place before I glue this front hull bit in.
Image
Image
Image

Now comes the decision as to interior colour. Shermans, M10s etc where white inside I believe, but these Sextons were build in Canada and being open topped I assume that the interior would not be white. Most pics I have seen suggest the interior to be the same colour as the exterior, so that's what I am going for. In that case I can just prime and paint the interior at the same time as the rest of the vehicle.

That's it for this update. I will be sorting out a unit history update in the near future so stay tuned for that.

Thanks for reading, please do comment.

Ciao for now :hi:
User avatar
fly1ngdutchm4n
First Lieutenant
First Lieutenant
Posts: 3554
Joined: Fri Aug 09, 2013 11:17 pm
Location: Hoogerheide The Netherlands
Netherlands

Re: Dragon 1/35 Sexton II - 90th Field Regiment Royal Artill

Post by fly1ngdutchm4n »

looks great so far!
As for the interior, I would think that it would be the same colour as the vehicle itself.
Like you said, for being open topped. :thumb2:
Build what you love, Love what you build
User avatar
wappynutter
Chief Warrant Officer 3
Posts: 2256
Joined: Mon Jun 17, 2013 11:39 pm
Location: Sutton in Ashfield, Nottinghamshire. UK
Great Britain

Re: Dragon 1/35 Sexton II - 90th Field Regiment Royal Artill

Post by wappynutter »

Well done Gav....fight it buddy... all the way.... kick its A#s into shape! :whistle:
Nice update mate, i do like the Sexton .... :thumb1:
All the best, Happy Modelling.. :thumb2:
:cheers2:
Regards Andy...Image
YouTube Channel..... http://www.youtube.com/channel/UCRdZFBjr6oO-T-2ydSB4HIg
User avatar
Nige99
Command Sergeant Major
Posts: 751
Joined: Sun May 26, 2013 2:53 pm
Location: Wrexham North Wales

Re: Dragon 1/35 Sexton II - 90th Field Regiment Royal Artill

Post by Nige99 »

This build is coming along nicely! Can't wait to see it completed
You can run, but you'll only die tired!
User avatar
Gav0909
Chief Warrant Officer 5
Posts: 2927
Joined: Tue May 28, 2013 11:56 am
Location: Fife, Scotland
Contact:

Re: Dragon 1/35 Sexton II - 90th Field Regiment Royal Artill

Post by Gav0909 »

Image

Thanks for the comments. As I mentioned I am hoping now that the side panels are in place that the worst of the build issues are over. I am anticipating a little fettling to get the front to fit nice though.

I moved on to constructing the gun, a model in itself almost! This part will stay separate from the main hull and only ever sit in place on the model.

First thing was to construct one side of the gun cradle. This is the gunners side with the traverse and elevation controls, as well as the sight.
Image
Image

Various parts for the sight and elevation/traverse controls
Image

All in place
Image
Image

Pedestal and other side of the gun cradle
Image

Recoil mechanism was next. I think I might be able to make this part move still. As can be seen in the two pics. The gun will sit on top of the sliding part.
Image
Image
Image

That's it for now. Next is the gun barrel and breech I think. Lots more parts to go just for the gun!

Ciao for now
:hi: :hi:
User avatar
Nige201980
Captain
Captain
Posts: 4095
Joined: Wed Jun 05, 2013 9:30 am
Location: Doncaster South Yorkshire UK
Contact:

Re: Dragon 1/35 Sexton II - 90th Field Regiment Royal Artill

Post by Nige201980 »

Looking great so far Gav mate.
http://www.youtube.com/channel/UCy-TGcs5u_ZXSZ9kObNfsPg


On the go at the Mo

Quite a few :banana:
User avatar
Gav0909
Chief Warrant Officer 5
Posts: 2927
Joined: Tue May 28, 2013 11:56 am
Location: Fife, Scotland
Contact:

Re: Dragon 1/35 Sexton II - 90th Field Regiment Royal Artill

Post by Gav0909 »

Cheers Nige.

I am really keen to get this build done so I can start painting this. The gun is all built up now, so really I don't think there is much to do in the way of building. Few PE straps to add on the rear, details to add on the inside of the front plate for the driver instruments etc. Then I think I can get the rest of the model primed and on with the painting.
User avatar
Gav0909
Chief Warrant Officer 5
Posts: 2927
Joined: Tue May 28, 2013 11:56 am
Location: Fife, Scotland
Contact:

Re: Dragon 1/35 Sexton II - 90th Field Regiment Royal Artill

Post by Gav0909 »

Once again this build has stalled out a bit. I need to just put some detail parts on the inside face of the front hull plate, and a few other small parts and then I think this is ready for paint.

I will probably work on this some more today before work. I also have a history post to write and post as well.

Please keep checking back!

Cheers :hi:
User avatar
Gav0909
Chief Warrant Officer 5
Posts: 2927
Joined: Tue May 28, 2013 11:56 am
Location: Fife, Scotland
Contact:

Re: Dragon 1/35 Sexton II - 90th Field Regiment Royal Artill

Post by Gav0909 »

Image

Welcome to another update, this time it has progress pictures in it!! :banana: :banana:

I have managed to shoot some primer onto the Sexton and its various sub-assemblies. I now need to decide what colour to paint the main vehicle, some where painted in the standard Canadian/British Dark Green, others seem to have been in a more brown colour, with black camo. I think I am just going to paint mine in the standard British armour green with the black camo. So for this I will probably use Vallejo Russian Uniform.

Sorry the pics aren't that exciting, just black parts...

Image
Image
Image
Image

I left the front of the Sexton unprimed for now to give me somewhere to hold the kit, but I will re-prime this bit before I paint the base coats.

Cheers, please feel free to leave comments.

Ciao for now

:hi: :hi:
User avatar
Gav0909
Chief Warrant Officer 5
Posts: 2927
Joined: Tue May 28, 2013 11:56 am
Location: Fife, Scotland
Contact:

Re: Dragon 1/35 Sexton II - 90th Field Regiment Royal Artill

Post by Gav0909 »

Image

So I know its been nearly a month since my last update, and I am sorry for that. However a month since the last update and not a single comment, is a slight bit worrying. But hey ho.

This post will be my unit history and information post. And the following post will contain the final picture update. Not long after that post goes up there will be a reveal thread going up, and a YT video covering the reveal of this model.

90th Field Regiment, Royal Artillery

The 90th Field Regiment was raised at the start of September 1939, and its first war related duties were guarding the Royal Docks in London. It later moved to Sussex where it was in place to defend Southern England. During this time the Regiment was equipped with various artillery pieces, ranging from WW1 era British 4.5 inch, 18 pounder and 25 pounder guns to French 75 mm guns. By the time the Regiment was deployed overseas, it appears to have been fully equipped with the modern 25 pounder gun.

The Regiment was part of 56 (London) Division, and its first trip overseas was to Iraq, where it was stationed at Kirkut. During this time the Regiment took part in training in Iraq and Iran. An overland journey to Egypt saw the Regiment join the 50th (Northumbrian) Division to prepare for the Invasion of Sicily. The Regiment landed in Sicily in July 1943 and was in action 3 days after landing, operating in the area of Mount Etna. In October 1943, the Regiment returned to the UK in preparation for the Normandy landings. 50th Division was earmarked to spearhead the British amphibious landings in Normandy. The 90th FR were trained initially using the American built 105mm armed M7 Priest Self Propelled Howitzer. Before the invasion however the Regiment was issued the 25-pounder armed, Canadian build Sexton Self Propelled Howitzer. Sherman V's and Universal Carriers provided the OP vehicles for the unit.

The 90th FR were assigned as support for the 231 Brigade Group and would land at Jig sector on Gold Beach, the most westerly area of British 2nd Army. 2 troops of 95 mm howitzer armed Centaur tanks of the Royal Marine Support Group were also tasked with landing in this area.

At 0650 on D-Day, the Sextons and Centaurs began shooting at the Normandy coastline as their landing craft commenced their run in to the beach. Their initial target was the village of Hamel, but due to the loss of several control craft, the artillery was unable to accuratly fire upon their target. Infantry from the 1st Battalion, The Hampshire Regiment suffered heavy losses due to fire from the village, including senior officers and forward artillery observers, further hampering the effectiveness of the artillery. Only 5 of the 10 Centaurs were able to land, and 4 were put out of action by fire from the village. At 0825, A, C and E troops of the 90th FR landed and were in action at 0845. Their Sextons were the first artillery to land in the Jig Sector of Gold Beach.

Hamel was captured the following day, and the rest of 50th Divisions brigades landed. The 90th FR supported 151 Brigade in their push towards Bayeux. 90th FR were then involved in most of the 50th Divisions actions during Operations Perch and Bluecoat as the British moved inland from the beaches to secure and establish a solid foothold in Normandy.

Late 1944 saw the break up of 50th Division and control of the 90th FR was passed to the British 2nd Army. Early 1945 saw the Regiment supporting the actions of the First Canadian Army, including the 1st Polish Armoured Division and 4th Commando Brigade.

On 4th May 1945, after hearing on the wireless of the German surrender, Regimental officers shared a bottle of brandy which had been bought in Alexandria in 1943, and carried with the unit ever since. After VE day, the unit was put on occupation duties in Lunen under control of the 49th (West Riding) Infantry Division, and was subsequently put into suspended animation on 18th May 1946.

Here I have found a picture of the actual vehicle my model depicts. "Fee", from 465 Battery, F Troop, 90th Field Regiment, Royal Artillery.

Image
Image

Looking at the following images, it seemed that "F troop" had 4 guns named "Fee, Fie, Foe and Fum".

Image
Image
Image

Thanks for reading. Next post will be an update on the model itself.

Cheers :hi:
User avatar
wappynutter
Chief Warrant Officer 3
Posts: 2256
Joined: Mon Jun 17, 2013 11:39 pm
Location: Sutton in Ashfield, Nottinghamshire. UK
Great Britain

Re: Dragon 1/35 Sexton II - 90th Field Regiment Royal Artill

Post by wappynutter »

I'm still watchin mate!!
Don't be disheartened by the lack of posts, my threads a bit the same.. :scratch::
Think all the usual lurkers and posters are on their holidays or tied up with "real life" summertime, kids off school stuff to find time to do a full log on and post thing..
Even i got "Post-Traumatic-School holidays-disorder"..... coupled with " just-had-a-kid-itis..." :lol:
The views go up still tho' so someone's watching.. :D
Keep up the good work Gav,stay well bud.. :thumb1:
:cheers2:
Regards Andy...Image
YouTube Channel..... http://www.youtube.com/channel/UCRdZFBjr6oO-T-2ydSB4HIg
User avatar
wappynutter
Chief Warrant Officer 3
Posts: 2256
Joined: Mon Jun 17, 2013 11:39 pm
Location: Sutton in Ashfield, Nottinghamshire. UK
Great Britain

Re: Dragon 1/35 Sexton II - 90th Field Regiment Royal Artill

Post by wappynutter »

What's the quote from "Field of Dreams"??

" Build it...and they will come!"
Well take a look see anyways... lol.....
:pop: " munch....munch...munch..."
:cheers2:
Regards Andy...Image
YouTube Channel..... http://www.youtube.com/channel/UCRdZFBjr6oO-T-2ydSB4HIg
User avatar
Gav0909
Chief Warrant Officer 5
Posts: 2927
Joined: Tue May 28, 2013 11:56 am
Location: Fife, Scotland
Contact:

Re: Dragon 1/35 Sexton II - 90th Field Regiment Royal Artill

Post by Gav0909 »

Image

Hello and welcome to the last update of this GB entry. In the previous update I got the Sexton all primed up using Vallejo Black primer. Next steps were laying down some colour! Take a look!

Vallejo Model Colour Russian Uniform was used as a basecoat over the entire model.
Image
Image
Image
Image

I then wanted to create a slight "colour modulation" effect. I used VMC Russian Uniform and mixed in a touch of VMC Black.Image

I then applied this to the corners between plates, and the lower halves of the vertical surfaces.
Image
Image
Image
Image
Image
Image

VMC Russian Uniform was mixed with a touch of white for the upper surfaces. I later redid this effect as I had to glue bits together still and had to re-apply the paint to ensure all was cohesive. The same principle was applied, but I was much happier with the effect 2nd time around.

I painted the tools on the rear deck.
Image

And then proceeded to paint the details, and weather the fighting compartment and drivers controls etc.
Image
Image
Image
Image
Image
Image
Image

VMC German Camo Black Brown and VMA Steel were used for the chipping, as well as pure VMC Russian Uniform. I thought that the fighting compartment would be pretty worn out, so went with a heavily used look.

The tracks were primed Black and subsequently painted with AMMO Dark Tracks, and AMMO Tyres and Rubber. AMMO Track Wash was then used after worn metal had been depicted with Citadel Boltgun Metal.
Image

The 25 pounder after the modulation was re-applied and a coat of Alclad Klear was applied.
Image

Main vehicle varnished and decals on.
Image
Image
Image
Image
Image

And a final few pictures showing the weathering in progress. I used AMMO Nature effects Kursk Soil and Light Dust airbrushed around the lower hull, then blended with white spirit to show dusting. I then added some dust pigments in places. AMMO wash for Modern US Vehicles was used before this as a pin wash. And chips and scratches were added in the same manner as the interior. AK Rainstreaks and AMMO streaking grime for US Desert Vehicles were used to add some streaking to the sides of the vehicle for visual interest, and to create a used look. I am pleased overall with the weathering, although my control with pigments to create a more natural look could be improved.

Image
Image
Image
Image

And the final pictures will be in the reveal thread shortly, and within a few days I will put this on YT also.

Thanks for those who did look at my thread and take the time to comment. For those who didn't, any feedback on how to make future project logs more interesting etc. please let me know, as there was a distinct lack of comments on this one, and if I can improve then let me know how.

Thanks. :hi:
User avatar
wappynutter
Chief Warrant Officer 3
Posts: 2256
Joined: Mon Jun 17, 2013 11:39 pm
Location: Sutton in Ashfield, Nottinghamshire. UK
Great Britain

Re: Dragon 1/35 Sexton II - 90th Field Regiment Royal Artill

Post by wappynutter »

Nice bit of modulation and weathering going on mate... :clap:
Well done on finishing this build.. :thumb1:
:cheers2:
Regards Andy...Image
YouTube Channel..... http://www.youtube.com/channel/UCRdZFBjr6oO-T-2ydSB4HIg
User avatar
Tiger131
Chief Warrant Officer 2
Posts: 1700
Joined: Tue May 28, 2013 3:44 pm
Location: walsall
England

Re: Dragon 1/35 Sexton II - 90th Field Regiment Royal Artill

Post by Tiger131 »

love what your doing with the cracking kit and them photo's of the crew outside the vehicle is quality its screaming for that in a dio
Image
User avatar
gaz45
Chief Warrant Officer 3
Posts: 1971
Joined: Mon Jan 06, 2014 3:35 pm
Location: Nottingham uk
Great Britain

Re: Dragon 1/35 Sexton II - 90th Field Regiment Royal Artill

Post by gaz45 »

Very nice work there mate looks awesome
User avatar
Gav0909
Chief Warrant Officer 5
Posts: 2927
Joined: Tue May 28, 2013 11:56 am
Location: Fife, Scotland
Contact:

Re: Dragon 1/35 Sexton II - 90th Field Regiment Royal Artill

Post by Gav0909 »

Cheers guys.

I do plan on getting some figures for this, but not sure when. I haven't the space for a dio base etc, so it may wait until I have moved somewhere else and set up more display space. But I think it does need a wee base, like the M10 had.
Post Reply

Return to “Builds”