1/32 F4U BIRDCAGE CORSAIR

All your build threads here...

Moderator: T3hGuppy

Post Reply
User avatar
kprice52001
Corporal
Corporal
Posts: 59
Joined: Mon May 09, 2016 5:18 am
Location: Okinawa Japan
Contact:

1/32 F4U BIRDCAGE CORSAIR

Post by kprice52001 »

Hello I am new to the forum and this will be my first time entering a group build. I am currently editing my first ever YouTube video which is an unboxing and I will post it, hopefully, this evening and link it to the forum. Please check it out. I know that the purpose of the group build is to share my experience so that others my learn but I ask that you please reciprocate. I am eager to learn from you too, so please, if you have some constructive criticism I would love to hear it.

Here are a couple of pictures of the sprues so that you know its a fresh kit. I hope you can read the date on my Ipad I took it in high res so you should be able to zoom in and see the date. This is going to be the most challenging kit I have every attempted in my life so wish me luck and enjoy the show! :pop:
Image
Image
If it ain't rainin, you ain't trainin!
User avatar
Stokesy44
Major General
Major General
Posts: 8517
Joined: Thu Jun 18, 2015 10:13 am
Location: The Midlands, UK
Great Britain

Re: 1/32 F4U BIRDCAGE CORSAIR

Post by Stokesy44 »

You've picked a beauty to build mate. I've got it in my stash and the reviews say its even better than the Spit and the P51! Should be awesome.

Good luck :pop:

:cheers2:
Its been tried and tested, it works! So don't blame the system if you're no good. :doh:
User avatar
Paul
Site Admin
Site Admin
Posts: 12622
Joined: Thu May 23, 2013 4:47 pm
Location: Merseyside, England, UK
Contact:
England

Re: 1/32 F4U BIRDCAGE CORSAIR

Post by Paul »

Great entry :thumb2:
User avatar
kprice52001
Corporal
Corporal
Posts: 59
Joined: Mon May 09, 2016 5:18 am
Location: Okinawa Japan
Contact:

Re: 1/32 F4U BIRDCAGE CORSAIR

Post by kprice52001 »

Today I was digging up some info on what colors were actually used to paint the f4U-1A Bridcage and I stumbled across this article:
http://forum.largescalemodeller.com/top ... our-notes/

This guy was able to acquire an original Chance Vought Erection and Maintenance Instructions from Mr. Larry Webster who is associated with the New England Air Museum. The post gives the actual color call out that were used at the plant and includes paint ratios. Needless to say this is exactly what I was looking for in order to help me get my colors right for this build :banana:

Here is the summary of the article:

"What is the bottom line of all of this? Well, for one, F4U-1 Birdcage Corsairs had their interior areas except the wheelbays, engine cowling and accessory cowlings painted in a dull orange-brown tinted zinc chromate primer know as 'Salmon'. The closest paint that I have found to the samples in my possession is PollyScale Railroad, Southern Pacific Daylight Orange.

The wheelbays, engine cowling and accessory cowlings were painted in Non-Specular Light Gray to match the underside of the aircraft.

The cockpit was painted Du Pont Dull Dark Green. Photos of F4U 1s taken at the time show the cockpits as being a very dark color. Articles recovered from various F4U-1 crash sites confirm these instructions.

Articles removed from F4U 1, BuNo 02368 which crashed near Exeter, Rhode Island on September 12, 1944 show good evidence of the use of 'Salmon' primer on the structural spaces. Other parts recovered from other crash sites show evidence of 'Salmon' on interior spaces and inside the wheelbays and tailwheel bay. Others show 'Salmon' underneath Non-Specular Light Gray in the wheelbay tops.


Many thanks to Larry Webster for his time finding the documentation on this subject. Any errors or omissions are the sole responsibility of the author.


William Reece.

Fly Navy!


Excerpt from William Reece’s USN Interior Colors - Revised


F4U-1 Birdcage Corsair. Cockpit:

Well this is tricky. The best evidence is black.

Photos of F4U-1s taken at the time show the cockpits as being a very dark color. The F4U-1 E & M manual calls for Dull Dark Green. Photos and some wrecks show flat black.

A photo of 'Pappy" Boyington in Bruce Gamble's book, The Black Sheep, shows him sitting in a Birdcage with a black armor plate and upper seat. This a/c also has no headrest. All other areas of the F4U-1 Birdcage Corsair would normally be 'Salmon'.

Salmon is a pale pinkish/brown primer made by mixing Indian Red pigment with Zinc Chromate Yellow. The closest Munsell match is 2.5 YR 6/8 or between FS 32276 and FS 32356. This color was applied to the whole F4U before the final camo finish. The landing gear bays were this color.

The insides of the main gear doors were Light Gray. Sometimes this was only overspray over the Salmon. Note: there were canvas covers on the inner and outer wheel bays that were either Olive Drab or Light Gray. The closest paint that I have found to the Salmon samples in my possession is PollyScale Railroad, Southern Pacific Daylight Orange. The wheelbays, engine cowling and accessory cowlings were painted in Non-Specular Light Gray to match the underside of the aircraft".

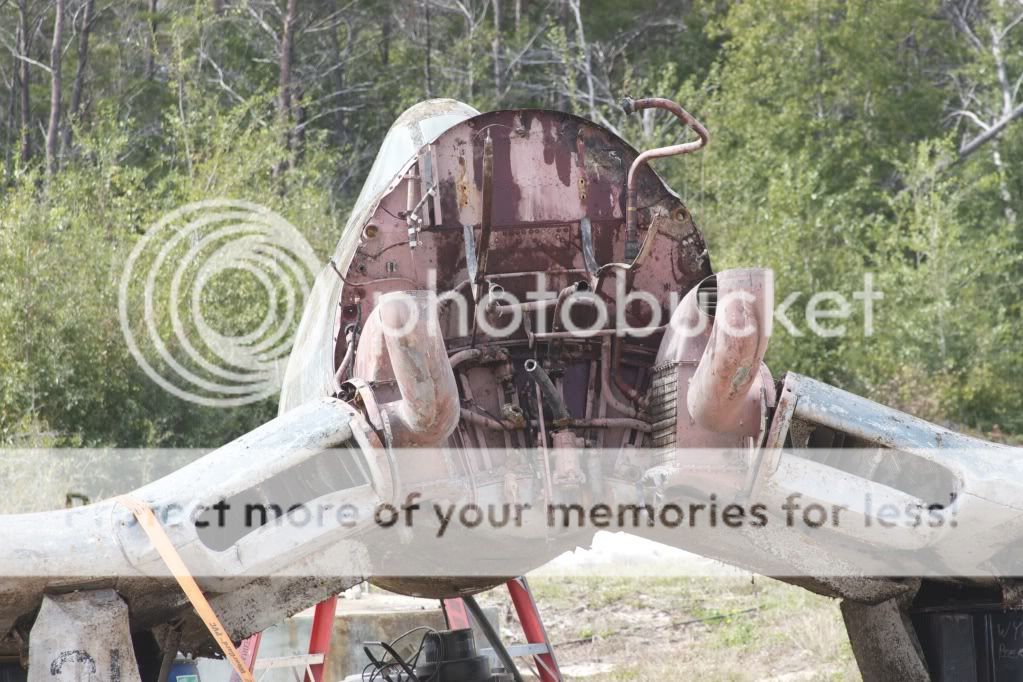
Here are some reference PICS:
Image

Image
If it ain't rainin, you ain't trainin!
User avatar
kprice52001
Corporal
Corporal
Posts: 59
Joined: Mon May 09, 2016 5:18 am
Location: Okinawa Japan
Contact:

Re: 1/32 F4U BIRDCAGE CORSAIR

Post by kprice52001 »

[youtube]-q3m1dBAztc[/youtube]

OK so it took me all weekend but here it is. https://youtu.be/-q3m1dBAztc My first ever You tube video. Today I posted the first of my series for a complete build vlog for this kit and for the group build. Please take the time to take a look and leave me some feed back. This was not an easy process, I had to learn how to edit in both adobe after effects and in windows movie maker. For me it was a slow learning curve. :bash:

At any rate here are a few pics of the progress I have made so far. Its not much but like I said I spent so much time getting this video up that I didn't even get to touch the Corsair this weekend. But I did get the cockpit put together and coated with primer so its almost ready for paint. I want to get the fuselage halfs ready first and I'll pint them all together. There be another video for that too. Thanks for looking

Image
Image
Image
Image
Image
Last edited by kprice52001 on Tue Sep 27, 2016 6:53 am, edited 5 times in total.
If it ain't rainin, you ain't trainin!
User avatar
mincemeat
Sergeant Major
Sergeant Major
Posts: 702
Joined: Sat Jun 14, 2014 9:14 pm
Location: MN, USA
United States of America

Re: 1/32 F4U BIRDCAGE CORSAIR

Post by mincemeat »

Great vid Kevin! So much opportunity for detail in that beast, makes me want to pick one up. I'm currently wrapping up a 1/48 Tamiya Corsair, just need to get the guts to try some different weathering. 1/48 is a pretty good size too.

One thing you may want to try is take some 28 or 32 gauge wire create a small loop with tweezers for CA glue. I found it works better than a toothpick. You can clean it up with a lighter. I use an old pin vise as a permanent holder.
Current Builds
Mk. A Whippet: http://www.intscalemodeller.com/viewtop ... 29&t=21073
Panzer IV Ausf D Buddy Build with SteveAFV: http://www.intscalemodeller.com/viewtop ... 29&t=19653
User avatar
NorthernModeller
Command Sergeant Major
Posts: 927
Joined: Sat Jan 09, 2016 8:39 pm
Location: Preston, Lancashire, England
Contact:
England

Re: 1/32 F4U BIRDCAGE CORSAIR

Post by NorthernModeller »

It is a lovely kit, I am really looking forward to seeing how the build progresses. I also really like the video formats
SAMI Magazine, Model aircraft and Tamiya Model Magazine contributor
User avatar
Paul
Site Admin
Site Admin
Posts: 12622
Joined: Thu May 23, 2013 4:47 pm
Location: Merseyside, England, UK
Contact:
England

Re: 1/32 F4U BIRDCAGE CORSAIR

Post by Paul »

Yep nice start to the build, as per my other post just remember pictures and text build a forum so videos often get overlooked, join our facebook page and post you updates there too :cheers2:
User avatar
kprice52001
Corporal
Corporal
Posts: 59
Joined: Mon May 09, 2016 5:18 am
Location: Okinawa Japan
Contact:

Re: 1/32 F4U BIRDCAGE CORSAIR

Post by kprice52001 »

NorthernModeller wrote:It is a lovely kit, I am really looking forward to seeing how the build progresses. I also really like the video formats
Thanks for the comment. I was concerned that it was going to be boring doing it this way. But I couldnt imagine shooting it with me jabbering the whole time so I opted for this format. I might change it up when I got to paint will see.

Thanks again

Kevin
If it ain't rainin, you ain't trainin!
User avatar
kprice52001
Corporal
Corporal
Posts: 59
Joined: Mon May 09, 2016 5:18 am
Location: Okinawa Japan
Contact:

Re: 1/32 F4U BIRDCAGE CORSAIR

Post by kprice52001 »

mincemeat wrote:Great vid Kevin! So much opportunity for detail in that beast, makes me want to pick one up. I'm currently wrapping up a 1/48 Tamiya Corsair, just need to get the guts to try some different weathering. 1/48 is a pretty good size too.

One thing you may want to try is take some 28 or 32 gauge wire create a small loop with tweezers for CA glue. I found it works better than a toothpick. You can clean it up with a lighter. I use an old pin vise as a permanent holder.

Thank You! I will try that I have been making quite a mess with my CA glue. :thumb2:

Ive done the corsair 1/48th before. Are you working on the one that has the folded wing option? I would be interested to see how its coming along. I still haven't decided If I'm going to do mine with the wings up or not. I would like to do one wing up and one down but that would look silly, I think.

Kevin
If it ain't rainin, you ain't trainin!
User avatar
Vleugelmoer
Sergeant Major of the Army
Posts: 1011
Joined: Mon Mar 21, 2016 3:06 pm
Location: Geleen, Limburg, The Netherlands
Contact:

Re: 1/32 F4U BIRDCAGE CORSAIR

Post by Vleugelmoer »

kprice52001 wrote:Today I was digging up some info on what colors were actually used to paint the f4U-1A Bridcage and I stumbled across this article:
http://forum.largescalemodeller.com/top ... our-notes/

This guy was able to acquire an original Chance Vought Erection and Maintenance Instructions from Mr. Larry Webster who is associated with the New England Air Museum. The post gives the actual color call out that were used at the plant and includes paint ratios. Needless to say this is exactly what I was looking for in order to help me get my colors right for this build :banana:
Hi there Kevin,

Having the original paint numbers does help. However in modeling we are also dealing with the "scale effect" this will make the "correct" colors to look more intens and vivid when used on a model. To combat this "problem" it is best to knock the paint down with white paint. For 1:32 scale aircraft it is between 15 and 25% depending on how sunbeaten you want the paint work to look.

As to your CA Glue difficulties some acetone or CA Debonder works great in cleaning up CA Glue mishaps. Do not use the acetone on the model though as it will ruin the plastic.

As always happy modeling and keep sticking styrene.

Paul J (The Other One)
Damm the glue is getting to me :crazy:

On the Bench:

1:35 Italeri Jeep Follow Me Jeep for the PTO GB
1:32 Revell F-4 Phantom for the Phantom Freaks SIG
User avatar
kprice52001
Corporal
Corporal
Posts: 59
Joined: Mon May 09, 2016 5:18 am
Location: Okinawa Japan
Contact:

Re: 1/32 F4U BIRDCAGE CORSAIR

Post by kprice52001 »

I set a goal for this week to get the Fuselage Halves put together. This was a bigger task then I had imagined but I was able to accomplish it and I had a lot of fun doing it. The kit has assembled flawlessly so for, I have no gripes to speak of. My biggest enemy as always has been me. Painting the cockpit was a lot of slips and near misses but I was able to correct them all. One problem that I'm having is gluing painted parts using tamiyas thin glue. What can I do to get a good weld when I have to paint parts before assy? I was thinking super glue but maybe there is a better way.

The kit required minimum amount of putty but I still managed to blow out a few rivets and panel lines, luckily they are on the bottom so not too big of an issue but I will to my best to re-scribe them back in. Also, I am going back to the drawing board on my paint scheme. I was supposed to paint the middle color (intermediate blue...) just aft of the cockpit under the canopy but when I got it laid down and My Hobbys intermediate blue was not at all what I expected. I am going to start searching for late WW2 US NAVY and MARINE aircraft colors to see what I can come up with. I think AK might have something in his AIR series but I have determined that what ever I get its going to have to be ordered online. My hobby shop has nothing that will work.

OK, enough of my rambling, I hope that this inspires you guys and as allays I would love your feed back. Thanks for having a look.

I used a five stage paint process on this section of the cockpit in order to apply some chipping. This is Mr. Hobby's gloss black lacquer, I used this as my second coat and it went down over my primer.

Image

This is Gaia Color metallic paint. I used this as my third coat because on Okinawa I can't find Alclad or Mr Hobby buffable paint so this is the alternative that I have found. Its not buffable but I find that its my best alternative.

Image

This is the result after I applied two coats of AK interactive's Heavy chipping fluid and then my top coat. I think the result are good and AK interactive was simple enough to work with. The Chipping fluid didn't go down as smooth as I hoped. When it dried it left bubbles in the layer but I simply moistened a brush and worked them out and was able to correct it. I normally use hair spray for this step and this was the first time I had used this product. I cant honestly say if it worked any better than hair spray or not but the paint seem to come off with less effort then when I use hair spray but, this could have been placebo effect. I Started with a brush moistened with tap water and liberally coated the part with water after a few minutes of working over the top coat in this manner I switched to a q-tip ( cotton bud) and had no problem. It was very predictable I didn't loose paint in giant chips like I have seen with hairspray, in this way I found the Chipping fluid to be more controllable than hair spray. Again, this could have been placebo effect.

Image
Image

The Final Product. I applied some chipping to the fire bottle where I though ti may have gotten bang around and I touched up the seat head rest where I accidentally chipped away some of the pint. Also, I cut off the sprue tab that I missed. I painted the PE with AK's bullet Metal Case AK4002 and I used XF-52 flat earth for the harnesses. Let me just tell you how difficult it was to get this harness to play ball. I went online and ordered Kicker and a glue applicator immediately after this was done LOL
Image[/img]

I weathered the forward section of the cockpit with a simple dry brush using some XF-18 silver. I didn't apply a wash to this mainly because I didn't have the heart, it was just too beautiful, but also because I thought that it was going to be too dark in the cockpit when the model is complete and I didn't want to make it any more difficult to see the details. I hope this doesn't come back to haunt me. I do plan on weathering the model when it is all said and done and I don't want the cockpit to look out of place. We shall see...... :scratch::

Image
Image

I painted the map pouch using the same colors that I used on the Photo Etch harness, AK 4002 Bullet Metal Case and XF-52 Flat Earth. My camera died so I didn't get any shots of the cock pit fully assembled. But it looks amazing... you'll have to take my word on that LOL
Image

I painted about three coats of black paint on the the back of the instrument panel and I feel that It really made the dials pop. You can also see that in the pictures above I originally painted the Oxygen control panel green because nt real life this is how you Identify O2 but it looked gay so I painted over it. I did leave the O2 bottle green though.
Image

More to follow soon. I still have the pics of the fuselage halves to post and how it turned out after I glued puttied and sanded it. Of course I filmed it all and I'm also working on editing the video as well. That too will follow in the coming days. Thanks again all :cheers2:
If it ain't rainin, you ain't trainin!
User avatar
mincemeat
Sergeant Major
Sergeant Major
Posts: 702
Joined: Sat Jun 14, 2014 9:14 pm
Location: MN, USA
United States of America

Re: 1/32 F4U BIRDCAGE CORSAIR

Post by mincemeat »

Hey Kevin, Great update!

There is no glue that will bond paint to paint surfaces well, because you are essentially doing just that. I dry fit the parts and with a hobby knife scrape the paint from the mating surfaces and apply my glue, whether its TET or CA. I've had the wings come off my Corsair due to this problem more than once, but since everything is all painted my glue application is pretty limited. It's now apply the glue and handle carefully. Granted, I glued the wings prior to paint, but I don't think I used enough TET because I was trying to avoid the "molten plastic splooj problem" in the wing connection area and screw up the panel line.

I do have the 1/48 Tamiya Birdcage Corsair with foldable wings, haven't finished it or gotten around to posting it. It's partly on my website in my signature. I've been at the ready to weather stage for months now and building a new website which has resulted in no posts lately or progress. I think you're right, it would be weird for one wing up and one down, unless your modelling a mechanical malfunction which would be your prerogative.

I've used the AKAN WWII US Navy Set, it's a beautiful paint. I plan on getting the RAF set. http://www.ebay.com/itm/AKAN-47201-Pain ... SwcnpToR-C

From what I've heard the chipping fluids are going to be more stable than hairspray and give you better controlled chips. It also depends on how many layers of chipping fluid you put down and the thickness of the paint on top.
Current Builds
Mk. A Whippet: http://www.intscalemodeller.com/viewtop ... 29&t=21073
Panzer IV Ausf D Buddy Build with SteveAFV: http://www.intscalemodeller.com/viewtop ... 29&t=19653
User avatar
kprice52001
Corporal
Corporal
Posts: 59
Joined: Mon May 09, 2016 5:18 am
Location: Okinawa Japan
Contact:

Re: 1/32 F4U BIRDCAGE CORSAIR

Post by kprice52001 »

mincemeat wrote:Hey Kevin, Great update!

There is no glue that will bond paint to paint surfaces well, because you are essentially doing just that. I dry fit the parts and with a hobby knife scrape the paint from the mating surfaces and apply my glue, whether its TET or CA. I've had the wings come off my Corsair due to this problem more than once, but since everything is all painted my glue application is pretty limited. It's now apply the glue and handle carefully. Granted, I glued the wings prior to paint, but I don't think I used enough TET because I was trying to avoid the "molten plastic splooj problem" in the wing connection area and screw up the panel line.

I do have the 1/48 Tamiya Birdcage Corsair with foldable wings, haven't finished it or gotten around to posting it. It's partly on my website in my signature. I've been at the ready to weather stage for months now and building a new website which has resulted in no posts lately or progress. I think you're right, it would be weird for one wing up and one down, unless your modelling a mechanical malfunction which would be your prerogative.

I've used the AKAN WWII US Navy Set, it's a beautiful paint. I plan on getting the RAF set. http://www.ebay.com/itm/AKAN-47201-Pain ... SwcnpToR-C

From what I've heard the chipping fluids are going to be more stable than hairspray and give you better controlled chips. It also depends on how many layers of chipping fluid you put down and the thickness of the paint on top.
Thanks for the heads up on the paints. Yesterday I ordered a last Ww2 us nave and marine paint set by HATAKA:

http://www.hobbyworld-usa.com/Store/hat ... t-set.html

When they come In ill have a look and if they don't look right then I'll order the AKAN set for sure. I wish I would have seen this post before I place the order :bash:
If it ain't rainin, you ain't trainin!
User avatar
kprice52001
Corporal
Corporal
Posts: 59
Joined: Mon May 09, 2016 5:18 am
Location: Okinawa Japan
Contact:

Re: 1/32 F4U BIRDCAGE CORSAIR

Post by kprice52001 »

Ive got the Fuselage but together. There were just a couple of seems that needed a little putty I used magic putty to fill the seem and sanded back the excess then applied MR Surfacer 1000 after it dried I wiped it down with a moistened paper towel, so overall it was an excellent fit. I did manage to loose some surface detail on the bottom of the aircraft and I don't own a rivet maker so I'm just going to have to let it go. I did my best to scribe the panel lines back in.

You can see in the pics the completed cockpit. I am happy with the way it turned out.

Next Step is the engine! I am enjoying this kit and sharing it progress thanks again for looking!

Image
Image
Image
Image
Image
Image
Image
Image
Image
Image
Image
Image
If it ain't rainin, you ain't trainin!
User avatar
kprice52001
Corporal
Corporal
Posts: 59
Joined: Mon May 09, 2016 5:18 am
Location: Okinawa Japan
Contact:

Re: 1/32 F4U BIRDCAGE CORSAIR

Post by kprice52001 »

Let me start off with a little rant....I love AK paints and the weathering products all work exactly like they are supposed to. But for some reason I cant get their primers or their varnishes to preform. So far it has taken everything in me to not toss them in the garbage. Tell me your thoughts. If anyone has used them with any success I would love to hear it. Or if you agree I would like to hear that too.... Enough Moaning.....

Please let me know if you have any suggestions, input, or wisdom that you can share on this build. What am I doing wrong what did did/would you do different? Thanks! :cheers2:

This weekend I had a little extra time off work so I was able to complete the engine assy. I took the time to weather it using AK interactive's enamels. I base coated the gear box with Mr. Hobby's Ultra Violet grey which I think better represented the pictures I was able to find of corsairs. All be it, I know that these may not be accurate as they too are reproductions but the call out in the kit was for a flat grey color and was a lighter gray. The Ultra Violet Grey was a semi gloss and this was appealing to me even though I had to clear coat it so that I could weather it.

As I began to weather the cylinder heads I ran into some trouble. Originally I used AK's gloss varnish which I shoot straight out of the bottle over Gaia lacquer based Star Bright Aluminum and immediately noticed something wrong, as soon as I laid it down it beaded up like rain on a freshly waxed car. I though well maybe it will level so I left it sit for the day and walked away from the bench. When I came back it looked a little wavy but I didn't worry about it too much I knew I was going to weather it and though it might leave a neat effect. However, As soon as I started to clean up the wash I was using the Odorless thinners they stripped the varnish clean off. This didn't make any sense to me as it is an acrylic varnish. So I ended up stripping the paint off using Mr. Hobby's lacquer thinners very slowly with a flat brush and then repainted the base color. After it dried I shot Gaia's lacquer Based Ex-Clear varnish over all the components that I had already shot with the AK. Problem solved no more issues with the weathering.

Here are the pics of where I am at so far:


In this pic you may be able to make it out. I base coated the exhaust with a gunmetal color and then in the bend of the pipe I shot a very thin mix of Tamiya clear orange to give a burnt effect. It was hard for the camera to pic it up but this was the best shot of it I was able to get.
Image
Image

The gearbox was base coated in Ultra Violet Greay Mr. Hobby and then weathered with AK Interactive Streaking Engine grime and in a few spots I used engine oil effects mainly just at the base of the prop shaft as if the seal was a little worn out from use. I liked the effect. I know that in this picture it looks very overdone but I continued to bled it after this was taken and you can see in later pics how it turned out. I am happy with it. :dance:
Image

The instructions called for these to be painted in a semi gloss black and then, I imagine, Tamiya wants us to dry brush the detail back it. I felt differently, as you can see. In order to get a similar effect I did it in reverse. On the cylinder heads I painted a base coat of Gaia Star Bright Aluminum and the applied AK's engine grime enamel wash using it as a filter. I think it turned out great. It was exactly what I was anticipating so again AK washes preform flawlessly and with ease. I'm a big Fan...
Image
Image
Image
Image

This is the Engine installed in the air-frame I would love to hear what you guys think about how it coming along and if you thing there is any improvements I can make to the proces to make this build look better.

Image

Image
Image
If it ain't rainin, you ain't trainin!
User avatar
kprice52001
Corporal
Corporal
Posts: 59
Joined: Mon May 09, 2016 5:18 am
Location: Okinawa Japan
Contact:

Re: 1/32 F4U BIRDCAGE CORSAIR

Post by kprice52001 »

I was finally able to edit and post the second part of my video build. In this video I mainly get the cockpit and fuselage painted and detailed. I hope you find it helpful, let me know what you think.

[youtube]TVu6zgmrppc[/youtube]
If it ain't rainin, you ain't trainin!
User avatar
kprice52001
Corporal
Corporal
Posts: 59
Joined: Mon May 09, 2016 5:18 am
Location: Okinawa Japan
Contact:

Re: 1/32 F4U BIRDCAGE CORSAIR

Post by kprice52001 »

Here is Part 3 of my video build:

I spend a lot of time weathering and detailing the engine in this video. I show how I used AK interactives products to to get a streaking effect on the crank case and how I used a wash to apply a variation in the tone on the radial engine. I base painted the engine with Gaia'a Star Aluminum and then used a dark brown wash to bring out the detail. I felt this way was less time consuming then painting the engine black and then dry brushing the detail in. Also, I show how I used Tamiya Clear Orange thinned down using 9 parts Mr. Hobby Lacquer thinner to 1 part Tamiya paint in order to make the paint even more transparent. Using this mix I was able to airbrush the bends in the exhaust manifold to achieve a burnt look that I feel gives a more realistic look. :thumb2:

As always I hope that you find the video informative and useful. Let me know what you think. Your comments me a lot and are very helpful.

Kevin

[youtube]EMbTByIFYoI[/youtube]
If it ain't rainin, you ain't trainin!
User avatar
kprice52001
Corporal
Corporal
Posts: 59
Joined: Mon May 09, 2016 5:18 am
Location: Okinawa Japan
Contact:

Re: 1/32 F4U BIRDCAGE CORSAIR

Post by kprice52001 »

I got my HATAKA paints in the mail and was finally able to lay them down to see how they look. I think that the top color is too dark and that is the problem Ive been running into. I want a faded appearance but I don't want to just add white because If I have to do any touch up, matching the paint will be very difficult. However, I may not have a choice.

I also laid down the Mr. Hobby Aquios colors in equivalent shades. Up text is to shoot the Tamiya and the Mr. Hobby, Mr. Color(lacquer line) down and see what decision I'm forced to make. Ill post those pics later this after noon but for know were are the HATAKA and Mr. Aquios samples.

What are your thoughts.

Image
Image
Image
If it ain't rainin, you ain't trainin!
User avatar
mincemeat
Sergeant Major
Sergeant Major
Posts: 702
Joined: Sat Jun 14, 2014 9:14 pm
Location: MN, USA
United States of America

Re: 1/32 F4U BIRDCAGE CORSAIR

Post by mincemeat »

Black basing.

[youtube]_yQNHVFf0uU[/youtube]
Current Builds
Mk. A Whippet: http://www.intscalemodeller.com/viewtop ... 29&t=21073
Panzer IV Ausf D Buddy Build with SteveAFV: http://www.intscalemodeller.com/viewtop ... 29&t=19653
User avatar
kprice52001
Corporal
Corporal
Posts: 59
Joined: Mon May 09, 2016 5:18 am
Location: Okinawa Japan
Contact:

Re: 1/32 F4U BIRDCAGE CORSAIR

Post by kprice52001 »

mincemeat wrote:Black basing.

[youtube]_yQNHVFf0uU[/youtube]
What a great resource! Thank You so much. I am defiantly going to give this a try. I have to get the wings assembled so it may be a few more days or so before I get to paint this thing. Work as always seems to get in the way of my fun. But I will keep updates coming and again thank you for the help.

Kevin
If it ain't rainin, you ain't trainin!
User avatar
mincemeat
Sergeant Major
Sergeant Major
Posts: 702
Joined: Sat Jun 14, 2014 9:14 pm
Location: MN, USA
United States of America

Re: 1/32 F4U BIRDCAGE CORSAIR

Post by mincemeat »

You're welcome. Here is the blog post to go with it. It has a little more detail to ratios etc.

https://doogsmodels.com/2014/07/03/tech ... ck-basing/
Current Builds
Mk. A Whippet: http://www.intscalemodeller.com/viewtop ... 29&t=21073
Panzer IV Ausf D Buddy Build with SteveAFV: http://www.intscalemodeller.com/viewtop ... 29&t=19653
Bissyboat
Sergeant Major of the Army
Posts: 1254
Joined: Sun Jan 05, 2014 9:49 pm
Location: Norway

Re: 1/32 F4U BIRDCAGE CORSAIR

Post by Bissyboat »

Great details on the office. Keep up the good work! :th:
Where`s my dinghy?
Post Reply

Return to “Builds”