SMJ's Tamiya 1/24 Porsche 911 Turbo '88

Post your in progress builds here

Moderator: T3hGuppy

Post Reply
User avatar
ScaleModelJedi
Master Sergeant
Master Sergeant
Posts: 396
Joined: Sun Dec 20, 2015 12:47 am
Location: Birmingham, UK
Contact:

SMJ's Tamiya 1/24 Porsche 911 Turbo '88

Post by ScaleModelJedi »

When I heard about this SIG I had to enter as Mr McCord is a top bloke :th:, For my entry I will be building Tamiya's 1/24 Porsche 911 Turbo '88. This is a 2005 kit with the kit number 24279.

Image

Contents
Image
There are no failed builds only learning experiences.
MY Youtube channel : Scale Model Jedi
https://www.youtube.com/channel/UCSk5py ... taceCr3_3g
User avatar
ScaleModelJedi
Master Sergeant
Master Sergeant
Posts: 396
Joined: Sun Dec 20, 2015 12:47 am
Location: Birmingham, UK
Contact:

Re: SMJ's Tamiya 1/24 Porsche 911 Turbo '88

Post by ScaleModelJedi »

First off I made a start with the body. There were some seam lines that ran from the headlight up to the windscreen and a couple on the rear running from the spoiler down to the base. These were a little tricky in places to clean up and still showed up a line after sanding and polishing but no step could be felt. Hopefully they will not show through the paint. I then used the paint prep kit from Zero paints to clean up and key the surface ready for primer. This product is applied to the surface using the scourer and clean water and worked in to the surface. This took the high sheen off the plastic and left a nice surface for primer.

Image

After drying the body off I primed it using Zero paints Etch primer. This is a two part primer and hardener that is mixed 50/50. This is probably not needed but I wanted to give it a try. It sprayed really well and gave a nice smooth finish. A couple of areas needed a bit of clean up around the bumpers as some of the seams showed through. The primer sanded really well and was easy to cover with out showing up.

Image

Next up was the top coat, for this I used Zero paints Gauloises extreme blue ZP-1045. This was the first time using Zero paints so was keen to see how the performed. It sprayed really well through my Iwata HP-TH. It needs a bit of clean up in a couple of places and a further coat but I'm pleased with how it's looking and love the colour.

Image

That's all for now made some good progress and looking forward to doing some more work on this.
Thank you for looking :th:
There are no failed builds only learning experiences.
MY Youtube channel : Scale Model Jedi
https://www.youtube.com/channel/UCSk5py ... taceCr3_3g
User avatar
Timplastic
Sergeant Major
Sergeant Major
Posts: 648
Joined: Thu Oct 09, 2014 7:29 am
Location: French quarter
Contact:
UN

Re: SMJ's Tamiya 1/24 Porsche 911 Turbo '88

Post by Timplastic »

looks great Si

You know i got that colour and was tempted to paint mine this colour and from whats in the i would have not thought that this is how the colour would spray out.

look forward too the gloss
I like to know what you think even if it is critique , If you spotted it let me know
Trying to finish what I started, and take part

My youtube channel that needs some updates
https://www.youtube.com/channel/UCjQvLz ... subscriberImage
User avatar
EvilCarrot
Sergeant
Sergeant
Posts: 147
Joined: Wed Jul 27, 2016 9:08 pm
Location: Belgium

Re: SMJ's Tamiya 1/24 Porsche 911 Turbo '88

Post by EvilCarrot »

Really nice looking paint job there, Si! Hope I'll be able to get a nice smooth finish like that.
Sebastian
User avatar
Twokidsnosleep
General
General
Posts: 18138
Joined: Thu Aug 07, 2014 4:07 pm
Location: BC,Canada
Canada

Re: SMJ's Tamiya 1/24 Porsche 911 Turbo '88

Post by Twokidsnosleep »

That is solid painting skills from prep to colour layer, WOW :clap:
The blue looks absolutely magnificent :thumb2:
Just subscribed to your channel, gotta see more work like that!

Also, I really like that Tamiya kit as well...it just looks better than the Fujimi or Revell and you KNOW it will go together well
Wishing mine was Tamiya
Scott

On, Under or near the desk
Brewster Buffalo ..buddy build
Rockford Firebird
1/72 Black Pearl Pirate Ship in dry dock
User avatar
ScaleModelJedi
Master Sergeant
Master Sergeant
Posts: 396
Joined: Sun Dec 20, 2015 12:47 am
Location: Birmingham, UK
Contact:

Re: SMJ's Tamiya 1/24 Porsche 911 Turbo '88

Post by ScaleModelJedi »

Thank you guy's :th:

So on with the build and to get this all finished before the deadline :crazy:

The interior was all primed in Ultimate black and I used Mr Hobby aqueous 15 Bright blue for the centre sections of the seats. The rest was left in the black primer colour.

Image

Image

The underside was masked of and sprayed with the body colour. This was sprayed over black primer and the body was over grey so a slight darker colour on the under side. I also left this as is and didn't give it a gloss coat. The engine detail was painted with Vallejo metal colours Aluminium and steel. The exhaust was sprayed with some AK extreme metals gun metal and burnt metal, with AK extreme Chrome for the tips.

Image

I stripped the chrome off the wheels with some bleach and then gave them a coat of Ultimate gloss black primer. I was going to re chrome them but decided I liked the look of the black so left them as they are.

Image

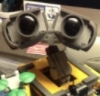
Chassis with tub and the wheels on.

Image

Test fitting the body

Image

First time using the Zero paints 2K diamond clearcoat and must say I'm very impressed with how it turned out, I think I could of done with a bit more thinner in the mix to get it to spray a bit nicer but it turned out ok.

Image

I first gave it a light coat wich was then left for ten minutes to tack off and then sprayed two heavier coats at 5 minute interavls.
Image

Image

Next up was to polish the body, For this I used Zero paints polishing compounds. Starting with the coarse and working through to the fine.
First time using these and they seemed to work really well. Not sure how they compare to Tamiya's as I've yet to use those.

https://scontent-lhr3-1.xx.fbcdn.net/v/ ... e=5A45C458

The body after polishing

Image

So all that was left was to paint the black parts and assemble the last few parts to the body. I masked off all the areas to paint the black and used black primer for these areas. The clear parts for the lights were all left clear as I liked the look of them.

Thats all I got until the final reveal. Thank you for looking :th:
There are no failed builds only learning experiences.
MY Youtube channel : Scale Model Jedi
https://www.youtube.com/channel/UCSk5py ... taceCr3_3g
Post Reply

Return to “Build threads”