My first build on this forum.
My first group build.
And my first buildreport (is this how you guys call it?) in English, so forgive
me for any mistakes. If I don't know the correct word for something, I'll just
describe it and hope you will understand.
So, like the title says, the DUKW.
Brought to you by the people ho gave you the GMC CCKW, or "Deuce and a half"
Seen here during D-day.

First of all, the name DUKW.
The name DUKW comes from the model naming terminology used by GMC.
"D", designed in 1942
"U", "utility"
"K", all-wheel drive
"W", dual rear axles
And now that's cleared, a (very) brief history
In 1942, the U.S. military, represented by the Commanding General, Service and Supply,
called the National Defense Research Committee to provide an amphibious vehicle
capable of traveling both at sea and on land.
With 6 wheel drive, the first prototype was manufactured by General Motors Company.
Immediately adopted by the U.S. Army, the GMC DUKW 353 could move in the water
using a propeller.
This vehicle could carry a large amount of equipment (up to 2368 kg) or 25 equipped
troops. Widely used during amphibious exercises, including the Normandy landings,
its maneuverability allowed the DUKW to be the link between transport ships and
the beach. It could also cross rivers.
Used during the Korean War, the GMC DUKW 353 were highly appreciated by American
soldiers. The DUKW remained in service until the 50s
And some facts and numbers
Creator: USA
Name: GMC DUKW 353
Length: 9,45 m
Width: 2,10 m
Height: 2,44 m
Weight: 6600 kg
Maximum speed at sea: 10 km/h
Maximum speed on land: 80 km/h
Maximum autonomy at sea: 80 km
Maximum autonomy on land: 385 km
Armament: 12,7 mm Browning machine gun
Transport : 25 soldiers with equipment or 2368 kg of material
Engine: GMC 270 6-cylinder, 4 417 cc, 104 hp, 2 750 rpm
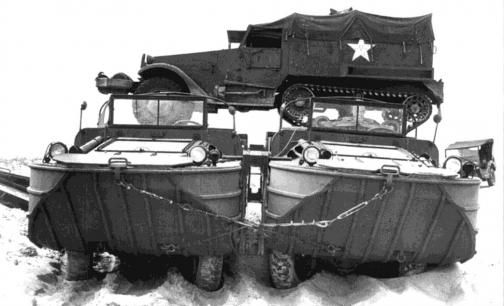
As you can see, it was not only used for transporting troops and supplies.
With a construction between two DUKW's, they could also carry some bigger
loads.

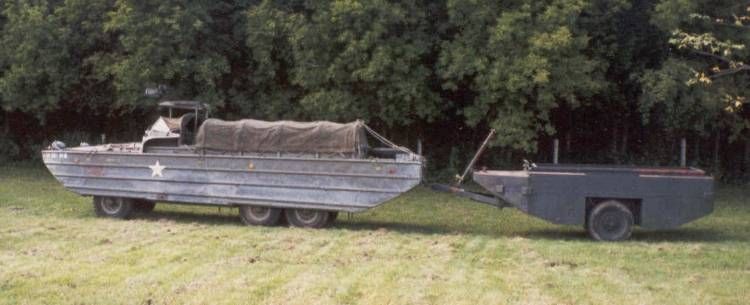
There even was a floating trailer for it.
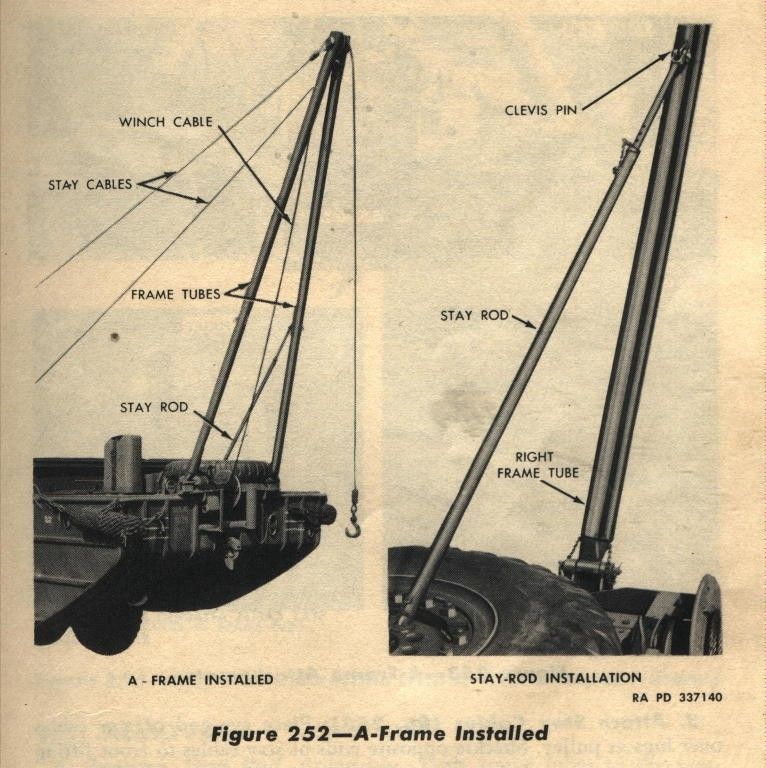
And a A-frame crane, Used for loading and unloading other DUKW's.
Ok, that was enough facts for me, up to the kit. I found this kit on MP, a Dutch Amazone
I guess, like all my kits up to now, for a very nice price
used to be a pilot, went all over the world and everywhere he came he bought kits, so he
would have something to do once he stopped working. Now retired, he found out he had over
a thousand kits on the attick, so decided to keep the ones he liked most and sell the rest
for really low prices. My luck.
The reason I chose for this build, is that YOU chose this GB and I had had this one
lying around, so...
The kit is the Italeri 6392 from 2002.

Sprues.

Small sinkhole, but for the rest, no flash and full with detail. I'm inpressed.


Nice detail on the dashboard, gauges and switches (look at the one sticking out even...)

Windscreen with the wipers allready on, woohoo
or loosing them.


It's even got his own bra! Or should I say: she...

Again, look at the detail. Don't forget were talking about Italeri.

The glass.

The enormous decal sheet.

And off course the book.

You can choose between 3 versions.

And the version I'm going to make (DUH)

I'm going to build this mainly oob, maybe adding some scratch, I don't know yet. I always try
to find as many as possible pictures of the object I'm building and when I see something
that's missing in the kit and is relativly easy to scratch (so no, not a complete engine),
then I will try to bake something and ad it. That also depends on how the build
goes. For some reason I can only work on a build for certain amount off time. If it takes
to long I loose interest and I just want to finish it (I know.....
Sorry no PE for me (up to now), because I think that when I buy a kit on MP for like
10 or 15 euro's, putting on a PE set for 35 euro's is like crazy.
But he, that's me.
And now, as I'm used to from the dutch forum I'm on, when you start a topic,
you also make a start on the build.
______________________________________________________________________________
______________________________________________________________________________
Part 1.
I always like to take out the big parts and do a dryfit, just to see how
she's gone look.
Here she (it's the bra thing...)is, next to here brother.

WOW, they realy added some serious stuff, just to get her floating.
Now I know it's D-day and they probably send in a lot off new vehicles into the
battle, but I like my vehicles to have a used look (even the one on the boxart
has some damage), and knowing this is a boat, used for driving out of the water
onto the shore, made from sheet metal. It must have hit some rocks, creating
some dents and scratches here and there. So out comes the dremel.

And here we go. Off course on the front.

But also on the sides.

And a bigger booboo.

Probably from driving in England, where everybody (still) drives on the wrong
side off the road..
Did the rump all the way around and the started on cleaning and assembling some
small parts.
Putting the backplates on the seats.

Hmm, still need some cleaning I see.
Tried some testfitting, but it's a no go

The locatorribs are wider then the hole in the bottom off the seat. So from this

To this.

And..

That's better.
The book tells you to build up the complete upper part (deck?) first, and at the
end put the top and bottom together. But inside the hull there's nothing so
I was thinking about glueing it together right away. But after putting in
the grate (?) behind the cabine, I realised you can see trough it (duh..) so
I have to paint the inside as well.

Since I'm waiting for my paint to arrive, I'll wait and follow the instructions.
Some more parts, just to show you some detail.


Even a hint of fabric on the seats.

The exhaustpipe with allready a hole in it, thank you Italeri.

Made it a little bigger, for realism and sanded it with some rough paper for the
rusted look later on.

Here you were supposed to glue it on the grid, but in real life it would come
through the grit. So drilled a hole, slightly bigger then the pipe and glued
it in possition.


And yes, I know. Would have been nice to put in some grate myself, but since I'
have only started building again since this year, I don't have any stuff
laying around for making a grate. So maybe next time.
The first pinmarks I found were on the sides for making the loading area.


They are the kind that stick out, so just sanding required. Only little bit
fiddly because off the rivets close to it.
But you will see the result of that and some more in part 2.
______________________________________________________________________________
______________________________________________________________________________
It's been a nice build up to now. Still very surprised with the quality of
the kit.
The only problem I have to solve is the small parts and the details in the
cabine. If I put them (handels, steeringwheel) in now, it will be a hell of
a job painting the details and stuff. Same goes for the dashboard.
But if I don't put them in, I can't put on the windscreen and the I can't put
on the intake covers on the side and so on, they are all connected
But then I will end up with a bunch off loose parts, all painted, having to put
everything together without messing up the paint
Normally with a truck, a build the cabine, paint it, and close it up before
painting the rest of the vehicle (like with airplanes), but this one has a
open cabine, so that's a nono.
Let me know about your thoughts about this, and tips off course...
Oh, and if you see any mistakes I have made, please let me know
After all, I'm here to learn and become the Jedi off modelling
Thanks for watching,
Peter.


 [/URL]