

Hello everyone,
This is my first ever entry into a SIG here at ISM. I've recently started building scale models again so looking forward to following the pros and learning a lot!
I'm going to build a Tamiya Leopard 2A5. It is going to be stock standard out of the box unless my PE part arrive within the next week. We have been struggling with a Post Office strike here and mail is just not getting through from abroad at the moment. Unboxing pics will follow soon.
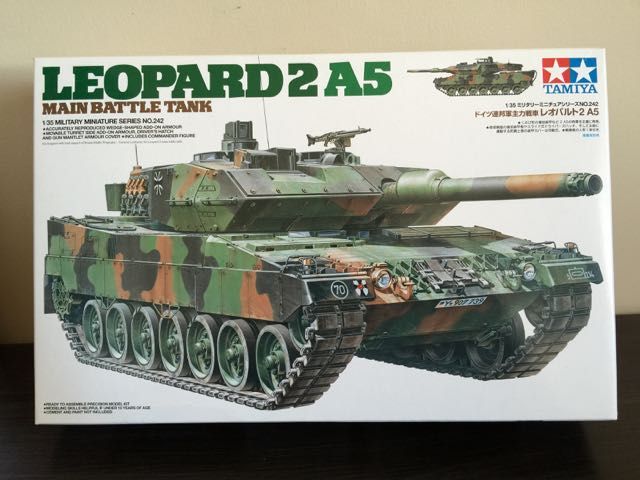
Tamiya 1/35 Leopard 2A5
Tamiya 1/35 Leopard 2A5
- Attachments
-
- Modern Armor Leopard 2.jpg (55.92 KiB) Viewed 6812 times
JediBoer
On the bench righ now: Hmm... Lots of unfinished business!
On the bench righ now: Hmm... Lots of unfinished business!
-
DBMiller

- Chief Warrant Officer 3

- Posts: 2250
- Joined: Mon Jan 06, 2014 8:10 pm
- Location: Guilford, Vermont, USA

Re: Tamiya 1/35 Leopard 2A5
I'm glad you are building this! I've been wanting a Leopard for a while so this will be a great build to watch! 
ON THE BENCH: Do I have to say? 


Re: Tamiya 1/35 Leopard 2A5
Let's unbox this wild cat!
So, the box is typical Tamiya.
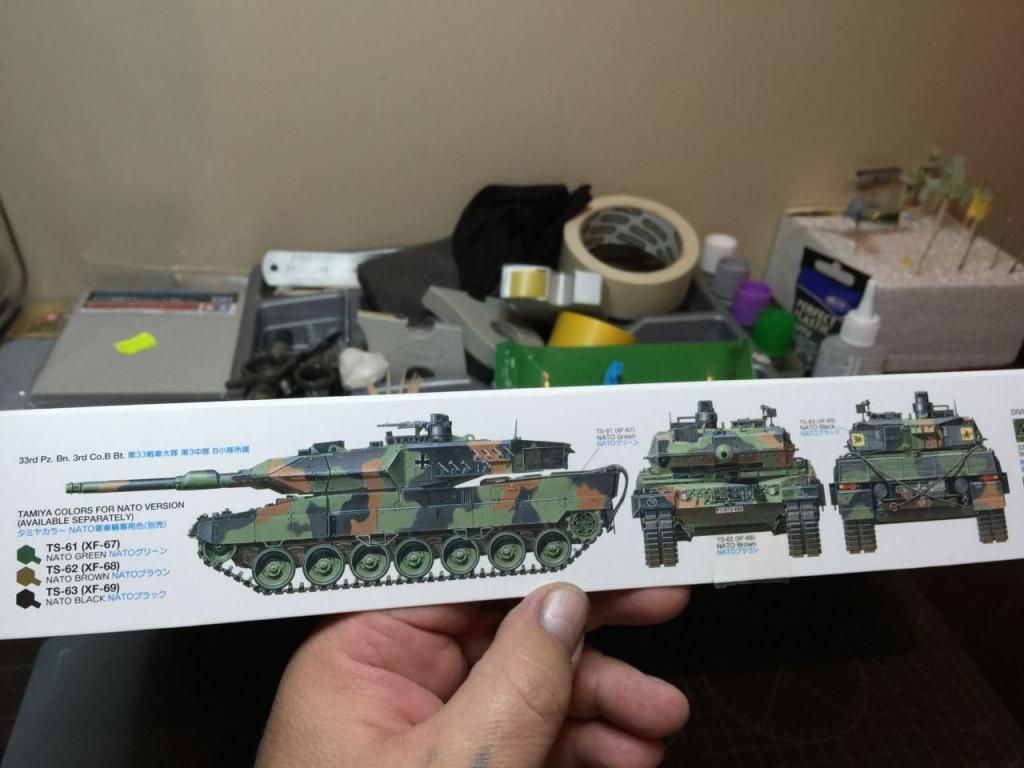
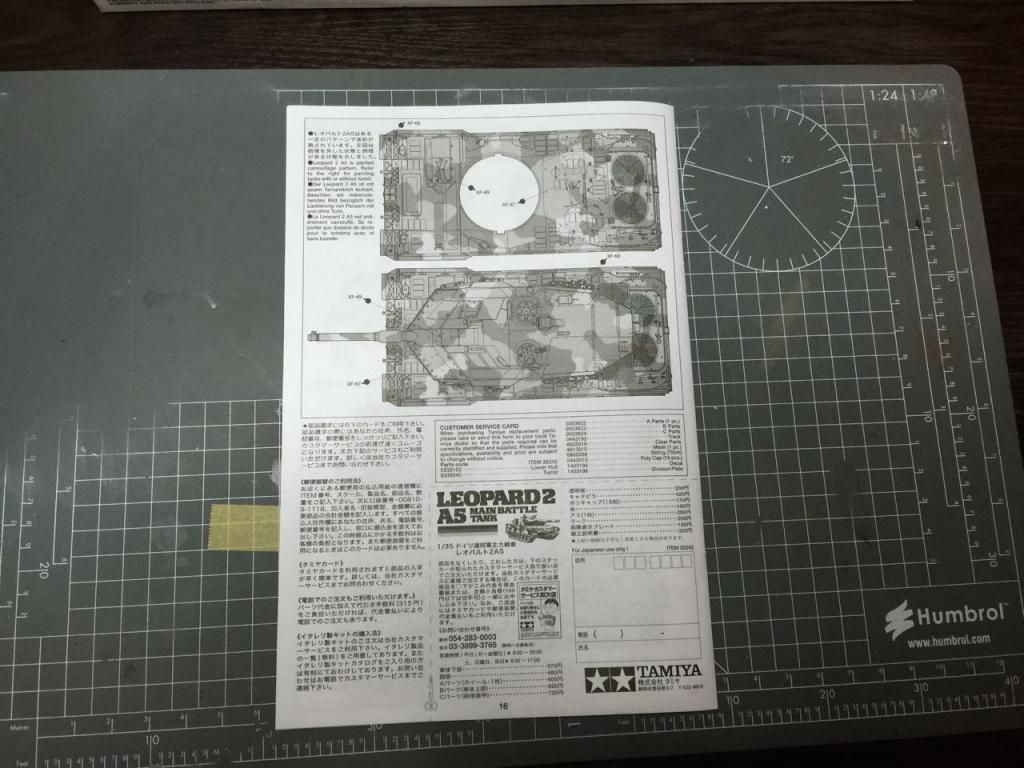
Only one camouflage scheme (NATO) is suggested for the Leopard 2
Box opened and this is what you get.
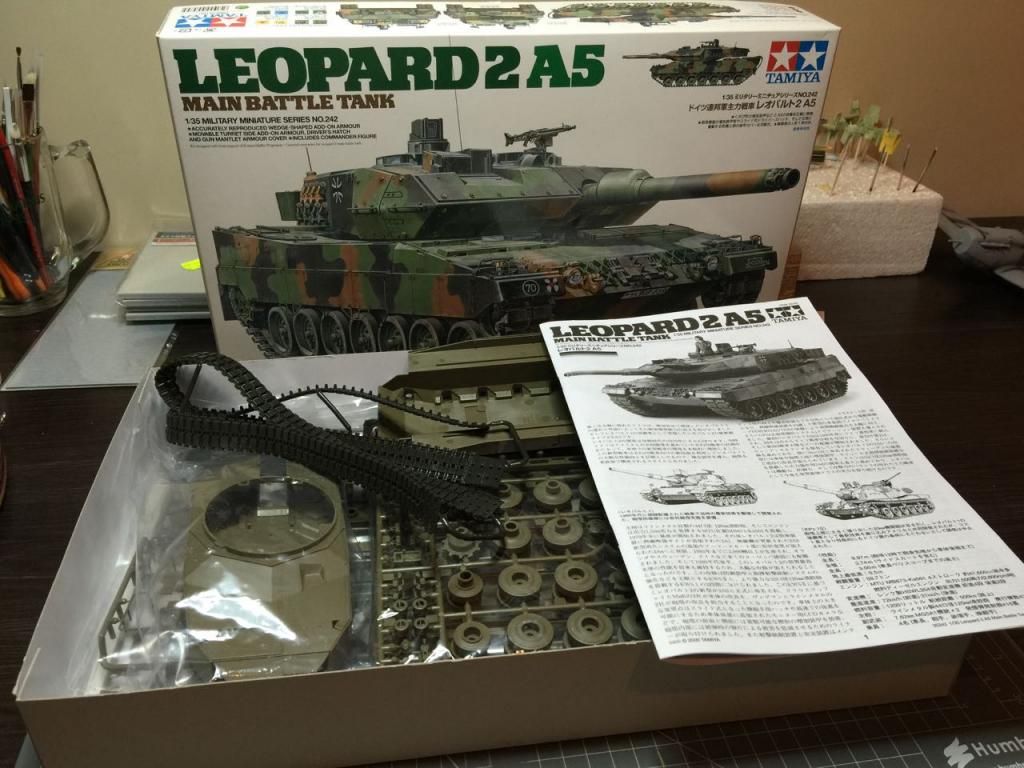
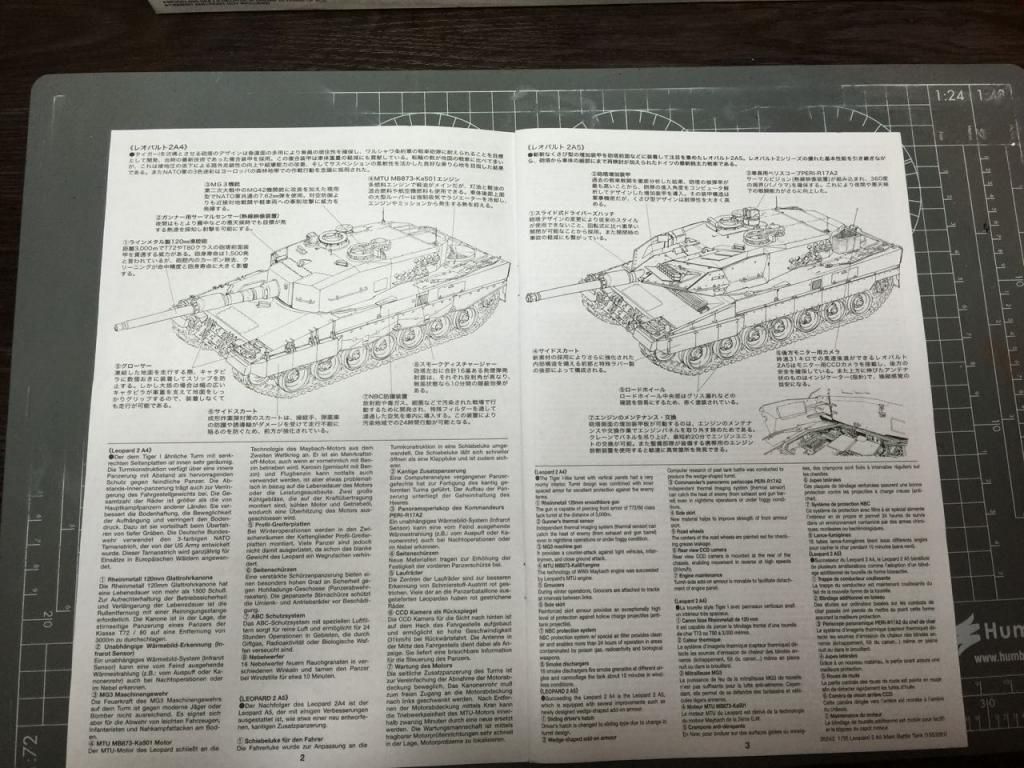
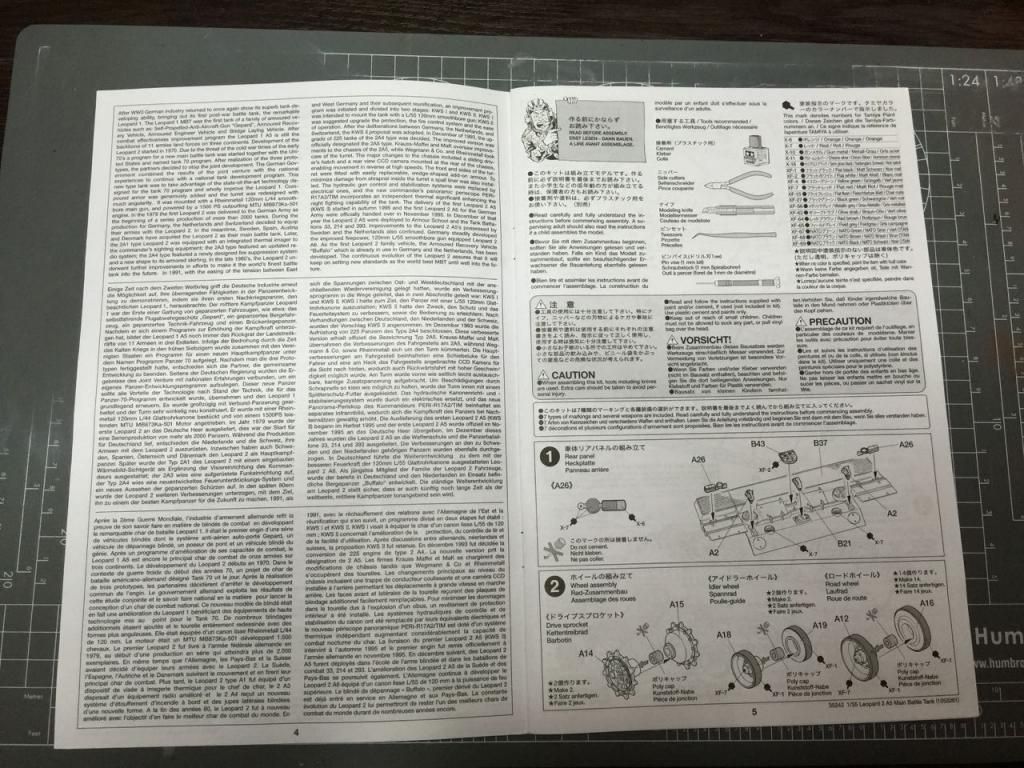
The instructions is in book form and not the usual fold-out type you get with Tamiya kits.
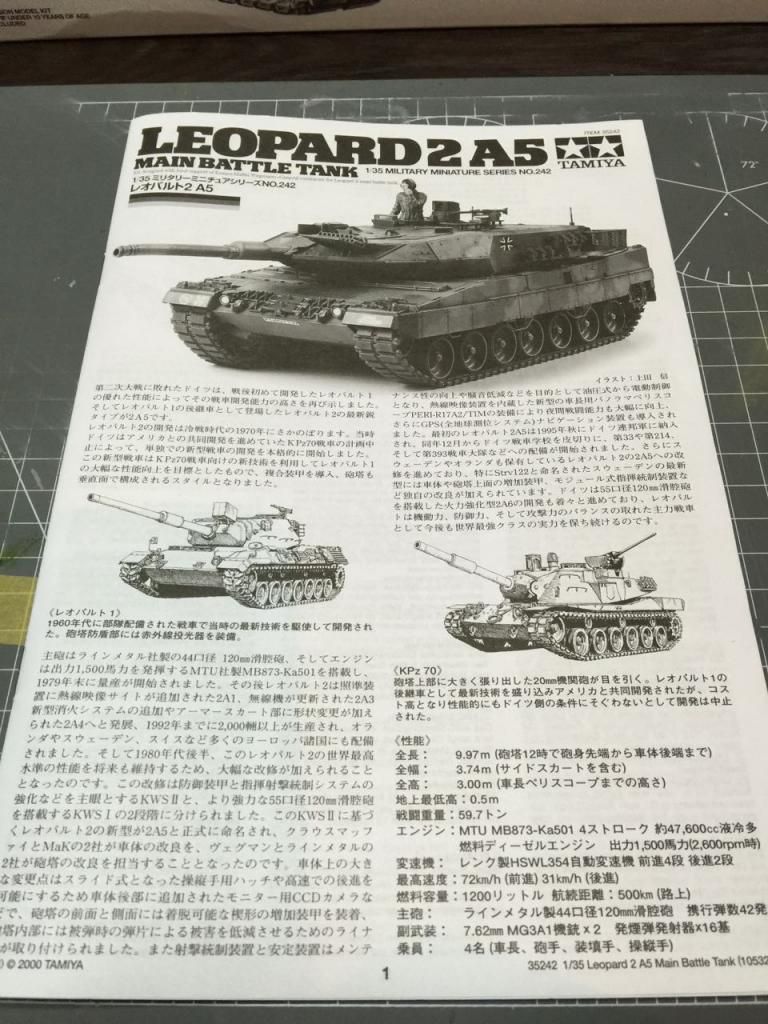
There is a great write up, with some images, on the development of the Leopard up to the 2A5. Typically of Tamiya it is done in several languages.
The usual "please read the instructions carefully" and safety warnings follows with the color call-outs before the build instructions. No mixing necessary with this kit. Tamiya XF-67 - NATO Green, XF-68 - NATO Brown, and XF-69 NATO Black are mostly suggested. I have them on hand so I'll will use them for this build.

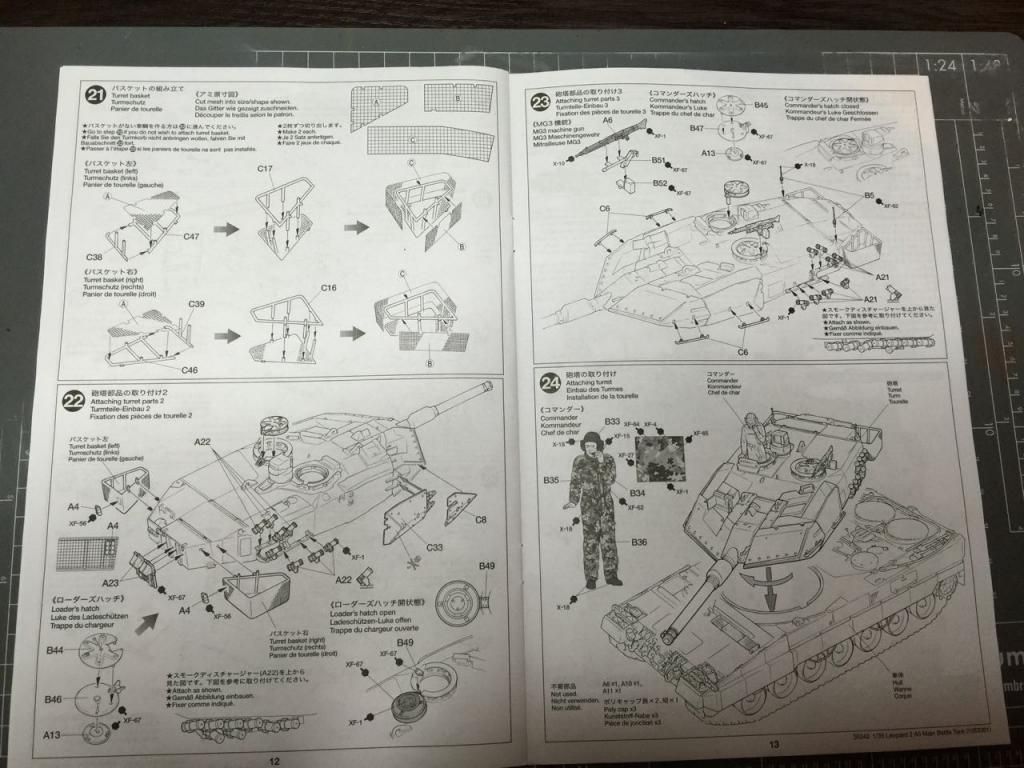
Painting and decal position instructions right at the end.

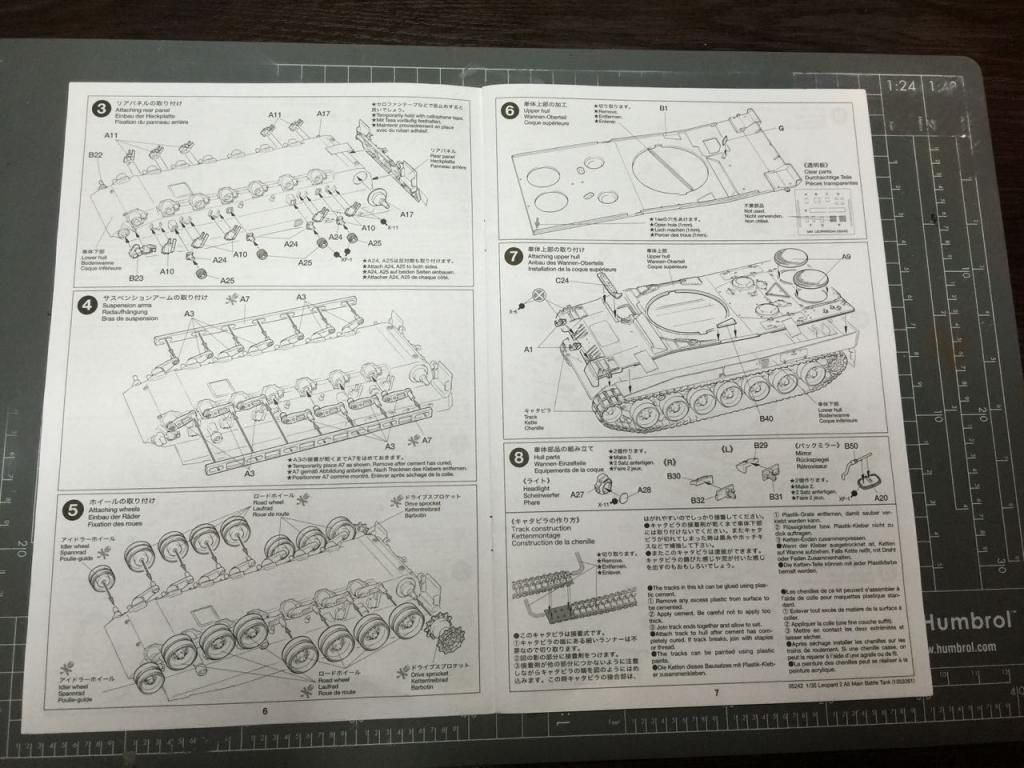
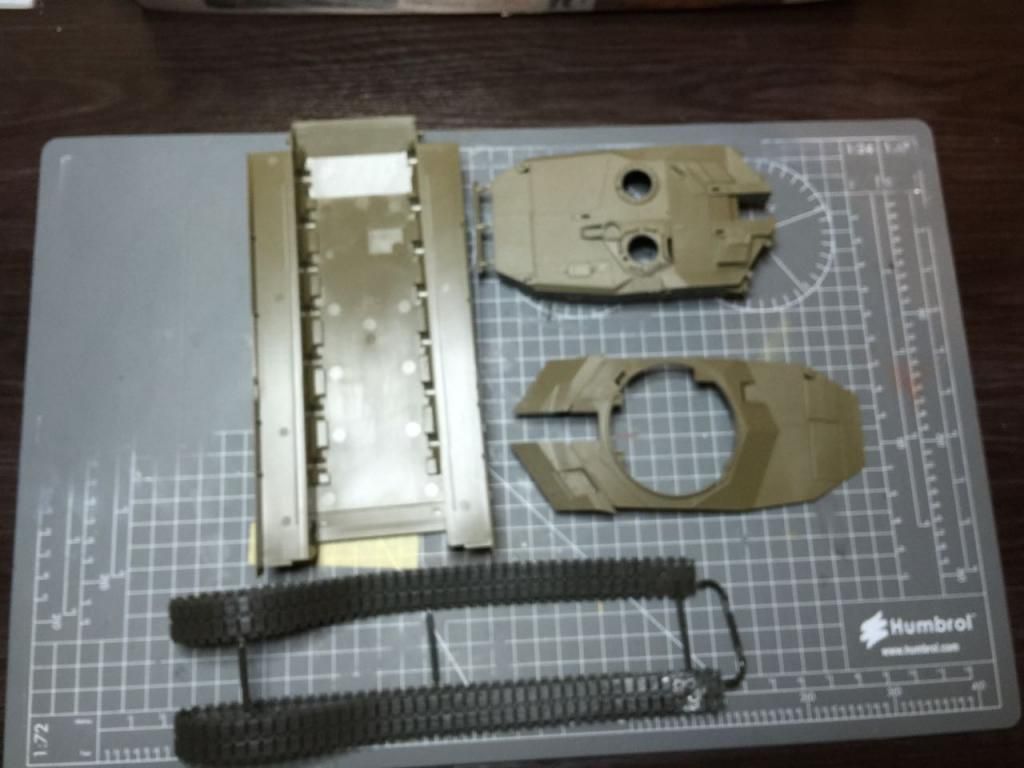
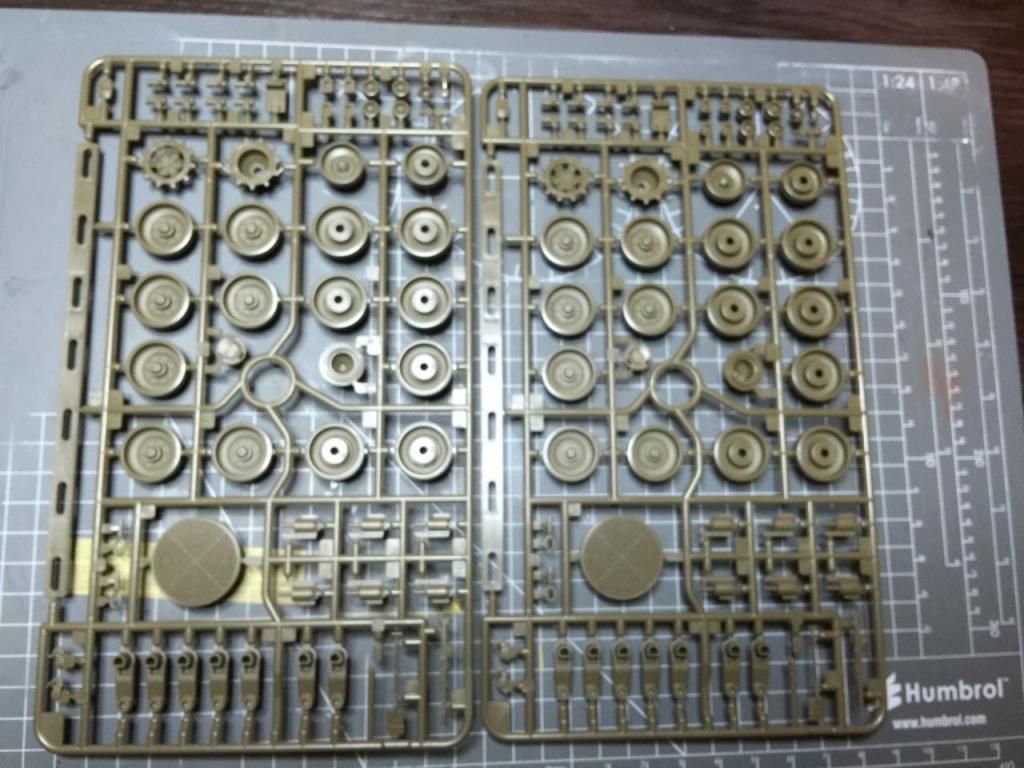
The sprue count is 4 if you exclude the hull, turret and tracks.
Sorry for the image quality. My phone is owned by a photographically challenged master.
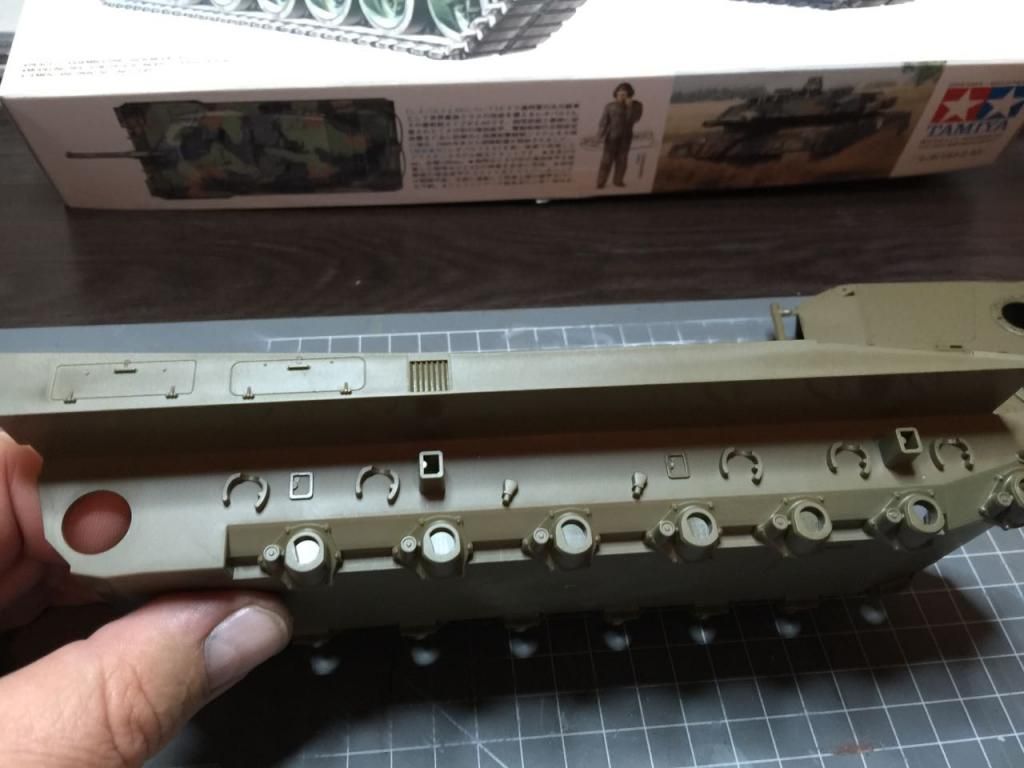
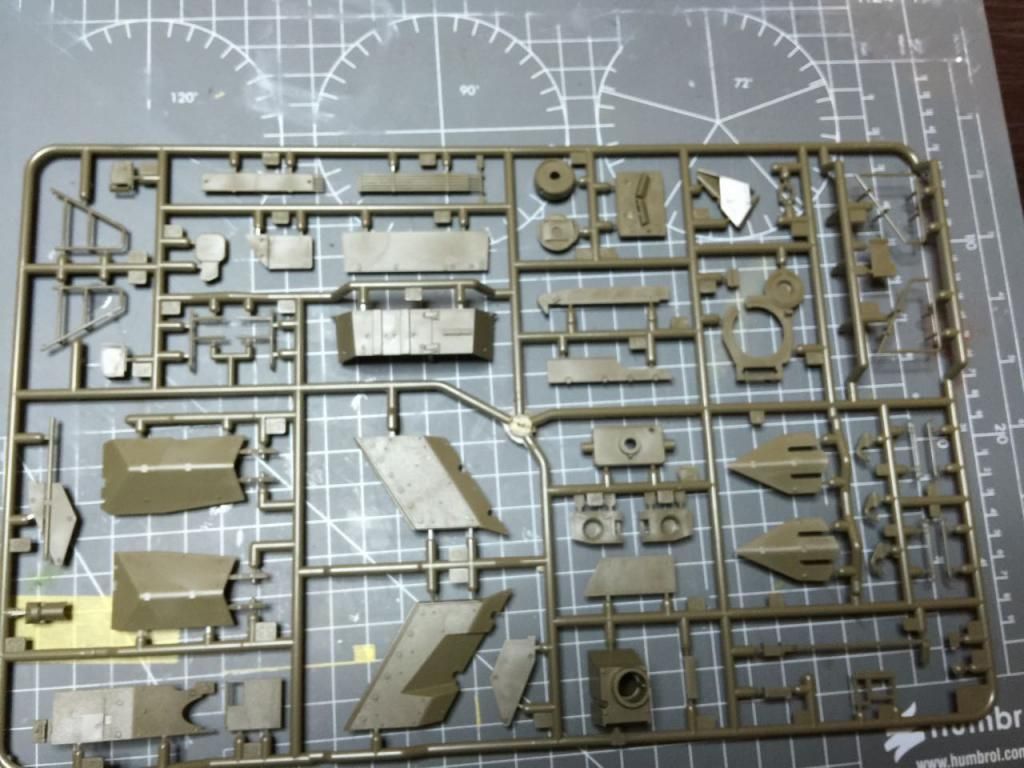
Nice details are found on the lower hull.
The tracks are not too bad either. I know many of the pros dislike these but I love them.

Typical double wheel section sprue.
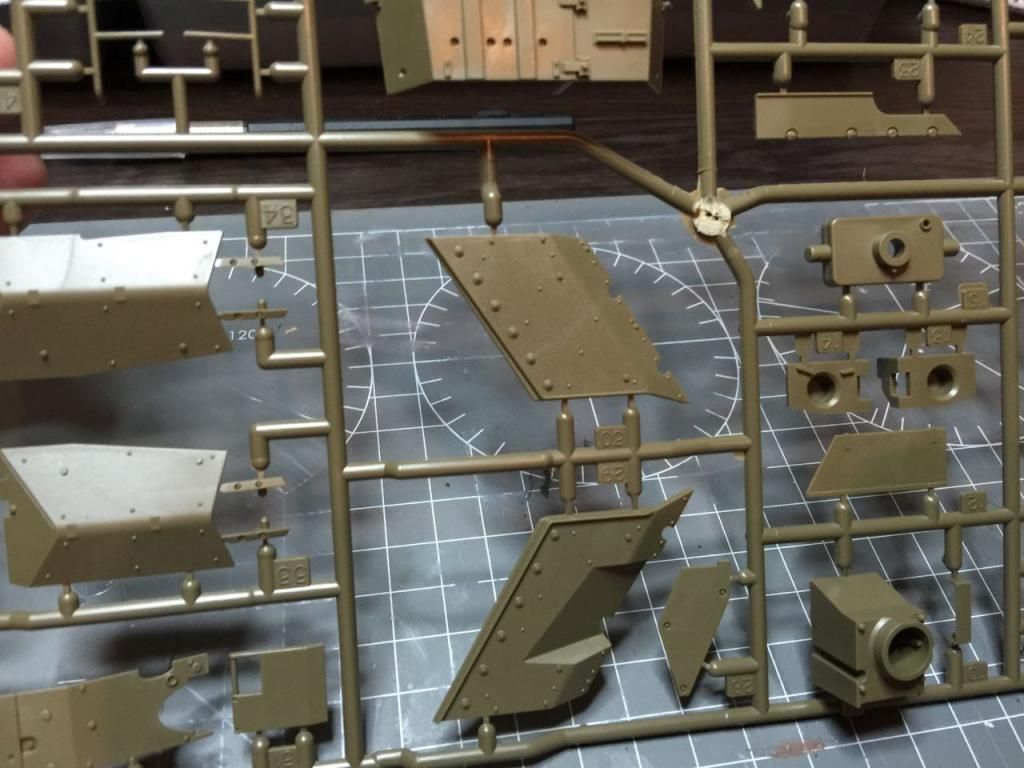
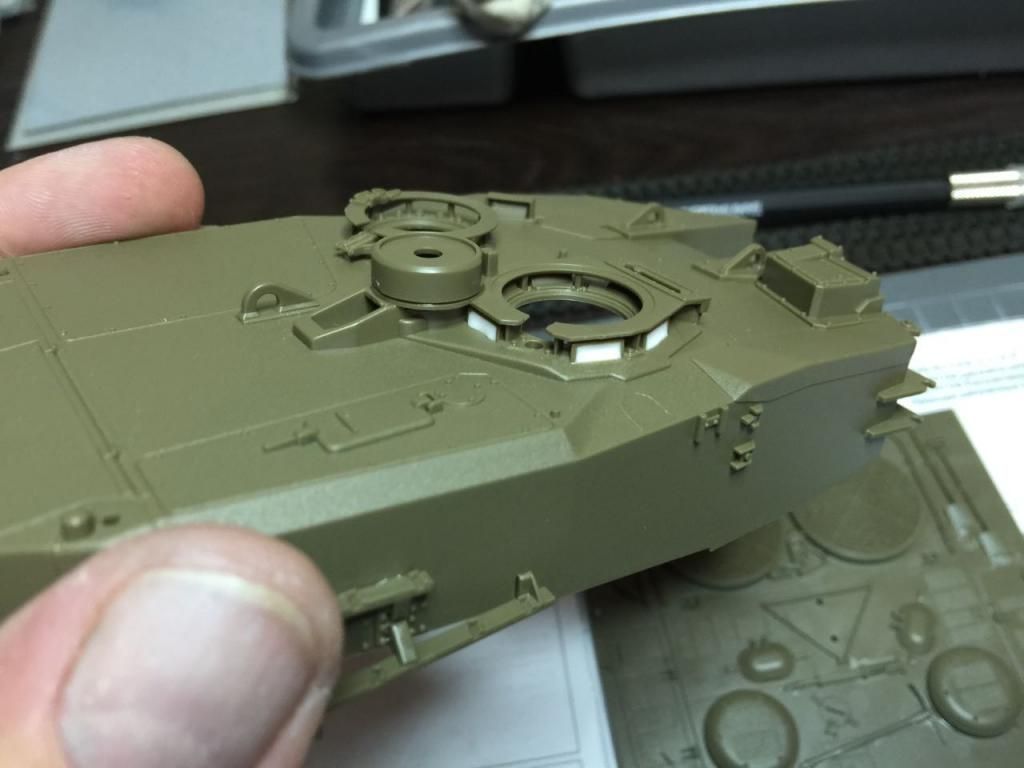
Turret detail.
Parts look great.
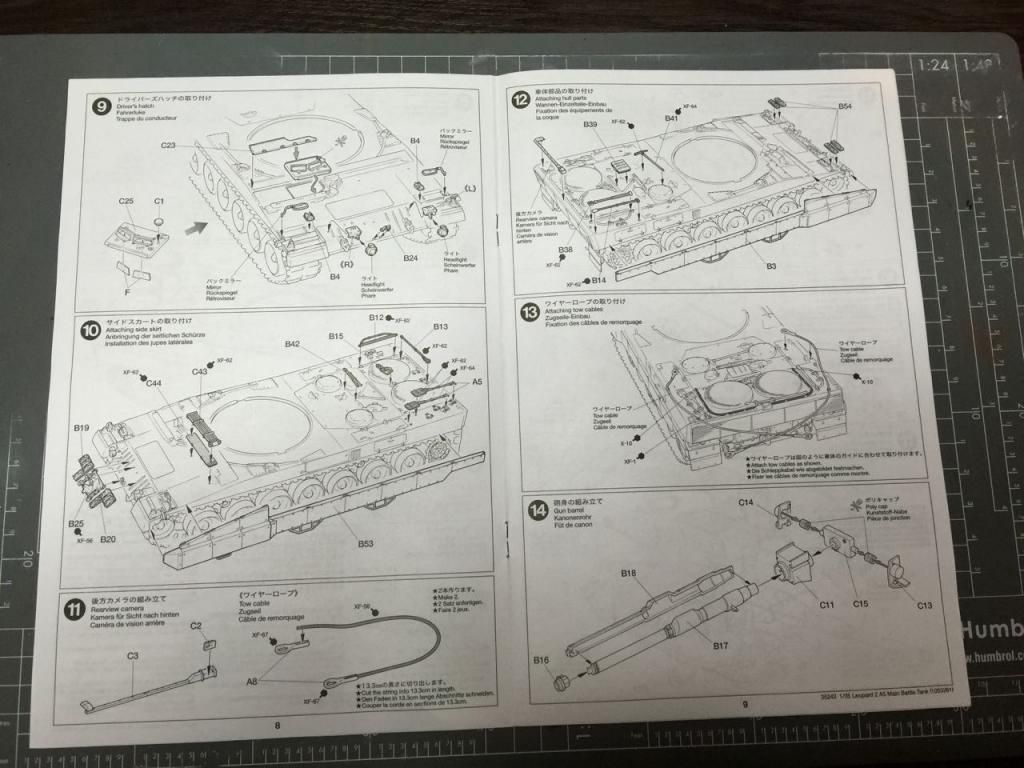
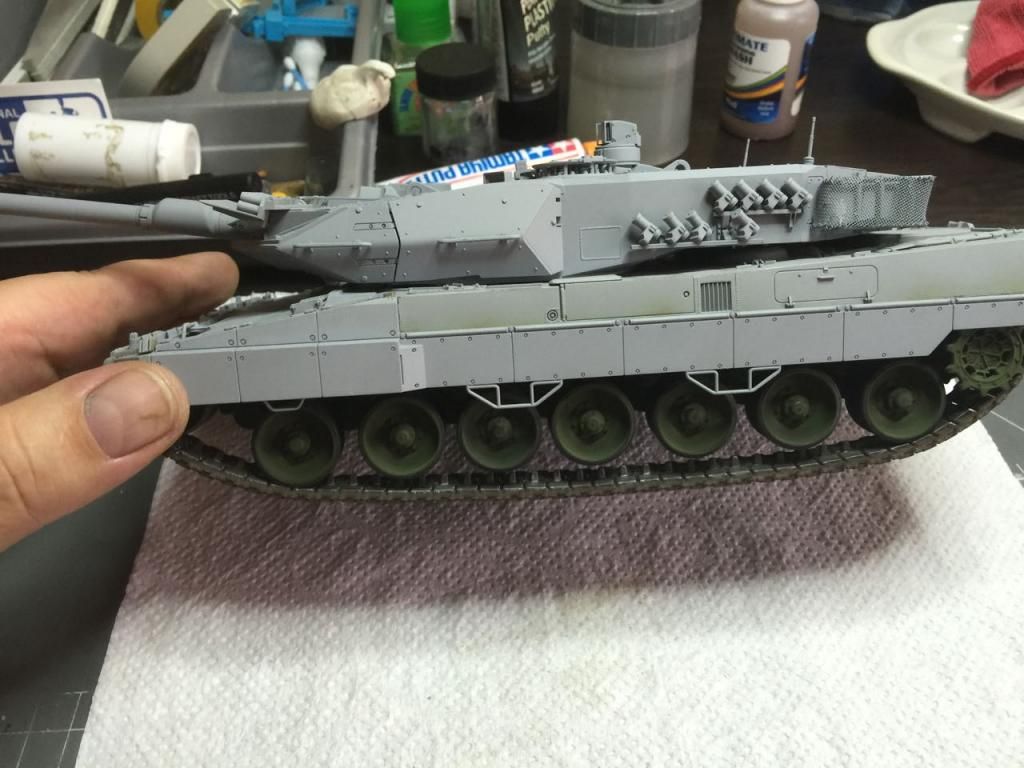
Hull details with the barrel. Unfortunately, the barrel is in two parts.
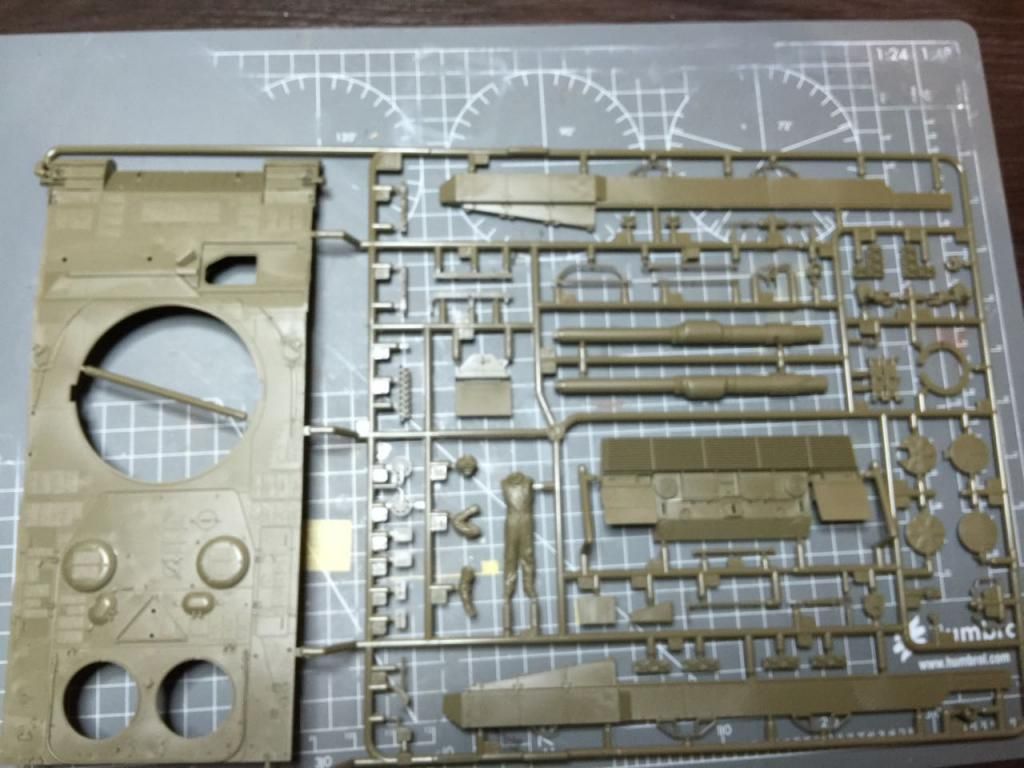
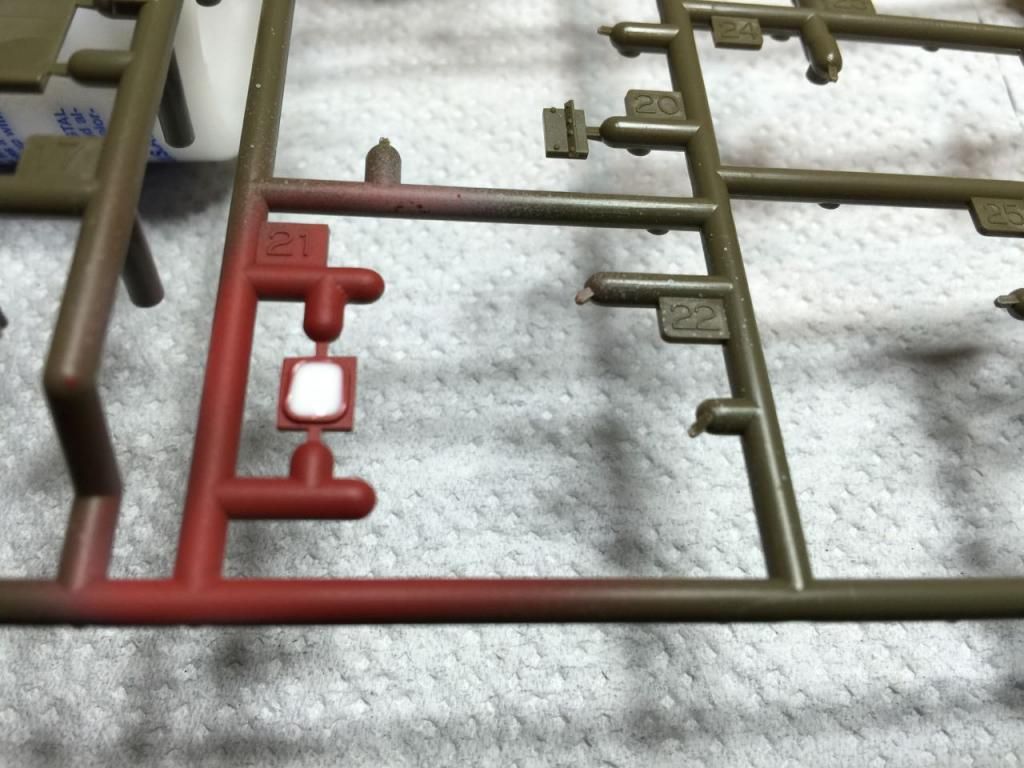
Some other bits and bops.
Lastly, the decals.
So, the box is typical Tamiya.

Only one camouflage scheme (NATO) is suggested for the Leopard 2

Box opened and this is what you get.

The instructions is in book form and not the usual fold-out type you get with Tamiya kits.

There is a great write up, with some images, on the development of the Leopard up to the 2A5. Typically of Tamiya it is done in several languages.

The usual "please read the instructions carefully" and safety warnings follows with the color call-outs before the build instructions. No mixing necessary with this kit. Tamiya XF-67 - NATO Green, XF-68 - NATO Brown, and XF-69 NATO Black are mostly suggested. I have them on hand so I'll will use them for this build.


Painting and decal position instructions right at the end.


The sprue count is 4 if you exclude the hull, turret and tracks.

Sorry for the image quality. My phone is owned by a photographically challenged master.
Nice details are found on the lower hull.

The tracks are not too bad either. I know many of the pros dislike these but I love them.

Typical double wheel section sprue.

Turret detail.

Parts look great.

Hull details with the barrel. Unfortunately, the barrel is in two parts.

Some other bits and bops.

Lastly, the decals.

JediBoer
On the bench righ now: Hmm... Lots of unfinished business!
On the bench righ now: Hmm... Lots of unfinished business!
-
Dunhill2005

- Sergeant Major of the Army

- Posts: 1195
- Joined: Sat Aug 03, 2013 1:38 pm
- Location: Wunstorf, Germany

Re: Tamiya 1/35 Leopard 2A5
Nice to see a Leo 2A5!!!!
In my opinion, the 2A5 version is the best tank in the world.
With a Tamiya kit you can never do it wrong.
Have fun
In my opinion, the 2A5 version is the best tank in the world.
With a Tamiya kit you can never do it wrong.
Have fun
Re: Tamiya 1/35 Leopard 2A5
Thank you Dunhill2005! Yes, it is pretty much my favorite modern tank.
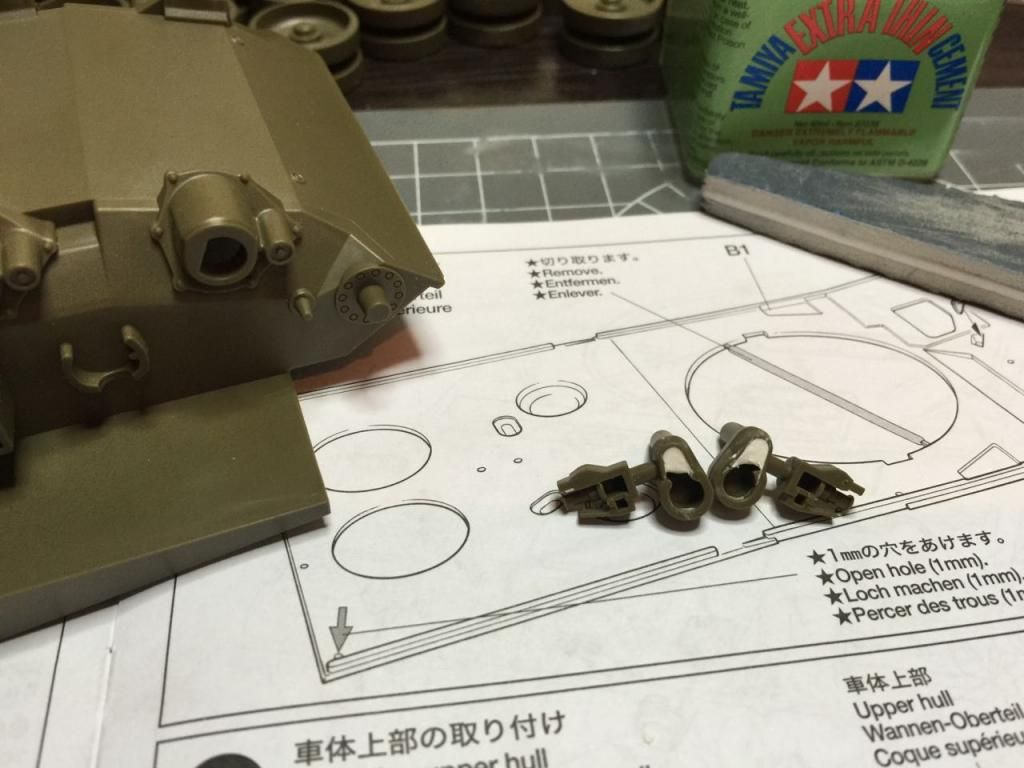
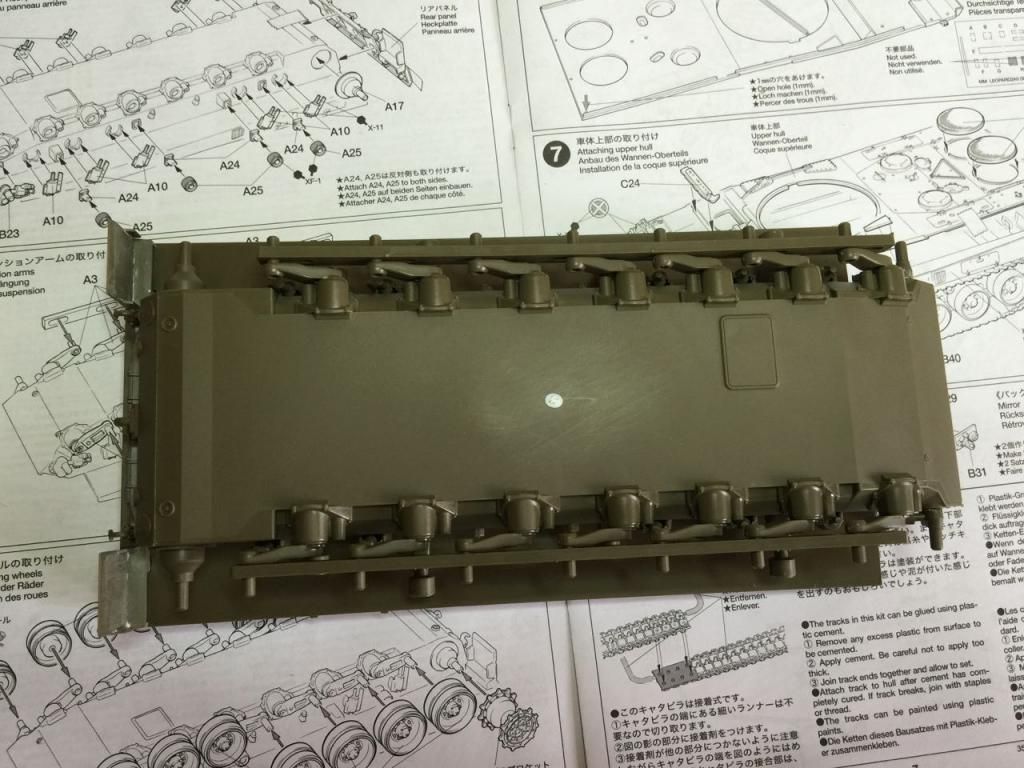
Started out with Step 1 tonight. Cut off and cleaned up the parts.
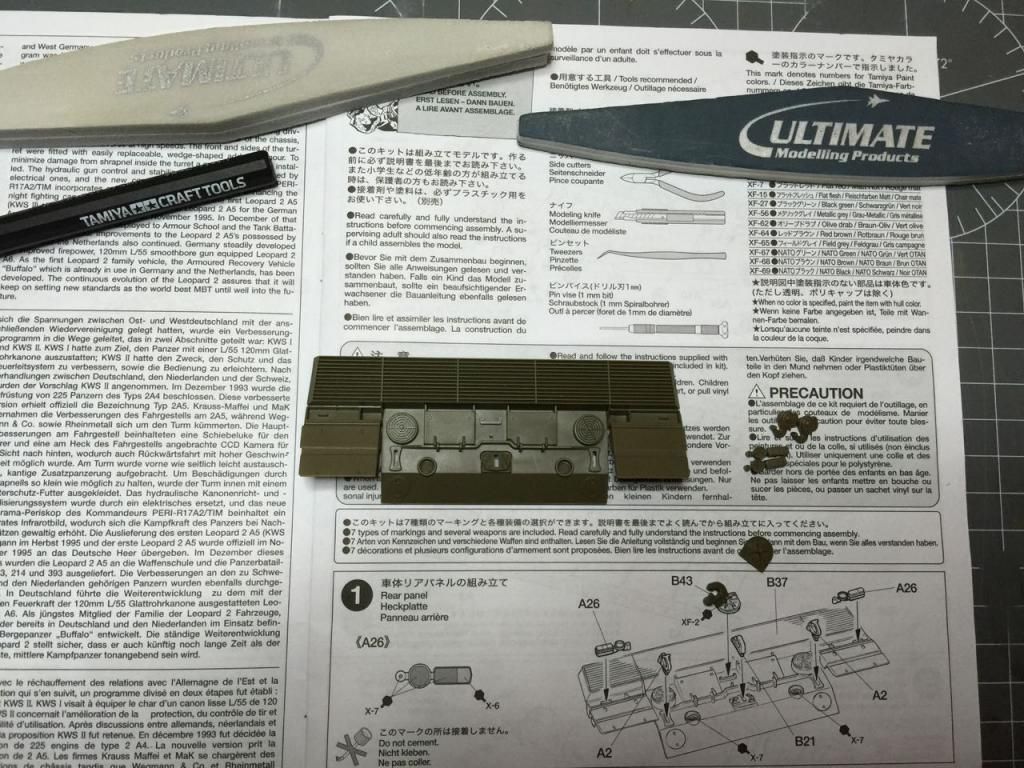
Then glued everything together. Easy as pie.
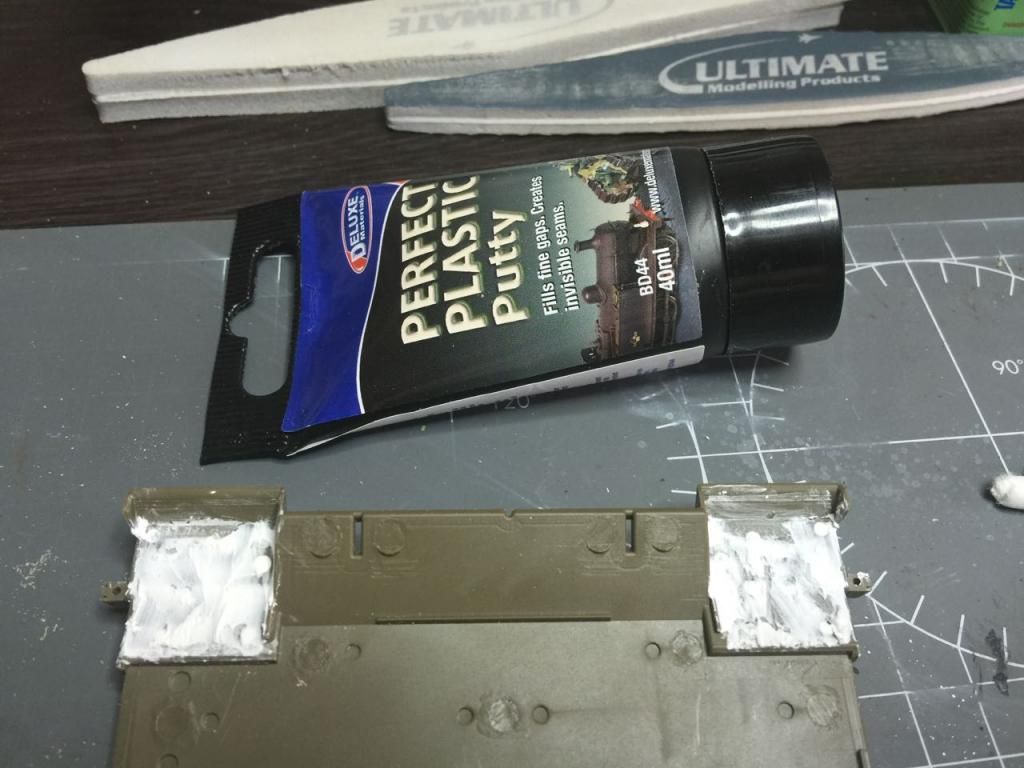
Test fitted the rear panel to the hull. Fit is OK. I may have to use a little bit of Perfect Plastic Putty but maybe not. I had to sand away a couple of ejector pin marks on the back of the mud flaps. It was probably not necessary, but I wanted to get it right.
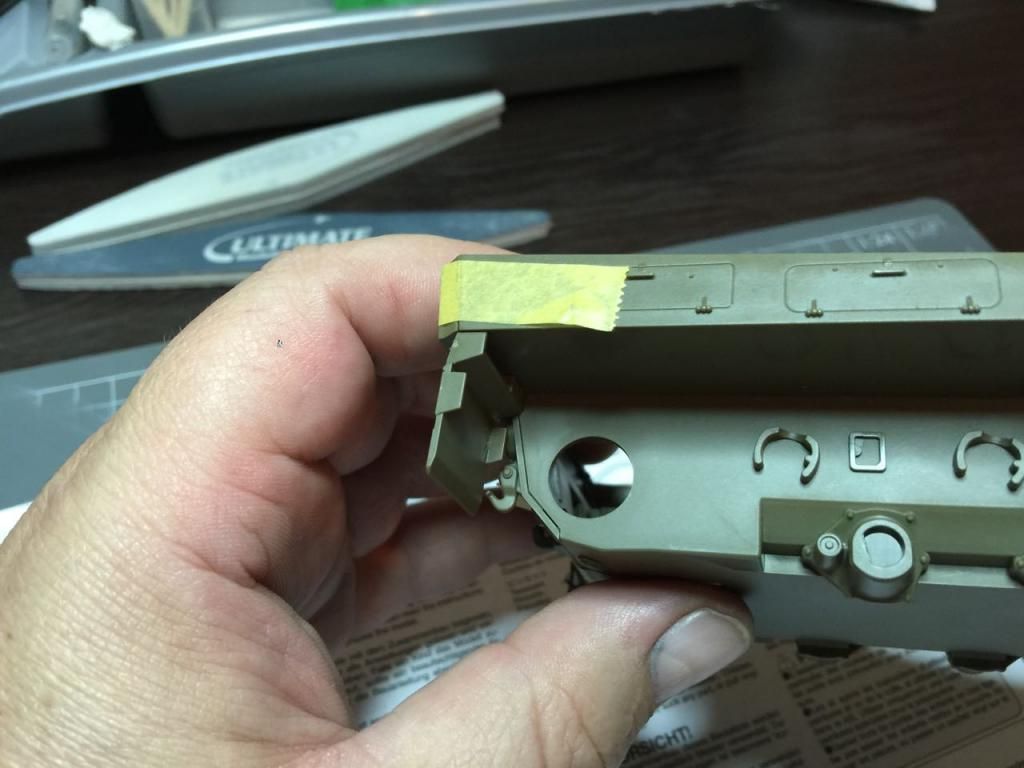
Now for the wheel assembly!
JediBoer
On the bench righ now: Hmm... Lots of unfinished business!
On the bench righ now: Hmm... Lots of unfinished business!
Re: Tamiya 1/35 Leopard 2A5
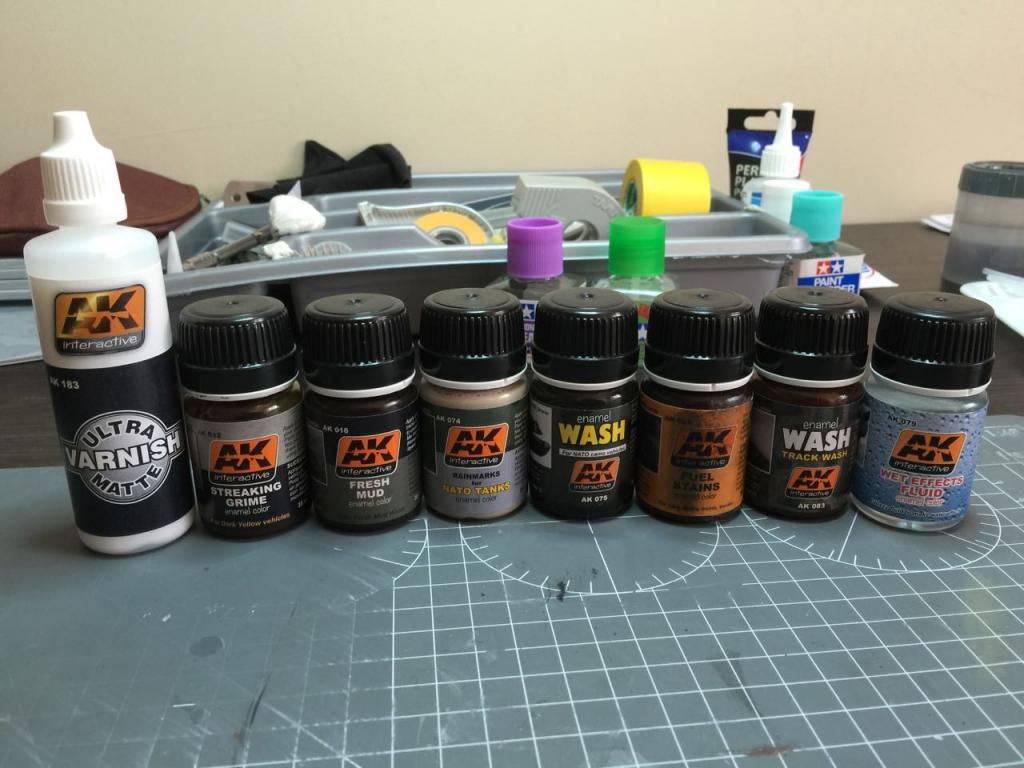
Courier company delivered some AK Interactive goodies I ordered on New Years Eve. I will use, please read here try out for the first time ever, some of their weathering products designed for NATO camouflage and some other weathering effects for this build.
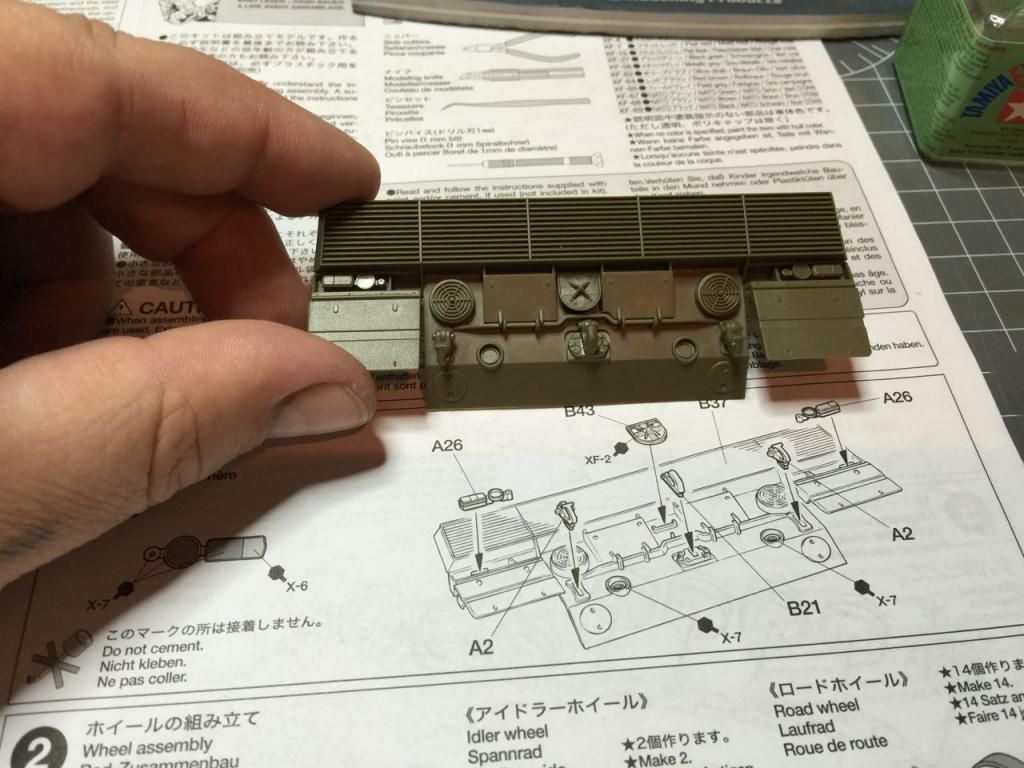
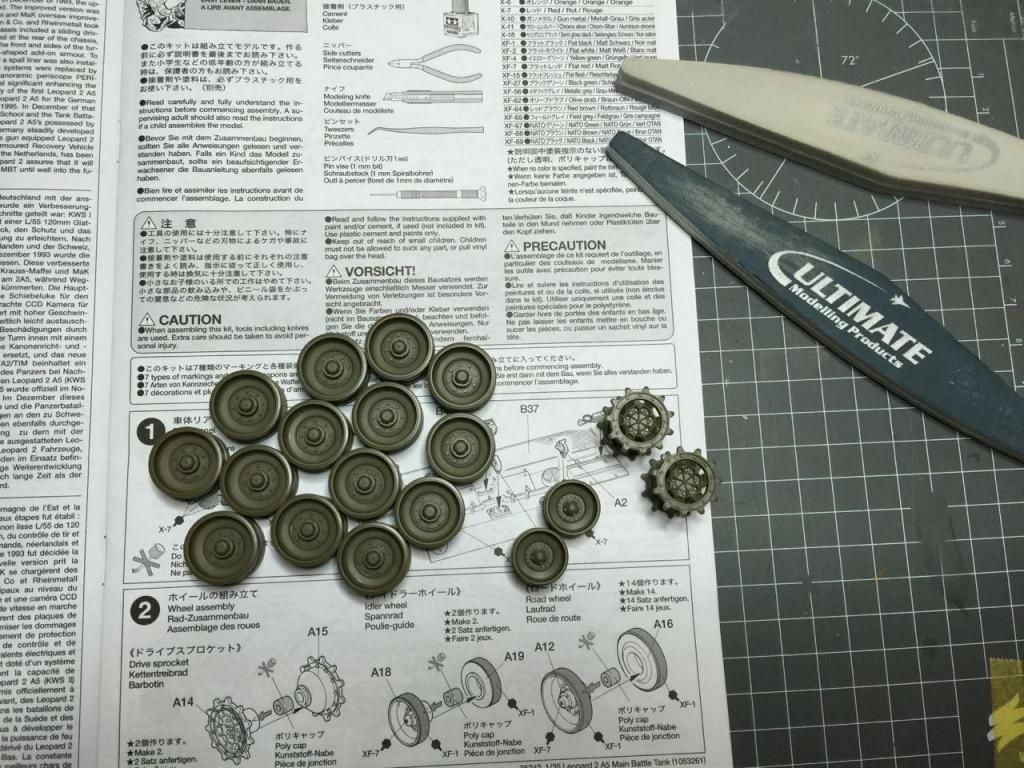
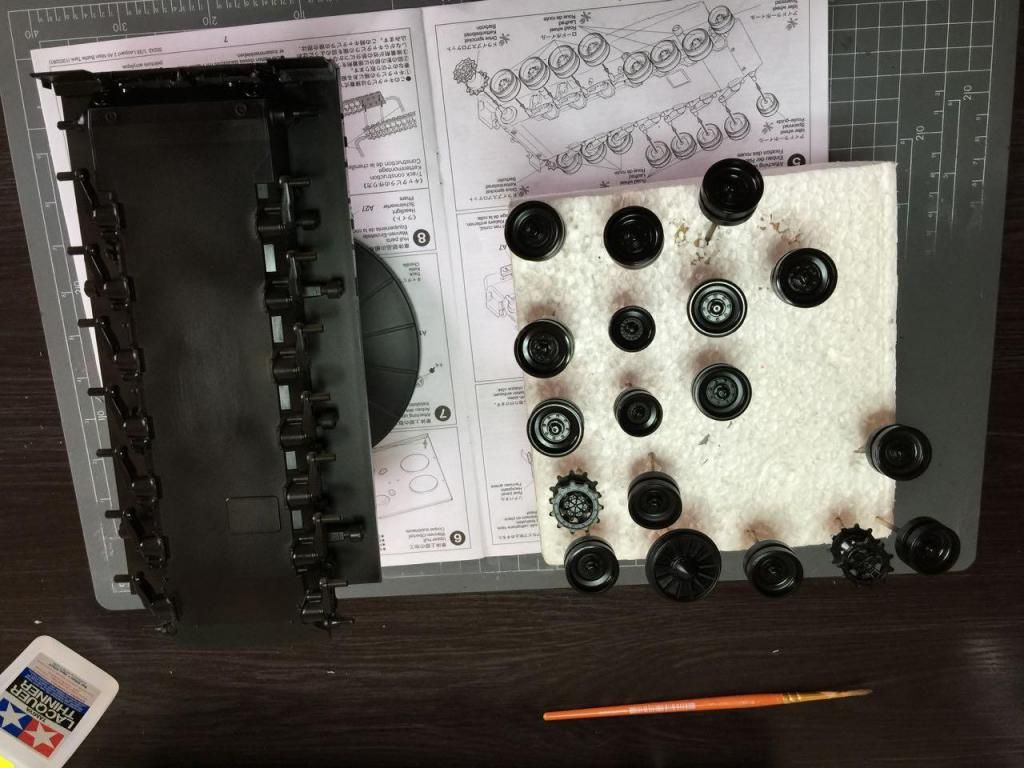
I started with the wheel assembly today. Don't particularly like this part of a tank build but it has to get done! Wheels were on 2 sprues and the clean up was surprisingly easy! As you can see there is no seam line in the middle of the wheel like you get more than often.
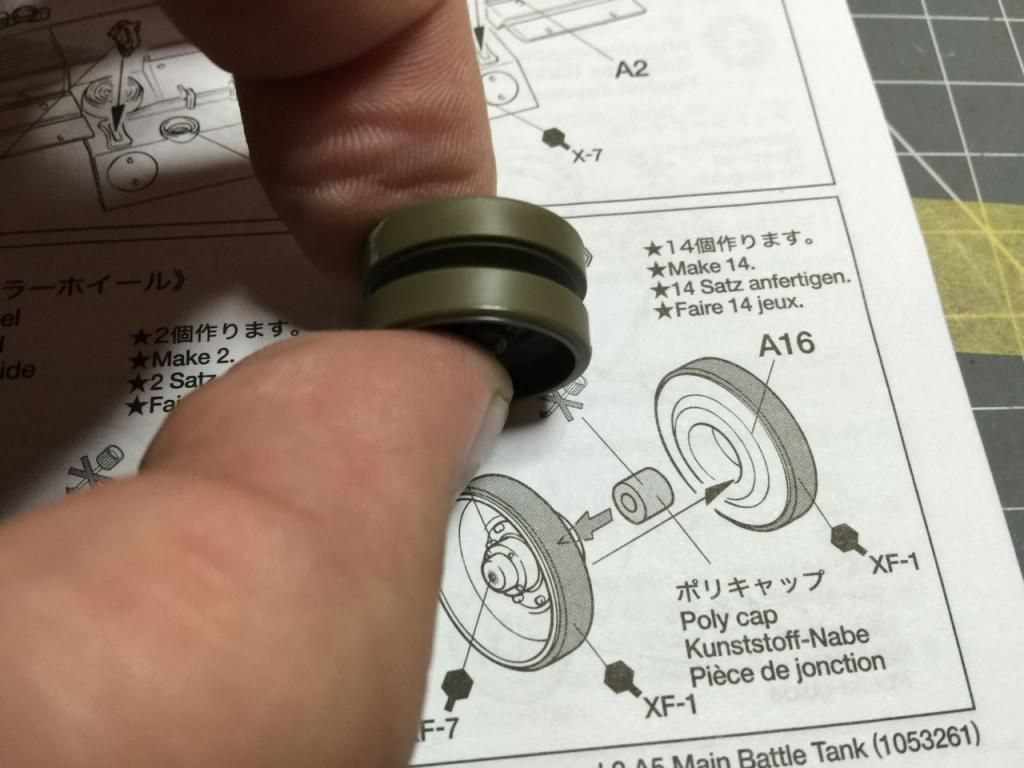
Here they are done, 14 of those, 2 of these, and 2 of the other ones!
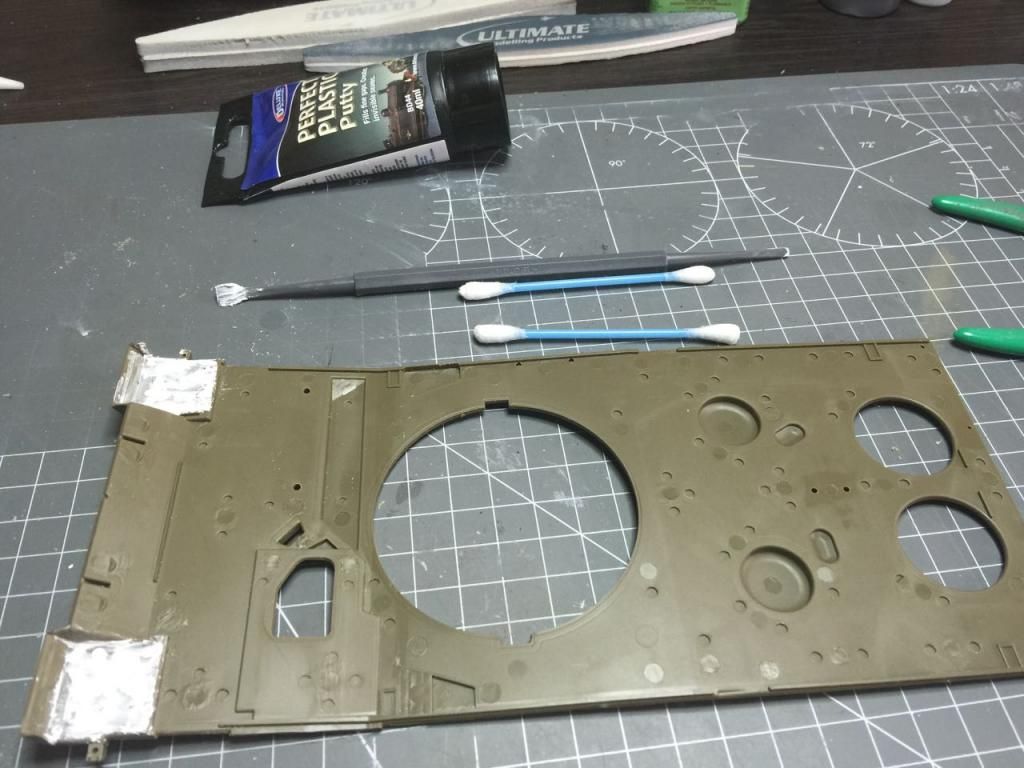
I dry fitted parts B22/23 to the lower hull and found out that there is a big hole! So filling had to be done and it was sealed in with some Tamiya Liguid Surface Primer. Once it is dry, I'll sand it down and glue it in place.


Also glued on some other parts of the wheel assembly.
And that is where we are for today! Please let me know if you have any suggestions/criticism! New to this and eager to learn!

I started with the wheel assembly today. Don't particularly like this part of a tank build but it has to get done! Wheels were on 2 sprues and the clean up was surprisingly easy! As you can see there is no seam line in the middle of the wheel like you get more than often.

Here they are done, 14 of those, 2 of these, and 2 of the other ones!

I dry fitted parts B22/23 to the lower hull and found out that there is a big hole! So filling had to be done and it was sealed in with some Tamiya Liguid Surface Primer. Once it is dry, I'll sand it down and glue it in place.


Also glued on some other parts of the wheel assembly.

And that is where we are for today! Please let me know if you have any suggestions/criticism! New to this and eager to learn!
JediBoer
On the bench righ now: Hmm... Lots of unfinished business!
On the bench righ now: Hmm... Lots of unfinished business!
Re: Tamiya 1/35 Leopard 2A5
Wheels ugggg... worst part of a tank. I've got the Men Char 2C and it has a million wheels on both sides.
I build bad models so you can feel good about yourself!
-
Gav0909

- Chief Warrant Officer 5

- Posts: 2927
- Joined: Tue May 28, 2013 11:56 am
- Location: Fife, Scotland
- Contact:
Re: Tamiya 1/35 Leopard 2A5
Nice start mate. Got to love modern German armour. Very sleek and menacing looking. I have a Leo 2 in the stash, but its a Hobby Boss kit, to go with my PzH2000 (well one of them lol).
Looking forward to seeing this progress.
Looking forward to seeing this progress.

Re: Tamiya 1/35 Leopard 2A5
Yes, robertw, I don't particularly like doing wheels but I find it strangly meditative!robertw wrote:Wheels ugggg... worst part of a tank. I've got the Men Char 2C and it has a million wheels on both sides.
JediBoer
On the bench righ now: Hmm... Lots of unfinished business!
On the bench righ now: Hmm... Lots of unfinished business!
Re: Tamiya 1/35 Leopard 2A5
Gav0909, I really like the Leopard 2. It is one mean looking tank and so far I'm enjoying the kit very much! Thank you for the kind comments!Gav0909 wrote:Nice start mate. Got to love modern German armour. Very sleek and menacing looking. I have a Leo 2 in the stash, but its a Hobby Boss kit, to go with my PzH2000 (well one of them lol).
Looking forward to seeing this progress.
JediBoer
On the bench righ now: Hmm... Lots of unfinished business!
On the bench righ now: Hmm... Lots of unfinished business!
Re: Tamiya 1/35 Leopard 2A5
I made a little bit of progress today. I hit a small snag but it all turned out fine in the end.
I started with the suspension arms yesterday. Tamiya also provides a jig type tool to help align all the suspension arms.
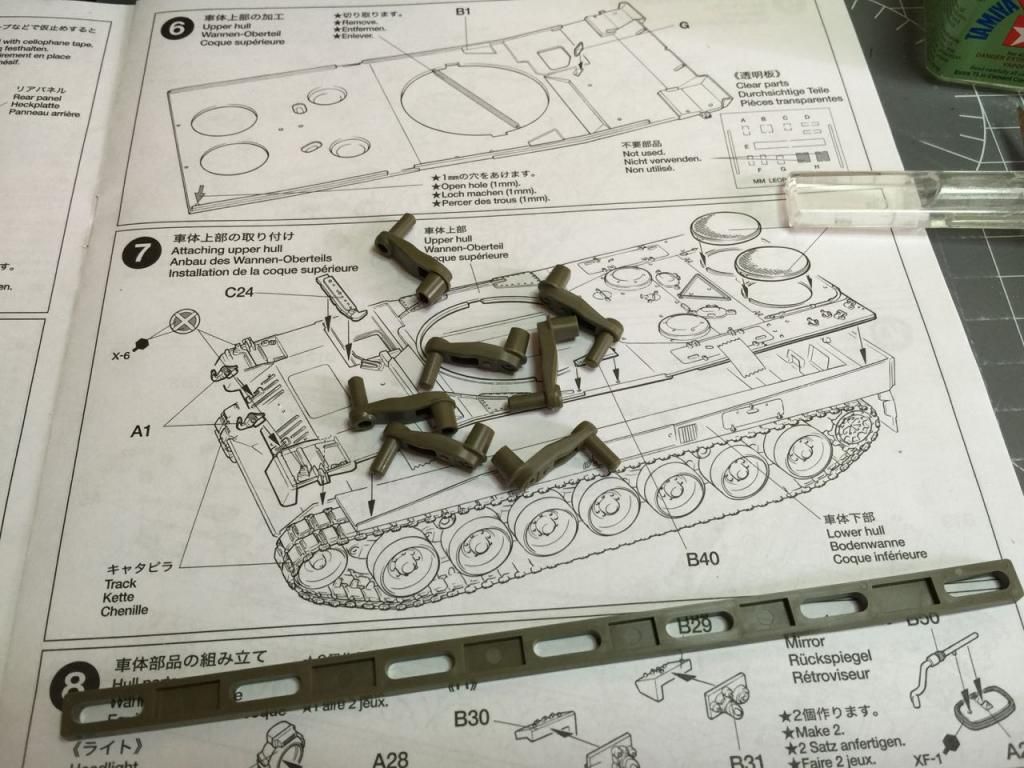
It is nice of them but I found the suspension arms fit so well and snugly that it is almost unnecessary to use the jig.
But alas, I used it as instructed.
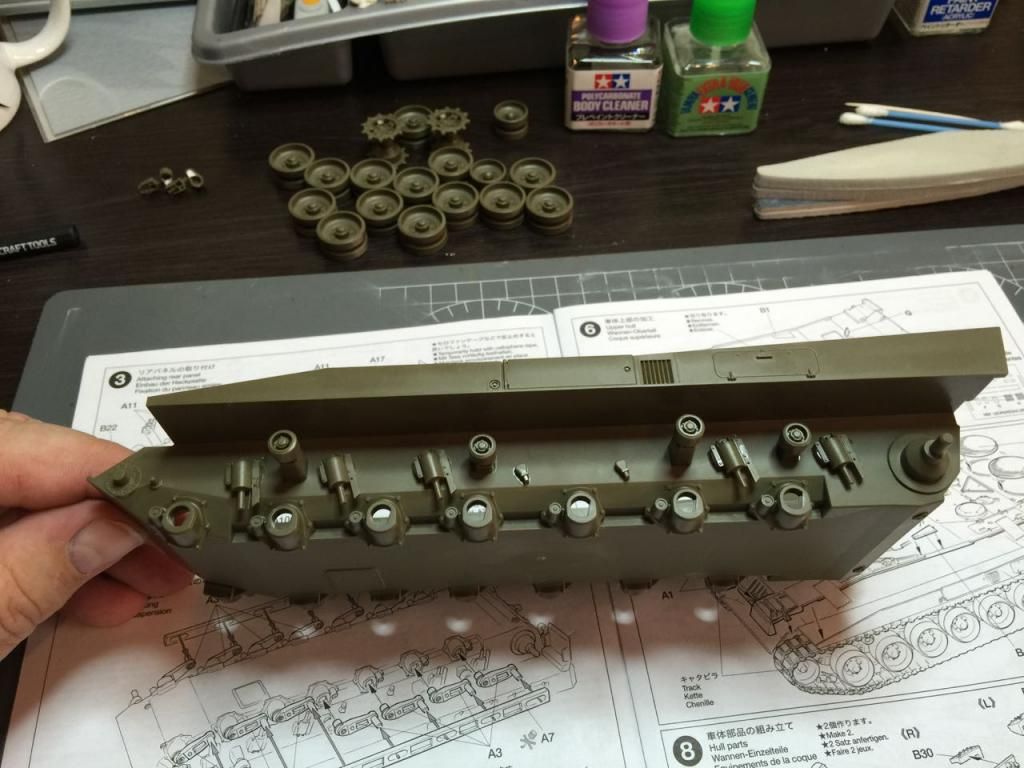
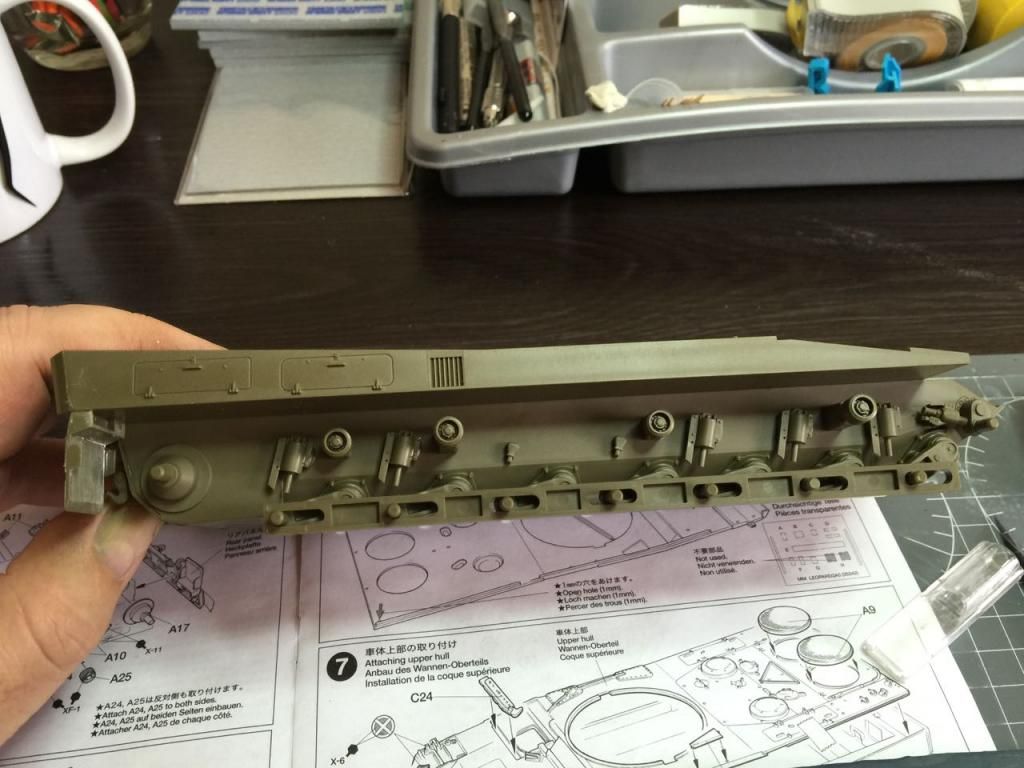
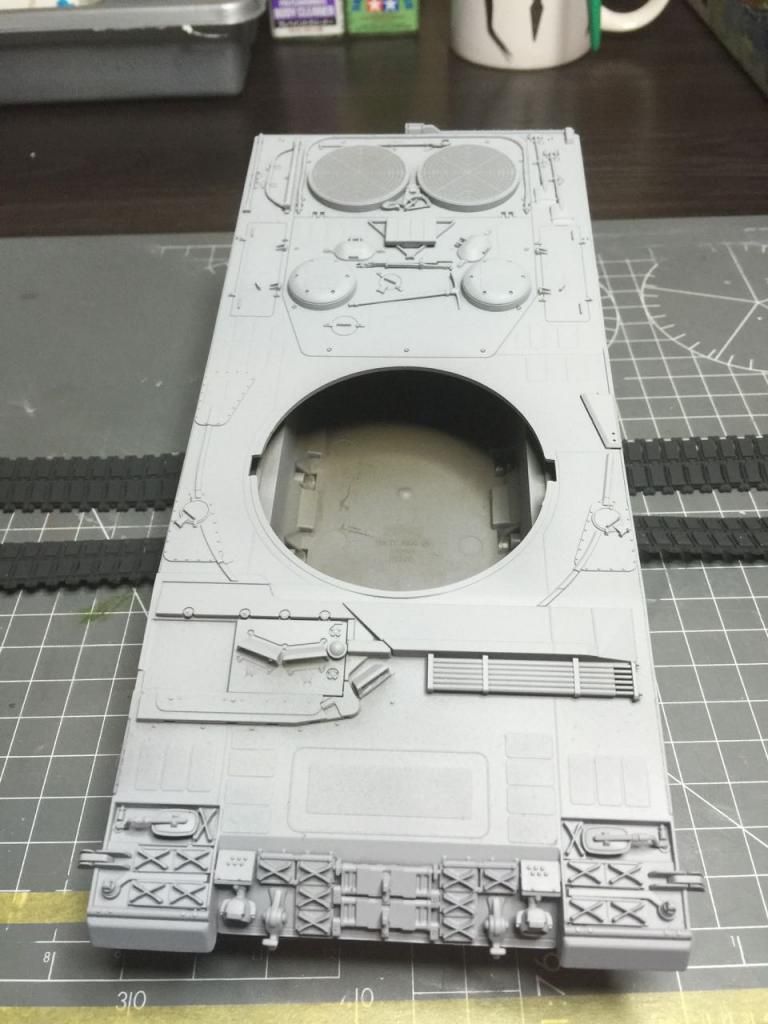
After the glue cured, the lower hulle assembly was all done and ready to be primed.
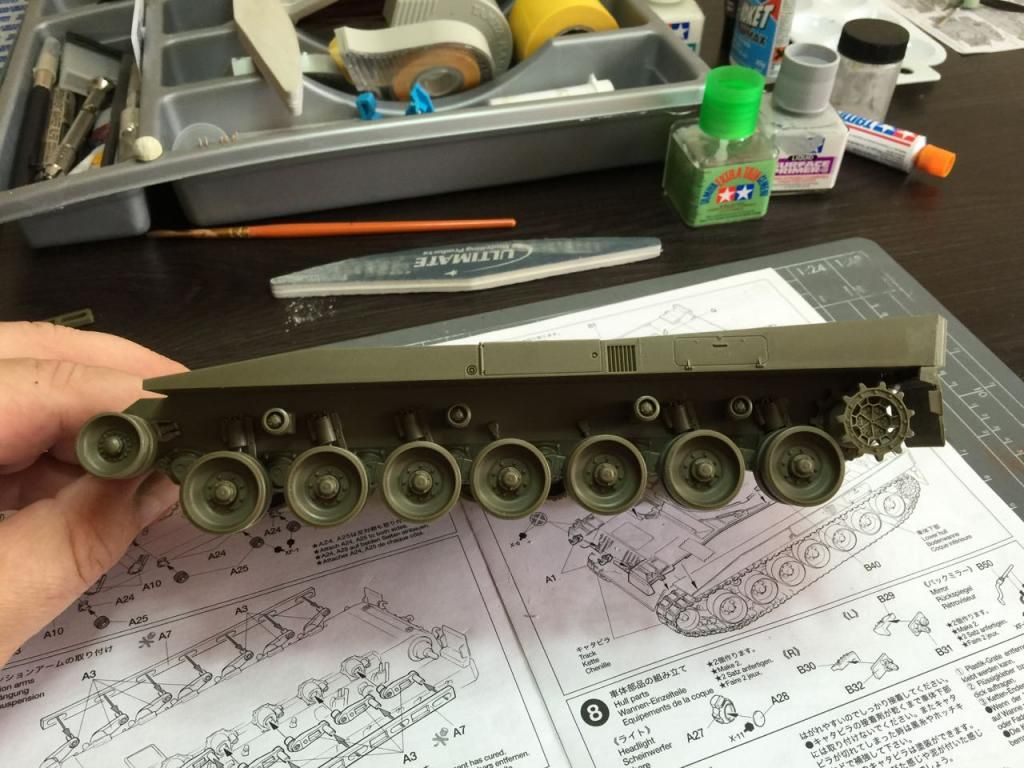
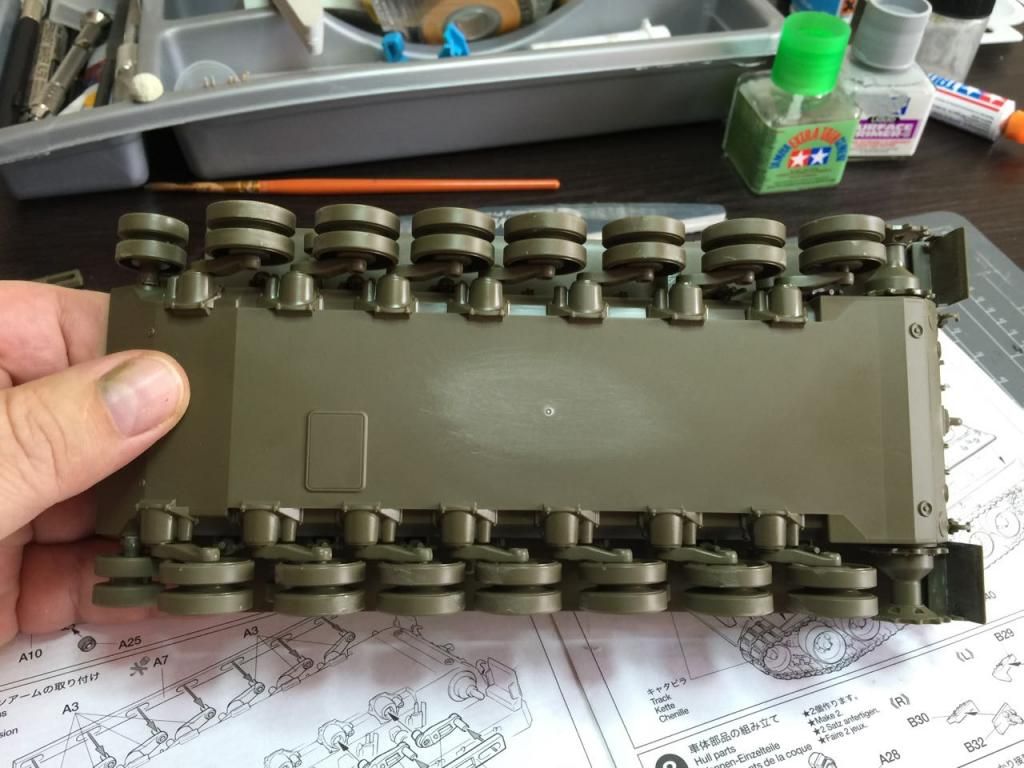
Priming all done!
This is where I noticed that I was missing a wheel. I had to delve into the ether but was lucky enough to find it but now I have to go through all the motions of airbrushing just one wheel. 
Anyway, I also started cleaning up the upper hull section. The upper hull was full of EPM on the bottom part. Not bad you may thing as all will be covered up. Except for the 2 mud guard pars in the front. Theyl will be visible if you pick up and look underneath the model. I know, I know... So I had to do some filling and now have to wait for it to dry before sanding it down and making it look all nice!
I started with the suspension arms yesterday. Tamiya also provides a jig type tool to help align all the suspension arms.


It is nice of them but I found the suspension arms fit so well and snugly that it is almost unnecessary to use the jig.
But alas, I used it as instructed.

After the glue cured, the lower hulle assembly was all done and ready to be primed.


Priming all done!

This is where I noticed that I was missing a wheel.
Anyway, I also started cleaning up the upper hull section. The upper hull was full of EPM on the bottom part. Not bad you may thing as all will be covered up. Except for the 2 mud guard pars in the front. Theyl will be visible if you pick up and look underneath the model. I know, I know... So I had to do some filling and now have to wait for it to dry before sanding it down and making it look all nice!


JediBoer
On the bench righ now: Hmm... Lots of unfinished business!
On the bench righ now: Hmm... Lots of unfinished business!
Re: Tamiya 1/35 Leopard 2A5
I've been busy with work so the updates have not happened. I'll upload some photos of this weekend's progress tomorrow.
Here is an interesting video on how a Leopard 2 crosses and anti-tank ditch:
http://youtu.be/0Uk36r3s6Lo
I was looking around on the AK Interactive website and found that they have some resources that are absolutely free to use and download in PDF form. There is a PDF walkaround showing a Leopard 2A6. The photos are great showing a muddy Leopard 2. You can find it on the page below;
http://ak-interactive.com/v2/?page_id=23430
I'll use this as inspiration for weathering my Leopard 2 with a combination of AK Interactive products and some Ultimate washes.
PS: I couldn't embed the video so if anyone can share how it is done, it will be appreciated.
JediBoer
On the bench righ now: Hmm... Lots of unfinished business!
On the bench righ now: Hmm... Lots of unfinished business!
-
DBMiller
- Chief Warrant Officer 3
- Posts: 2250
- Joined: Mon Jan 06, 2014 8:10 pm
- Location: Guilford, Vermont, USA
Re: Tamiya 1/35 Leopard 2A5
Her you go. I'm looking forward to this build! That's some bit of landscaping going on too!
By the way, just get rid of the bit before the code numbers in the YouTube link and it will embed.
[youtube]0Uk36r3s6Lo[/youtube]
By the way, just get rid of the bit before the code numbers in the YouTube link and it will embed.
[youtube]0Uk36r3s6Lo[/youtube]
ON THE BENCH: Do I have to say?
Re: Tamiya 1/35 Leopard 2A5
Thank you for the kind comments and embedding the video!DBMiller wrote:Her you go. I'm looking forward to this build! That's some bit of landscaping going on too!
By the way, just get rid of the bit before the code numbers in the YouTube link and it will embed.
JediBoer
On the bench righ now: Hmm... Lots of unfinished business!
On the bench righ now: Hmm... Lots of unfinished business!
Re: Tamiya 1/35 Leopard 2A5
As promised, I got some modeling time in over the weekend and made some progress over the weekend.
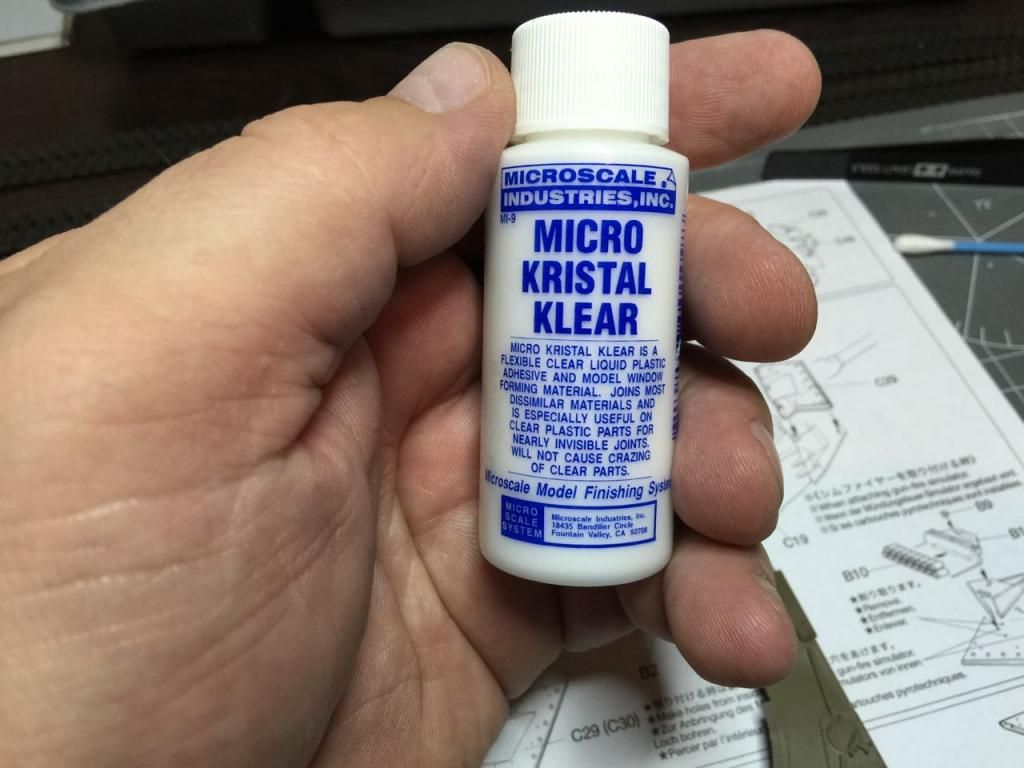
The Leopard kit, like most Tamiya AFV kit, comes with a clear plastic bit that you have to cut to size and then fit into the periscope spaces. I never manage to get it right and am always disappointed. I decided to try a trick I saw someone use on Youtube for making clear bits using the old faithful below.
I used it for the driver periscopes,
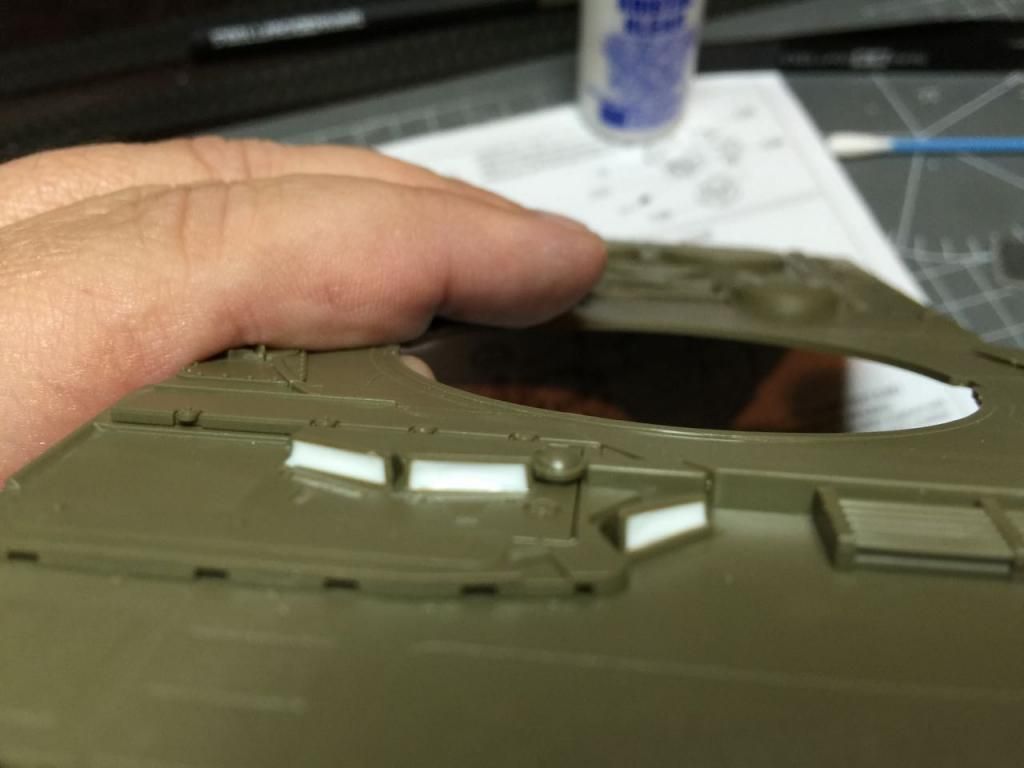
the commander's hatch,
and the Rheinmetall/Zeiss PERI-R 17 A2 periscope at the commander's hatch.
It turned out quite nice and I'm happy with the result. I'll touch them up with a mix of Tamiya X-23 and X-25 to get a similar blue-green armoured glass look. I still need to figure out how to get that iridescent look of the periscope "glass"!
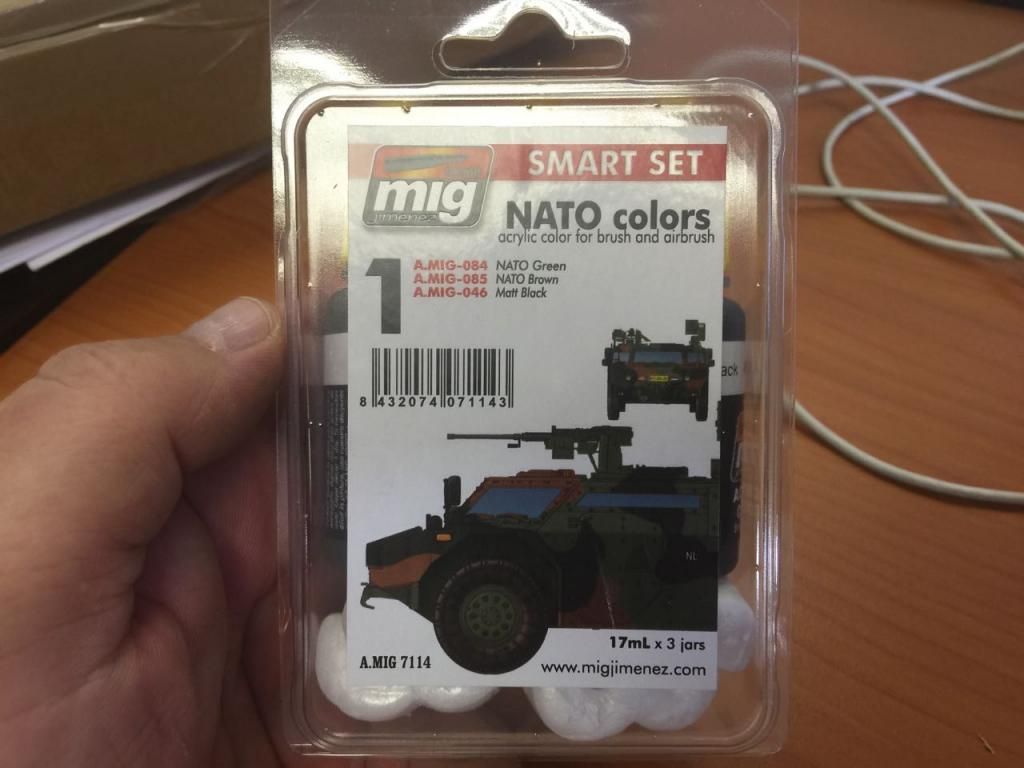
Next up, I finish the hull, except for the towing cables that still needs attaching. I have found a company in Germany that can ship AP to South Africa so I sent them a little order and will see how that goes. It normally takes takes 3 - 4 weeks so we'll see. The hull was also primed with Ammo Mig grey primer which went on like a dream. The wheels were painted with Tamiya XF-67, NATO Green, and XF-85, Rubber Black. I also primed the tracks with the Ammo Mig primer and airbrushed them with the XF-85 as a base before weathering. I'm going to try out the Ammo Mig NATO Colors set for the majority of the paint work.

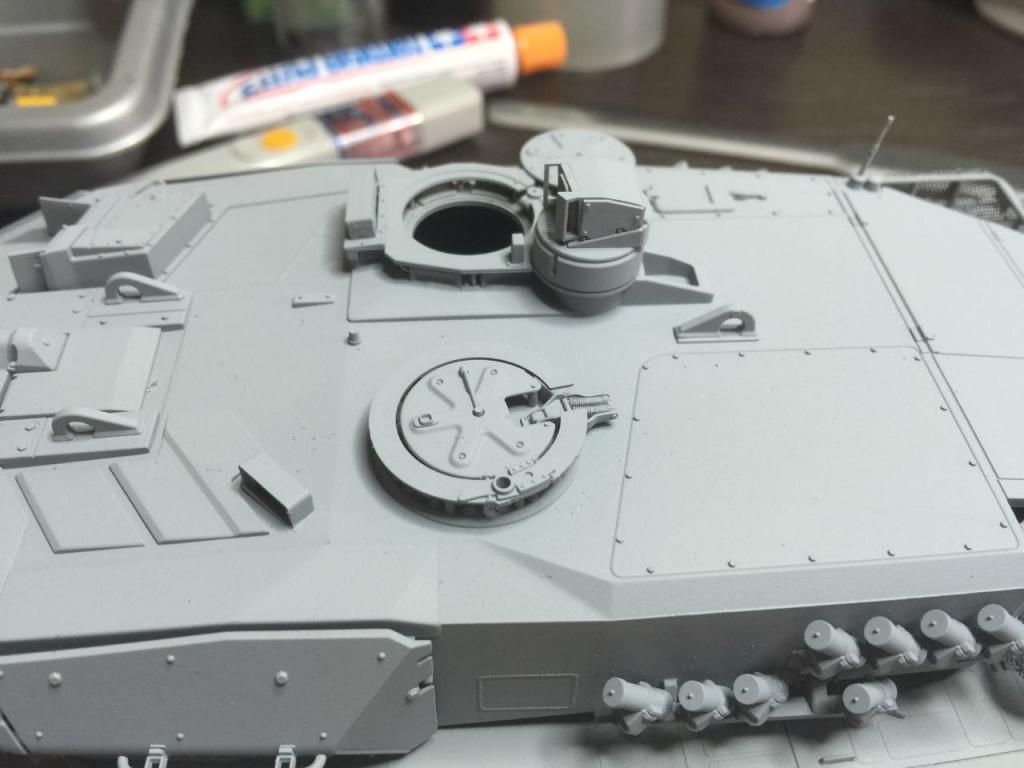
Next up, I worked on the turret some more. Added the commanders periscope and other bits and bops.
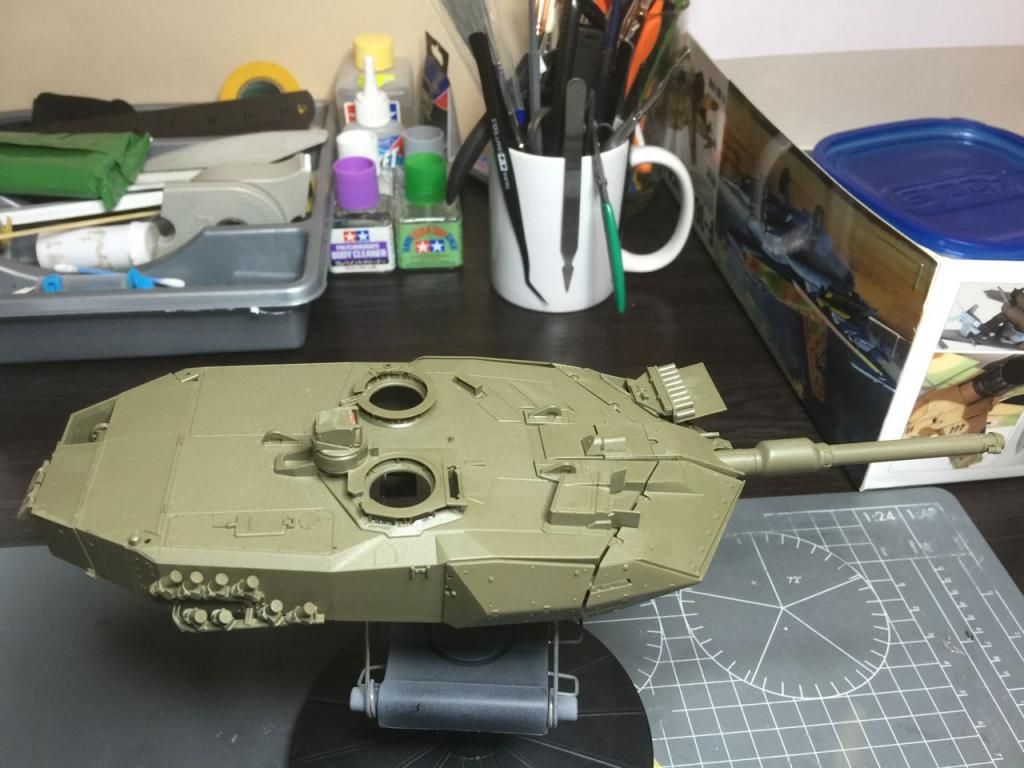
I was quite surprised by the "turret wings" on the Leopard 2.
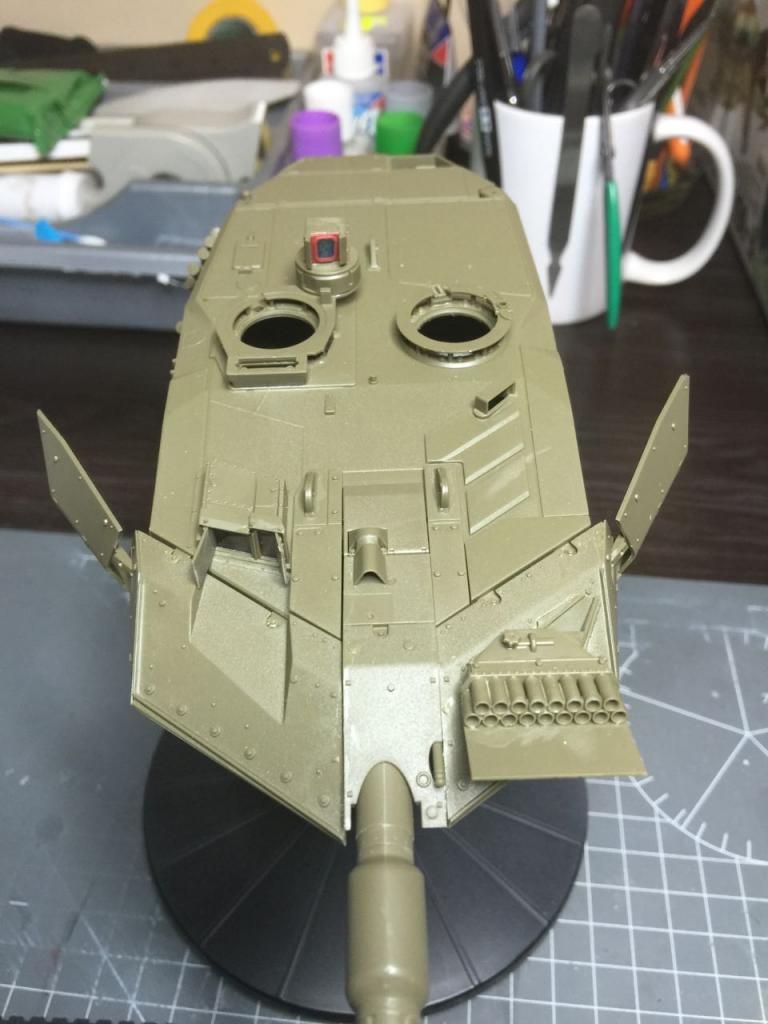
These wings are wedge shaped add-on modular armor modules which can be easily replaced in field conditions. They also provide a bullet-proof cover when the turret is in the 9 o' clock position and he wings opened up for mechanics to work on the engine in field conditions.
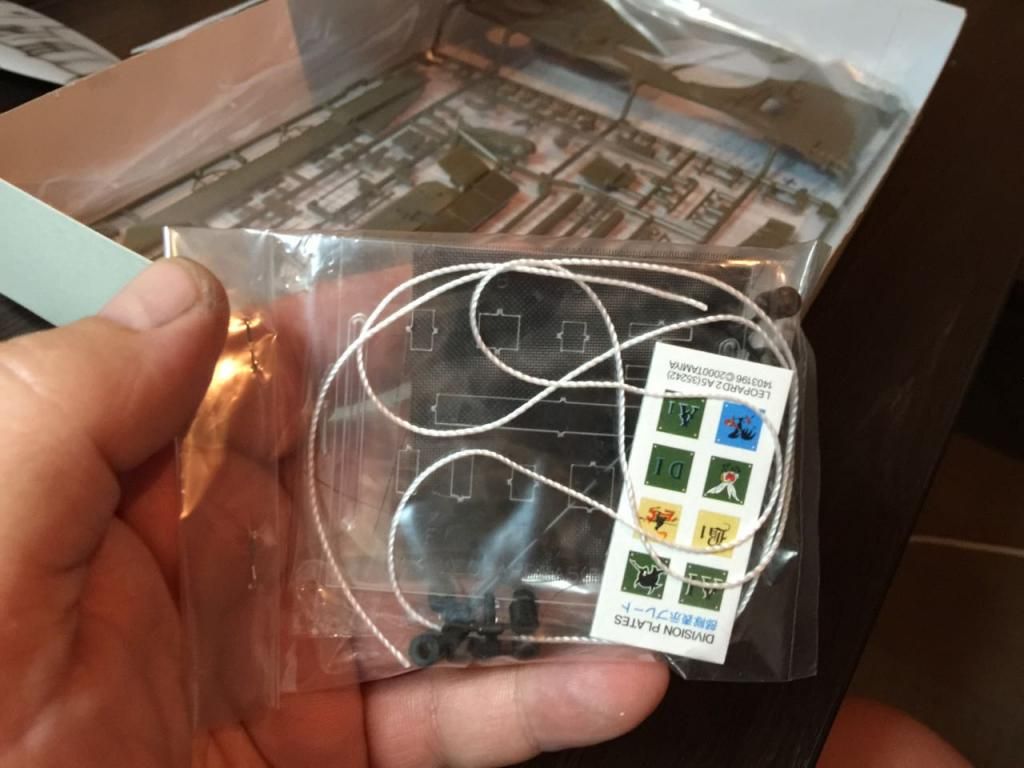
I still have to add the hatches and the baskets on the back of the turret but am waiting for some PE with my towing cables in the post. I just don't like the meshy material Tamiya supplies for the basket. So this is the tank almost 90% built. Machine gun, left side smoke grenade launchers, towing cables, turret baskets and side skirts are all that is missing.
Hope to update again soon.
The Leopard kit, like most Tamiya AFV kit, comes with a clear plastic bit that you have to cut to size and then fit into the periscope spaces. I never manage to get it right and am always disappointed. I decided to try a trick I saw someone use on Youtube for making clear bits using the old faithful below.

I used it for the driver periscopes,

the commander's hatch,

and the Rheinmetall/Zeiss PERI-R 17 A2 periscope at the commander's hatch.

It turned out quite nice and I'm happy with the result. I'll touch them up with a mix of Tamiya X-23 and X-25 to get a similar blue-green armoured glass look. I still need to figure out how to get that iridescent look of the periscope "glass"!
Next up, I finish the hull, except for the towing cables that still needs attaching. I have found a company in Germany that can ship AP to South Africa so I sent them a little order and will see how that goes. It normally takes takes 3 - 4 weeks so we'll see. The hull was also primed with Ammo Mig grey primer which went on like a dream. The wheels were painted with Tamiya XF-67, NATO Green, and XF-85, Rubber Black. I also primed the tracks with the Ammo Mig primer and airbrushed them with the XF-85 as a base before weathering. I'm going to try out the Ammo Mig NATO Colors set for the majority of the paint work.


Next up, I worked on the turret some more. Added the commanders periscope and other bits and bops.

I was quite surprised by the "turret wings" on the Leopard 2.

These wings are wedge shaped add-on modular armor modules which can be easily replaced in field conditions. They also provide a bullet-proof cover when the turret is in the 9 o' clock position and he wings opened up for mechanics to work on the engine in field conditions.
I still have to add the hatches and the baskets on the back of the turret but am waiting for some PE with my towing cables in the post. I just don't like the meshy material Tamiya supplies for the basket. So this is the tank almost 90% built. Machine gun, left side smoke grenade launchers, towing cables, turret baskets and side skirts are all that is missing.

Hope to update again soon.
JediBoer
On the bench righ now: Hmm... Lots of unfinished business!
On the bench righ now: Hmm... Lots of unfinished business!
Re: Tamiya 1/35 Leopard 2A5
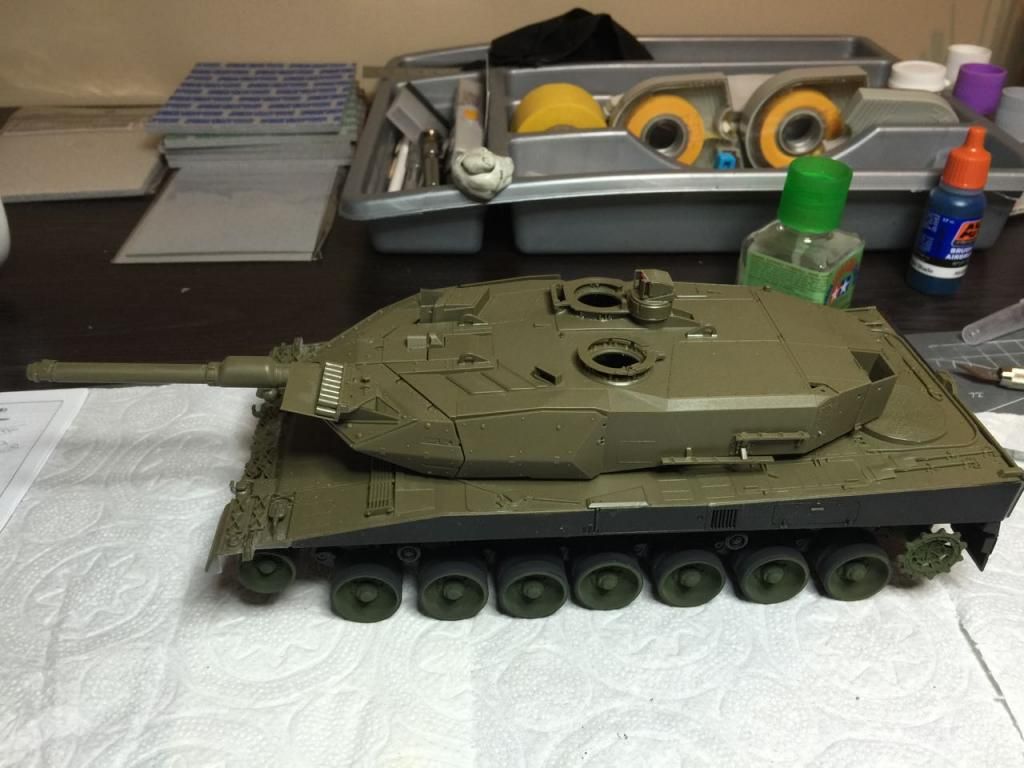
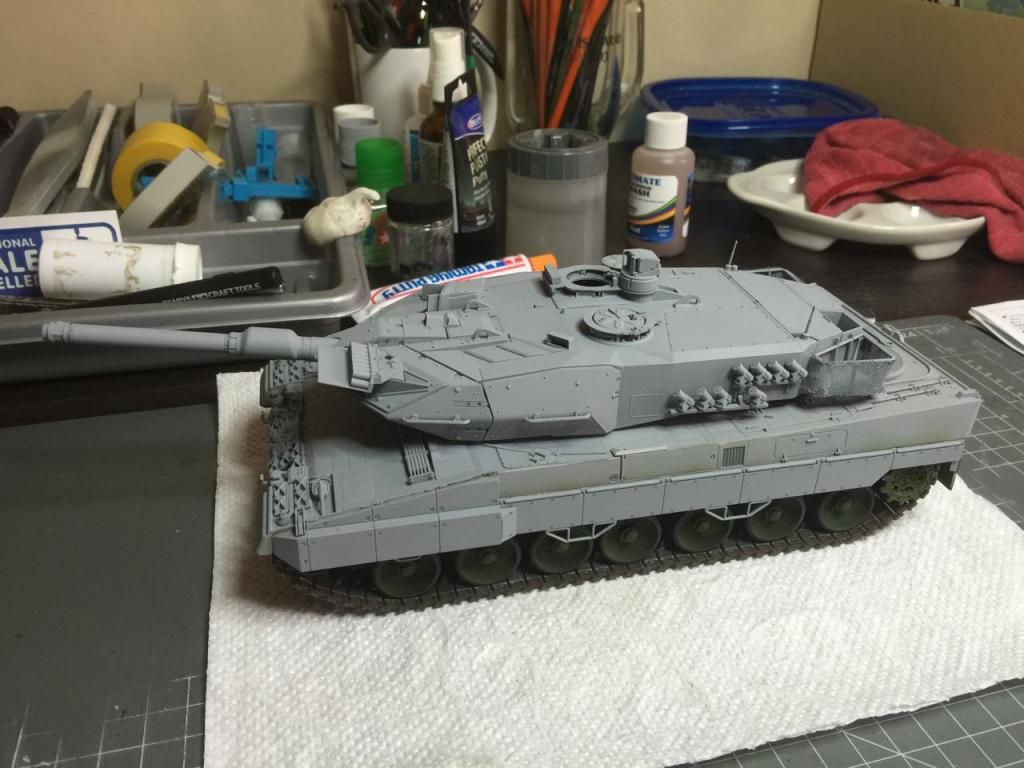
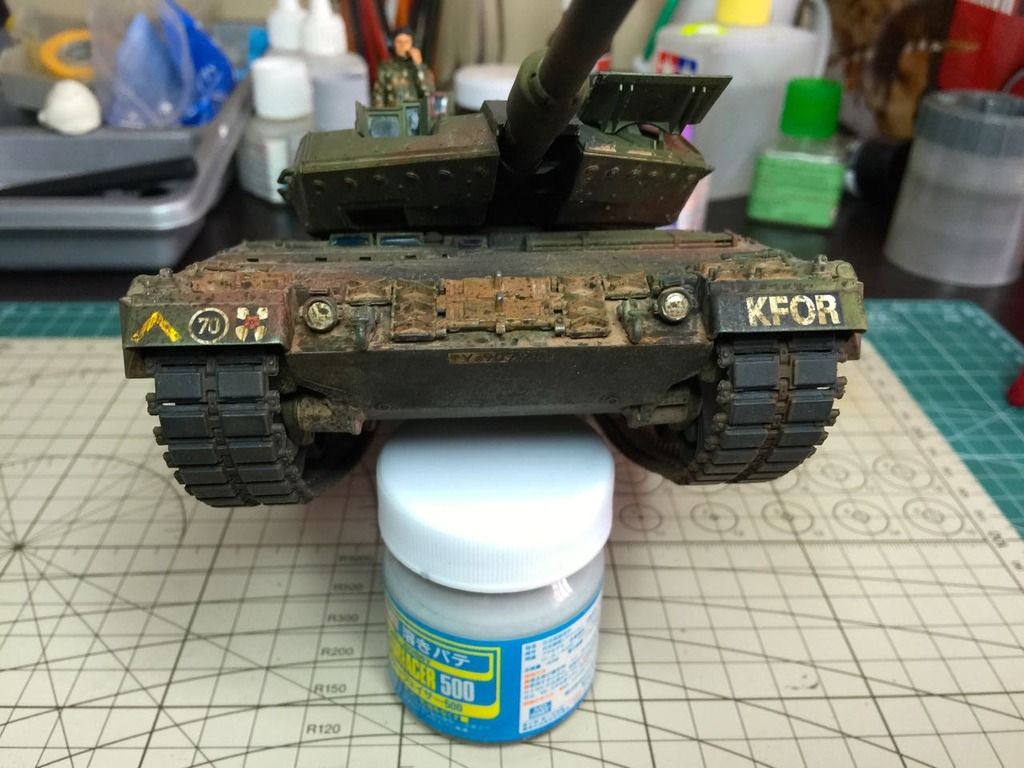
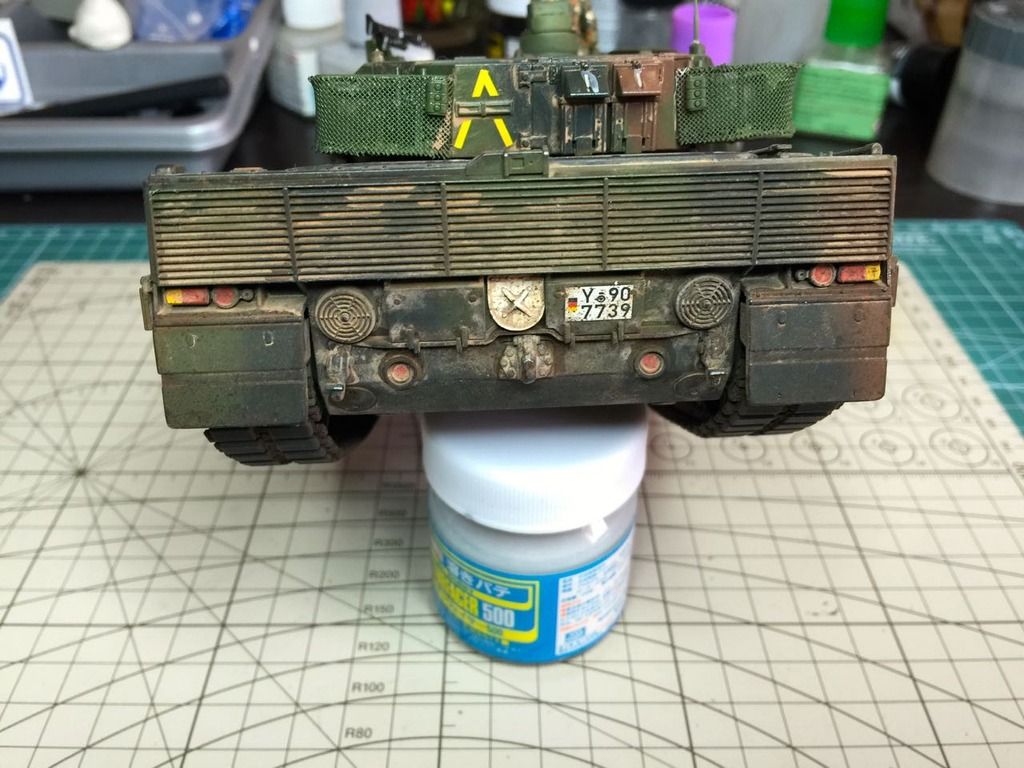
OK, so I made a little progress this weekend on the Leopard. The build is complete and the tank has been primed and is now ready for painting.
The side skirts has also been glued on and the tracks have been painted and attached.
I used the following pic as inspiration for painting the tracks.
And this is my effort using some AK Interactive Rubber Tires, Rusty Tracks and True Metal Gun Metal.

The first primer I used was from Ammo Mig and it left a very rough service which I had to sand back. I then switched to AK Interactive's primer and it left a smooth and beautiful finish.
I know a lot of people say that they are the same but I have done a little experimentation and found that Ammo and AK paints and primers react differently when adding a drop of Tamiya Airbrush Cleaner so I think there may be slight differences in the formulation.
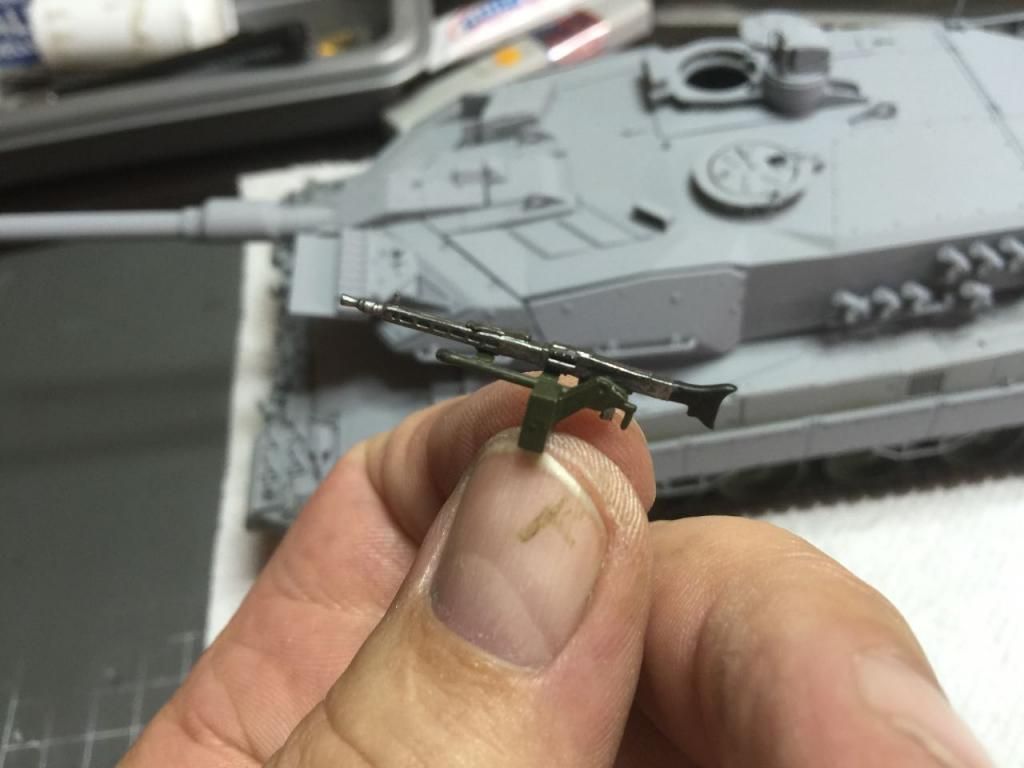
I also painted the MG. Used AK True Metal again and gave it an black oil wash afterwards to bring back the shine a bit.
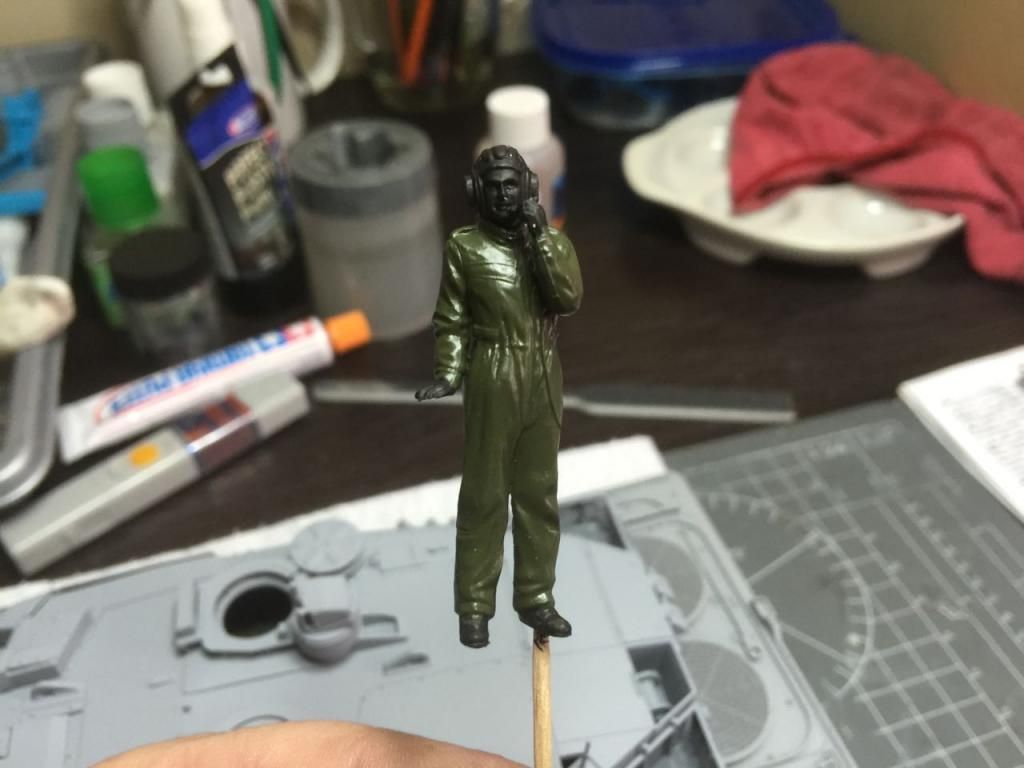
I also started on the commander's figure. Primed in Citadel Imperial Primer and then laid down a base coat of Ammo Mig Nato Green as a base for the camo pattern.
Well, I hope to get started with the camo during the week. Hope you like the update and as always, please feel free to comment with any suggestion or critique.

The side skirts has also been glued on and the tracks have been painted and attached.

I used the following pic as inspiration for painting the tracks.

And this is my effort using some AK Interactive Rubber Tires, Rusty Tracks and True Metal Gun Metal.

The first primer I used was from Ammo Mig and it left a very rough service which I had to sand back. I then switched to AK Interactive's primer and it left a smooth and beautiful finish.

I know a lot of people say that they are the same but I have done a little experimentation and found that Ammo and AK paints and primers react differently when adding a drop of Tamiya Airbrush Cleaner so I think there may be slight differences in the formulation.
I also painted the MG. Used AK True Metal again and gave it an black oil wash afterwards to bring back the shine a bit.

I also started on the commander's figure. Primed in Citadel Imperial Primer and then laid down a base coat of Ammo Mig Nato Green as a base for the camo pattern.

Well, I hope to get started with the camo during the week. Hope you like the update and as always, please feel free to comment with any suggestion or critique.
JediBoer
On the bench righ now: Hmm... Lots of unfinished business!
On the bench righ now: Hmm... Lots of unfinished business!

Re: Tamiya 1/35 Leopard 2A5
Its looking sweet! I ll be keeping a good eye on your progress, youve got me excited to get crackin on mine!
Re: Tamiya 1/35 Leopard 2A5
Thank you Jmart95!Jmart95 wrote:Its looking sweet! I ll be keeping a good eye on your progress, youve got me excited to get crackin on mine!
JediBoer
On the bench righ now: Hmm... Lots of unfinished business!
On the bench righ now: Hmm... Lots of unfinished business!
Re: Tamiya 1/35 Leopard 2A5
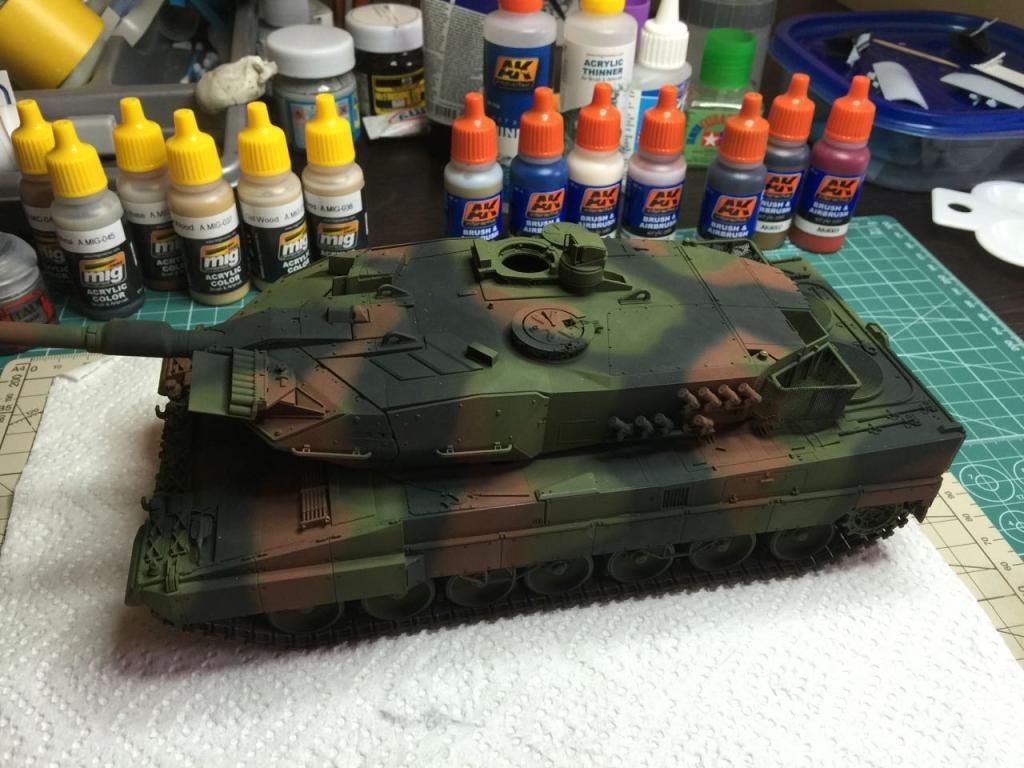
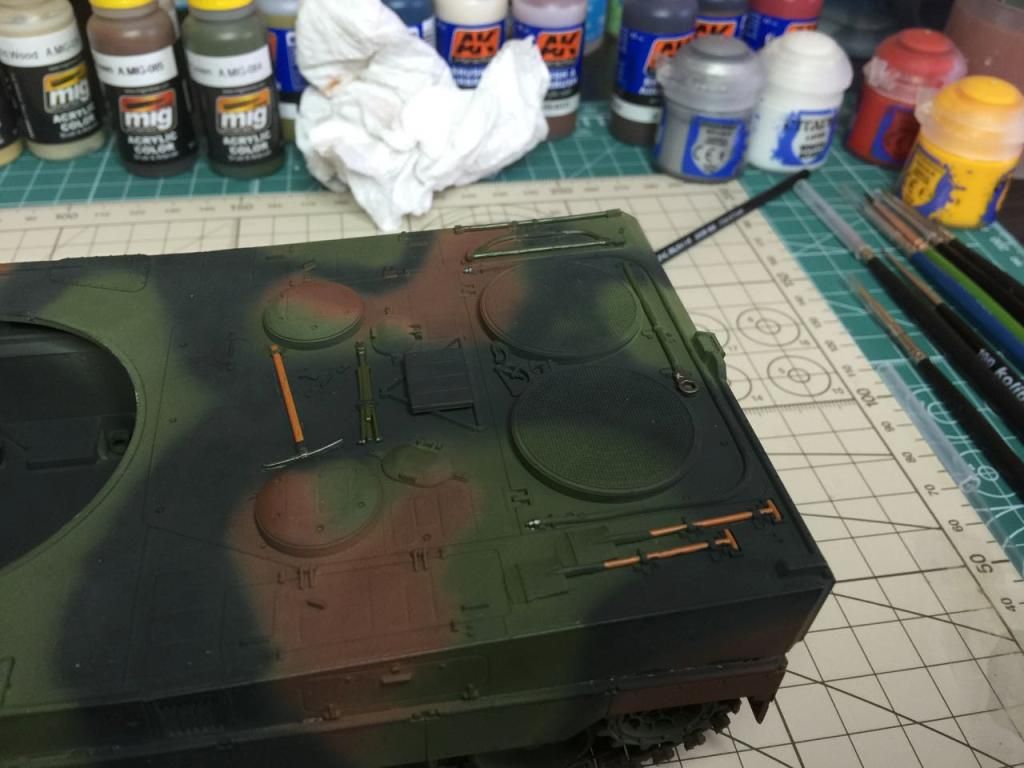
Could get home early today and wanted to start with the camouflage on the tank but the weather did not allow any airbrushing today!
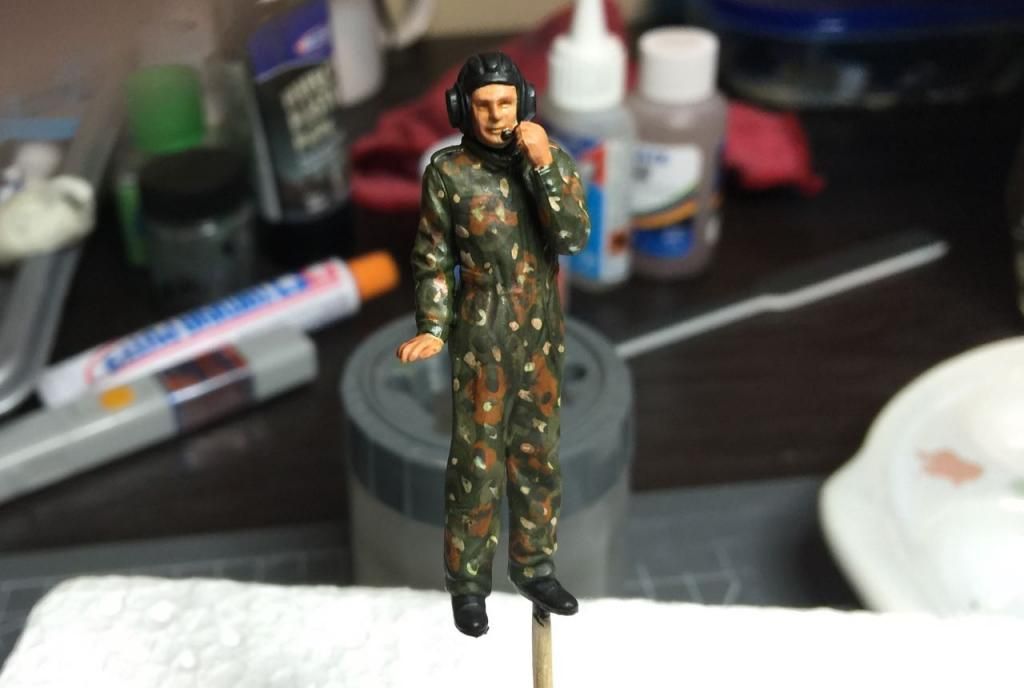
I decided to give the figure a go and it turned out not too bad.
The figure was painted with a combination of Ammo, AK and Citadel paints. The modern German camouflage is hard to paint me thinks!
That is the short update for today!
I decided to give the figure a go and it turned out not too bad.

The figure was painted with a combination of Ammo, AK and Citadel paints. The modern German camouflage is hard to paint me thinks!

That is the short update for today!
JediBoer
On the bench righ now: Hmm... Lots of unfinished business!
On the bench righ now: Hmm... Lots of unfinished business!


Re: Tamiya 1/35 Leopard 2A5
nice work there mate
-
schweinhund227
- Chief Warrant Officer 4

- Posts: 2627
- Joined: Fri May 24, 2013 9:51 pm
- Location: Ontario,Canada
- Contact:

Re: Tamiya 1/35 Leopard 2A5
maybe this would interest you ?

Keep up the good work...
I love the Tamiya Leo2
Beautiful beast ! nice work on the Optics...
Keep up the good work...
I love the Tamiya Leo2
Beautiful beast ! nice work on the Optics...
Re: Tamiya 1/35 Leopard 2A5
Thank you schweinhund227! I'mn going to order me one of those!schweinhund227 wrote:maybe this would interest you ?
Keep up the good work...
I love the Tamiya Leo2
Beautiful beast ! nice work on the Optics...
JediBoer
On the bench righ now: Hmm... Lots of unfinished business!
On the bench righ now: Hmm... Lots of unfinished business!
-
schweinhund227
- Chief Warrant Officer 4
- Posts: 2627
- Joined: Fri May 24, 2013 9:51 pm
- Location: Ontario,Canada
- Contact:
Re: Tamiya 1/35 Leopard 2A5
If you take your time and use
HOT WATER.... and Mr. Setter for decals from Mr. Hobby.
and cut it in small pieces.. you can cover an entire Figure... in a few hrs.. maybe a day !
and will look superb ! a lot of work but... it does look very nice !
Take care and take the time to look at their other products..
they have the Desert variant of that German Modern Camo.
Later mate !
Re: Tamiya 1/35 Leopard 2A5
I've been a bit busy at work the last couple of and didn't have time to spend on the Leopard. Found a little bit of time here and there and got a little bit of paint down and will hopefully finish the painting over the coming weekend and post some pics!
JediBoer
On the bench righ now: Hmm... Lots of unfinished business!
On the bench righ now: Hmm... Lots of unfinished business!
-
Dunhill2005
- Sergeant Major of the Army
- Posts: 1195
- Joined: Sat Aug 03, 2013 1:38 pm
- Location: Wunstorf, Germany
Re: Tamiya 1/35 Leopard 2A5
Take your time, FELLAJediBoer wrote:I've been a bit busy at work the last couple of and didn't have time to spend on the Leopard. Found a little bit of time here and there and got a little bit of paint down and will hopefully finish the painting over the coming weekend and post some pics!
Do not hurry...
-
schweinhund227
- Chief Warrant Officer 4
- Posts: 2627
- Joined: Fri May 24, 2013 9:51 pm
- Location: Ontario,Canada
- Contact:
Re: Tamiya 1/35 Leopard 2A5
Work on this only..... When you feel like it !
no one is forcing you !.... We will be here...
so take your time buddy !
no one is forcing you !.... We will be here...
so take your time buddy !
-
timtamtung

- Sergeant Major

- Posts: 689
- Joined: Fri Aug 01, 2014 3:42 am
- Location: Melbourne, Australia
Re: Tamiya 1/35 Leopard 2A5
Looking fine mate
-tungy

To do list:
1:35 Tasca Fury+Bravo6 crew | 1:48 Danger Zone F-14 |
To do list:
1:35 Tasca Fury+Bravo6 crew | 1:48 Danger Zone F-14 |
Re: Tamiya 1/35 Leopard 2A5
Thank you Tungy!timtamtung wrote:Looking fine mate
JediBoer
On the bench righ now: Hmm... Lots of unfinished business!
On the bench righ now: Hmm... Lots of unfinished business!
Re: Tamiya 1/35 Leopard 2A5
Thank you for the encouragement mate!schweinhund227 wrote:Work on this only..... When you feel like it !
no one is forcing you !.... We will be here...
so take your time buddy !
JediBoer
On the bench righ now: Hmm... Lots of unfinished business!
On the bench righ now: Hmm... Lots of unfinished business!
Re: Tamiya 1/35 Leopard 2A5
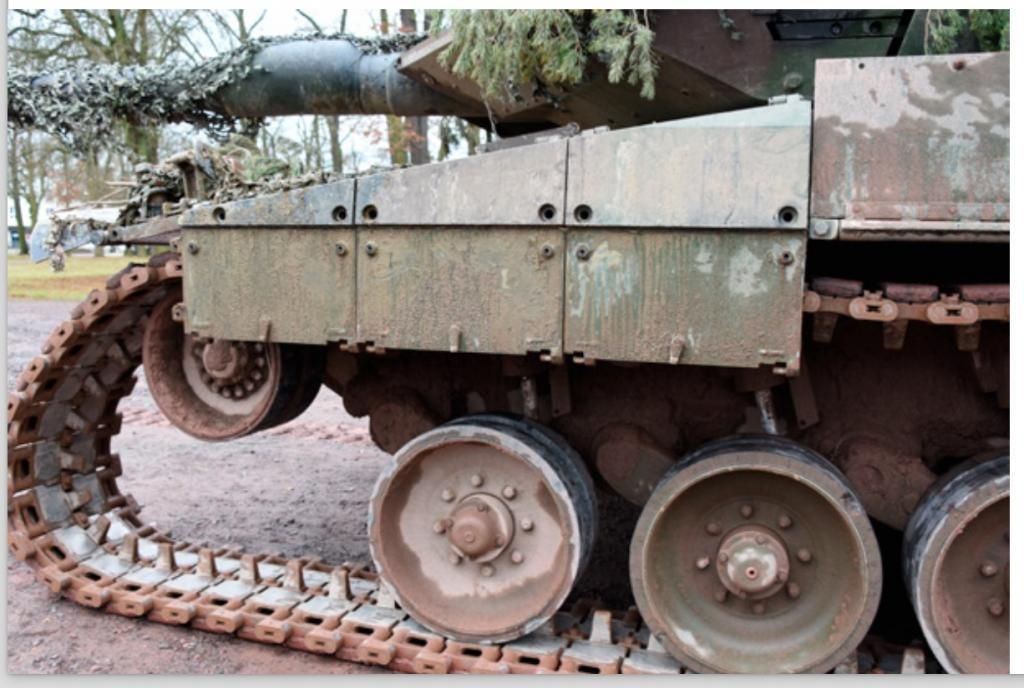
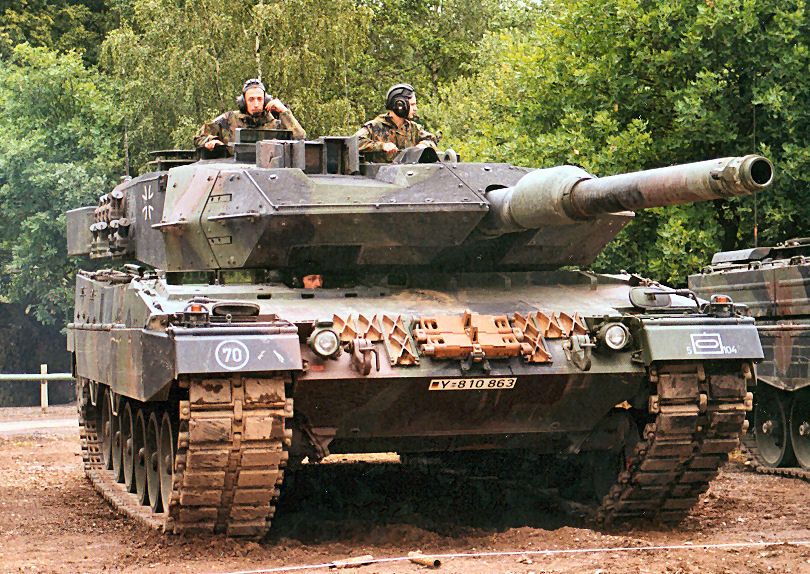
I know I still have to finish the painting but I've been wondering about how to weather the Leopard. Found a couple of nice pics online which will serve as inspiration.
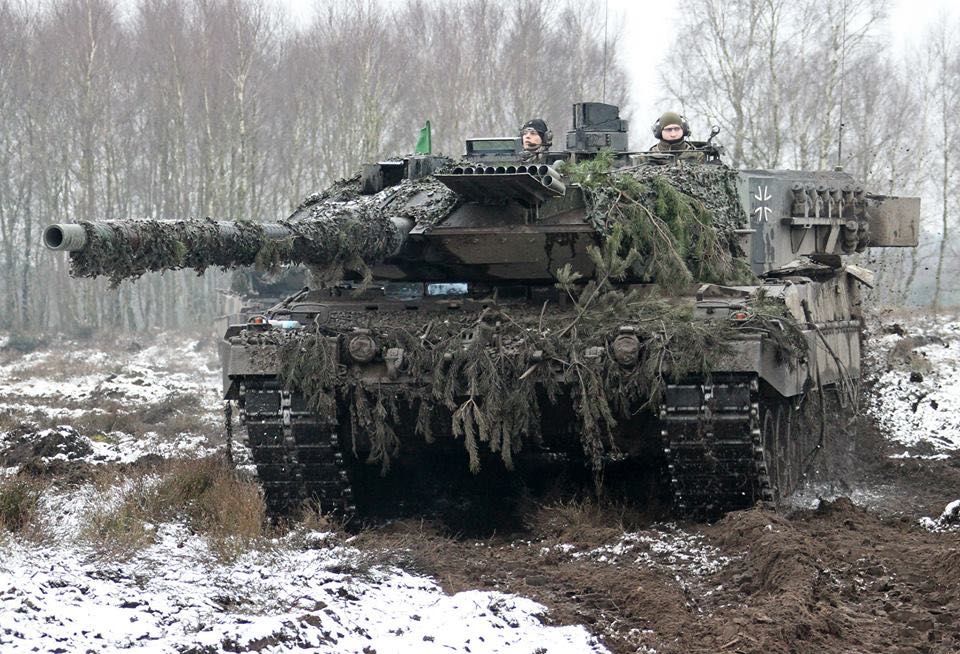
I really like this photo of the Leopard! What a beast! It seems to be a recurring theme with most photos I find, that the Germans love to break up the silhouette of the tank with branches or some camo netting. I'm lookng at a couple of options but I may give this a go. Another interesting thing about this photo is how clean the tracks are on the contact side going through the mud. I'm going to touch up my tracks a little with some AK-Interactive Dark Steele and buff it up a little to put some shine in and between the rubber pads.
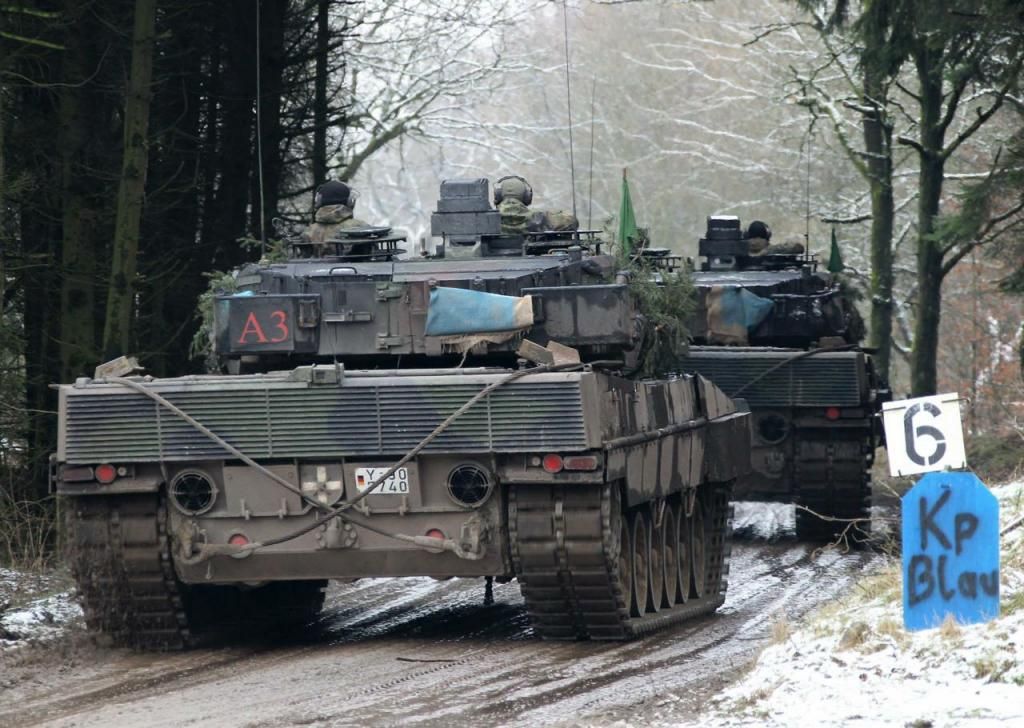
I like the weathered look of these Leopards. This will be the look I'm gonna go after!
Some ideas about how muddy to make the tracks and wheels. This is just right!
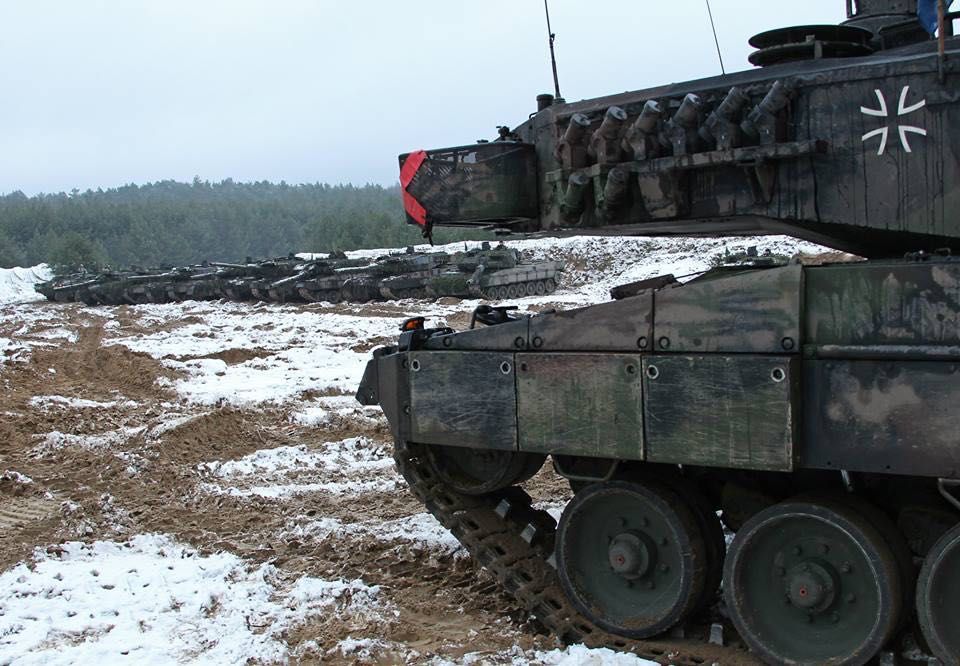
Monster tank!

Another view of the tracks after some TLC!
Now to get the paint down! Come on weekend!
Thank you to the kind comments and for having a look!

I really like this photo of the Leopard! What a beast! It seems to be a recurring theme with most photos I find, that the Germans love to break up the silhouette of the tank with branches or some camo netting. I'm lookng at a couple of options but I may give this a go. Another interesting thing about this photo is how clean the tracks are on the contact side going through the mud. I'm going to touch up my tracks a little with some AK-Interactive Dark Steele and buff it up a little to put some shine in and between the rubber pads.

I like the weathered look of these Leopards. This will be the look I'm gonna go after!

Some ideas about how muddy to make the tracks and wheels. This is just right!
Monster tank!

Another view of the tracks after some TLC!
Now to get the paint down! Come on weekend!
Thank you to the kind comments and for having a look!
JediBoer
On the bench righ now: Hmm... Lots of unfinished business!
On the bench righ now: Hmm... Lots of unfinished business!
-
PaulAyrey

- Sergeant Major of the Army
- Posts: 1141
- Joined: Tue Feb 04, 2014 5:24 pm
- Location: Worthing, West Sussex, UK
- Contact:
Re: Tamiya 1/35 Leopard 2A5
Muddy tanks......awesome!

Re: Tamiya 1/35 Leopard 2A5
The pressure is on! In the last month of the SiG! Had been doing a lot of traveling so there was little time to get to the bench but I'm home this weekend!
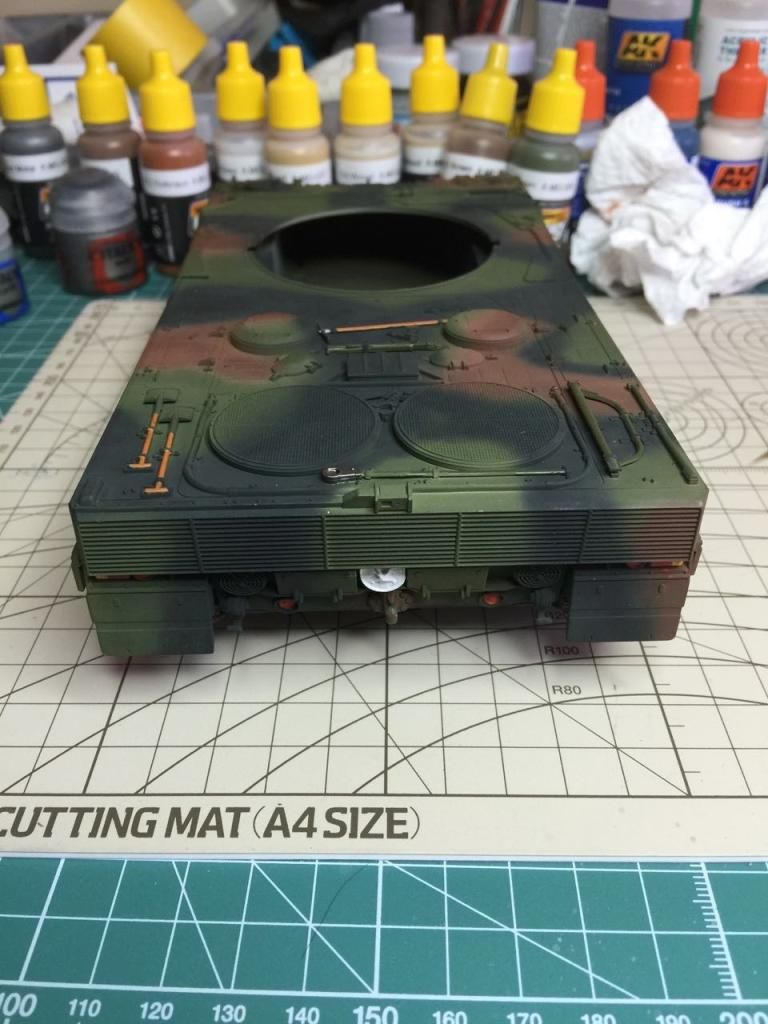
So, I wanted to try out painting the camouflage free hand! It was much, much harder than I imagined it would be. It freaked me out just how easy some of you pro's make it look on Youtube! It was hard but it turned out OK.
Unfortunately, the helper moved some of my stuff around, to dust off, while I was away and 3 little bits broke off and disappeared into the ether!
I picked out some detail this weekend. Just the tools on the back. Mostly used some Ammo Mig and AK Interactive paints. I cannot spray with the Ammo paints but they seem to be fine for brush painting! I have had no issues with the AK paints, brushing or airbrushing.
Tools:
Back lights and regimental badge:
Front lights:
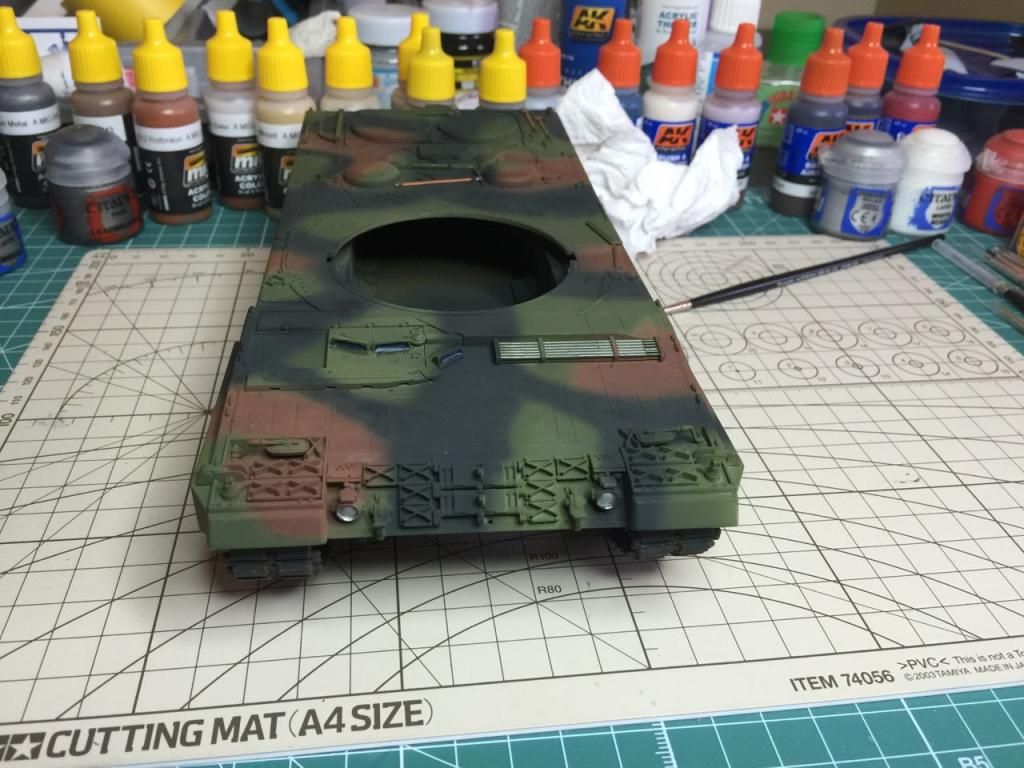
Once the paint dried, the first coat of Aqua Gloss airbrushed on.
I'll give the Aqua Gloss a day to cure and then give the Leopard another coat before I start with the decals and weathering.
So, I wanted to try out painting the camouflage free hand! It was much, much harder than I imagined it would be. It freaked me out just how easy some of you pro's make it look on Youtube! It was hard but it turned out OK.

Unfortunately, the helper moved some of my stuff around, to dust off, while I was away and 3 little bits broke off and disappeared into the ether!
I picked out some detail this weekend. Just the tools on the back. Mostly used some Ammo Mig and AK Interactive paints. I cannot spray with the Ammo paints but they seem to be fine for brush painting! I have had no issues with the AK paints, brushing or airbrushing.
Tools:

Back lights and regimental badge:

Front lights:

Once the paint dried, the first coat of Aqua Gloss airbrushed on.


I'll give the Aqua Gloss a day to cure and then give the Leopard another coat before I start with the decals and weathering.
JediBoer
On the bench righ now: Hmm... Lots of unfinished business!
On the bench righ now: Hmm... Lots of unfinished business!
-
Gav0909
- Chief Warrant Officer 5
- Posts: 2927
- Joined: Tue May 28, 2013 11:56 am
- Location: Fife, Scotland
- Contact:
Re: Tamiya 1/35 Leopard 2A5
Looks cracking mate. The freehand camo looks awesome! I have a Leopard 2 in the stash to go alongside my PzH2000, I am looking forward to it. Its just such a mean, sleek looking machine.
Re: Tamiya 1/35 Leopard 2A5
nice work there mate love the camo

Re: Tamiya 1/35 Leopard 2A5
A very interesting, with lots of information, build. I've never done armour (well tried one, but failed), only planes, but one day I will go for them  Your tank is looking great, good luck
Re: Tamiya 1/35 Leopard 2A5
Thank you Gav! This is the ultimate modeler"s dilemma: Had one in the stash, now it's build but the stash doesn't have one anymore so you know what it means!Gav0909 wrote:Looks cracking mate. The freehand camo looks awesome! I have a Leopard 2 in the stash to go alongside my PzH2000, I am looking forward to it. Its just such a mean, sleek looking machine.
JediBoer
On the bench righ now: Hmm... Lots of unfinished business!
On the bench righ now: Hmm... Lots of unfinished business!
Re: Tamiya 1/35 Leopard 2A5
Thank you Mate! Appreciate the encouragement!gaz45 wrote:nice work there mate love the camo
JediBoer
On the bench righ now: Hmm... Lots of unfinished business!
On the bench righ now: Hmm... Lots of unfinished business!
Re: Tamiya 1/35 Leopard 2A5
Thank you Daimyo! I learnt everything I know about modeling on this forum! There are guys here who are masters and who have perfected the art! This is my first go!Daimyo wrote:A very interesting, with lots of information, build. I've never done armour (well tried one, but failed), only planes, but one day I will go for them
JediBoer
On the bench righ now: Hmm... Lots of unfinished business!
On the bench righ now: Hmm... Lots of unfinished business!
Re: Tamiya 1/35 Leopard 2A5
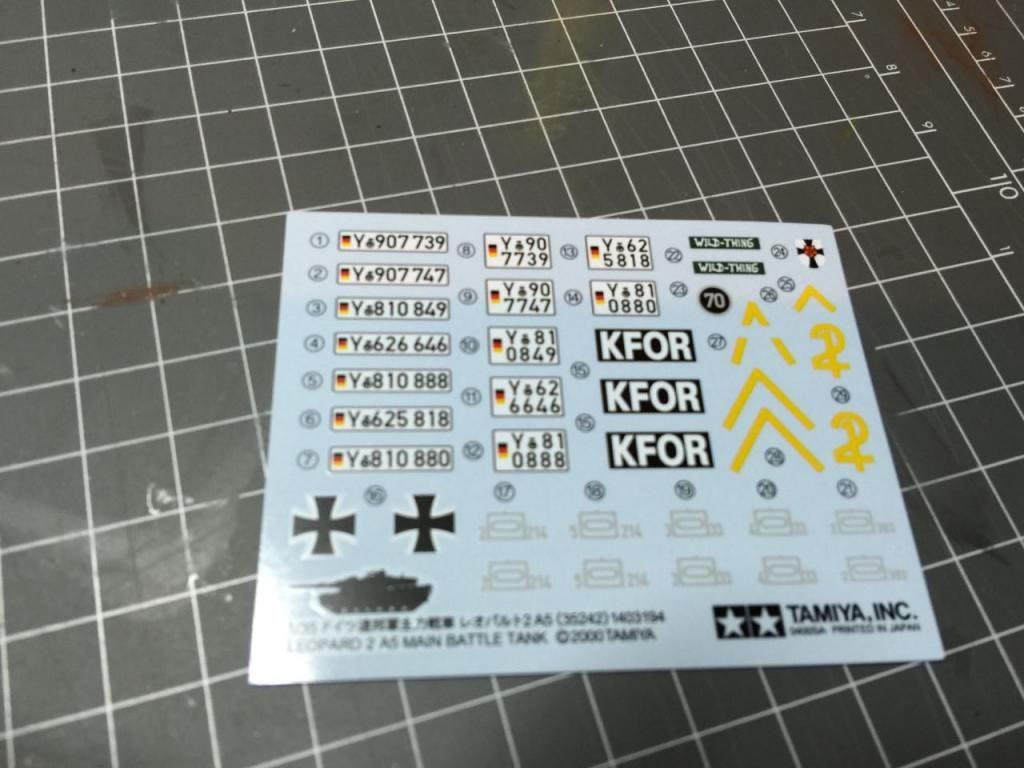
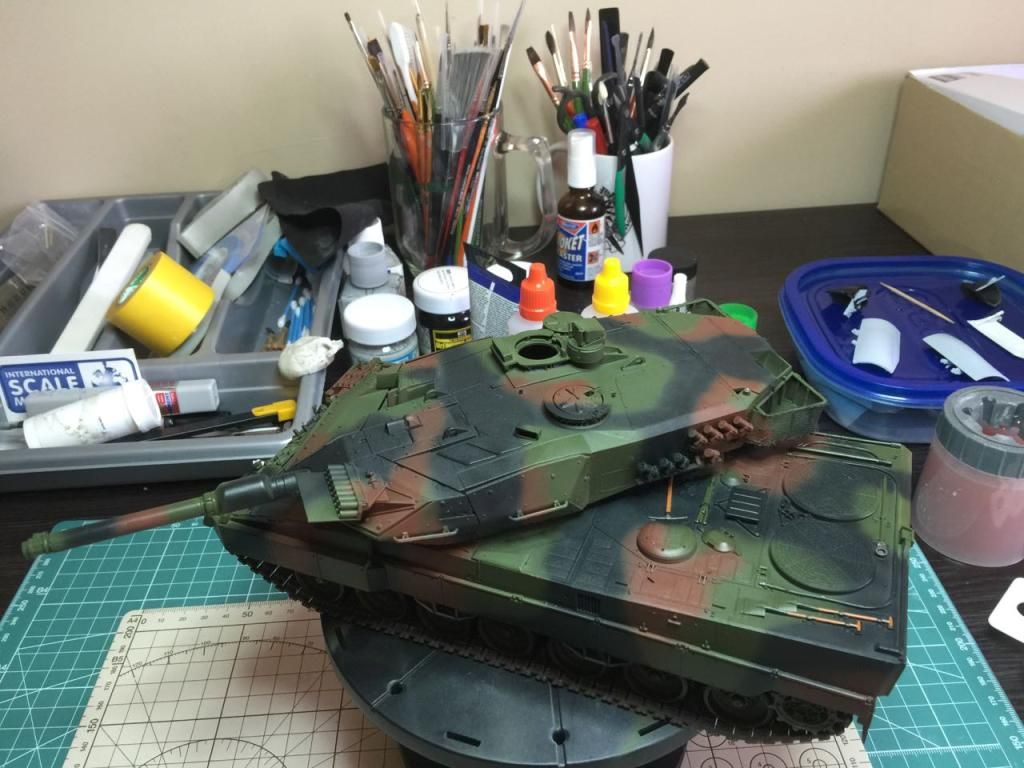
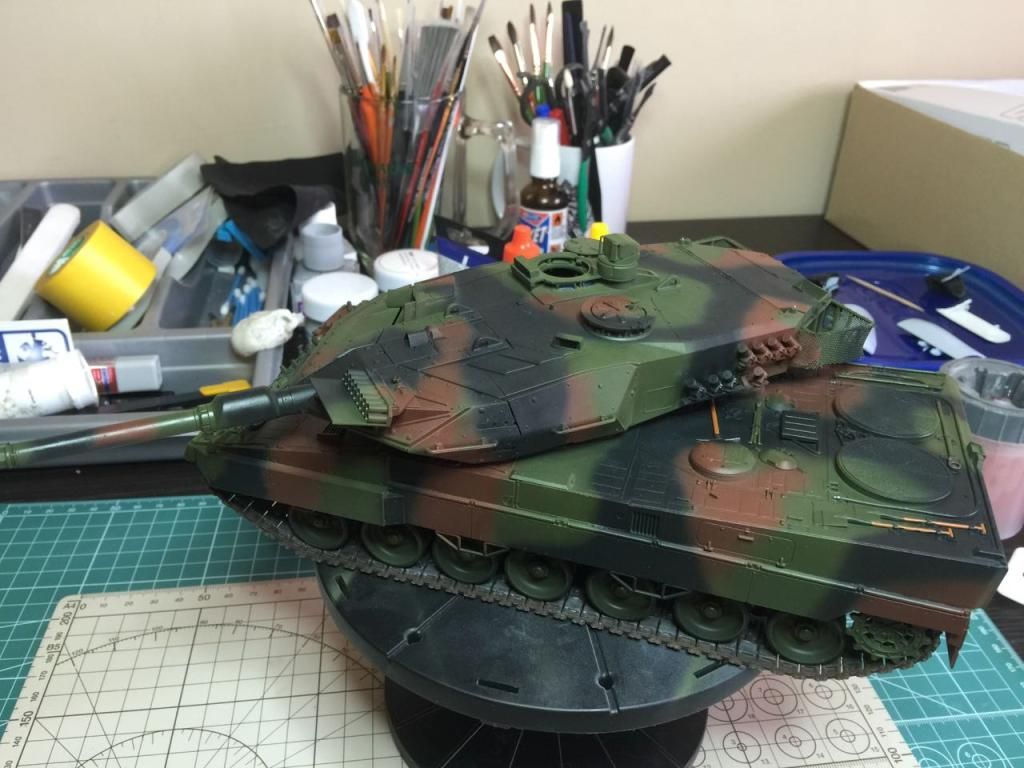
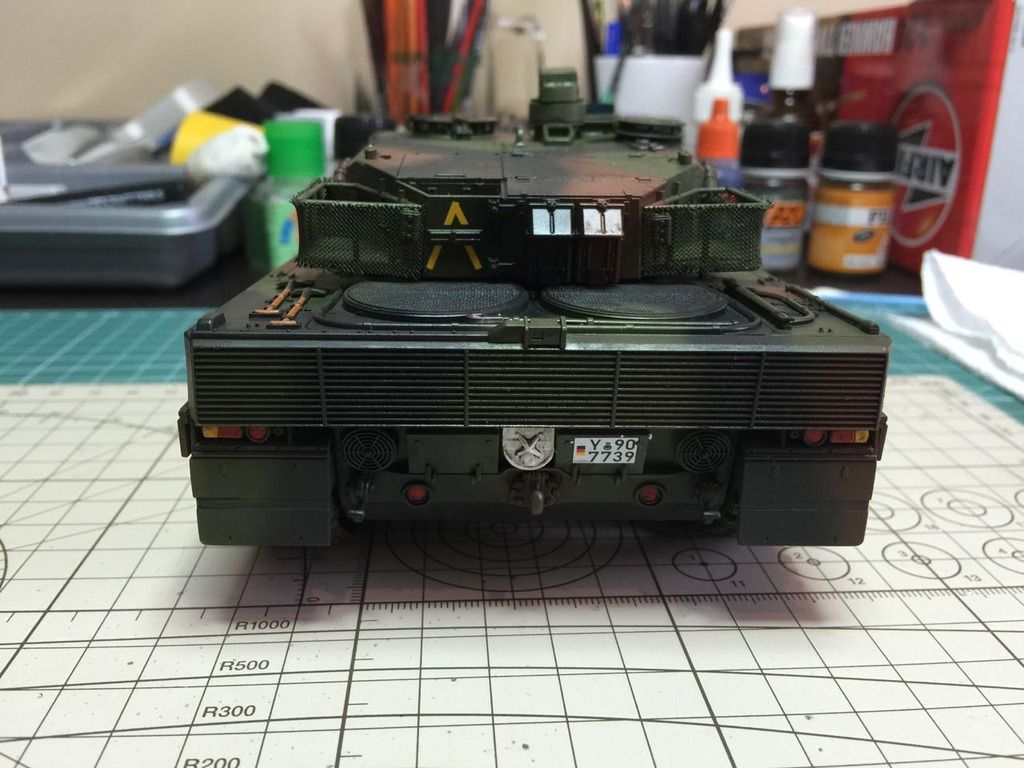
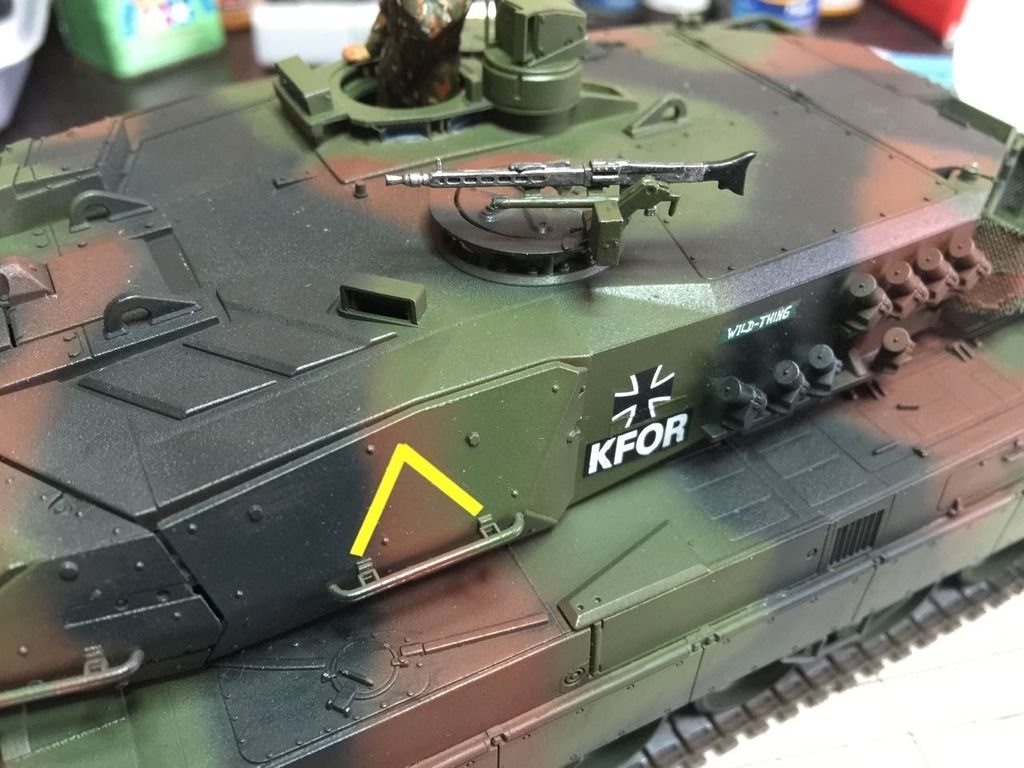
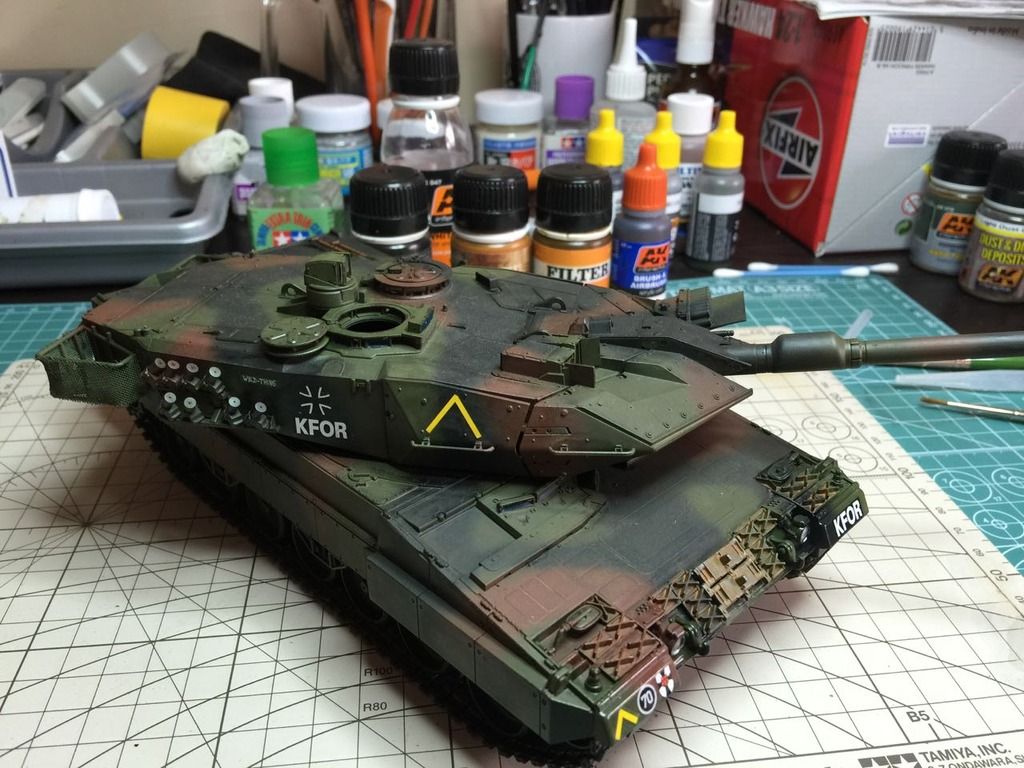
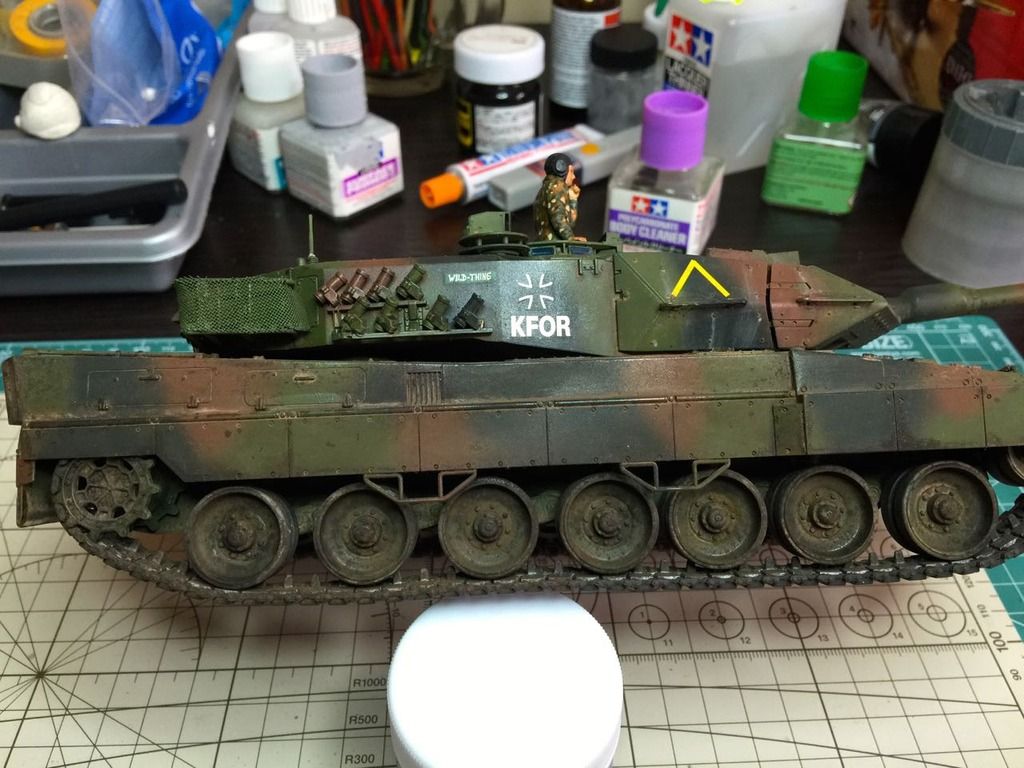
The Leopard 2 finally got its spots! Decals went on this week! Absolutely no problem with the decals and there were only a couple of them anyway! One of the advantages of building armor! 
Front decals
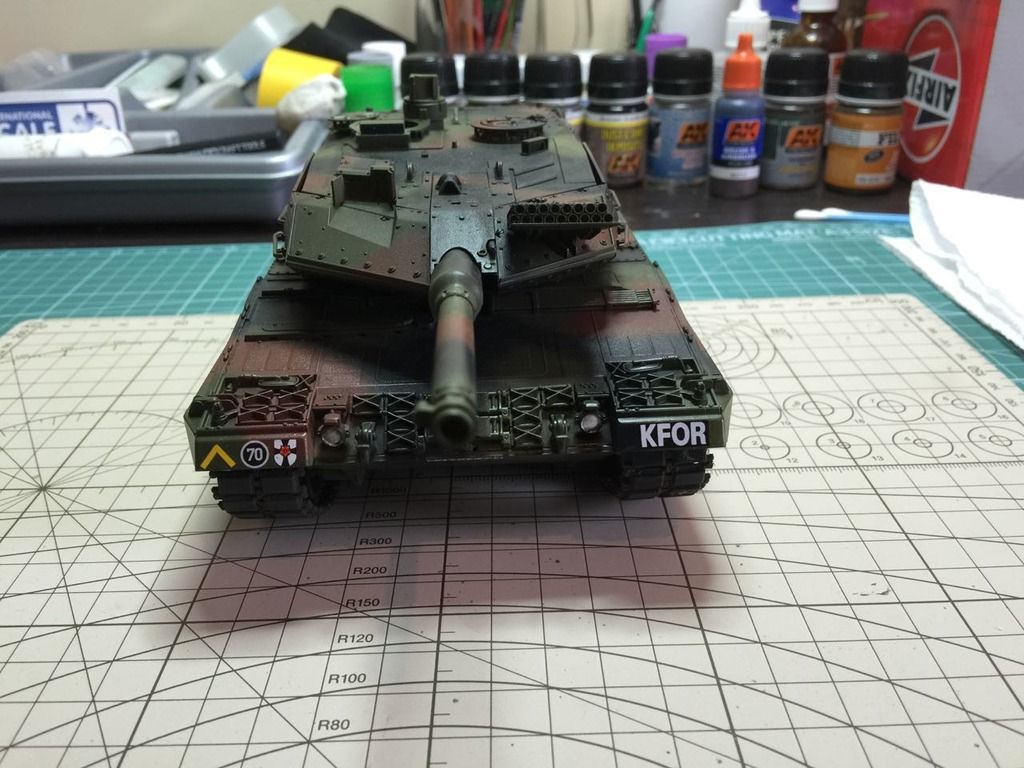
Side of the turret
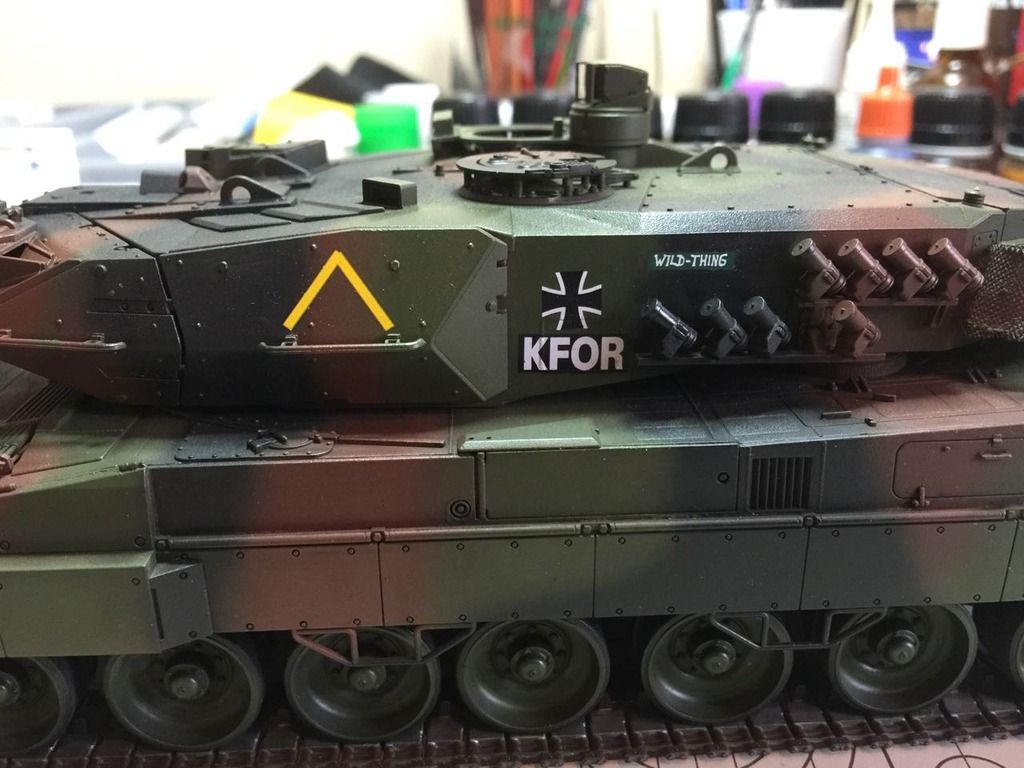
And the back
And there she is, decalled, Aqua Gloss coated, and AK Interactive Wash for NATO tanks applied!
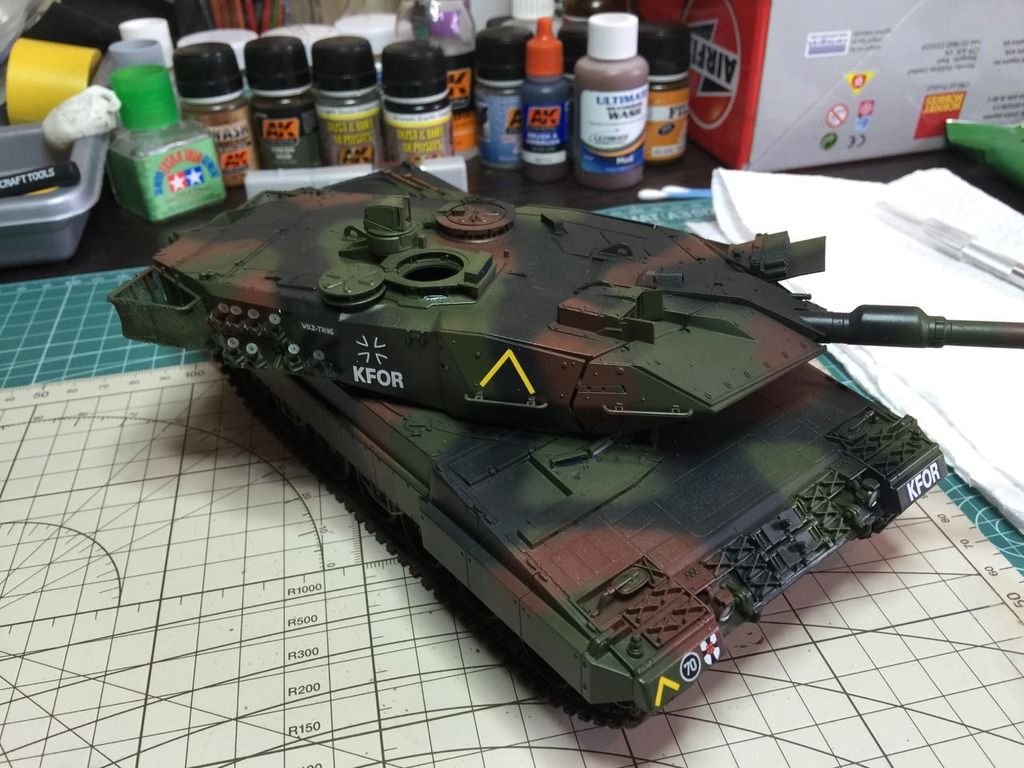
Close up with the MG
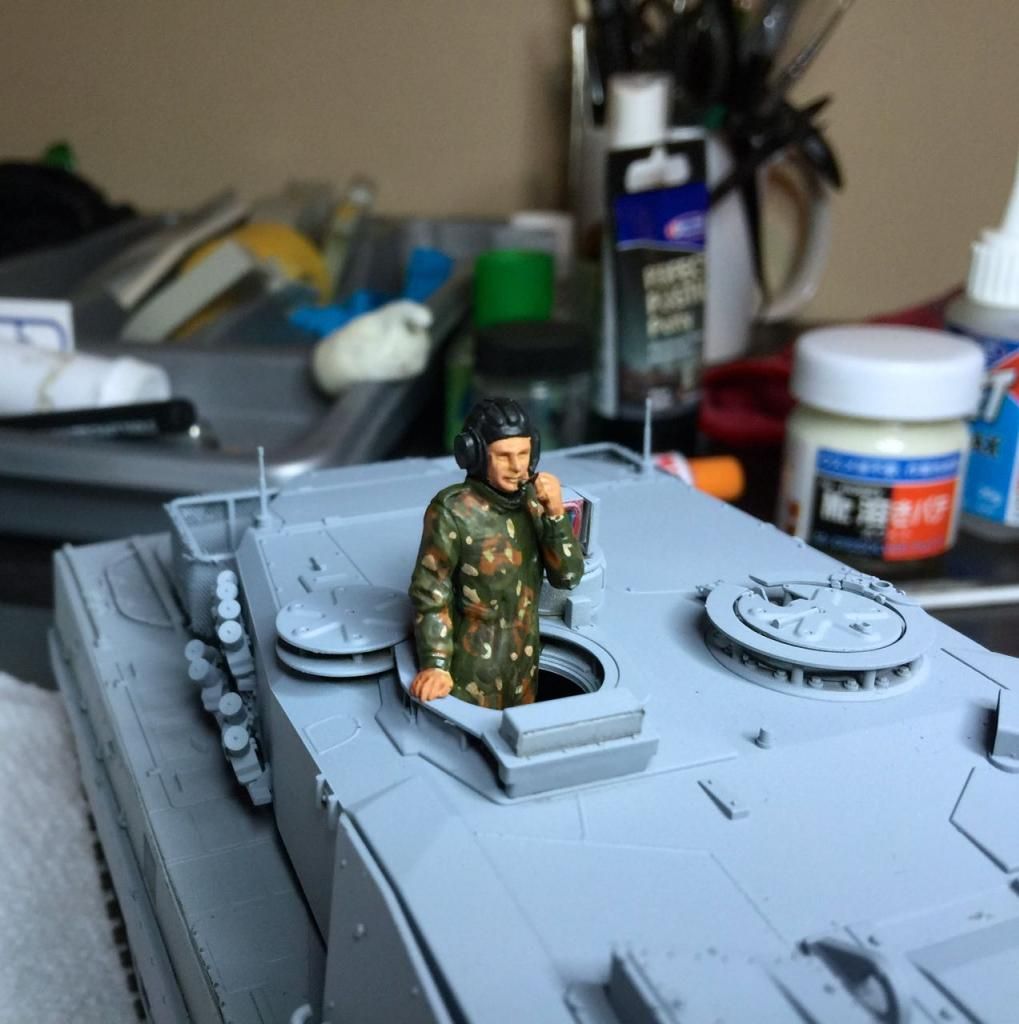
Commander figure in place
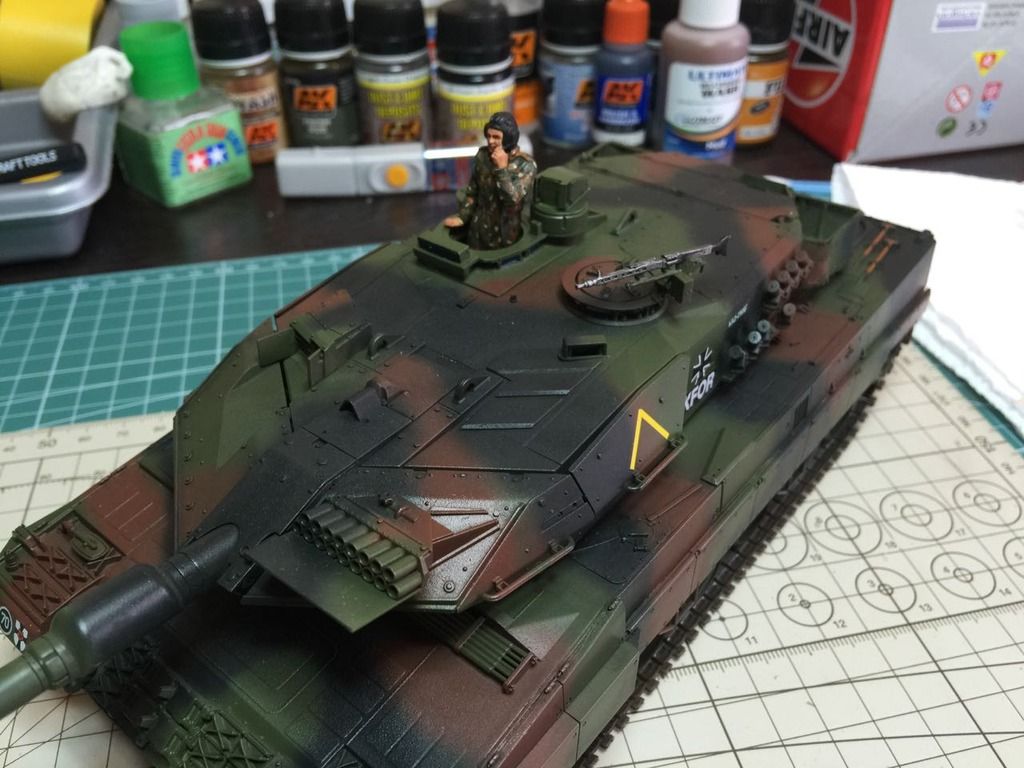
Now the real weathering is going to start! Time to play in the mud!
Front decals

Side of the turret

And the back

And there she is, decalled, Aqua Gloss coated, and AK Interactive Wash for NATO tanks applied!


Close up with the MG

Commander figure in place

Now the real weathering is going to start! Time to play in the mud!
JediBoer
On the bench righ now: Hmm... Lots of unfinished business!
On the bench righ now: Hmm... Lots of unfinished business!
-
PaulAyrey
- Sergeant Major of the Army
- Posts: 1141
- Joined: Tue Feb 04, 2014 5:24 pm
- Location: Worthing, West Sussex, UK
- Contact:
Re: Tamiya 1/35 Leopard 2A5
Nice! Can't wait for the weathering. Keep up the good work.
Re: Tamiya 1/35 Leopard 2A5
It has been a good weekend of modeling! So, I gave the Aqua Gloss some time to cure properly and tried out a filter for the first time. Applied some AK-Interactive Filter for NATO Tanks. I first applied it directly out of the bottle on the underside of the turret just to see what the effect would be. It was a bit too much too my liking so had a look at how some guys apply it and followed advice by first wetting the surface with some white spirit and then applying the filter. This worked a lot better and I liked how the filter kind of brought the camouflage colors together.
I don't know if I had to wait a little longer for the Aqua Gloss to cure some more or if it is the strength of the AK White Spirit but the gloss totally disappeared with the filter.
I also applied some AK-Interactive Light Rust Wash to the spare tracks on the front guided by some reference photos.

Another coat will probably be needed!
I've also given the Leopard 2 another Aqua Gloss coat. I'll just give it a good 48 hours to cure before starting with some streaking effects and MUD!


I don't know if I had to wait a little longer for the Aqua Gloss to cure some more or if it is the strength of the AK White Spirit but the gloss totally disappeared with the filter.
I also applied some AK-Interactive Light Rust Wash to the spare tracks on the front guided by some reference photos.

Another coat will probably be needed!

I've also given the Leopard 2 another Aqua Gloss coat. I'll just give it a good 48 hours to cure before starting with some streaking effects and MUD!
JediBoer
On the bench righ now: Hmm... Lots of unfinished business!
On the bench righ now: Hmm... Lots of unfinished business!
-
eightfooticeman
- First Sergeant

- Posts: 581
- Joined: Sat Nov 02, 2013 1:39 am
- Location: Woodbridge Virginia, USA
Re: Tamiya 1/35 Leopard 2A5
I have no doubt you'll be making it to the finish line with this fine Leopard! Just a friendly reminder 10 days and please don't forget to post pictures in the reveals section.

Jermaine
On The Bench:1/12 Tamiya Honda NSR 500 Kit 14099
Ideas: ?
On Hold:1/48 Revell F-15E
On The Bench:1/12 Tamiya Honda NSR 500 Kit 14099
Ideas: ?
On Hold:1/48 Revell F-15E
Re: Tamiya 1/35 Leopard 2A5
It is all done Jermaine! Just have to work out which pics I'm going to post and then it will all be done! Thank you for the challenge! It has been awesome!eightfooticeman wrote:I have no doubt you'll be making it to the finish line with this fine Leopard! Just a friendly reminder 10 days and please don't forget to post pictures in the reveals section.
JediBoer
On the bench righ now: Hmm... Lots of unfinished business!
On the bench righ now: Hmm... Lots of unfinished business!
Re: Tamiya 1/35 Leopard 2A5
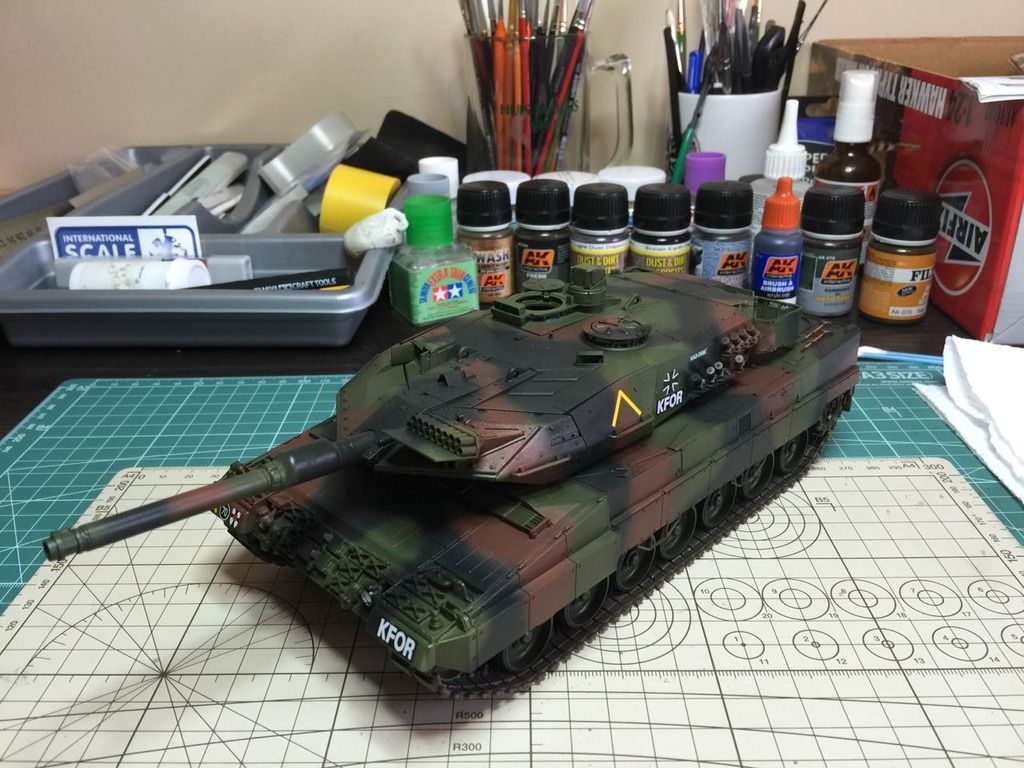
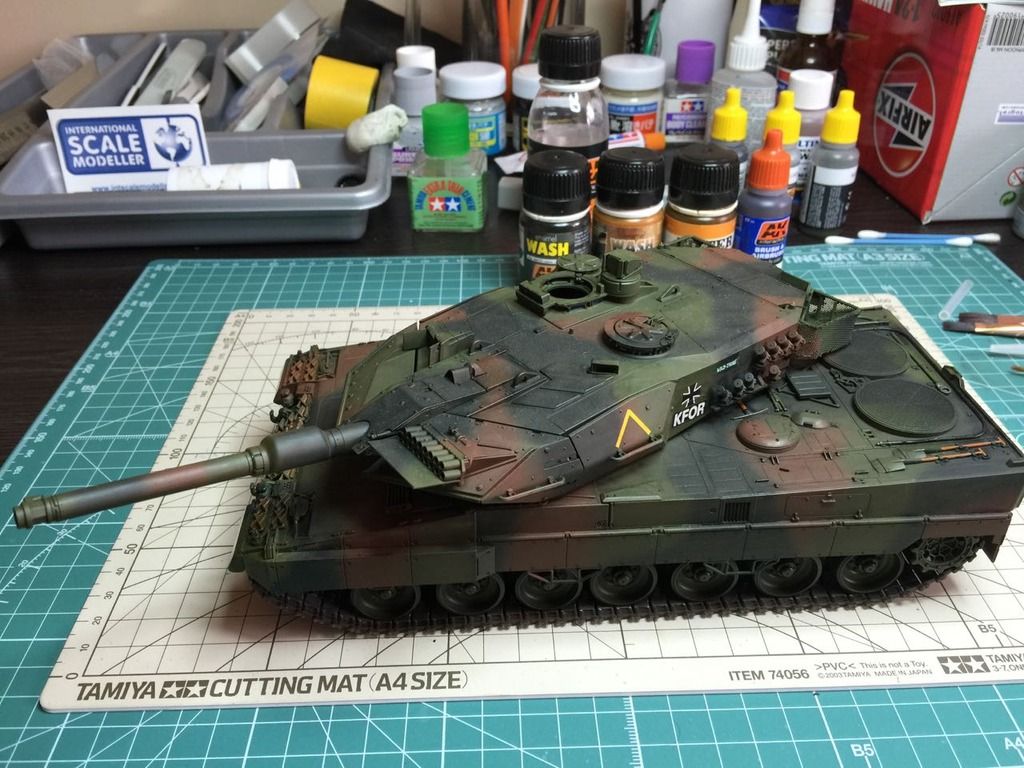
It is done, and dusted, and mudded, and wet effectsted, and pigmented, and matted, and photographed!
Here she is, the Tamiya 1/35 Leopard 2A5!
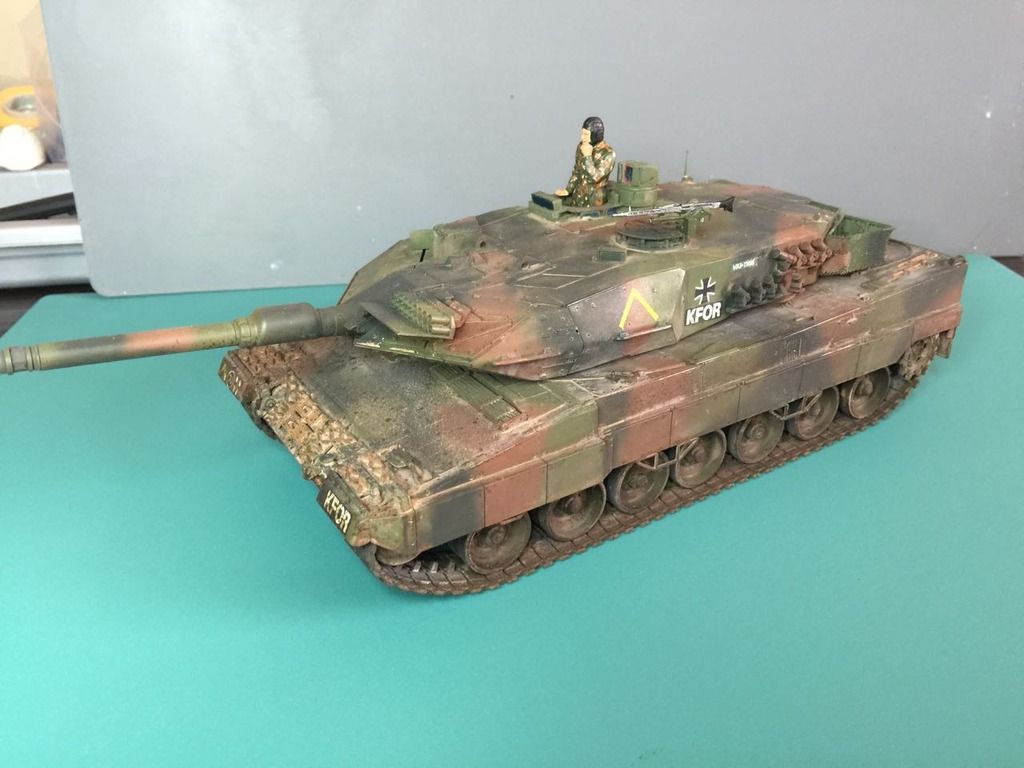
Forgive the amateur photographer in me! One hobby at a time!
A closer look at the weathering:
Front
Back
Sides

Weathering was done with the following products:
Ultimate Weathering Wash - Mud
AK Interactive Wet Effects Fluid
AK Interactive Dust and Dirt Deposits
AK Interactive Fresh Mud
Humbrol Dark Earth Pigment
Building the Leopard 2 was a nice challenge, not so much the build itself but the painting and especially the weathering! This is/was my first weathered armor build and I'm quite happy for a first go. Thank you to everyone who watched and encouraged! A special thank you to everyone who shared tips, tricks, videos etc. It is/was fun to learn from you guys! 
Here she is, the Tamiya 1/35 Leopard 2A5!

Forgive the amateur photographer in me! One hobby at a time!
A closer look at the weathering:
Front

Back

Sides


Weathering was done with the following products:
Ultimate Weathering Wash - Mud
AK Interactive Wet Effects Fluid
AK Interactive Dust and Dirt Deposits
AK Interactive Fresh Mud
Humbrol Dark Earth Pigment
Building the Leopard 2 was a nice challenge, not so much the build itself but the painting and especially the weathering! This is/was my first weathered armor build and I'm quite happy for a first go.
JediBoer
On the bench righ now: Hmm... Lots of unfinished business!
On the bench righ now: Hmm... Lots of unfinished business!
-
Panzermeister36

- Sergeant Major
- Posts: 692
- Joined: Sat Sep 14, 2013 5:59 pm
- Location: Ottawa, Ontario, Canada
- Contact:
Re: Tamiya 1/35 Leopard 2A5
Unleash the DShK!
http://www.youtube.com/user/Panzermeister36
WIPs
Dragon Sd.Kfz.7/2 FlaK 37 - Adam Mann's Halbkettenfahrzeug Gruppenbau
Dragon StuG IV Early - Unarmed Snowplow Modification
Trumpeter BMP-1 w/ BTR-70 Turret
Cyberhobby Geschützwagen 38M FlaK 103/38 - "M" GB
HobbyBoss T-40
Meng T-90
Orochi M3A3 Bradley
http://www.youtube.com/user/Panzermeister36
WIPs
Dragon Sd.Kfz.7/2 FlaK 37 - Adam Mann's Halbkettenfahrzeug Gruppenbau
Dragon StuG IV Early - Unarmed Snowplow Modification
Trumpeter BMP-1 w/ BTR-70 Turret
Cyberhobby Geschützwagen 38M FlaK 103/38 - "M" GB
HobbyBoss T-40
Meng T-90
Orochi M3A3 Bradley
Re: Tamiya 1/35 Leopard 2A5
A big thank you Sir! the front and back mud splashing was done after watching your YouTube video on weathering a modern tank and trying out your toothbrush technique!Panzermeister36 wrote:That's your first weathering attempt? Incredible! The dust and mud are superb, buddy
I especially love the effects on the front and rear of the hull there where the markings are covered by the mud slightly; it's very realistic in my eyes!
JediBoer
On the bench righ now: Hmm... Lots of unfinished business!
On the bench righ now: Hmm... Lots of unfinished business!
-
Panzermeister36
- Sergeant Major
- Posts: 692
- Joined: Sat Sep 14, 2013 5:59 pm
- Location: Ottawa, Ontario, Canada
- Contact:
Re: Tamiya 1/35 Leopard 2A5
ThanksJediBoer wrote:A big thank you Sir! the front and back mud splashing was done after watching your YouTube video on weathering a modern tank and trying out your toothbrush technique!Panzermeister36 wrote:
Unleash the DShK!
http://www.youtube.com/user/Panzermeister36
WIPs
Dragon Sd.Kfz.7/2 FlaK 37 - Adam Mann's Halbkettenfahrzeug Gruppenbau
Dragon StuG IV Early - Unarmed Snowplow Modification
Trumpeter BMP-1 w/ BTR-70 Turret
Cyberhobby Geschützwagen 38M FlaK 103/38 - "M" GB
HobbyBoss T-40
Meng T-90
Orochi M3A3 Bradley
http://www.youtube.com/user/Panzermeister36
WIPs
Dragon Sd.Kfz.7/2 FlaK 37 - Adam Mann's Halbkettenfahrzeug Gruppenbau
Dragon StuG IV Early - Unarmed Snowplow Modification
Trumpeter BMP-1 w/ BTR-70 Turret
Cyberhobby Geschützwagen 38M FlaK 103/38 - "M" GB
HobbyBoss T-40
Meng T-90
Orochi M3A3 Bradley
-
PaulAyrey
- Sergeant Major of the Army
- Posts: 1141
- Joined: Tue Feb 04, 2014 5:24 pm
- Location: Worthing, West Sussex, UK
- Contact:
Re: Tamiya 1/35 Leopard 2A5
Fantastic result, you have done a great job and used the weathering effects to a high standard.
Re: Tamiya 1/35 Leopard 2A5
Thank you Paul! Much appreciated!PaulAyrey wrote:Fantastic result, you have done a great job and used the weathering effects to a high standard.
JediBoer
On the bench righ now: Hmm... Lots of unfinished business!
On the bench righ now: Hmm... Lots of unfinished business!
