Sturmmörser Tiger - 1:35 Italeri

All your builds here...

Moderator: T3hGuppy

User avatar
papatika
Master Sergeant
Master Sergeant
Posts: 382
Joined: Thu Jun 05, 2014 11:12 am
Location: Budapest, Hungary
Hungary

Sturmmörser Tiger - 1:35 Italeri

Post by papatika »

This beast will be my next victim... :)

Nice boxart:
Image

packed in one bag:
Image

sprue "A":
Image

nice details on the floor of the fighting compartment:
Image

gun and mantlet:
Image

great welding and rolled steel details:
Image

dirve wheel:
Image

sprue "B":
Image

wheels:
Image

tracks:
Image

the other side (does anybody know if the guide horns are correct? :scratch:: I never know whether they shall be hollowed or not)
Image

380mm destruction:
Image

sprue "C":
Image

rear plate with zimmerit:
Image

engine deck:
Image

gun:
Image

decals:
Image


So, this is the box's content. Overall I'm very pleased with this kit, it is far better then the average Italeri kits. It also features interior details, which is quite unusual for Italeri. It has nice details, they could be crisper though. I'm not sure about the guide horns on the tracks. But my biggest hart break is the lack of grills of the engine deck. I have to fine a nice solution for scratch building some, or aftermarket PE parts.
RobertK
Sergeant First Class
Posts: 314
Joined: Wed Dec 25, 2013 3:49 pm
Location: Sweden
Sweden

Re: Sturmmörser Tiger - 1:35 Italeri

Post by RobertK »

I've built this kit, minimal amount of flash and everything fit together without any real problems. Well worth what I paid for the kit, can't remember how much other than it was cheap :)
:banana:
User avatar
papatika
Master Sergeant
Master Sergeant
Posts: 382
Joined: Thu Jun 05, 2014 11:12 am
Location: Budapest, Hungary
Hungary

Re: Sturmmörser Tiger - 1:35 Italeri

Post by papatika »

RobertK wrote:I've built this kit, minimal amount of flash and everything fit together without any real problems. Well worth what I paid for the kit, can't remember how much other than it was cheap :)
I got mine in a sale, so it was even cheaper :) Minimal flash, that's right. Everything fit to together without any real problems? Umm... questionable, but still worth the price.

Interior is ok, only a few ejector pinmark here and there, most of which won't be visible.
Image

Serious sandings and fillings had to be done on the outher side. The mold's shape was incorrect, thus the parts didn't fit, and huge gaps were left behind. As you can see the lower hull badly needed filling where the drive sprocket and the idler wheels shall be attached. Gaps are in the front section, and the back section. Will not fill it however, because I plan to cover it with mud. The side armor's fit is also only a mediocre quality, I'll handle it after the interior has been completed.
Image

Currently I see this kit like "nice, but..." Same goes for the interior.
Nice texture on the floor, but where is the radio for example? :doh:
Image

Cool details on the gun, but the vision ports are just empty holes... Same goes for the wents on the top. :jd:
Image

Great replication of the wholes around the gun, flame cutter marks nicely molded, but inside it is a smooth bored gun! It was rifled irl, and in this size it IS visible indeed! This tank is all about the gun! This will be the first thing sy checks! :crazy:
Image

So I spent a few hours to measure, test, cut, remeasure, retest, recut stripes from paper. Finally I cut one bigger one to perfectly fit inside in length and also in width, and 9 thinner ones, and glued them slightly diagonally onto the larger one. Then using a pen, which fortunately has a perfect fit, I rolled up the new internal sleeve, and glued into it's place.
Image
Image
Image

For the missing vision ports I planned to use small pieces of an old CD, but when I cut it, the carrier film peeled of. I glued the film with superglue to two of the numberings from the sprue, and glued that into it's place.
Image
Image

It looks something like this:
Image

I still don't know whether to show more from the interior, or not. If yes, I have to cut out a small piece from the sides or the deck.
Image
I would really like to know your opinion about this.

One more thing has been done: primed with black. Probably I'll give it an other coat of gray. Interior color is a cream white, and white colors don't like dark primers that much... :)
Image

Thank you for stopping by, reading this whole stuff, leaving a comment or suggestion about the cut-out.

Regards,
Attila
Bissyboat
Sergeant Major of the Army
Posts: 1254
Joined: Sun Jan 05, 2014 9:49 pm
Location: Norway

Re: Sturmmörser Tiger - 1:35 Italeri

Post by Bissyboat »

Looks grand mate. Does it come with ammo? :scratch::
Where`s my dinghy?
User avatar
papatika
Master Sergeant
Master Sergeant
Posts: 382
Joined: Thu Jun 05, 2014 11:12 am
Location: Budapest, Hungary
Hungary

Re: Sturmmörser Tiger - 1:35 Italeri

Post by papatika »

Bissyboat wrote:Looks grand mate. Does it come with ammo? :scratch::

Ty! Yes, 4 cute little rounds are in the box waiting for assembly. :)
Bissyboat
Sergeant Major of the Army
Posts: 1254
Joined: Sun Jan 05, 2014 9:49 pm
Location: Norway

Re: Sturmmörser Tiger - 1:35 Italeri

Post by Bissyboat »

Fantastic. A stocked ammo rack is far better than an empty one. :thumb2:
Where`s my dinghy?
User avatar
SergioSolo
Sergeant Major
Sergeant Major
Posts: 643
Joined: Sun Apr 03, 2016 10:31 pm
Location: Colombia
Contact:

Re: Sturmmörser Tiger - 1:35 Italeri

Post by SergioSolo »

Wow! The attention to detail is outstanding, specially inside the gun :jd:
User avatar
RonBurgundy
Sergeant
Sergeant
Posts: 140
Joined: Mon Feb 23, 2015 8:23 pm
Location: Croatia

Re: Sturmmörser Tiger - 1:35 Italeri

Post by RonBurgundy »

Nice build so far, keep it up :)
And to answer your question about tracks, yes they should have lightning holes in guide horns.
User avatar
papatika
Master Sergeant
Master Sergeant
Posts: 382
Joined: Thu Jun 05, 2014 11:12 am
Location: Budapest, Hungary
Hungary

Re: Sturmmörser Tiger - 1:35 Italeri

Post by papatika »

RonBurgundy wrote:Nice build so far, keep it up :)
And to answer your question about tracks, yes they should have lightning holes in guide horns.
Thank you for the answer. In the mean time I found a great video on youtube:
[youtube]1ZNZCTNGtlI[/youtube]
There is a nice shot about the tracks used:
guidehorns.PNG
guidehorns.PNG (470.5 KiB) Viewed 3573 times
Last edited by papatika on Wed Jan 11, 2017 9:43 pm, edited 1 time in total.
User avatar
papatika
Master Sergeant
Master Sergeant
Posts: 382
Joined: Thu Jun 05, 2014 11:12 am
Location: Budapest, Hungary
Hungary

Re: Sturmmörser Tiger - 1:35 Italeri

Post by papatika »

Sergiotron wrote:Wow! The attention to detail is outstanding, specially inside the gun :jd:
Thank you. In the movie mentioned above there is a nice view about the gun. I used this as a guide. Mine is not 100% accurate, but the goal is to catch the feeling:
rifled_barrell.PNG
rifled_barrell.PNG (346.84 KiB) Viewed 3572 times
User avatar
papatika
Master Sergeant
Master Sergeant
Posts: 382
Joined: Thu Jun 05, 2014 11:12 am
Location: Budapest, Hungary
Hungary

Re: Sturmmörser Tiger - 1:35 Italeri

Post by papatika »

Bissyboat wrote:Fantastic. A stocked ammo rack is far better than an empty one. :thumb2:
Full stock would be 12 rounds. I plan to put 3 in, and leave one outside (maybe hanging on the crane). I still have to figure out how to place the rounds to have a nice visual experience. For sure there will be some empty credos, so some modifications have to be done to force them to a hanging position:
empty_crados.PNG
empty_crados.PNG (441.79 KiB) Viewed 3509 times
Bissyboat
Sergeant Major of the Army
Posts: 1254
Joined: Sun Jan 05, 2014 9:49 pm
Location: Norway

Re: Sturmmörser Tiger - 1:35 Italeri

Post by Bissyboat »

Full stock would be 12 rounds. I plan to put 3 in, and leave one outside (maybe hanging on the crane). I still have to figure out how to place the rounds to have a nice visual experience. For sure there will be some empty credos, so some modifications have to be done to force them to a hanging position:
That would do nicely. Will it be displayed with tank crew operating the crane? Looking forward to more updates on your Stürm Tiger.
Where`s my dinghy?
privatepete
First Lieutenant
First Lieutenant
Posts: 3871
Joined: Thu Dec 11, 2014 1:13 pm
England

Re: Sturmmörser Tiger - 1:35 Italeri

Post by privatepete »

Hi looks a really great kit and your doing a great job, will have to put on my want list,very clever idea on the rifeling the barrel might have to steal that :lol:
User avatar
OliveDrab
Command Sergeant Major
Posts: 823
Joined: Thu Dec 25, 2014 4:48 am
Location: Missouri, USA
United States of America

Re: Sturmmörser Tiger - 1:35 Italeri

Post by OliveDrab »

Great start on this monster :th:
Curt :cheers2:
User avatar
demarcation
Command Sergeant Major
Posts: 960
Joined: Wed May 13, 2015 11:34 pm
Location: Denmark
Denmark

Re: Sturmmörser Tiger - 1:35 Italeri

Post by demarcation »

Nice choice and interesting build mate. :th:
:cheers2:

//Anders
User avatar
Stokesy44
Major General
Major General
Posts: 8374
Joined: Thu Jun 18, 2015 10:13 am
Location: The Midlands, UK
Great Britain

Re: Sturmmörser Tiger - 1:35 Italeri

Post by Stokesy44 »

papatika wrote:
RonBurgundy wrote:Nice build so far, keep it up :)
And to answer your question about tracks, yes they should have lightning holes in guide horns.
Thank you for the answer. In the mean time I found a great video on youtube:
[youtube]1ZNZCTNGtlI[/youtube]
There is a nice shot about the tracks used: guidehorns.PNG
Interesting tracks. No ice cleats or indents, I thought Tiger tracks had one or the other, not neither.

Good looking build mate, very cool subject too.
Its been tried and tested, it works! So don't blame the system if you're no good. :doh:
User avatar
papatika
Master Sergeant
Master Sergeant
Posts: 382
Joined: Thu Jun 05, 2014 11:12 am
Location: Budapest, Hungary
Hungary

Re: Sturmmörser Tiger - 1:35 Italeri

Post by papatika »

demarcation wrote:Nice choice and interesting build mate. :th:
OliveDrab wrote:Great start on this monster :th:
privatepete wrote:Hi looks a really great kit and your doing a great job, will have to put on my want list,very clever idea on the rifeling the barrel might have to steal that :lol:
Thank you guys! :)
Stokesy44 wrote:Interesting tracks. No ice cleats or indents, I thought Tiger tracks had one or the other, not neither.

Good looking build mate, very cool subject too.
You made me think, and I have checked several vintage photos. This one is a pretty nice picture, and the tracks are clearly visible: Image I think the tracks in the museum are correct. :) But it will be a huuuuuge work to drill/carve all those missing holes. :cry:

The building process is almost done, and the interior is almost painted, so I'm almost happy... :D

As mentioned, I changed a bit the ammo holders for the empty spaces, cut the upper right arms, sanded, and glued back in an angel. I plan to have the two armed shells on the left side close to the center to hide the empty space behind them. With this I hope the one who looks into the tank will assume that more shells are behind, thus the number of ammo will look to be higher then the reality. On the right I will place one, and one goes outside.
Image

I like HS chipping. For this I used a fairly strong hairspray, and covered the interior with 2 even coats, and applied Cremweiß over it. After about 10 minutes I came back with a flat brush moistened with tap water, and started to build up the chipping.
Image

To finish it up I applied a glossy coat to protect the HS layer and the chipping, and provide a smooth surface for enamel washes and oil paints. While it was drying, and added some old figures (I made them about 20 yrs ago :) ) just to see the scale, to feels the enormous size of this stubby nosed kitty. :)
Image

Wash applied. I used highly diluted streaking grime.
Image

Details painted with browns, grays, acrylics, oils. I intentionally kept the front section darker, and I think I will add more black to it, because of the missing details. For example you should be able to see the torsion bar system at the feet of the loader / radio operator, or the transmission and pedals on driver side... I can scratch build something, or try to hide it. I choose the second one :)
Image

The exterior is almost ready.
Image

So, what's next? I have to finish the interior first. Then I can close it, and paint the exterior. And drill the holes of the tracks... :doh:

Thank you for stopping by, and the questions / comments you left behind. :)

Regards,
Attila
User avatar
papatika
Master Sergeant
Master Sergeant
Posts: 382
Joined: Thu Jun 05, 2014 11:12 am
Location: Budapest, Hungary
Hungary

Re: Sturmmörser Tiger - 1:35 Italeri

Post by papatika »

Hi all,

some time has passes since my last entry. I was busy, then sick, the busy again, and hadn't enough time or mood write this article.

So, last time I was looking for a solution to make holes into the guide horns. I ended up using my rotary tool with 0.7 drillbit, and drilled 2 holes next to each other, then gently moving the drill between the holes I removed the plastic between them. I did it only for the horns on the outer side, the inner ones won't be visible.
Image
Image

After changing the bit in the tool I carved some demages, scratches, bounces, missing zimmerit.
Image
Image
Image

Using Ultimate black primer as base coat, I added some German primer / rusty color to the hull, and gray to zimmerit as preparation for HS chipping.
Image
Image

The whole stuff was covered then with Dunkelgelb, and using masking putty I added olive green and brown patches.
Image
Image
Image

It was time to make some scratches using brushes, pins and tap water.
Image
Image
Image
Image

While the paint cures to be covered by white, I moved on to the figures. I saw the figures is Stokesy44's Nashorn build, and found really nice, so bought a kit to add some life. :)
I like MiniArt anyway, though this particular kit isn't the best imho.
So here they are:
Image
Image

Beside the figures I was working on the wheels. Procedure is the same: black primer, HS, Dunkelgelb.
Image

The task for tonight is to apply the winter camo.
Image

Thank you for stopping by, leaving a comment!
See you soon!

Attila
User avatar
RonBurgundy
Sergeant
Sergeant
Posts: 140
Joined: Mon Feb 23, 2015 8:23 pm
Location: Croatia

Re: Sturmmörser Tiger - 1:35 Italeri

Post by RonBurgundy »

Great looking Sturmtiger you got there sir. I am in the process of building one myself. Keep up the good work with it.
Bissyboat
Sergeant Major of the Army
Posts: 1254
Joined: Sun Jan 05, 2014 9:49 pm
Location: Norway

Re: Sturmmörser Tiger - 1:35 Italeri

Post by Bissyboat »

Coming along nicely mate. Proficient paint job all the way. :th:
Where`s my dinghy?
User avatar
Kevthemodeller
Lieutenant Colonel
Lieutenant Colonel
Posts: 5657
Joined: Sat Mar 26, 2016 8:31 am
Location: Newton Abbot UK
England

Re: Sturmmörser Tiger - 1:35 Italeri

Post by Kevthemodeller »

Lovely work, amazing attention to detail :th:
Kev

On the bench:
Border Model FOCKE-WULF W190A-8 R2 - 8
mick
First Sergeant
First Sergeant
Posts: 569
Joined: Mon Feb 03, 2014 2:02 pm
Wales

Re: Sturmmörser Tiger - 1:35 Italeri

Post by mick »

great work :thumb2:
privatepete
First Lieutenant
First Lieutenant
Posts: 3871
Joined: Thu Dec 11, 2014 1:13 pm
England

Re: Sturmmörser Tiger - 1:35 Italeri

Post by privatepete »

Hi looking very good indeed, keep up the excellent work :th:
User avatar
papatika
Master Sergeant
Master Sergeant
Posts: 382
Joined: Thu Jun 05, 2014 11:12 am
Location: Budapest, Hungary
Hungary

Re: Sturmmörser Tiger - 1:35 Italeri

Post by papatika »

RonBurgundy wrote: Thu Feb 09, 2017 1:26 pm Great looking Sturmtiger you got there sir. I am in the process of building one myself. Keep up the good work with it.
Great stuff, I definitely want to build the one from AFV Club, with full interior. Not now, maybe next year... :)
Bissyboat wrote: Thu Feb 09, 2017 1:47 pm Coming along nicely mate. Proficient paint job all the way. :th:
Kevthemodeller wrote: Fri Feb 10, 2017 12:45 pm Lovely work, amazing attention to detail :th:
mick wrote: Sat Feb 11, 2017 9:00 am great work :thumb2:
privatepete wrote: Sat Feb 11, 2017 9:06 am Hi looking very good indeed, keep up the excellent work :th:
Thank you all, guys! :)


It was time to - possibly not to - ruin all the paintjob I've done until now, and add a white camo.
As far I know, the Germans used high quality paint, which sticks very good, and fades away instead of chipping. But it was the last winter when these machines were used, and the quality wasn't that high anymore. So I went for a mid-winter look by having the vehicle mostly covered by the white, but it already started to chip away in large areas. Is this historically accurate? Dunno. Probably not, but will look nice... ;)

I used White and Dunkelgelb to create a slightly yellowish camo (10 white 1 yellow). This provides me the option to add white highlights and mapping later on. Also a light coat of HS was applied underneath to help in chipping. The white went on pretty thick to provide a good coverage, and to produce large chips.
Image

Tap water, brushes, toothpick:
Image

The Balkenkruez on the lower side was not visible enough, so I decided to paint my own. I cut out the main shape using a wide masking tape, placed on the tank, applied some HS, than black, masked out the center of the cross, and applied a white. With water I added chipping, and I think it got really nice.
Image
Image
Image
Image

While the paints were curing, I started to add mud to the lower glaces and the side armor. To do this I use regular earth from the garden, and pigments to add color variations. I made 3 tones by mixing Vallejo Light Siena and Humbrol Dark Earth in different ratio.
Image

Darker goes down, lighter goes up.
Image

I applied my home made scenic glue (made of 1pt wood glue and 4pts water, plus some dish washer to break surface tension), which makes the whole mixture darker. I also added some more pigments here and there to create more shades.
Image

A dark brown wash was applied onto the wheels, trying to have random shapes and thicknesses. With this the tank is ready for the oil paints.
Image

The final picture is not the best, will try to make a better one tonight. I used Abteilung 502 white, different browns and reds for highlights, accumulated dust and rust, and streakings.
Image

One side ready, 4 more to go... :)


Thank you for your questions, leaving comments, or just stopping by! :)

Regards,
Attila
Last edited by papatika on Mon Feb 13, 2017 10:59 am, edited 2 times in total.
User avatar
papatika
Master Sergeant
Master Sergeant
Posts: 382
Joined: Thu Jun 05, 2014 11:12 am
Location: Budapest, Hungary
Hungary

Re: Sturmmörser Tiger - 1:35 Italeri

Post by papatika »

Damn! Having problems with the pictures. Trying to fix them... :(


Fixed! :banana:
User avatar
Stokesy44
Major General
Major General
Posts: 8374
Joined: Thu Jun 18, 2015 10:13 am
Location: The Midlands, UK
Great Britain

Re: Sturmmörser Tiger - 1:35 Italeri

Post by Stokesy44 »

I love the weathering you're applying to the winter wash. Stunning stuff mate. :clap: :clap: :clap:
Its been tried and tested, it works! So don't blame the system if you're no good. :doh:
Bissyboat
Sergeant Major of the Army
Posts: 1254
Joined: Sun Jan 05, 2014 9:49 pm
Location: Norway

Re: Sturmmörser Tiger - 1:35 Italeri

Post by Bissyboat »

Same here. The surface is nice and chalky. Love the subtle chipping effects. :thumb2:
Where`s my dinghy?
User avatar
demarcation
Command Sergeant Major
Posts: 960
Joined: Wed May 13, 2015 11:34 pm
Location: Denmark
Denmark

Re: Sturmmörser Tiger - 1:35 Italeri

Post by demarcation »

Very very nice mate! :th:
:cheers2:

//Anders
User avatar
papatika
Master Sergeant
Master Sergeant
Posts: 382
Joined: Thu Jun 05, 2014 11:12 am
Location: Budapest, Hungary
Hungary

Re: Sturmmörser Tiger - 1:35 Italeri

Post by papatika »

Stokesy44 wrote: Mon Feb 13, 2017 11:25 am I love the weathering you're applying to the winter wash. Stunning stuff mate. :clap: :clap: :clap:
Bissyboat wrote: Mon Feb 13, 2017 3:18 pm Same here. The surface is nice and chalky. Love the subtle chipping effects. :thumb2:
demarcation wrote: Tue Feb 14, 2017 8:44 pm Very very nice mate! :th:

Thank you guys!

Here is the other shot I promised, with some added brightness, and from a different angle:
Image

I also upgraded the front section. Photos before and after:
Image
Image

This weekend's quest is to finish the tracks.
I primed them first with Ultimate primer
Image

Then a thinned, uneven coat of rust primer. I sprayed it from quite a distance to have tiny dots.
Image

Some "dark track" followed. Not too much, a bit here and there.
Image

Bare metal (Revell Eisen) drybrushed
Image

And finally some oils. The first was the "red primer", highly diluted, somewhere between a wash and a filter, to provide an even base color, and highlight the deeper parts. Second was the "light rust". A diluted like a wash, and not painted, just dubbed onto the surface. And finally the thickest and darkest, the "dark rust". Only here and there.
Image

I painted only the outer section which will be visible. The oil is still wet, it won't be shiny at the end. And there will be a clear coat, too, but only after the mud and snow effects, which will come tonight, if I can stop playing The Division for a few hours... :)

Cheers,
Attila
User avatar
Stokesy44
Major General
Major General
Posts: 8374
Joined: Thu Jun 18, 2015 10:13 am
Location: The Midlands, UK
Great Britain

Re: Sturmmörser Tiger - 1:35 Italeri

Post by Stokesy44 »

I really like the rusting on the hull and I cant wait to see how those tracks turn out. Looks like you're off to a great start with them. :th: :th:
Its been tried and tested, it works! So don't blame the system if you're no good. :doh:
mick
First Sergeant
First Sergeant
Posts: 569
Joined: Mon Feb 03, 2014 2:02 pm
Wales

Re: Sturmmörser Tiger - 1:35 Italeri

Post by mick »

great winter finish :thumb2:
User avatar
Tomcat64
Brigadier General
Brigadier General
Posts: 7051
Joined: Thu Sep 22, 2016 3:24 pm
Location: Swindon, UK
England

Re: Sturmmörser Tiger - 1:35 Italeri

Post by Tomcat64 »

That looks great - stunning work on the weathering and dirt and great attention to detail all over. :clap:
Cheers, Neil

On the Bench:
Revell 1/72 Millennium Falcon
Tamiya 1/48 P-38F/G
Bissyboat
Sergeant Major of the Army
Posts: 1254
Joined: Sun Jan 05, 2014 9:49 pm
Location: Norway

Re: Sturmmörser Tiger - 1:35 Italeri

Post by Bissyboat »

Amazing. I like the rusty look on the tracks. :th:
Where`s my dinghy?
User avatar
papatika
Master Sergeant
Master Sergeant
Posts: 382
Joined: Thu Jun 05, 2014 11:12 am
Location: Budapest, Hungary
Hungary

Re: Sturmmörser Tiger - 1:35 Italeri

Post by papatika »

Stokesy44 wrote: Sun Feb 19, 2017 12:34 pm I really like the rusting on the hull and I cant wait to see how those tracks turn out. Looks like you're off to a great start with them. :th: :th:
mick wrote: Sun Feb 19, 2017 5:07 pm great winter finish :thumb2:
Tomcat64 wrote: Sun Feb 19, 2017 7:06 pm That looks great - stunning work on the weathering and dirt and great attention to detail all over. :clap:
Bissyboat wrote: Sun Feb 19, 2017 8:46 pm Amazing. I like the rusty look on the tracks. :th:

Thank you guys! :)

I managed to accomplish both tasks for this weekend: finish the tracks and level up in The Division. :)

First I mixed up regular dirt from the garden and two kind of pigments. The pigments are great to add color to the dirt, and to maki it finer. With a small brush I applied some of my home made scenic glue to the tracks, concentrating on the deeper sections, and covered with the dirt mixture. The ends are kept clear for future gluing. I let it dry fore a minute or so, and then with a kitchen paper wiped off the surface to reveal the shiny metal edge of the tracks. Where I added more glue, the mud will be darker. If I'd like to add some more dark areas, I only need to add some more glue. Again, to save some material I added the mud only to the visible areas.
Image

When all the track segments have been dried, I added to the lower hull. Tigers had 3 rows of wheels in combat mode. I glued only the internal ones first. Then using then as a support I could add the return roller and the upper section of the tracks, and secure it with Tamiya Extra Thin. Then I added the middle wheels, and glued them on adding more strength to the tracks. And here I also added the drive sprocket. With its teeth it provides a great area to join the upper and the lower section of the tracks. Here I used superglue first, and reinforced it with Extra Thin. When the two halves were glued together, the lower section was aligned to the wheels and secured with Extra thin, and with superglue to the other end of the upper section. Ummm... might sound a bit complicated, but it is only me, who cannot explain it... :D
At the end the outer wheels were also added. Finally I added some dirt to the joints.
Image

And when that all have been done, I started over on the other side... :)
Here are some closeups:
Image
Image
Image

Now I have to weather the remaining of the hull, paint the figures, and figure out how to make a nice snow with the materials I have. I probably try to add flour and baking soda to wood glue with different dilution. Any idea how to make nice snow effect in a DIY way?

Ragards,
Attila
Last edited by papatika on Mon Feb 20, 2017 10:53 am, edited 1 time in total.
User avatar
Tomcat64
Brigadier General
Brigadier General
Posts: 7051
Joined: Thu Sep 22, 2016 3:24 pm
Location: Swindon, UK
England

Re: Sturmmörser Tiger - 1:35 Italeri

Post by Tomcat64 »

Looks like you might have a couple of busted images mate but the end result shots look fabulous :clap:
Cheers, Neil

On the Bench:
Revell 1/72 Millennium Falcon
Tamiya 1/48 P-38F/G
User avatar
papatika
Master Sergeant
Master Sergeant
Posts: 382
Joined: Thu Jun 05, 2014 11:12 am
Location: Budapest, Hungary
Hungary

Re: Sturmmörser Tiger - 1:35 Italeri

Post by papatika »

Tomcat64 wrote: Mon Feb 20, 2017 10:12 am Looks like you might have a couple of busted images mate but the end result shots look fabulous :clap:
Yep, first 2 has been changed by google... :( I hope they keep the rest. Thanx for the warning! :)
User avatar
papatika
Master Sergeant
Master Sergeant
Posts: 382
Joined: Thu Jun 05, 2014 11:12 am
Location: Budapest, Hungary
Hungary

Re: Sturmmörser Tiger - 1:35 Italeri

Post by papatika »

Hi all!

I continued with applying oils. The right side, the back, and the top were missing.
Here is the right side before / after:
Image
Image

From the back and top sections I have only "after"s:
Image
Image

With this, the vehicle itself is basically ready. Next up: figures.
First I used light gray primer.
Image

Then the white was sprayed from above in an angle, so the gray primer is also acting as shadow.
Image

Eyes, faces, details painted.
Image

After covering everything with a gloss coat, I applied pinwash with a dark gray shade to emphasize the details. Also added some brown dots here and there, and blended with a dry brush to imitate dirt.
Image
Image

I leave them like this for a day or so, and then I seal everything with a flat coat.
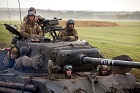
So, here is the beast with the crew (still glossy):
Image

I want the base to be - partially - covered by snow. I was looking for a cheap material in our household and ended up with flour and baking soda. I made some tests on the belly of the tiger. :)
Here you can see the baking soda on the left, the flour on the right.
The first row is a sample of mixing the "snow" in thick wood glue.
The second is mixed in thin wood glue.
In the third I applied the thin glue first, and sprinkled the "snow" in it.
Image
It is already visible, that flour is a bit yellowish. It is also a bit uneven, using a sieve would result better distribution, but would be less controllable.
The second thing you can discover, that baking soda can be dissolved much better.
After drying for a couple hours I removed the excess with a vacuum cleaner.
Image
For me, the baking soda is the winner in all three categories.
The thick mixture looks smoother, the thin needs no comment, and the sprinkled sample looks much more like fresh snow.

I plan to use a bamboo board from IKEA. I don't know yet whether I should paint the sides black, or keep the bamboo visible. What do you think?
Image

As always thank you for reading the whole stuff, asking questions, leaving comments, or just stopping by! :)

Cheers,
Attila
User avatar
Stokesy44
Major General
Major General
Posts: 8374
Joined: Thu Jun 18, 2015 10:13 am
Location: The Midlands, UK
Great Britain

Re: Sturmmörser Tiger - 1:35 Italeri

Post by Stokesy44 »

Looking good mate. The crew really brings the kit to life. Looking forward to seeing what you do with the base :pop:
Its been tried and tested, it works! So don't blame the system if you're no good. :doh:
User avatar
spock1701
Master Sergeant
Master Sergeant
Posts: 449
Joined: Wed Apr 29, 2015 1:58 pm
Location: Upstate New York
United States of America

Re: Sturmmörser Tiger - 1:35 Italeri

Post by spock1701 »

I would go for painting the sides of the base black. It would contrast nicely with the snow, and I just think that the bamboo look wouldn't be appropriate for a wintry scene. That seems more like a summer/autumn/PTO look, IMHO
There is always time for modeling.
User avatar
TommyKillander
Chief Warrant Officer 5
Posts: 2776
Joined: Sat Dec 27, 2014 1:59 pm
Location: Gothenburg, Sweden
Sweden

Re: Sturmmörser Tiger - 1:35 Italeri

Post by TommyKillander »

Excellent work, buddy ! :banana:

Chipping and white-wash looks fantastic! :th:

:cheers2:
Tommy
User avatar
papatika
Master Sergeant
Master Sergeant
Posts: 382
Joined: Thu Jun 05, 2014 11:12 am
Location: Budapest, Hungary
Hungary

Re: Sturmmörser Tiger - 1:35 Italeri

Post by papatika »

Stokesy44 wrote: Tue Feb 28, 2017 7:39 pm Looking good mate. The crew really brings the kit to life. Looking forward to seeing what you do with the base :pop:
I prefer to add at least one figure. I want convert all my finished works to at least a vignette.
spock1701 wrote: Tue Feb 28, 2017 8:12 pm I would go for painting the sides of the base black. It would contrast nicely with the snow, and I just think that the bamboo look wouldn't be appropriate for a wintry scene. That seems more like a summer/autumn/PTO look, IMHO
Yes, I had the same feelings. And decided at the end to do differently...
TommyKillander wrote: Sun Mar 05, 2017 8:12 am Excellent work, buddy ! :banana:

Chipping and white-wash looks fantastic! :th:

:cheers2:
Tommy
Hi Tommy! Thank you! I was a bit surprised you haven't entered this GB. :)


I decided to use a peace of MDF as base. I will lay a thin sheet of foam underneath, and cover the edges with balsa wood. The terrain will be shaped with air drying clay. Unfortunately I have only in terracotta color.
I don't want to cover the tracks with snow completely, and hide all those nice mud effects. But I still want to add some snow. My vision is a dirt road, narrower than the tracks of the tiger. Therefore only the outer sides of the tracks will contact with the show, the inner ones may remain "snowless". At least that's the plan, will see how it turns out.
First I traced the basic shapes on the board, then transferred the lines to a backing paper which might serve as reference when the clay covers drawings on the base. Here you can see how the road and the tracks will interfere.
Image

I added the clay in small pieces.
Image
Image
Image

When I was happy with the basic shapes, I smoothed the surface with my fingers dipped into water.
Image

I let it dry for a couple of minutes, and sprinkled some baby powder all over where I planned to add more texture. The powder prevents the tools to get stuck into the clay.
Image

Tools used: old wheel form an Opel Blitz, tiger track made of leftover links of the kit, figures, and the tank itself.
Image

I added some more details (poles for a fence, tree trunk, bush) and now I leave it like this for 48 hours to dry. It will crack I think here and there, but they can be fixed by adding some more clay later on.
Image
Image

I'm not sure about the outcome, but I'm curious and optimistic... :)

As always, thank you for asking, commenting, or just stopping by! :D

Attila
User avatar
TommyKillander
Chief Warrant Officer 5
Posts: 2776
Joined: Sat Dec 27, 2014 1:59 pm
Location: Gothenburg, Sweden
Sweden

Re: Sturmmörser Tiger - 1:35 Italeri

Post by TommyKillander »

papatika wrote: Mon Mar 06, 2017 7:58 am
Hi Tommy! Thank you! I was a bit surprised you haven't entered this GB. :)
You're welcome! :)

Jeezz, I thought about it, but I was busy with other kits. Then I could not make up my mind what to build... :doh:
...and now I'm in a 1/72 scale jet-period :scratch:: :roll:

There are lots of greats builds going on, so I'll have to look forward to all the eye-candy in the GB Reveal Show. Good luck ! :thumb2:

:cheers2:
Tommy
User avatar
Tomcat64
Brigadier General
Brigadier General
Posts: 7051
Joined: Thu Sep 22, 2016 3:24 pm
Location: Swindon, UK
England

Re: Sturmmörser Tiger - 1:35 Italeri

Post by Tomcat64 »

That's coming together really nicely - great work on the weathering and camo on the afv and the base is looking really well laid out.
Cheers, Neil

On the Bench:
Revell 1/72 Millennium Falcon
Tamiya 1/48 P-38F/G
privatepete
First Lieutenant
First Lieutenant
Posts: 3871
Joined: Thu Dec 11, 2014 1:13 pm
England

Re: Sturmmörser Tiger - 1:35 Italeri

Post by privatepete »

Tomcat64 wrote: Tue Mar 07, 2017 9:33 am That's coming together really nicely - great work on the weathering and camo on the afv and the base is looking really well laid out.
Hi couldn't have said it any better well done :th:
User avatar
papatika
Master Sergeant
Master Sergeant
Posts: 382
Joined: Thu Jun 05, 2014 11:12 am
Location: Budapest, Hungary
Hungary

Re: Sturmmörser Tiger - 1:35 Italeri

Post by papatika »

Tomcat64 wrote: Tue Mar 07, 2017 9:33 am That's coming together really nicely - great work on the weathering and camo on the afv and the base is looking really well laid out.
privatepete wrote: Tue Mar 07, 2017 11:06 am
Tomcat64 wrote: Tue Mar 07, 2017 9:33 am That's coming together really nicely - great work on the weathering and camo on the afv and the base is looking really well laid out.
Hi couldn't have said it any better well done :th:
Thanks guys!


I plan to finish this project this week.
As I expected the clay cracked, but since it was right between the two tracks, it was controllable. I left the tank in it's place during the drying time, I think this helped to keep the track lines intact, and forced the clay to crack somewhere else.
It is hard to tell where the patch is:
Image

Next I placed a polystyrene sheet under the MDF to gain more height for the dio. I also squared off the sides, and put some handles under the MDF, so I can easily take the base out from the frame if needed.
Image

I added balsa wood to the sides, and glued them to the polystyrene. At this phase the base was still on the polystyrene, and when the glue begun to dry I removed it with the help of the handles.
Image

While the wood glue was drying, I applied some white and dark earth colors to the base.
Image

By putting the base back into the frame I could shape the balsa wood with a sharp hobby knife to match to the shape of the base. After removing the base I painted the frame with black. The visible parts of the tracks were covered with a gloss coat.
Image

Last night I applied some washes and dry brushes on the wheel and tank tracks, and painted the fence and the tree trunk, but forgot to take a photo... :doh:

I have to put everything together now.

As always thank you for stopping by, asking question, leaving comment! :)

Cheers,
Attila
User avatar
Stokesy44
Major General
Major General
Posts: 8374
Joined: Thu Jun 18, 2015 10:13 am
Location: The Midlands, UK
Great Britain

Re: Sturmmörser Tiger - 1:35 Italeri

Post by Stokesy44 »

I really like this. The base looks great and shows off the Tiger nicely but the eye is still drawn to the vehicle.

It dominates the scene with its size and weight - just like it would have in real life :clap: :clap:
Its been tried and tested, it works! So don't blame the system if you're no good. :doh:
User avatar
papatika
Master Sergeant
Master Sergeant
Posts: 382
Joined: Thu Jun 05, 2014 11:12 am
Location: Budapest, Hungary
Hungary

Re: Sturmmörser Tiger - 1:35 Italeri

Post by papatika »

Stokesy44 wrote: Mon Mar 13, 2017 11:15 am I really like this. The base looks great and shows off the Tiger nicely but the eye is still drawn to the vehicle.

It dominates the scene with its size and weight - just like it would have in real life :clap: :clap:
Thanks Stokesy!

Baking soda is my new favorite toy! I still need to learn how to use it properly, so I only tested it on the bottom section. Man, check out the result:
Image
wood glue, baking soda, a cup, and nylon stockings from my wife...

And here is a close-up:
Image

I still have to find out how to make smooth transition between snowy and bare areas on the ground. Maybe I should try to "mist" the wood glue by using some kind of spray bottle. Any idea or suggestion?
Last edited by papatika on Tue Mar 14, 2017 11:52 am, edited 1 time in total.
User avatar
Tomcat64
Brigadier General
Brigadier General
Posts: 7051
Joined: Thu Sep 22, 2016 3:24 pm
Location: Swindon, UK
England

Re: Sturmmörser Tiger - 1:35 Italeri

Post by Tomcat64 »

Looking really good - although I think you've got a problem with the last two pics for some reason.

Regarding the transition you can try spraying the glue although I struggle to control where that's going. Another thing to try is thinning the glue some more as you transition over and then just gradually sprinkle less powder over it and actually work backwards from the thin area to build it up as you want to nearer the heavier fall.
Cheers, Neil

On the Bench:
Revell 1/72 Millennium Falcon
Tamiya 1/48 P-38F/G
User avatar
SergioSolo
Sergeant Major
Sergeant Major
Posts: 643
Joined: Sun Apr 03, 2016 10:31 pm
Location: Colombia
Contact:

Re: Sturmmörser Tiger - 1:35 Italeri

Post by SergioSolo »

Awesome project and execution!
Btw, I also can't see the last two pictures
User avatar
papatika
Master Sergeant
Master Sergeant
Posts: 382
Joined: Thu Jun 05, 2014 11:12 am
Location: Budapest, Hungary
Hungary

Re: Sturmmörser Tiger - 1:35 Italeri

Post by papatika »

Tomcat64 wrote: Tue Mar 14, 2017 8:44 am Looking really good - although I think you've got a problem with the last two pics for some reason.

Regarding the transition you can try spraying the glue although I struggle to control where that's going. Another thing to try is thinning the glue some more as you transition over and then just gradually sprinkle less powder over it and actually work backwards from the thin area to build it up as you want to nearer the heavier fall.
I used thinned glue, but haven't sprinkled the powder gradually... :( Will try it, thanks!
Sergiotron wrote: Tue Mar 14, 2017 10:36 am Awesome project and execution!
Btw, I also can't see the last two pictures
Thank you! Image links fixed. :)
Post Reply

Return to “Build Threads”