Tomcat's Puma

Post your in progress build threads here.

Moderator: T3hGuppy

User avatar
Tomcat64
Brigadier General
Brigadier General
Posts: 7034
Joined: Thu Sep 22, 2016 3:24 pm
Location: Swindon, UK
England

Tomcat's Puma

Post by Tomcat64 »

My entry into this GB will be Dragon's 1/35 Sd.Kfz.234/2 almost universally referred to as the Puma even though the name was never adopted officially.
Image

Some Background From Tanks Encyclopedia:
Sd.Kfz.234 Puma

Design of the Sd.Kfz.234
This new armored car was seen as a successor to the eight-wheeled (8×8) Panzerspähwagen Sd.Kfz.231. Among other priorities, better protection and heavier armament were viewed as crucial for the new armored car. But this model also had to comply to a specification from 1940, which requested a tropicalized armored car. Tatra was placed in charge of the overall design, while Büssing developed the body, and Daimler-Benz and Schichau devised a new turret. Three engines were tested, the third being tropicalized in the spring of 1942. However, in June 1942, priorities changed and the final production machines had a more conventional air-cooled engine, capable of handling a wide range of temperatures (extreme heat and cold), better suited to the Russian front.

The production vehicle was heavier and bulkier than the Sd.Kfz.231, with mudguards that went along the side from end to end, with four storage compartments located inside. Because of the lack of resources necessary to build the specified new turret, housing a 50 mm (1.97 in) gun, the first series was equipped with the Sd.Kfz.222 Hängelafette 38 barbette instead. The engine was a Tatra air-cooled V12 diesel, with a net power of 220 hp@2,250 rpm, and a power-to-weight ratio of 21 hp/ton. The transmission was by claw, with 6 forward and 6 reverse gears. Fuel capacity was 240 liters, with a consumption of 40 liters/100 km. The radio was a FuG Spr Ger “A”2 set with a FuG 122 aerial. On the second version, famously known as the Puma, the main gun was a 50 mm (1.97 in) KwK 39/1 L/60. The turret had a manual traverse due to its small size, and -10° to +20° depression/elevation. Smoke dischargers were often mounted on top. On trials, the Puma was found capable of fording 3 feet 11 in (1.2 m) deep, crossing a trench 4 ft 5 in (1.35 m) wide and climb inga vertical obstacle of 1 feet and 7.75 inches, or 0.5 m.

Production & variants
All variants were built by Büssing-NAG between June 1942 and March 1945. The Puma turret was originally planned to be used on the Leopard, the intended replacement for the Panzer II light tank, but this project was cancelled, and the turret was “recycled” for the Puma.

The Sd.Kfz.234/1 (Gerät 95)
The first version received an open-top turret fitted with a 2 cm (0.79 in) KwK 30 L/55 autocannon and coaxial MG 34 in a simplified Hängelafette 38 turret. Around 200 were produced from June 1942 to January 1944

The Sd.Kfz.234/2 Puma (Gerät 96)
The standard turret version. It was the best known but not the most produced, with only 101 being released between September 1943 and September 1944.

The Sd.Kfz.234/3 (Gerät 94)
The support version. It was an open-top SPG (nicknamed “Stummel”) equipped with the 7.5 cm (2.95 in) K51 L/24 standard howitzer. 88 built between June and December 1944.

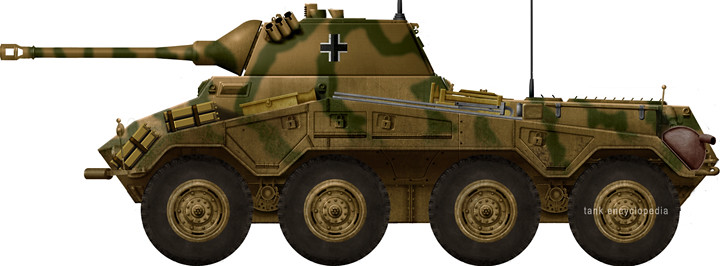
The Sd.Kfz.234/4 (Gerät 96)
The “Pak-Wagen” or tank hunter variant, open-topped with a 7.5 cm (2.95 in) PaK 40 L/46. 89 were apparently built between December 1944 and March 1945.

Operational history
Just like the Sd.Kfz.231, the 234 and variants were used in the same composite reconnaissance units. 19 were issued to each Panzerspähwagen company of the Panzer Aufklärung battalions, and with time, all four variants were used in each of them, to provide either artillery, AA and AT support. The Pumas were mostly given to veteran crews and equipped four 25-strong units which equipped each a Panzerdivision operating in Russia. The Sd.Kfz.234/3 was used in 6-strong platoon in support of the Sd.Kfz.234/1 units, just like the Sd.Kfz.234/4 later. These units also participated in the battle of Normandy with good results, and the whole German campaign, but used more as fast tank hunters. By that time, on Hitler’s orders, the whole production was shifted towards the Sd.Kfz.234/4. They were well ahead of their time and the Allies captured and studied them with great interest, as early precursors of the wheeled tanks we know today.

Sd.Kfz.234/2 specifications
Dimensions 6.02 x 2.36 x 2.10 m (19.9 x 7.9 x 6.10 ft)
Total weight, battle ready 10.5 tons max. (23,148 lbs)
Crew 4 (commander, gunner, driver, co-driver)
Propulsion Tatra 103 V-12 diesel, 155 bhp
Speed (on/off road) 80/60 km/h (50/37 mph)
Armament 50 mm (1.97 in) KWK 39 L60
7.92 mm (0.31 in) Mauser MG 34 coaxial
Operational range 1000 km (625 mi)
Production (Puma only) 101

Image

And finally here are a couple of my own photos of a 234/3 from the Tank Museum at Bovington. Although this is a different variant the basic hull and chassis remain the same:
Image

Image

Unfortunately down the back end the exhaust system isn't the original layout
Image
Last edited by Tomcat64 on Mon Sep 25, 2017 10:03 am, edited 1 time in total.
Cheers, Neil

On the Bench:
Tamiya 1/35 PzKpfwIB
Tamiya 1/35 Willys Jeep
Revell 1/72 Millennium Falcon
User avatar
Tomcat64
Brigadier General
Brigadier General
Posts: 7034
Joined: Thu Sep 22, 2016 3:24 pm
Location: Swindon, UK
England

Tomcat's Puma - The Kit

Post by Tomcat64 »

This will be my first Dragon kit and I'm looking forward to getting stuck in as the moulding appears to be great on first look. The kit includes a well detailed basic interior as well as some PE and clear parts.

First here's the box art
Image

And lots of useful close ups on the bottom too
Image

Inside the sprue frames are all well packaged in sealed bags
Image

So lets break them out and take a look
Image

Image

Image

Image

The instructions are a fold out sheet - the first thing that struck me was the lack of info about the subject itself that's usually included on the instruction sheet
Image

Some busy stages looming on the horizon
Image

And finally I'll be using some reference info from these
ImageImage

Which includes another shot of the 234/2 as well as other 234 versions
Image

This isn't my first attempt at a Puma as I build the matchbox 1/76 version about four years ago after returning to the hobby - hopefully it's bigger brother will show how some of my modelling techniques have improved since then
Image

If time permits I'll put together a diorama base and figures to finish this off.
Last edited by Tomcat64 on Fri Sep 15, 2017 5:46 pm, edited 1 time in total.
Cheers, Neil

On the Bench:
Tamiya 1/35 PzKpfwIB
Tamiya 1/35 Willys Jeep
Revell 1/72 Millennium Falcon
User avatar
Quax
Sergeant Major of the Army
Posts: 1262
Joined: Thu Feb 26, 2015 9:52 am
Location: Andover, Hampshire
England

Re: Tomcat's Puma

Post by Quax »

Good luck Neil, I usually find the kits are good but there's always something in the instructions that makes.you go wtf..lipping heck. the hard part is finding it :scratch:: Looking forward to seeing this :pop:
Paul
Paul :hi: (not THE Paul a more inconsequential Paul)

On the bench:
A mess as usual...
now residing in the Peoples Democratic Republic of Penguinland - long live the Emperor!
User avatar
Tomcat64
Brigadier General
Brigadier General
Posts: 7034
Joined: Thu Sep 22, 2016 3:24 pm
Location: Swindon, UK
England

Re: Tomcat's Puma

Post by Tomcat64 »

Quax wrote: Tue Sep 05, 2017 5:27 pm Good luck Neil, I usually find the kits are good but there's always something in the instructions that makes.you go wtf..lipping heck. the hard part is finding it :scratch:: Looking forward to seeing this :pop:
Paul
Thanks Paul - good to have you along for another build.

I did take a look at the instructions and a couple of the steps with options left me scratching my head. I was working on the theory that it'd make sense when I had the parts in my hands but maybe not from what you're saying!

Hoping to get started this weekend.
Cheers, Neil

On the Bench:
Tamiya 1/35 PzKpfwIB
Tamiya 1/35 Willys Jeep
Revell 1/72 Millennium Falcon
User avatar
Tomcat64
Brigadier General
Brigadier General
Posts: 7034
Joined: Thu Sep 22, 2016 3:24 pm
Location: Swindon, UK
England

Tomcat's Puma - Build Part 1

Post by Tomcat64 »

Time to start work on the Puma so here's the first page of the instruction sheet. Stage one doesn't look too bad, but stage two looks like Dragon released a swarm of mad pen-wielding spiders across the page!
Image
A couple of things were discovered during my initial check through at this stage. Firstly the letters in the instructions (like the G highlighted here) relate to the colour chart even though they're not included in the chart. Secondly as well as three identical sprue Bs and two identical sprue Ds there are also two sprue Cs and they're different and both are used in the kit - brilliant idea! :crazy:

As it turns out the mad spider scrawl wasn't as bad as it originally looked and basically consisted of eight repeated stages paying really close attention to the part callouts.
Image

Moving onto the second page
Image

This completes the initial part of the suspension build with the spring assemblies
Image

The sub assemblies for the fighting compartment - although these will be barely visible once the build is complete I'll paint most of these up separately prior to final assembly. Partly for practice and partly for my own sense of completeness
Image

And here they are in place at the rear driving position
Image

The next page of the instructions completes the first stage of the interior and then the mad spider swarm is back for the steering arms!
Image

Here's the interior at the front end - the seat and steering wheel are just dry fitted
Image

And an overhead view of the full compartment
Image

The result of the spider attack - these were slightly more fiddly to complete than the earlier stage. Things did go a little easier when I realised the steering arms weren't quite symmetrical and each end had a slightly different sized locating hole
Image

I'll probably never complain about aircraft undercarriage being fiddly again! Well at least not until next time I have to try it :)
Image

That's all for this weekend, next up it looks like the interior of the upper hull. So far I have to say this has hit just the right balance of complexity and buildability and has been a pleasure to work with.

Thanks for checking in.
Cheers, Neil

On the Bench:
Tamiya 1/35 PzKpfwIB
Tamiya 1/35 Willys Jeep
Revell 1/72 Millennium Falcon
User avatar
Tomcat64
Brigadier General
Brigadier General
Posts: 7034
Joined: Thu Sep 22, 2016 3:24 pm
Location: Swindon, UK
England

Tomcat's Puma - Build Part 2

Post by Tomcat64 »

Work continued this week with a couple of sessions to get the upper part of the interior finished.

Here's the relevant page from instruction sheet
Image

This is where Quax's prediction really came true - the assemblies for the windows were slightly baffling but eventually sorted them out.

But first the upper hull included some sink holes - nothing too major or too deep, but a couple were in awkward corners
Image

And here's the completed upper hull interior
Image

I then skipped ahead to assemble the gun breech - pretty much the only interior detail included for the turret
Image

Nothing too challenging here although the fit was a little tight in a couple of places and required some gentle sanding down to get everything lined up
Image

That's all for this week. I've now assembled all the interior components so I'll paint those next before continuing with the main assembly.

Thanks for looking - have a great weekend! :cheers2:
Cheers, Neil

On the Bench:
Tamiya 1/35 PzKpfwIB
Tamiya 1/35 Willys Jeep
Revell 1/72 Millennium Falcon
User avatar
Quax
Sergeant Major of the Army
Posts: 1262
Joined: Thu Feb 26, 2015 9:52 am
Location: Andover, Hampshire
England

Re: Tomcat's Puma

Post by Quax »

Looks great so far and well done for overcoming Dragons little complications :clap:
Paul :hi: (not THE Paul a more inconsequential Paul)

On the bench:
A mess as usual...
now residing in the Peoples Democratic Republic of Penguinland - long live the Emperor!
User avatar
DrSprue
Warrant Officer
Warrant Officer
Posts: 1497
Joined: Wed Apr 26, 2017 3:24 am
United States of America

Re: Tomcat's Puma

Post by DrSprue »

OK Neil, count me in for this build dude! :pop: Well.. not a tank guy (hehe..yet) but I have started a few cars from back in the day.. yanoo automobiles. So being that this is one (times two.. hmm with 8 wheels) I think I should follow you with this twice as much! (haha, yea get it... 2 cars, twice, Puma has 8.. oh never mind :rofl: ) It is made of sprues which usually means I would watch it anyways :lol: Good luck my friend, and as far as the 1/76th version, dang.. that one looks really great too! Love the dio you dId on it as well.
-Doc
On the bench:
User avatar
Tomcat64
Brigadier General
Brigadier General
Posts: 7034
Joined: Thu Sep 22, 2016 3:24 pm
Location: Swindon, UK
England

Tomcat's Puma - Build Part 3

Post by Tomcat64 »

Quax wrote: Sat Sep 16, 2017 1:13 pm Looks great so far and well done for overcoming Dragons little complications :clap:
Thanks mate :th:
DrSprue wrote: Sat Sep 23, 2017 4:31 pm OK Neil, count me in for this build dude! :pop: Well.. not a tank guy (hehe..yet) but I have started a few cars from back in the day.. yanoo automobiles. So being that this is one (times two.. hmm with 8 wheels) I think I should follow you with this twice as much! (haha, yea get it... 2 cars, twice, Puma has 8.. oh never mind :rofl: ) It is made of sprues which usually means I would watch it anyways :lol: Good luck my friend, and as far as the 1/76th version, dang.. that one looks really great too! Love the dio you dId on it as well.
Welcome to the tank factory Tony :) Although I've got a fairly equal interest in armour and aircraft I find that armour kits don't tend to fight me back as much as aircraft do - although that's as much to do with me learning the skills on aircraft building as the kits themselves. The old 1/76 Matchbox kits actually come with the mini-dios included which was a neat touch - some of them are now being reissued by Revell.

Anyway - time for an update on the Puma methinks :)

When I last checked in the interior had been built up and was waiting for paint. The instructions call out for this to be Khaki-Green, which didn't sound right to me, so a little research on the interweb revealed that the general consensus was that aside from some left in red-oxide primer they were generally Elfenbein (Ivory) - which seems to be borne out by this photo from one of my reference shots
Image

So the whole lot was primed in Ultimate red oxide (old style) - which looks a lot brighter in the photo than in reality
Image

And then sprayed with Vallejo ModelAir Ivory before picking the details out in German grey, giving it all a thinned black wash and then adding some European dust from MiG. I didn't spend too much time here as it'll hardly been seen after completion unless the turret is removed. I also painted the inside of the engine louvres with German grey as I've fitted them in the open position
Image

Gun breech got the same treatment
Image

Onto the next page of the instructions which seal up the two halves of the hull, add the fenders and various details
Image

Something to note here is that the callouts for the middle equipment lockers are the wrong way around
Image

Also the placement of these middle lockers isn't overly obvious, so I fitted the fore and aft lockers
Image

Then added the fenders and positioned the middle lockers once the fenders were in place. I had originally toyed with leaving the fenders off during the initial painting stages as I was concerned they might restrict access to the suspension but after test fitting it looked like it wouldn't be a problem so I went ahead and attached them.
Image

It's starting to take shape now
Image

There was a seam between the transmission section and the lower hull at the front which I filled and sanded
Image

But following a visit to the Tank Museum yesterday it turns out it's there on the original too... so I might try and chip the filler out again :bash:
Image

Leaving that aside the front fitments and bumper bar were added with no problems
Image

Down the back the spare wheel bracket was a little fiddly to get together and needed a bit of light sanding to fit onto the hull correctly
Image

A couple of notes for the back end details in that the call-outs for the end plates & pipes of the exhaust system were the wrong way around, and I don't know if I was being especially dumb but it took me a while to figure out how to fit parts E52 & E53
Image

Anyway here they are in place from the underside attached the inside of the fenders
Image

The instructions then move onto the fitting of the pioneer tools and boxes
Image

My preference is to fit them after painting so I'll start to pick and choose from the instructions from this point on, but I've added the storage boxes as well as the exhaust system. Again my original thought was to add the exhaust parts after painting but this proved to be a little tricky given the fit of the parts so I've attached them and will paint them by brush out after the primary colours have been laid down
Image

Finally for this update the wheels - the instructions call out for the hubs to be added to the tyres
Image

But I've gone my own way and added them to the suspension units as I believe this will help painting
Image

Here's the pile of assembled tyres and a couple of the completed jerry cans from the pioneer section
Image

All dry fitted in place so I can see how it sits (all eight wheels appear to make contact with a flat surface!)
Image

I need to finish building up the tools, cases and cans and then add the final details to the hull before moving onto the turret at which point it'll be ready for priming.

Thanks for looking.
Last edited by Tomcat64 on Tue Oct 03, 2017 9:30 am, edited 1 time in total.
Cheers, Neil

On the Bench:
Tamiya 1/35 PzKpfwIB
Tamiya 1/35 Willys Jeep
Revell 1/72 Millennium Falcon
User avatar
DrSprue
Warrant Officer
Warrant Officer
Posts: 1497
Joined: Wed Apr 26, 2017 3:24 am
United States of America

Re: Tomcat's Puma

Post by DrSprue »

Oh this looks great so far Neil. Man that PE is looking really cool too. Yea I know what you mean about the instructions with a few parts. As I have read on so many Dragon kit builds over many of the posts I have looked at, some intense youtube ones also, from many of our ISM guys have made, they all say Dragon is great for the molds, but suck at the (D)istructions!! (to quote our friend at Sharpies Models)

Hmmm. from what Ive seen on yours, it does look like it takes a while to see this during the build. I do have a 1/35th Dragon V2 I started a while ago and it looks familiar, but that only had 15 parts for the V2! I love that ship so much I could put it together without any help :lol:
-Doc
On the bench:
User avatar
Tomcat64
Brigadier General
Brigadier General
Posts: 7034
Joined: Thu Sep 22, 2016 3:24 pm
Location: Swindon, UK
England

Tomcat's Puma - Build Part 4

Post by Tomcat64 »

After working on another project over the weekend I've gone back to the Puma for a couple of evenings this week.

The turret came together fairly easily but once again Dragon threw the curve ball of swapping the call outs for the brackets on the smoke dischargers
Image

So then I had a pile of parts including the assembled wheels, jerry cans and jack
Image

The hull & turret were primed first with Ultimate black and then with Ultimate grey from the top down (unfortunately it's not too clear in the photo). This was an attempt to create some basic modulation and I think will need some fine tuning in my air brushing techniques!
Image

A couple of coats of Vallejo modelair dark yellow were then applied - this is quite a bit darker than the Tamiya that I'd used previously but is probably a more accurate representation of the actual colour.
Image

I wanted to free hand the camo pattern on this one but since I'm still fairly new to this paint squirting malarkey I pulled out a test sheet of plastic to play with as I've only used masks or blocked out areas previously
Image

After playing about with that for a bit I took the plunge and applied my first freehand camo pattern with modelair dark green and red-brown. Once again Dragon muddied the waters because despite providing diagrams of both sides, front, back and top - the camo patterns don't always match up so a little improvisation was required
Image

I'm fairly happy with this as a first go but there's obviously some more practice required
Image

There was one area that I wasn't happy with on the front armour where I was a little heavy handed
Image

So I went back and reworked that area - I've also noticed an area on the rear deck that'll need similar attention
Image

And that's where I've got to - next up is attempting to work the camo pattern up the turret without messing up what I've already done. The turret hatches are just taped in position at the moment as ultimately they'll be opened up
Image

Thanks for looking!
Cheers, Neil

On the Bench:
Tamiya 1/35 PzKpfwIB
Tamiya 1/35 Willys Jeep
Revell 1/72 Millennium Falcon
User avatar
ElCapitan
Chief Warrant Officer 2
Posts: 1725
Joined: Sun Aug 14, 2016 10:59 pm
Location: Glasgow
Scotland

Re: Tomcat's Puma

Post by ElCapitan »

Awesome work Neil, that camo looks great!
Rob
ElCapitan
User avatar
Tomcat64
Brigadier General
Brigadier General
Posts: 7034
Joined: Thu Sep 22, 2016 3:24 pm
Location: Swindon, UK
England

Re: Tomcat's Puma

Post by Tomcat64 »

ElCapitan wrote: Thu Oct 05, 2017 10:05 am Awesome work Neil, that camo looks great!
Thanks mate! :cheers2:
Cheers, Neil

On the Bench:
Tamiya 1/35 PzKpfwIB
Tamiya 1/35 Willys Jeep
Revell 1/72 Millennium Falcon
User avatar
Stokesy44
Major General
Major General
Posts: 8221
Joined: Thu Jun 18, 2015 10:13 am
Location: The Midlands, UK
Great Britain

Re: Tomcat's Puma

Post by Stokesy44 »

:banana: Man, that looks absolutely stunning. Airbrushing camo on German vehicles is one of the highlights of AFV modelling for me.

Definitely watching with interest. :th:
Its been tried and tested, it works! So don't blame the system if you're no good. :doh:
User avatar
bfrd
Site Admin
Site Admin
Posts: 1887
Joined: Tue Aug 01, 2017 11:43 am
Location: Carrollton, TX
Contact:
United States of America

Re: Tomcat's Puma

Post by bfrd »

Nice work on the cammo!
Matthew (or Bifford if you prefer)
Stash
User avatar
Tomcat64
Brigadier General
Brigadier General
Posts: 7034
Joined: Thu Sep 22, 2016 3:24 pm
Location: Swindon, UK
England

Re: Tomcat's Puma

Post by Tomcat64 »

Stokesy44 wrote: Thu Oct 05, 2017 11:14 am :banana: Man, that looks absolutely stunning. Airbrushing camo on German vehicles is one of the highlights of AFV modelling for me.

Definitely watching with interest. :th:
bfrd wrote: Thu Oct 05, 2017 11:30 am Nice work on the cammo!
Thanks guys - it's definitely a learning experience!
Cheers, Neil

On the Bench:
Tamiya 1/35 PzKpfwIB
Tamiya 1/35 Willys Jeep
Revell 1/72 Millennium Falcon
User avatar
Quax
Sergeant Major of the Army
Posts: 1262
Joined: Thu Feb 26, 2015 9:52 am
Location: Andover, Hampshire
England

Re: Tomcat's Puma

Post by Quax »

Cammo looks great to me, the practice on plasticard is a good one and I do it,unfortunately I'm still rubbish at it despite that but yours is cracking :clap: :clap:
Paul :hi: (not THE Paul a more inconsequential Paul)

On the bench:
A mess as usual...
now residing in the Peoples Democratic Republic of Penguinland - long live the Emperor!
User avatar
DrSprue
Warrant Officer
Warrant Officer
Posts: 1497
Joined: Wed Apr 26, 2017 3:24 am
United States of America

Re: Tomcat's Puma

Post by DrSprue »

Man that camo pattern looks great! Is the rest Vallejo like your top color for that camo?
-Doc
On the bench:
User avatar
Stokesy44
Major General
Major General
Posts: 8221
Joined: Thu Jun 18, 2015 10:13 am
Location: The Midlands, UK
Great Britain

Re: Tomcat's Puma

Post by Stokesy44 »

Err, the camo on the turret looks a bit pale.....

Image

:lol: :lol: :lol:
Its been tried and tested, it works! So don't blame the system if you're no good. :doh:
User avatar
Quax
Sergeant Major of the Army
Posts: 1262
Joined: Thu Feb 26, 2015 9:52 am
Location: Andover, Hampshire
England

Re: Tomcat's Puma

Post by Quax »

Stokesy44 wrote: Thu Oct 05, 2017 10:57 pm Err, the camo on the turret looks a bit pale.....

I think you're missing the point Stokesy, after building the gun that could shoot round corners the Germans concentrated on paints that blended into one colour. Experts such as myself investigated this property in the 1980's; it was called "Magnoliaisation....." and was particularly effective on a wood chip background :crazy: :lol: :lol: :lol:
Paul
Paul :hi: (not THE Paul a more inconsequential Paul)

On the bench:
A mess as usual...
now residing in the Peoples Democratic Republic of Penguinland - long live the Emperor!
User avatar
Tomcat64
Brigadier General
Brigadier General
Posts: 7034
Joined: Thu Sep 22, 2016 3:24 pm
Location: Swindon, UK
England

Re: Tomcat's Puma

Post by Tomcat64 »

Quax wrote: Thu Oct 05, 2017 9:44 pm Cammo looks great to me, the practice on plasticard is a good one and I do it,unfortunately I'm still rubbish at it despite that but yours is cracking :clap: :clap:
Thanks mate - this really is taking some practice.

I still think my shapes are too big and for some reason I'm struggling to get my head around needing to get closer to make things smaller... I understand the laws of physics but it just feels counter-intuitive. I might need to take the plunge on one of those ambush schemes with all the dots at some point!
DrSprue wrote: Thu Oct 05, 2017 10:30 pm Man that camo pattern looks great! Is the rest Vallejo like your top color for that camo?
Thanks Tony - yep it's all been done with Vallejo ModelAir.

This seems to be a real Marmite (love/hate) thing in general but I've found that it works well for me with a few drops of flow improver and a working pressure about 25psi. I've got the AK Interactive equivalent set because I'm a sucker for paints and will give that a go at some point because they've got a wider range of shades.
Cheers, Neil

On the Bench:
Tamiya 1/35 PzKpfwIB
Tamiya 1/35 Willys Jeep
Revell 1/72 Millennium Falcon
User avatar
Tomcat64
Brigadier General
Brigadier General
Posts: 7034
Joined: Thu Sep 22, 2016 3:24 pm
Location: Swindon, UK
England

Re: Tomcat's Puma

Post by Tomcat64 »

Stokesy44 wrote: Thu Oct 05, 2017 10:57 pm Err, the camo on the turret looks a bit pale.....

:lol: :lol: :lol:
Are you trying to say that I've been a little heavy handed with the highlights? :tongue:
Quax wrote: Fri Oct 06, 2017 7:47 am Experts such as myself investigated this property in the 1980's; it was called "Magnoliaisation....." and was particularly effective on a wood chip background :crazy: :lol: :lol: :lol:
Paul
PMSL!!!!! :rofl: :rofl: :rofl:

Although now I come to think about it we've still got a back room around here that might need some rectification :shifty:
Cheers, Neil

On the Bench:
Tamiya 1/35 PzKpfwIB
Tamiya 1/35 Willys Jeep
Revell 1/72 Millennium Falcon
User avatar
Stokesy44
Major General
Major General
Posts: 8221
Joined: Thu Jun 18, 2015 10:13 am
Location: The Midlands, UK
Great Britain

Re: Tomcat's Puma

Post by Stokesy44 »

Tomcat64 wrote: Fri Oct 06, 2017 11:46 am
Quax wrote: Fri Oct 06, 2017 7:47 am Experts such as myself investigated this property in the 1980's; it was called "Magnoliaisation....." and was particularly effective on a wood chip background :crazy: :lol: :lol: :lol:
Paul
PMSL!!!!! :rofl: :rofl: :rofl:

Although now I come to think about it we've still got a back room around here that might need some rectification :shifty:
I seem to remember a movement in the 70s and 80s which became known as Barley Whitism. It was certainly a movement in our house anyway :D
Its been tried and tested, it works! So don't blame the system if you're no good. :doh:
User avatar
gaz45
Chief Warrant Officer 3
Posts: 1971
Joined: Mon Jan 06, 2014 3:35 pm
Location: Nottingham uk
Great Britain

Re: Tomcat's Puma

Post by gaz45 »

Very nice work there mate the camo looks great
User avatar
pourquoi61
Sergeant Major of the Army
Posts: 1289
Joined: Tue Feb 16, 2016 12:57 pm
Location: Ilkeston, Derbyshire
Great Britain

Re: Tomcat's Puma

Post by pourquoi61 »

Just caught up on your build looking fantastic, yes Dragon instructions are demanding but they do make beautiful kits. :thumb1: :thumb1: :thumb1:
Image
User avatar
Tomcat64
Brigadier General
Brigadier General
Posts: 7034
Joined: Thu Sep 22, 2016 3:24 pm
Location: Swindon, UK
England

Re: Tomcat's Puma

Post by Tomcat64 »

gaz45 wrote: Fri Oct 06, 2017 5:32 pm Very nice work there mate the camo looks great
pourquoi61 wrote: Fri Oct 06, 2017 11:22 pm Just caught up on your build looking fantastic, yes Dragon instructions are demanding but they do make beautiful kits. :thumb1: :thumb1: :thumb1:
Thanks guys - really appreciate the support :cheers2:
Cheers, Neil

On the Bench:
Tamiya 1/35 PzKpfwIB
Tamiya 1/35 Willys Jeep
Revell 1/72 Millennium Falcon
User avatar
Tomcat64
Brigadier General
Brigadier General
Posts: 7034
Joined: Thu Sep 22, 2016 3:24 pm
Location: Swindon, UK
England

Tomcat's Puma - Build Part 5

Post by Tomcat64 »

Given that my minimalist turret didn't meet with universal approval I started off this update by adding some stripes...
Image

I'm not 100% happy with one set on this side but since I've tried to fix it twice before getting to this I'm leaving it here because if I "fix" it again I know I'll screw it up (again :bash: ) One thing I have realised whilst doing this part is that I'm working in my own shadow in my portable spray booth so I'll put some thought into how I might change the lighting
Image

So here's the turret attached to the body
Image

The more observant of you may have noticed the wheels are in place as well - at this point they're dry fitted so I could squirt some camo on them as well
Image

Before removing them and brushing the tyres with Tamiya Rubber black. To keep track of which wheel went back where I marked a small white card with an arrow and kept the spare at the rear.
Image

Then it was onto the pioneer tools - these were all brush painted with a mix of Vallejo model-colour, modelair and Tamiya. Then a couple of coats of brown wash, and finally a black wash as well to dull everything down
Image

While that was all in progress I picked out the base layer of the exhaust systems in Lifecolor Rust dark shadow, and also picked out the ping-pong balls on the top of the sighting poles with Vallejo White-Grey. The exhaust will be worked with varying shades of rust next so I'm not too bothered about the rough finish as that will come out in the next stage.
Image

And here's how it looks now with all the bits attached, the spare wheel was a bit of a fiddle but eventually fell into place and onto it's locating holes in the bracket.
Image

I've added the cone-shaped things into the smoke launchers but it's not clear what colour they should be so I'll do some investigation on those as they don't look right in metallic grey
Image

The jerry cans are still in progress as I'm going to try a new (for me) chipping technique on them that I wasn't brave enough to try on the Puma itself. Then it'll be onto the decals and weathering with a few final tweaks and it'll be done.

Thanks as always for looking and encouraging.
Cheers, Neil

On the Bench:
Tamiya 1/35 PzKpfwIB
Tamiya 1/35 Willys Jeep
Revell 1/72 Millennium Falcon
User avatar
Stokesy44
Major General
Major General
Posts: 8221
Joined: Thu Jun 18, 2015 10:13 am
Location: The Midlands, UK
Great Britain

Re: Tomcat's Puma

Post by Stokesy44 »

Oh I say, now that does look good. That is one fine paint job you’ve got there matey. Beautiful lines and colours.
Its been tried and tested, it works! So don't blame the system if you're no good. :doh:
User avatar
papatika
Master Sergeant
Master Sergeant
Posts: 382
Joined: Thu Jun 05, 2014 11:12 am
Location: Budapest, Hungary
Hungary

Re: Tomcat's Puma

Post by papatika »

Looking great so far! Keep up the good work!
User avatar
DrSprue
Warrant Officer
Warrant Officer
Posts: 1497
Joined: Wed Apr 26, 2017 3:24 am
United States of America

Re: Tomcat's Puma

Post by DrSprue »

Wow Neil, it does look so well built and painted. The wheels are a work of art!! I cant get that camo scheme out of my mind. Its beginning to look so real. You built this so fast too. I dont own any Vallejo products, but Model air is on my wishlist now along with that tank.
-Doc
On the bench:
User avatar
Tomcat64
Brigadier General
Brigadier General
Posts: 7034
Joined: Thu Sep 22, 2016 3:24 pm
Location: Swindon, UK
England

Re: Tomcat's Puma

Post by Tomcat64 »

Stokesy44 wrote: Sun Oct 08, 2017 7:20 pm Oh I say, now that does look good. That is one fine paint job you’ve got there matey. Beautiful lines and colours.
papatika wrote: Sun Oct 08, 2017 11:21 pm Looking great so far! Keep up the good work!
Thanks guys! :cheers2:
DrSprue wrote: Mon Oct 09, 2017 1:58 am Wow Neil, it does look so well built and painted. The wheels are a work of art!! I cant get that camo scheme out of my mind. Its beginning to look so real. You built this so fast too. I dont own any Vallejo products, but Model air is on my wishlist now along with that tank.
Thanks Tony :th:

I settled on the ModelAir primarily because they're pre-thinned and I was struggling to get the thinning ratios sorted for other paints. It's definitely worth getting a couple of pots and giving them a go in my opinion. They do have a habit of drying on the needle without the flow improver though.

As for the Puma, Tamiya also produce one which will probably be much cheaper and less fiddly than the Dragon version :)
Cheers, Neil

On the Bench:
Tamiya 1/35 PzKpfwIB
Tamiya 1/35 Willys Jeep
Revell 1/72 Millennium Falcon
User avatar
Quax
Sergeant Major of the Army
Posts: 1262
Joined: Thu Feb 26, 2015 9:52 am
Location: Andover, Hampshire
England

Re: Tomcat's Puma

Post by Quax »

Hi Neil, I think it looks terrific! you always set a high standard whatever you do :clap: we always have to bear in mind that these were probably resprayed by some poor sap under a tree at the edge of a muddy field, using one eye to watch for a wandering Tiffy thats looking for somewhere to expend a 60lb rocket or two... :bow::

Paul
Paul :hi: (not THE Paul a more inconsequential Paul)

On the bench:
A mess as usual...
now residing in the Peoples Democratic Republic of Penguinland - long live the Emperor!
User avatar
ElCapitan
Chief Warrant Officer 2
Posts: 1725
Joined: Sun Aug 14, 2016 10:59 pm
Location: Glasgow
Scotland

Re: Tomcat's Puma

Post by ElCapitan »

Excellent work - good luck with the chipping technique, I've never tried it either!
Rob
ElCapitan
User avatar
Tomcat64
Brigadier General
Brigadier General
Posts: 7034
Joined: Thu Sep 22, 2016 3:24 pm
Location: Swindon, UK
England

Re: Tomcat's Puma

Post by Tomcat64 »

Quax wrote: Mon Oct 09, 2017 2:04 pm Hi Neil, I think it looks terrific! you always set a high standard whatever you do :clap: we always have to bear in mind that these were probably resprayed by some poor sap under a tree at the edge of a muddy field, using one eye to watch for a wandering Tiffy thats looking for somewhere to expend a 60lb rocket or two... :bow::

Paul
Thanks mate :cheers2:

Yep you're right about the way the camo was applied in the field (sometimes with a broom) so it's amazing they were ever as neat as they look in photos.
ElCapitan wrote: Mon Oct 09, 2017 2:42 pm Excellent work - good luck with the chipping technique, I've never tried it either!
Cheers Rob - I'll post photos as it goes (hopefully!)
Cheers, Neil

On the Bench:
Tamiya 1/35 PzKpfwIB
Tamiya 1/35 Willys Jeep
Revell 1/72 Millennium Falcon
User avatar
Tomcat64
Brigadier General
Brigadier General
Posts: 7034
Joined: Thu Sep 22, 2016 3:24 pm
Location: Swindon, UK
England

Tomcat's Puma - Build Part 6

Post by Tomcat64 »

This week's progress has been focussed on the jerry cans.

As mentioned last time out I was going to use a new chipping technique, and this is what I was playing with
Image

Inside the set are two dropper bottles (Chipping Colour - which is a rusty brown, and Aluminium chipping) and two chipping agents (Worn effects, and Heavy chipping).
Image

So after priming the cans I coated them each in a layer of Chipping colour (brushed) and sprayed the "Worn Effects" agent (looks like I picked up some dust too - sorry about that, I was sanding something from another build).
Image

Since I wanted the dark yellow cans to be a slightly different shade to the vehicle to create a little contrast I used the AK interactive dark yellow mixed with a little brown, and also chose to do a couple of the parts in dark grey for variation
Image

After letting them dry I wetted them again and then worked on the surfaces - for the most part this went ok but I was a little heavy handed in a couple of places and got all the way through to plastic :doh: I used a variety of "tool" including cocktail sticks, airbrush cleaning brushes and an old toothbrush. In the next pic I've also picked out the strapping.
Image

Then they got a couple of coats of brown wash before being installed
Image

And the other side
Image

I think it's something I'll work at again on my scrap of card and try to progress with, but for a first go around I'm fairly happy with the results and here's how it looks
Image

So the Puma needs the exhausts working on, some decals and then weathering before picking out and adding the final details such as periscopes and aerials.

I've also been working out how I want to display this and will be wheeling out a Miniart Dio
Image

Anyone who came along for the epic that my "Winter is Coming" build turned into will know that I have a Love/Hate relationship with these things. Actually to be more accurate I have a Hate/Hate/Hate/Hate/Hate/Grudging Acceptance relationship with them but I went a little mad a couple of years back and have half a dozen in the stash (seemed like a good idea at the time). So the good news is that the vac-form part count is a lot (LOT) lower than last time
Image

And the IP parts are as rough as ever, but since I'm under less time pressure this time around I'll see if I can knock some of this into passable shape
Image

The instructions are just a single sheet
Image

And the flip side
Image

A quick check for size shows the Puma should fit nicely on this
Image

I've got an idea of the figure set I want to populate this with when it's done as well but will wheel them out when I get there.

That's all for now - thanks for looking!
Last edited by Tomcat64 on Thu Oct 12, 2017 4:57 pm, edited 1 time in total.
Cheers, Neil

On the Bench:
Tamiya 1/35 PzKpfwIB
Tamiya 1/35 Willys Jeep
Revell 1/72 Millennium Falcon
User avatar
Stokesy44
Major General
Major General
Posts: 8221
Joined: Thu Jun 18, 2015 10:13 am
Location: The Midlands, UK
Great Britain

Re: Tomcat's Puma

Post by Stokesy44 »

Chipping on the cans looks good mate.

And you've got a Mini Art dio going again :o :o :o Are we in for another epic like the Winter Stug in the Dining Room? :bow:: :bow:: :bow::
Its been tried and tested, it works! So don't blame the system if you're no good. :doh:
User avatar
Tomcat64
Brigadier General
Brigadier General
Posts: 7034
Joined: Thu Sep 22, 2016 3:24 pm
Location: Swindon, UK
England

Re: Tomcat's Puma

Post by Tomcat64 »

Stokesy44 wrote: Thu Oct 12, 2017 4:48 pm Chipping on the cans looks good mate.
Thanks mate :cheers2:
Stokesy44 wrote: Thu Oct 12, 2017 4:48 pm And you've got a Mini Art dio going again :o :o :o Are we in for another epic like the Winter Stug in the Dining Room? :bow:: :bow:: :bow::
Ooooh no! No No No! The only way I'm ever going to attempt something that bonkers again is if we have a twelve-month GB - that was four months of absolute plastic mayhem!
Cheers, Neil

On the Bench:
Tamiya 1/35 PzKpfwIB
Tamiya 1/35 Willys Jeep
Revell 1/72 Millennium Falcon
User avatar
DrSprue
Warrant Officer
Warrant Officer
Posts: 1497
Joined: Wed Apr 26, 2017 3:24 am
United States of America

Re: Tomcat's Puma

Post by DrSprue »

Oh wow, thats cool! Looks like the door has just a tiny bit of flash, but No problem and the kit looks really neat! Awesome jerry can(s) detail Neil. Oh, God, I just know Im gonna want to do this tank someday...and the dio stuff too... :eeek: :lol:
-Doc
On the bench:
User avatar
pourquoi61
Sergeant Major of the Army
Posts: 1289
Joined: Tue Feb 16, 2016 12:57 pm
Location: Ilkeston, Derbyshire
Great Britain

Re: Tomcat's Puma

Post by pourquoi61 »

Yes the jerry cans are just great wish I had a steady hand when painting small details.
lovely. :thumb2: :thumb2: :thumb2:
Image
User avatar
Quax
Sergeant Major of the Army
Posts: 1262
Joined: Thu Feb 26, 2015 9:52 am
Location: Andover, Hampshire
England

Re: Tomcat's Puma

Post by Quax »

they've come out great, it looks superb fully loaded :thumb1: :th:
Tomcat64 wrote: Thu Oct 12, 2017 5:12 pm
Ooooh no! No No No! The only way I'm ever going to attempt something that bonkers again is if we have a twelve-month GB - that was four months of absolute plastic mayhem!
You know deep down you want to.... :crazy:

You might not have enjoyed it but we did and I learned a lot too! :think:

Paul
Paul :hi: (not THE Paul a more inconsequential Paul)

On the bench:
A mess as usual...
now residing in the Peoples Democratic Republic of Penguinland - long live the Emperor!
User avatar
Tomcat64
Brigadier General
Brigadier General
Posts: 7034
Joined: Thu Sep 22, 2016 3:24 pm
Location: Swindon, UK
England

Re: Tomcat's Puma

Post by Tomcat64 »

DrSprue wrote: Thu Oct 12, 2017 7:13 pm Oh wow, thats cool! Looks like the door has just a tiny bit of flash, but No problem and the kit looks really neat! Awesome jerry can(s) detail Neil. Oh, God, I just know Im gonna want to do this tank someday...and the dio stuff too... :eeek: :lol:
Thanks Tony - we'll make an armour man out of you yet :D
pourquoi61 wrote: Thu Oct 12, 2017 7:47 pm Yes the jerry cans are just great wish I had a steady hand when painting small details.
lovely. :thumb2: :thumb2: :thumb2:
Thanks mate - yep steady hands is definitely something I don't take for granted.
Quax wrote: Fri Oct 13, 2017 8:33 am they've come out great, it looks superb fully loaded :thumb1: :th:
Tomcat64 wrote: Thu Oct 12, 2017 5:12 pm
Ooooh no! No No No! The only way I'm ever going to attempt something that bonkers again is if we have a twelve-month GB - that was four months of absolute plastic mayhem!
You know deep down you want to.... :crazy:

You might not have enjoyed it but we did and I learned a lot too! :think:

Paul
Thanks mate!

In a perverse way I did enjoy it but it just took on a life of its own and just kept growing and cramming more in the closer we got to the deadline. So yep - I'd like to do another mega-dio sometime but just not cram it into four months. I've actually got one in mind already with a British AFV...
Cheers, Neil

On the Bench:
Tamiya 1/35 PzKpfwIB
Tamiya 1/35 Willys Jeep
Revell 1/72 Millennium Falcon
User avatar
aur0ra145
Second Lieutenant
Second Lieutenant
Posts: 3079
Joined: Thu Jan 14, 2016 9:44 am
Location: TX
United States of America

Re: Tomcat's Puma

Post by aur0ra145 »

Looking excellent! I'm interested to see how it all comes together.
User avatar
pourquoi61
Sergeant Major of the Army
Posts: 1289
Joined: Tue Feb 16, 2016 12:57 pm
Location: Ilkeston, Derbyshire
Great Britain

Re: Tomcat's Puma

Post by pourquoi61 »

Laughing to myself thinking about a mega-dio. :lol: :lol: :lol:
Image
User avatar
Tomcat64
Brigadier General
Brigadier General
Posts: 7034
Joined: Thu Sep 22, 2016 3:24 pm
Location: Swindon, UK
England

Tomcat's Puma - Build Part 7

Post by Tomcat64 »

aur0ra145 wrote: Fri Oct 13, 2017 5:57 pm Looking excellent! I'm interested to see how it all comes together.
Thanks mate :cheers2:
pourquoi61 wrote: Fri Oct 13, 2017 9:59 pm Laughing to myself thinking about a mega-dio. :lol: :lol: :lol:
:th: :lol:

I didn't get much done last weekend but have made some steady progress in the evenings this week.

First up I applied the decals straight onto the satin finish of the ModelAir - something I've done before with no problems. I thought I'd boobed this time though as there was some silvering apparent in the clear film areas, but this was soon sorted after an application of Daco Strong Setting Solution over the usual Microset and Microsol.
Image

Down the back end I finished off the exhaust systems. I did this by wet-mixing Lifecolors Rust Base, Rust Dark Shadow and Rust Light Shadow 1 on the kit. So basically laying down blobs of each colour and then blending them together before they dried.
Image

This was then given a layer of Lifecolor Tensocrom Oil to dirty it up
Image

And here's how it looked after the final matt coat
Image

After giving the decals time to settle and dry out I applied a couple of coats of Alclad Aqua Gloss to seal them in, followed by a couple of coats of AK Interactive Ultra Matte to dull it all back down again
Image

While the clear coats were doing their thing I started on the Vac-form dio - first up separating the components from the sheet
Image

Unfortunately I was a little heavy handed in places - not to worry it's a ruin so we'll make a feature out of it :)
Image

Some of you may recall last time I did something like this I filled the structure with Pollyfilla to add some rigidity, but since these parts are a lot smaller and with no load bearing structures I didn't bother with that this time around and just glued the small half together after minimal clean up around the edges. This was glued with Tamiya thick (white lid) to allow some manipulating time.
Image

For the bigger wall I did make some guides out of scrap to try and get everything lined up - again I didn't bother filling the structure. These guides will also help when I come to tidy up the window bays where I cut too deep.
Image

When I placed the Puma on the base it flexed quite significantly so I've put a supporting bar across the full width underneath
Image

I then joined the two wall sections together - you can see where I've had to cut the plastic to try and fit the raised details together
Image

Here's the side view after joining around the back with the front still to be attended to
Image

And the rough edge of the walls - I've deliberately not spent too much time sanding this back to get it lined up as experience has shown that the join will be rough and need reworking in any case
Image

Here's that front outside corner tidied up - the join was done with CA section by section working down the wall, any gap was filled with Squadron white putty and then the corner and features were sanded back and chamfered to give a less sharp corner
Image

Around the back you can see where I've worked the Squadron White down the rough wall, but still need to work on the inner wall join, and also around the window casements.
Image

But it does give us enough to see how things will shape up
Image

Once the clear coats on the Puma are completely cured I'll start with the weathering wash & pigments before adding the final details. Hopefully this weekend I can get the base straightened out and then start laying some paint down on it too.

Thanks for looking!
Cheers, Neil

On the Bench:
Tamiya 1/35 PzKpfwIB
Tamiya 1/35 Willys Jeep
Revell 1/72 Millennium Falcon
User avatar
ElCapitan
Chief Warrant Officer 2
Posts: 1725
Joined: Sun Aug 14, 2016 10:59 pm
Location: Glasgow
Scotland

Re: Tomcat's Puma

Post by ElCapitan »

Looks great :th:

I'm sure we all have high expectations for your dio after the winter is coming one! :lol: no pressure
Rob
ElCapitan
User avatar
Quax
Sergeant Major of the Army
Posts: 1262
Joined: Thu Feb 26, 2015 9:52 am
Location: Andover, Hampshire
England

Re: Tomcat's Puma

Post by Quax »

nice to see you've stopped playing with that space stuff and got back to the important things... :nena: :lol: The Puma is fantastic and I'm learning more about these Miniart dio's, mostly that I'm not good enough :clap:

Paul
Paul :hi: (not THE Paul a more inconsequential Paul)

On the bench:
A mess as usual...
now residing in the Peoples Democratic Republic of Penguinland - long live the Emperor!
User avatar
Tomcat64
Brigadier General
Brigadier General
Posts: 7034
Joined: Thu Sep 22, 2016 3:24 pm
Location: Swindon, UK
England

Re: Tomcat's Puma

Post by Tomcat64 »

ElCapitan wrote: Thu Oct 19, 2017 2:09 pm Looks great :th:

I'm sure we all have high expectations for your dio after the winter is coming one! :lol: no pressure
Thanks Rob :cheers2: Fortunately I don't think there's any room for furniture in this one!
Quax wrote: Thu Oct 19, 2017 2:11 pm nice to see you've stopped playing with that space stuff and got back to the important things... :nena: :lol: The Puma is fantastic and I'm learning more about these Miniart dio's, mostly that I'm not good enough :clap:
:lol: Yeah I'm trying to juggle two builds at the same time so don't be surprised if this thing ends up with bits of lunar module sticking out of it!

I tell you one thing though, working with these Miniart Dios really makes you appreciate injection moulding!
Cheers, Neil

On the Bench:
Tamiya 1/35 PzKpfwIB
Tamiya 1/35 Willys Jeep
Revell 1/72 Millennium Falcon
User avatar
Stokesy44
Major General
Major General
Posts: 8221
Joined: Thu Jun 18, 2015 10:13 am
Location: The Midlands, UK
Great Britain

Re: Tomcat's Puma

Post by Stokesy44 »

Puma's looking nice and you're beginning to work your magic on the base :o :o :o
Its been tried and tested, it works! So don't blame the system if you're no good. :doh:
User avatar
papatika
Master Sergeant
Master Sergeant
Posts: 382
Joined: Thu Jun 05, 2014 11:12 am
Location: Budapest, Hungary
Hungary

Re: Tomcat's Puma

Post by papatika »

Great job done on that wall! It turned out nice, and will serve as a grate base for the Puma once you finished the interior, painted and weathered.
User avatar
Tomcat64
Brigadier General
Brigadier General
Posts: 7034
Joined: Thu Sep 22, 2016 3:24 pm
Location: Swindon, UK
England

Re: Tomcat's Puma

Post by Tomcat64 »

Stokesy44 wrote: Thu Oct 19, 2017 3:02 pm Puma's looking nice and you're beginning to work your magic on the base :o :o :o
papatika wrote: Thu Oct 19, 2017 3:14 pm Great job done on that wall! It turned out nice, and will serve as a grate base for the Puma once you finished the interior, painted and weathered.
Thanks guys :cheers2:
Cheers, Neil

On the Bench:
Tamiya 1/35 PzKpfwIB
Tamiya 1/35 Willys Jeep
Revell 1/72 Millennium Falcon
Post Reply

Return to “Build threads”