Attila's 1:35 Leopard C2 Mexas from Takom

Post your in progress build threads here.

Moderator: T3hGuppy

Post Reply
User avatar
papatika
Master Sergeant
Master Sergeant
Posts: 382
Joined: Thu Jun 05, 2014 11:12 am
Location: Budapest, Hungary
Hungary

Attila's 1:35 Leopard C2 Mexas from Takom

Post by papatika »

Hi all!

Most of you may probably know, that I am currently working on a Tiger 1 with interior, which makes me a lot of headache. :) I need something to do parallel, which just falls together.
I have a few options in my stash, like Panther G from Italeri, Hellcat from Academy, Gaz Tiger from Meng, or just something else, outside of this GB. And then this kit came around, with 35% discount. I'm sure you will understand the temporal weakness I suffered when I saw the offer. And the postman arrived today, so here it is: the Canadian MBT, Leopard C2 with Mexas, presented by Takom.

Image

The standard sized box is full with goodies.
Image

Sprue A with road wheels and some bits and bites (2 sprue).
Image

Sprue C with the turret and its particles
Image

Sprue D with sideskirts and armor
Image

Sprue E and F with even more armor and little pieces
Image

Sprue G whit a figure
Image

Sprue I with the track links (3 sprues)
Image

The upper hull
Image

And the lower hull
Image

Some clear parts, polycaps, PE, wire and decals
Image

The molds are in great condition, no flash, a tiny bit of seam lines, almost invisible ejection pin marks. The kit has working suspension and working tracks. The gun barrel is made of 2 parts. The figure has nice details. Instructions seem to be clear, easy to follow, contains 28 steps. Color callouts refer to Tamiya paints, and is says: "All the hull & turret parts' main color is XF-58+XF57+XF3". Ummm ... in what ratio?

Overall: the kit looks great!
The Leopard Club in their review complains about "inaccuracies and over-simplified moulding in places", but I think it'll be good enough for me... :th:
About the technical details you'll find a lot here: http://www.military-today.com/tanks/leopard_c2.htm

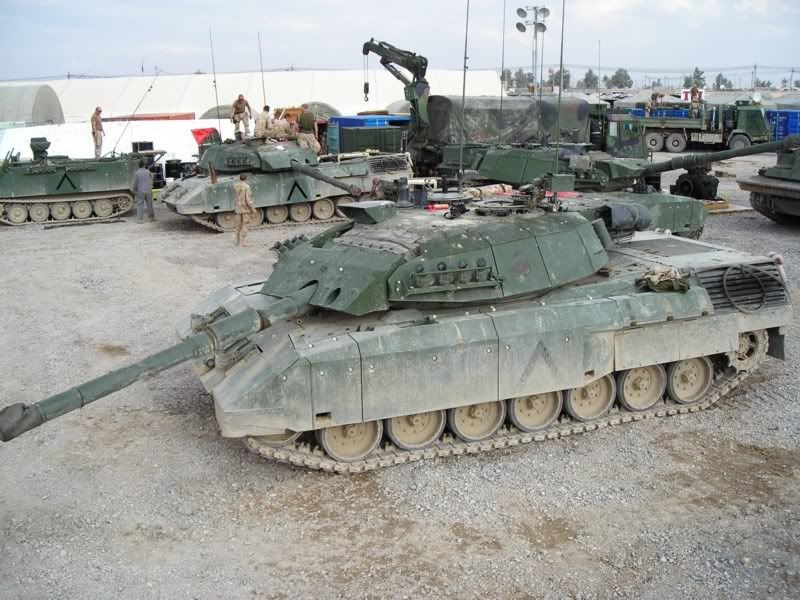
I also fount a nice picture for inspiration on Youtube:
inspirations_from_youtube.png
inspirations_from_youtube.png (414.03 KiB) Viewed 3970 times
R U Ready? :D
User avatar
ForbesHutton
Chief Warrant Officer 3
Posts: 1956
Joined: Mon Sep 02, 2013 9:10 am
Location: To,On,Ca
Scotland

Re: Attila's 1:35 Leopard C2 Mexas from Takom

Post by ForbesHutton »

Three things you should know about the kit:
-getting paint down between the turret and added armour is a pain, consider painting the turret before the armour goes on.
-when you do go to add the armour get the rear storage section on first then work forward, dry fit first, they can be a pain to get set up without gaps.
-the stand off "plugs" that go between the turret and added armour don't have any set location to go (no locator marks or holes), but can affect how the armour fits, again, try dry fitting to avoid problems.
Other than that, it's a really nice kit. Once you get into a grove the tracks aren't nearly as bad as you think and when done they are great, sadly, all the great sag is hidden behind the plates.
Image
User avatar
papatika
Master Sergeant
Master Sergeant
Posts: 382
Joined: Thu Jun 05, 2014 11:12 am
Location: Budapest, Hungary
Hungary

Re: Attila's 1:35 Leopard C2 Mexas from Takom

Post by papatika »

ForbesHutton wrote: Tue Oct 31, 2017 11:11 pm Three things you should know about the kit:
-getting paint down between the turret and added armour is a pain, consider painting the turret before the armour goes on.
-when you do go to add the armour get the rear storage section on first then work forward, dry fit first, they can be a pain to get set up without gaps.
-the stand off "plugs" that go between the turret and added armour don't have any set location to go (no locator marks or holes), but can affect how the armour fits, again, try dry fitting to avoid problems.
Other than that, it's a really nice kit. Once you get into a grove the tracks aren't nearly as bad as you think and when done they are great, sadly, all the great sag is hidden behind the plates.
Thank you m8! :cheers2:

I saw a build video on youtube from SchweinHund. He also mentioned the turret's armor (rear first, spacers), the paint of the turret, and 2 swapped pieces. SchweinHund had a kit with colored sprues, the one I got has only one color (excl. the tracks). Maybe they have fixed some of the problems, but based on the fact, that the instruction still shows the wrong piece numbers, I doubt it. :(
User avatar
papatika
Master Sergeant
Master Sergeant
Posts: 382
Joined: Thu Jun 05, 2014 11:12 am
Location: Budapest, Hungary
Hungary

Re: Attila's 1:35 Leopard C2 Mexas from Takom

Post by papatika »

Hi all,

a quick update comes here. The build phase is almost finished.
First I built the lower hull.
Image

Next was the upper hull:
Image

Then, when I was working on the turret's armor, I messed the back section up. If you compare the layout of my build with the one shown in step 21, you'll recognize, that I glued the back panel on upside down. :doh: The glue had 24 hrs to dry, no chance to remove and rotate that panel.
Image

I decided to cut the details off, and glue them back. But first I backed up the pattern onto paper.
Image

Then carefully cut the details down.
Image

Sanded the remaining chunks flat.
Image

And carefully glued them back. I didn't glued the locator pins of the cans back.
Image

Finally I put together the tracks.
Image

According to Tank Archives the Leo 1 has 84 links. I found it too loose, so I used 83 only.
Image
(return rollers are not in their place yet)

And here it is almost completed. The turret armor is not glued on yet, and a few smaller details are still missing.
Image

Next up is the paintjob. The manual calls for a mixture of Buff, Olive Green and Yellow in an unknown ratio. I think a Nato Green will be good enough.
Image

Thank you for your kind attention, I'll be back soon! ;)
User avatar
pourquoi61
Sergeant Major of the Army
Posts: 1289
Joined: Tue Feb 16, 2016 12:57 pm
Location: Ilkeston, Derbyshire
Great Britain

Re: Attila's 1:35 Leopard C2 Mexas from Takom

Post by pourquoi61 »

Looking good so far, keep up the great work. :th: :th: :th:
Image
User avatar
papatika
Master Sergeant
Master Sergeant
Posts: 382
Joined: Thu Jun 05, 2014 11:12 am
Location: Budapest, Hungary
Hungary

Re: Attila's 1:35 Leopard C2 Mexas from Takom

Post by papatika »

pourquoi61 wrote: Wed Nov 08, 2017 7:49 pm Looking good so far, keep up the great work. :th: :th: :th:
Thanks!
:cheers2:


While the 2 part epoxy dries on my Tiger, I continued to work on this kitty. I wanted to try color modulation using B&W technique.
Primed with Ultimate black...
Image

... and created the base for color modulation using AMMO's gray primer and Tamiya XF2 flat white.
Image

I even applied some mottling on the deck's gray base.
Image

After this all done I applied a few light coat of XF-67 Nato green. The B&W base shines through nicely. :)
Image

Next I painted the tracks, applied the decals, and built some figures using Maxerbox MB35131 kit.
Image
Image

And here it is waiting for a satin varnish, washes, weathering.
Image

Thank you for your kind attention!
:hi:
User avatar
Tomcat64
Brigadier General
Brigadier General
Posts: 7044
Joined: Thu Sep 22, 2016 3:24 pm
Location: Swindon, UK
England

Re: Attila's 1:35 Leopard C2 Mexas from Takom

Post by Tomcat64 »

That B&W colour modulation technique really shows nicely through the green!

This has gone together a bit quicker than the Tiger too :D
Cheers, Neil

On the Bench:
Revell 1/72 Millennium Falcon
Tamiya 1/48 P-38F/G
User avatar
papatika
Master Sergeant
Master Sergeant
Posts: 382
Joined: Thu Jun 05, 2014 11:12 am
Location: Budapest, Hungary
Hungary

Re: Attila's 1:35 Leopard C2 Mexas from Takom

Post by papatika »

Tomcat64 wrote: Mon Dec 18, 2017 3:14 pm That B&W colour modulation technique really shows nicely through the green!

This has gone together a bit quicker than the Tiger too :D
:D That's true. And still, I like the Tiger's build better.

So, 10 days left, and at least 3 of them are reserved for traveling and for the family. Not too much time remaining... :(
I finished the weathering of this tank, and now I will concentrate on the Tiger. And if there will be any leftover time, I might create a dio.

As for the weathering I used AMMO's Light Dust effect diluted with white spirit about 50:50, and sprayed the lower part. I used a 0.4 nozzle, and still it was hard to spray continuously. Spraying in small bursts was no problem, so I went on with this motion. From bottom to top in small bursts. It also created some initial streaking effect.
Image

In the desert there aren't too much of moisture, mostly the rundown marks of morning dew. To imitate it I used a wide flat brush, which was damped with white spirit, and then almost completely dried off. Still I had to be gentle, any hard stroke can remove a lot of paint, which is not what you want.
I did these effects on all the vertical, or close to vertical surfaces. Then I added some more streaks using a much thinner, pointed brush, mainly concentrating of those areas, where moisture might accumulate, like those large bolt heads.
Image

Next I mixed up AK's Dust with a touch of Humbrol's Sand pigments to have a slightly yellowish toned mixture, and applied mainly on the lower edges of the armor, then on the horizontal surfaces.
Image

Very important rule (also valid for all weathering steps): don't overdue! Keeping this in mind, I "carefully" went too far... Basically the turret's full upper section disappeared under the heavy layer of pigments. I just could not remove it with my fingers of with brushes.
Image

I was pretty much desperate at this point. Using water would probably make a bigger mess. And then I thought I give a try to masking tapes.
I cut a smaller patch, laid down carefully, and applied pressure using a brush (to spread the pressure and don't pick up too many pigments from one place).
Image

The result was great, so I kept doing it. The thicker pigment layer remained in the corners, but that's absolutely ok.
Image

I also added some pigments to the outer edge of the tracks leaving the inner area cleaner, where the rubber tires would clean the tracks. I usually paint and mask the inner lanes first, but I really like how it turned out, and will probably use this method in the future more often.
Image

And finally some micro speckling.
Image

Since I don't know yet whether I'll have time to completely finish this project, or not, here are some pictures about the tank .
Image
Image
Image
Image
Image
Image
Image

As always thank you everybody for reading my status report, asking questions, leaving comments, or just dropping in and stopping by for a few moments!

Cheers,
Attila
User avatar
ForbesHutton
Chief Warrant Officer 3
Posts: 1956
Joined: Mon Sep 02, 2013 9:10 am
Location: To,On,Ca
Scotland

Re: Attila's 1:35 Leopard C2 Mexas from Takom

Post by ForbesHutton »

There's more than a few photos of the Canada vehicles almost completely covered in the dust to the point you'd think they had been painted that colour. The crews aren't going to clean them off because 1) that would take time 2) that would take water (in short supply there) 3) it's free camo.

Image

Image
Image
User avatar
papatika
Master Sergeant
Master Sergeant
Posts: 382
Joined: Thu Jun 05, 2014 11:12 am
Location: Budapest, Hungary
Hungary

Re: Attila's 1:35 Leopard C2 Mexas from Takom

Post by papatika »

ForbesHutton wrote: Thu Dec 21, 2017 2:15 am There's more than a few photos of the Canada vehicles almost completely covered in the dust to the point you'd think they had been painted that colour. The crews aren't going to clean them off because 1) that would take time 2) that would take water (in short supply there) 3) it's free camo.
Thanks for the pictures, they rock! :pop:
User avatar
TommyKillander
Chief Warrant Officer 5
Posts: 2776
Joined: Sat Dec 27, 2014 1:59 pm
Location: Gothenburg, Sweden
Sweden

Re: Attila's 1:35 Leopard C2 Mexas from Takom

Post by TommyKillander »

Wow, I really like the effect with the pigment weathering, it looks really convincing! :th:

I'm also amazed how quick your build have moved forward :bow::

:cheers2:
Tommy
User avatar
pourquoi61
Sergeant Major of the Army
Posts: 1289
Joined: Tue Feb 16, 2016 12:57 pm
Location: Ilkeston, Derbyshire
Great Britain

Re: Attila's 1:35 Leopard C2 Mexas from Takom

Post by pourquoi61 »

Just fantastic! You must be very pleased. :bow:: :bow:: :bow::
Image
User avatar
Tomcat64
Brigadier General
Brigadier General
Posts: 7044
Joined: Thu Sep 22, 2016 3:24 pm
Location: Swindon, UK
England

Re: Attila's 1:35 Leopard C2 Mexas from Takom

Post by Tomcat64 »

Really nice work mate - the weathering looks great :clap:
Cheers, Neil

On the Bench:
Revell 1/72 Millennium Falcon
Tamiya 1/48 P-38F/G
User avatar
NorthernModeller
Command Sergeant Major
Posts: 927
Joined: Sat Jan 09, 2016 8:39 pm
Location: Preston, Lancashire, England
Contact:
England

Re: Attila's 1:35 Leopard C2 Mexas from Takom

Post by NorthernModeller »

Superb build mate :) Merry Christmas
SAMI Magazine, Model aircraft and Tamiya Model Magazine contributor
User avatar
papatika
Master Sergeant
Master Sergeant
Posts: 382
Joined: Thu Jun 05, 2014 11:12 am
Location: Budapest, Hungary
Hungary

Re: Attila's 1:35 Leopard C2 Mexas from Takom

Post by papatika »

TommyKillander wrote: Thu Dec 21, 2017 6:54 pm Wow, I really like the effect with the pigment weathering, it looks really convincing! :th:

I'm also amazed how quick your build have moved forward :bow::

:cheers2:
Tommy
Thank you, Tommy!
Usually I have 2 hrs a day to do something. Build a model, watch sport or a movie on TV, reading hobby related stuff (ex. this forum), do some coding, play games, do some ironing... Since I was on holiday, I could move faster... :D

pourquoi61 wrote: Thu Dec 21, 2017 8:41 pm Just fantastic! You must be very pleased. :bow:: :bow:: :bow::
Tomcat64 wrote: Fri Dec 22, 2017 8:06 am Really nice work mate - the weathering looks great :clap:
Thank you guys!
NorthernModeller wrote: Sun Dec 24, 2017 2:42 am Superb build mate :) Merry Christmas
Thank you, Ivan! Many happy returns to you as well! :D
User avatar
schweinhund227
Chief Warrant Officer 4
Posts: 2627
Joined: Fri May 24, 2013 9:51 pm
Location: Ontario,Canada
Contact:
Canada

Re: Attila's 1:35 Leopard C2 Mexas from Takom

Post by schweinhund227 »

Awesome work ! Gotta luv a nice filthy Leo ! Keep up the good work mate ! :cheers2:
User avatar
papatika
Master Sergeant
Master Sergeant
Posts: 382
Joined: Thu Jun 05, 2014 11:12 am
Location: Budapest, Hungary
Hungary

Re: Attila's 1:35 Leopard C2 Mexas from Takom

Post by papatika »

schweinhund227 wrote: Wed Dec 27, 2017 8:06 pm Awesome work ! Gotta luv a nice filthy Leo ! Keep up the good work mate ! :cheers2:
Thank you! I wanted to put it into a vignette, but I had no time for it at the end... :(
Probably after the GB. :)

Final reveal pictures coming soon! :D
User avatar
papatika
Master Sergeant
Master Sergeant
Posts: 382
Joined: Thu Jun 05, 2014 11:12 am
Location: Budapest, Hungary
Hungary

Re: Attila's 1:35 Leopard C2 Mexas from Takom

Post by papatika »

Update: final reveal is here! :dance:
Post Reply

Return to “Build threads”