Tomcat's Aoshima McLaren F1 GTR

Post your in progress build pictures and write ups here

Moderator: T3hGuppy

User avatar
Tomcat64
Brigadier General
Brigadier General
Posts: 7034
Joined: Thu Sep 22, 2016 3:24 pm
Location: Swindon, UK
England

Tomcat's Aoshima McLaren F1 GTR

Post by Tomcat64 »

So I'm taking the plunge and entering this GB with this:
Image

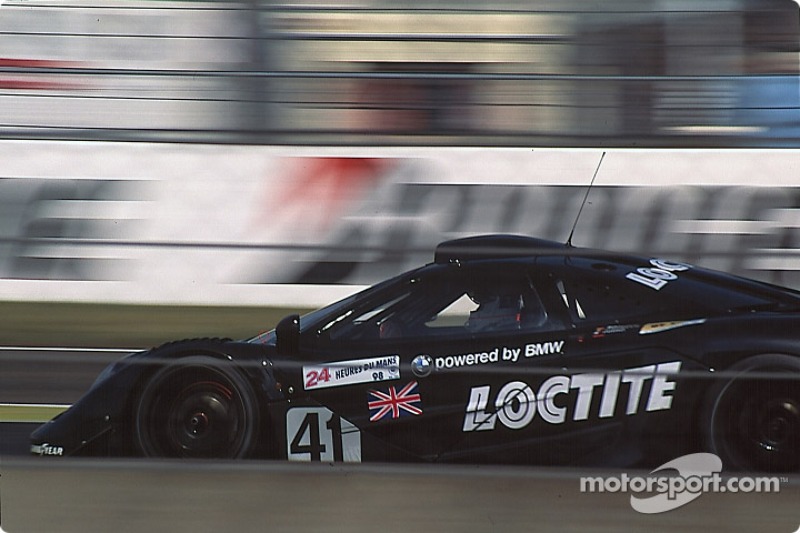
This is the car entered into the 1998 Le Mans 24 Hours race driven by Thomas Bscher, Emanuele Pirro & Rinaldo Capello. Unfortunately it failed to finish the race, but was classified in 28th place overall having completed 228 laps.

Some background on the McLaren F1 GTR courtesy of Wikipedia
The McLaren F1 GTR was a racing variant of the McLaren F1 sports car first produced in 1995 for grand touring style racing, such as the BPR Global GT Series, FIA GT Championship, JGTC, and British GT Championship. It is most famous for its overall victory at the 1995 24 Hours of Le Mans where it won against faster purpose-built prototypes. McLaren F1 GTRs raced internationally until 2005 when the final race chassis was retired.
Gordon Murray, creator of the McLaren F1, originally saw his creation as the ultimate road car, with no intention to take the car racing. Although the car used many racing technologies and designs, it was felt that the car should be a road car first, without any intent built into the creation of the car to modify it into a racing car.

However soon after the launch of the McLaren F1, the BPR Global GT Series was created. Starting in the 1994 season, the series featured racing modifications of sports cars such as the Venturi 600LM, Ferrari F40, and Porsche 911 Turbo. Viewed as a possible replacement for the defunct World Sportscar Championship, major manufacturers were taking interest in the series. At the same time, teams were also looking for faster and more capable cars for the series top class, GT1. Many teams, such as those run by Ray Bellm and Thomas Bscher, seeing the potential in the McLaren F1 road cars, turned to Gordon Murray in an attempt to convince him to offer factory backing on racing versions for the BPR series.
Finally, Murray relented and agreed to modify the F1 into a racing car, agreeing to build several chassis for competition in the 1995 season. An unused F1 chassis which was meant to become #019 was taken by McLaren and extensively modified by the company as a developmental prototype. Because of the similarity to a race car, extensive modification was not needed to actually turn the F1 into a racing car. Bodywork modification saw the addition of various cooling ducts, most noticeably a large one in the center of the nose and two placed in the location of the storage lockers on the side of the car. A large adjustable downforce wing was added to the back.Even the 1995 versions of F1 GTR generated enough downforce to run along the ceiling at 100 mph. The interior was merely stripped of all luxuries and given a full racing cage. Carbon brakes replaced the stock units. Because of the rules at the time, the BMW S70 V12 engine was required to use an air restrictor to limit horsepower to around 600 hp, actually making the racing car less powerful than the road car, yet faster and more nimble due to a lowered overall weight. Features such as the central seating position, butterfly doors, and even the stock gearbox were retained. McLaren co-ordinated a 24-hour test at Magny-Cours to find weaknesses in the car and develop upgrades to supply to the teams.

A total of nine chassis would be built for the 1995 season, with #01R being retained by the factory as a test mule, except for a one-off use by Kokusai Kaihatsu Racing at the 24 Hours of Le Mans. British team GTC Racing received two F1 GTRs, with a third being used to replace a destroyed car. David Price Racing, BBA Competition, Mach One Racing, and Giroix Racing Team would all receive one chassis each, while the final chassis, #09R, was sold to Hassanal Bolkiah, the Sultan of Brunei, for his car collection.

At Le Mans 1995, the Kokusai Kaihatsu McLaren obtained victory and the highest practice top speed of the year, reaching 281 km/h (174.605 MPH) on the Mulsanne Straight.

Following the success of the 1995 season, McLaren set forth to upgrade the car to remain competitive, especially against the threat of newer sports cars appearing such as the Ferrari F50 GT (which was withdrawn quickly enough) and Porsche 911 GT1. They were assisted by BMW Motorsport, who at the time decided to use their connection to McLaren to enter sports car racing by running their own race team with F1 GTRs. Among the modifications were an extension of the front and rear bodywork, including a larger splitter attached to the front of the car. The bodywork was also modified to allow it to be removed more quickly for easier repair. The car's normally stock gearbox was modified to include a lighter magnesium housing and more robust mechanicals. These modifications allowed for the weight of the GTR to be lowered by 38 kg. Due to demand, nine more new GTRs were built, while two older GTRs (#03R and #06R) were also modified to the 1996-spec. Although slower on an entire lap than the 1997 long-tail version due to the significantly lower downforce (the 1997 model relied on high-speed cornering much like prototypes of the 2000s), the F1 GTR of 1996 was the fastest variant in terms of straight line speed - the car hit 330 km/h on the Mulsanne Straight at Le Mans in 1996, which is 13 km/h faster than the 1997 long-tail F1 GTR and even 6 km/h faster than the 1996 Porsche GT1.

1997

With the BPR Global GT Series reformed into the FIA GT Championship in 1997, rules regarding the cars used in the premier GT1 class were altered. Homologation specials like the Porsche 911 GT1 had already proven their worth in the final races of 1996, while newcomer Mercedes-Benz was showing the potential of their new CLK-GTR in testing. McLaren was therefore forced to give the F1 extensive modification in order to be able to compete against cars which had been meant as race cars first, and not road cars like the F1.

First and foremost, the F1 required extensive modification to its bodywork in order to gain as much aerodynamic downforce as possible. Although it retained the same carbon fibre monocoque as the road car, the entire exterior of the car was purpose built. A much longer nose and tail, as well as a wider rear wing, were designed in order to maximize the amount of aerodynamic downforce, while the wheel arches were widened in order to allow for the maximum amount of grip from the tyres allowed by the rules. Ground clearance was also changed to 70 millimetres (2.76 in) front and rear, rather than the 60 millimetres (2.36 in) front and 80 millimetres (3.15 in) rear clearance of the 1996-spec car.

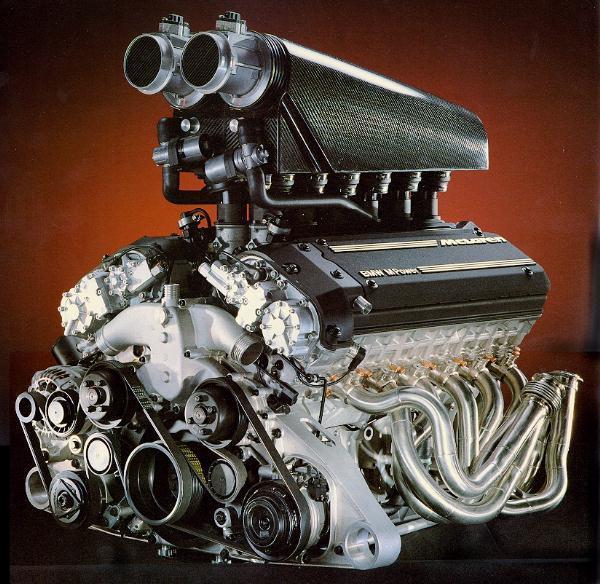
The engine also saw extensive modification, with a stroke reduction bringing the BMW S70 V12 down to 5,990 cubic centimetres (366 cu in) in an attempt to prolong the life of the engines, while still maintaining the air restrictor-controlled 600 brake horsepower (447 kW). The stock gearbox was replaced with a new X-trac 6-speed sequential transmission.

A total of ten more GTRs were built, with none of the previous cars being upgraded to the 1997-spec. In order to be allowed to construct cars that were so radically different from the F1 road car, McLaren was forced to build production cars using the GTR '97's bodywork. These cars became known as the F1 GT, of which only three were built. The 1997-spec cars are commonly referred to as the "Long Tail" version due to their stretched bodywork, most noticeably in the rear.

At Le Mans 1997, the car reached 317 kilometres per hour (196.97 mph) on the Mulsanne straight. This was still slightly slower than some of the field, including the Porsche 911 GT1 Evo - 326 kilometres per hour (202.57 mph), Nissan R390 GT1 - 319 kilometres per hour (198.22 mph), TWR Porsche Joest LMP - 320 kilometres per hour (198.84 mph).
24 Hours of Le Mans

Although officially not part of any one racing series, the 24 Hours of Le Mans was still considered important enough for McLaren to enter. Competing at Le Mans meant racing against many of their normal GT1 competitors from various series, as well as some unique cars which ran Le Mans only. McLaren first ran Le Mans in 1995, with all seven chassis built at the time being entered. Although only six cars were being used in the BPR Global GT Series, chassis #01R which had been used as a McLaren testbed was also entered for the Kokusai Kaihatsu Racing team.
Prior to the race, it was assumed that one of the competitors in the WSC class of Le Mans Prototype would easily take the win, since they were custom built racing cars with no relation to street cars like GT1 cars. However, during the race, various WSC cars succumbed to technical difficulties and dropped well down in the standings, while the GT1 class cars continued on without difficulty. In the closing hours of the race, five McLaren F1 GTRs were still racing while only three WSC cars remained. A close battle in the final hours saw the Kokusai Kaihatsu McLaren competing against the Courage Compétition prototype, with the McLaren finally taking the overall win in one of the shortest distances covered since the 1950s. Other McLarens finished 3rd, 4th, 5th, and 13th overall, with only two F1 GTRs failing to finish. In honor of McLaren's achievement, the company created the five special F1 LMs for customers to mark the five finishers. The winning car, which was driven by Yannick Dalmas, Masanori Sekiya, and JJ Lehto, was retained by McLaren and never raced again.

Returning in 1996, competition from the Le Mans Prototypes was stiffer as Porsche had a factory team in the class. GT1 class itself was also more competitive, again with Porsche having a factory team with their new 911 GT1s. McLaren had seven entries again, but were unable to repeat on their success, although they were only beaten by the two new 911 GT1s and the overall winning Porsche LMP. Six of the seven McLarens finished, taking the 4th, 5th, 6th, 8th, 9th, and 11th places.

With the upgraded 1997-spec cars, McLaren returned with six entries the following year. Now facing not only Porsche, but also Lister, Panoz, and Nissan, the McLarens again performed well. Only two entries managed to finish, taking 2nd and 3rd behind the repeat winner, the Porsche LMP. In 1998, only two McLaren F1 GTRs were entered, both by privateer teams, with only one car managing a fourth place.
The following year, the GT1 class was abandoned and the McLarens no longer eligible. However, in an ACO sanctioned event in Japan in 1999, a McLaren F1 GTR was entered by Hitotsuyama Racing in the new LMGTP class for closed-cockpit prototypes. Had the McLaren won its class, it would have earned an automatic entry to Le Mans as a prototype in 2000, however the car failed to finish.

Here's a couple of shots of this car before it failed at Le Mans in 1998
Image

Image
Last edited by Tomcat64 on Fri Feb 02, 2018 5:20 pm, edited 1 time in total.
Cheers, Neil

On the Bench:
Tamiya 1/35 PzKpfwIB
Tamiya 1/35 Willys Jeep
Revell 1/72 Millennium Falcon
User avatar
Tomcat64
Brigadier General
Brigadier General
Posts: 7034
Joined: Thu Sep 22, 2016 3:24 pm
Location: Swindon, UK
England

Re: Tomcat's Aoshima McLaren F1 GTR

Post by Tomcat64 »

Onto the kit itself and the sprue layout is shown on the back of the instructions
Image

And here they are in the plastic
Image

Image

Image

Image

Image

Image

Image

Image

The Cartograph decals
Image

And a few pages from the instruction booklet
Image

Image

On a personal note, a couple of you know that in a previous life I was an incident marshal in the UK for a number of years and aside from the "glamour" of the Formula One events GT and prototype racing was definitely the most enjoyable in terms of sheer variety of exotic machinery being pushed to the limit. As well as the McLarens there were Lister Storms, Chrysler (or Dodge) Vipers, Ferraris, Venturis and a host of other stunning looking cars involved and being posted on the outside of the first corner as a grid of 30 or so cars came thundering towards us was somethign I'll never forget!

Edit: Here's a photo provided by a friend showing me ignoring something suitably GT shaped (I think its a Lambo but stand to be corrected) going through Vale/Club at Silverstone in 2011
Image

This is the first car kit I've tackled since I was a teenager so I am most definitely stepping outside my comfort zone!
Last edited by Tomcat64 on Tue Feb 06, 2018 11:21 am, edited 1 time in total.
Cheers, Neil

On the Bench:
Tamiya 1/35 PzKpfwIB
Tamiya 1/35 Willys Jeep
Revell 1/72 Millennium Falcon
User avatar
DrSprue
Warrant Officer
Warrant Officer
Posts: 1497
Joined: Wed Apr 26, 2017 3:24 am
United States of America

Re: Tomcat's Aoshima McLaren F1 GTR

Post by DrSprue »

OOOOO Yea!! Wow what an awesome machine!!!
Well buddy your sprue layout and history is just awesome. Aoshima has cartograph decals too!...
I did not know that, cool.
Sign me up for a few buckets of popcorn please!! :pop: :pop: This is going to be alot of fun!!
-Doc
On the bench:
User avatar
Twokidsnosleep
General
General
Posts: 18019
Joined: Thu Aug 07, 2014 4:07 pm
Location: BC,Canada
Canada

Re: Tomcat's Aoshima McLaren F1 GTR

Post by Twokidsnosleep »

Oooo a BEEEEMer!!! well a beemer heart anyhows
I am almost front row :pop:
Scott

On, Under or Near the Bench:
American Graffiti Ford Coupe
Headless Horseman...figure sig
1/72 Black Pearl Pirate Ship
User avatar
DrSprue
Warrant Officer
Warrant Officer
Posts: 1497
Joined: Wed Apr 26, 2017 3:24 am
United States of America

Re: Tomcat's Aoshima McLaren F1 GTR

Post by DrSprue »

Twokidsnosleep wrote: Fri Feb 02, 2018 6:03 pm Oooo a BEEEEMer!!! well a beemer heart anyhows
I am almost front row :pop:
yea, I had to write this really fast... I knew your always close by! :eeek: Now I can go back and read Neils history a bit closer than what I did. Geezzz your so fast Scott! I was gonna say 1st, but Im not that cruel! :lol: (I hate that with peeps on youtube viewers!) :bash:

Same here Neil with not doing an Auto for a long time, but Im sure you'll kill this plastic beast. I will be so interested though with the color. Are you going to make this a cool glossy dark color like this loctite monster? The v12 engine looks cool. (I did find 2 errors tho in this kit... its got only one seat and two steering wheels.. (sry, I count resist that. :nena: ) )
-Doc
On the bench:
OlaHansson
Staff Sergeant
Staff Sergeant
Posts: 166
Joined: Wed Mar 01, 2017 6:38 pm
Location: Sweden
Contact:
Sweden

Re: Tomcat's Aoshima McLaren F1 GTR

Post by OlaHansson »

That looks great!
Tay99
Master Sergeant
Master Sergeant
Posts: 442
Joined: Wed Nov 25, 2015 8:46 pm
Location: South west uk
Turkmenistan

Re: Tomcat's Aoshima McLaren F1 GTR

Post by Tay99 »

Great kit.
I am building the fujimi version, I have one of these in the stash a least this kit has a proper engine the fujimi one has just the
In take and exhaust.

Just noticed you live just up the road from me I am just outside Chippenham.
:hi:
User avatar
Tomcat64
Brigadier General
Brigadier General
Posts: 7034
Joined: Thu Sep 22, 2016 3:24 pm
Location: Swindon, UK
England

Re: Tomcat's Aoshima McLaren F1 GTR

Post by Tomcat64 »

Twokidsnosleep wrote: Fri Feb 02, 2018 6:03 pm Oooo a BEEEEMer!!! well a beemer heart anyhows
I am almost front row :pop:
And there was me thinking I was building a Macca! :) Yep Tony beat you to the front on this one, but glad to have you around as I think I'm going to need some help with this one for sure!
DrSprue wrote: Fri Feb 02, 2018 6:26 pm Same here Neil with not doing an Auto for a long time, but Im sure you'll kill this plastic beast. I will be so interested though with the color. Are you going to make this a cool glossy dark color like this loctite monster? The v12 engine looks cool. (I did find 2 errors tho in this kit... its got only one seat and two steering wheels.. (sry, I count resist that. :nena: ) )
Good to have you along for the ride again Tony; I'm planning on sticking to the shiny black finish - actually toying with the idea of using Ultimate Glossy Black primer as the finished colour but will do some experimenting with spoons later.

Yep those Brits are crazy - two steering wheels and the seat's in the middle!
OlaHansson wrote: Fri Feb 02, 2018 10:40 pm That looks great!
Thanks mate - hope I can get it together without too much of a mess!
Tay99 wrote: Fri Feb 02, 2018 11:01 pm Great kit.
I am building the fujimi version, I have one of these in the stash a least this kit has a proper engine the fujimi one has just the
In take and exhaust.

Just noticed you live just up the road from me I am just outside Chippenham.
Thanks Tay - yep I've been watching yours with interest (got some catching up to do) and you've definitely got the more challenging paint job!

Which side of Chippenham are you? Do you manage to get over to Castle Combe at all?
Cheers, Neil

On the Bench:
Tamiya 1/35 PzKpfwIB
Tamiya 1/35 Willys Jeep
Revell 1/72 Millennium Falcon
User avatar
Tomcat64
Brigadier General
Brigadier General
Posts: 7034
Joined: Thu Sep 22, 2016 3:24 pm
Location: Swindon, UK
England

Tomcat's Aoshima McLaren F1 GTR - Build Part 1

Post by Tomcat64 »

Ok - time to get this one under way. There's been a lot of head scratching on this as to the best way to approach painting the components so I think it'll be like that all the way through with short bursts of actually building things interspersed with more pondering of the instructions.

Anyway stop waffling Tomcat - here's stage one, the front suspension. The main colour for the interior and underside is a 1:1 mix of Vallejo Model Air metallic black and Medium Sea Grey (the closest grey I had in model air to the Neutral grey called for in the instructions). The details on the suspension have been picked out in Vallejo Game Colour extra opaque red & blue - I wouldn't want to do large areas with these, but they're great for picking out details with a brush. The gold on the suspension arms is Citadel.
Image

Stage two was the front brake assemblies - nothing scary here, and added the decals refered to later in the instructions. The discs are a 1:1 mix of metalic black and field grey; the calipers are neutral grey (model colour) and the brighter bits are model air steel.
Image

I skipped stage three as that's the front wheels and I'll be doing the wheels later as I know I'll have problems with damaging them if I add them now as there's still a lot of handling to do with the chassis.

So onto Stages four and five, adding the front suspension and brakes to the floor; and then adding the radiators. These were painted in Model Air steel, and then washed with a black clay wash to give the grilles some depth - I know most of this won't be visible when it's finished but it's all good practice.
Image

Stage six is the initial build of the engine block. One thing I have found with this is that some of the plastic doesn't seem to take Tamiya Extra Thin too well, so I'm using small doses of the regular (white top) Tamiya glue.
Image

Flipping over the page we finish the engine off. The instructions call out for anything metallic to be silver which seems a bit odd to me, so as with the earlier stages I'm using Model Air Steel over Ultimate black primer. The cylinder heads are the black/sea grey mix and have the decals added.

I found a reference photo on the internet for how the engine looks
Image

And used that as a guide to the various components on the front - again most of this will be hidden when installed, but here's how it turned out
Image

The sharp-eyed may have noticed that the exhaust system is missing at this stage; this is because the parts are moulded in something shiny grey, and also have some seam lines to deal with. So I have some work to do on these before attaching them.
Image

That's all for this time, hopefully next up will be the addition of the exhaust system and adding the engine and gearbox to the floor.

Thanks for looking.
Cheers, Neil

On the Bench:
Tamiya 1/35 PzKpfwIB
Tamiya 1/35 Willys Jeep
Revell 1/72 Millennium Falcon
User avatar
Stokesy44
Major General
Major General
Posts: 8217
Joined: Thu Jun 18, 2015 10:13 am
Location: The Midlands, UK
Great Britain

Re: Tomcat's Aoshima McLaren F1 GTR

Post by Stokesy44 »

Wow that looks amazing!

And you look like a serious Badass in your marshalling getup too! 8-)
Its been tried and tested, it works! So don't blame the system if you're no good. :doh:
stellamonster
Corporal
Corporal
Posts: 99
Joined: Wed Jan 15, 2014 12:47 pm
Location: West Lothian, Near Edinburgh
Scotland

Re: Tomcat's Aoshima McLaren F1 GTR

Post by stellamonster »

Great review mate and I'm going to enjoy this build!!
Always apologies to the wife.....sorry love.....sorry ....sorry

ON THE BENCH.
Tamiya YZR M1 Valencia edition 2005
Tamiya Mercedes CLK GTR
Unfortunately no whiskey
User avatar
DrSprue
Warrant Officer
Warrant Officer
Posts: 1497
Joined: Wed Apr 26, 2017 3:24 am
United States of America

Re: Tomcat's Aoshima McLaren F1 GTR

Post by DrSprue »

Oh that engine looks great! Wow. To think about it the design of that V12 is amazing as well. Its looking really great bud. Funny.. white top Tamy, hmm... wonder why the classic tet wont grab it. :thumb2:
-Doc
On the bench:
User avatar
Twokidsnosleep
General
General
Posts: 18019
Joined: Thu Aug 07, 2014 4:07 pm
Location: BC,Canada
Canada

Re: Tomcat's Aoshima McLaren F1 GTR

Post by Twokidsnosleep »

The BMW engine looks awesome :thumb2:
Cool pic of you...I would have been hiding below that guard rail or running the other way!!!
Scott

On, Under or Near the Bench:
American Graffiti Ford Coupe
Headless Horseman...figure sig
1/72 Black Pearl Pirate Ship
User avatar
Stokesy44
Major General
Major General
Posts: 8217
Joined: Thu Jun 18, 2015 10:13 am
Location: The Midlands, UK
Great Britain

Re: Tomcat's Aoshima McLaren F1 GTR

Post by Stokesy44 »

Twokidsnosleep wrote: Tue Feb 06, 2018 4:08 pm The BMW engine looks awesome :thumb2:
Cool pic of you...I would have been hiding below that guard rail or running the other way!!!
Don’t you think he looks like a boss? The TC owns the place! 8-)

It’s no illusion either. I’ve MET the guy :shifty:
Last edited by Stokesy44 on Tue Feb 06, 2018 4:43 pm, edited 1 time in total.
Its been tried and tested, it works! So don't blame the system if you're no good. :doh:
User avatar
Tomcat64
Brigadier General
Brigadier General
Posts: 7034
Joined: Thu Sep 22, 2016 3:24 pm
Location: Swindon, UK
England

Re: Tomcat's Aoshima McLaren F1 GTR

Post by Tomcat64 »

Stokesy44 wrote: Tue Feb 06, 2018 12:29 pm Wow that looks amazing!

And you look like a serious Badass in your marshalling getup too! 8-)
Thanks mate! This is definitely more daunting than dealing with the real thing!
stellamonster wrote: Tue Feb 06, 2018 1:45 pm Great review mate and I'm going to enjoy this build!!
Thanks Daz - good to have you along!
DrSprue wrote: Tue Feb 06, 2018 3:10 pm Oh that engine looks great! Wow. To think about it the design of that V12 is amazing as well. Its looking really great bud. Funny.. white top Tamy, hmm... wonder why the classic tet wont grab it. :thumb2:
Thanks Tony! Ref the TET it just seemed to evaporate before biting into the plastic so I decided to go with something that hung around a bit longer.
Twokidsnosleep wrote: Tue Feb 06, 2018 4:08 pm The BMW engine looks awesome :thumb2:
Cool pic of you...I would have been hiding below that guard rail or running the other way!!!
Thanks Scott!

Trust me running away played a big part of events if anything came thundering in at a less than optimal trajectory!
Image
Cheers, Neil

On the Bench:
Tamiya 1/35 PzKpfwIB
Tamiya 1/35 Willys Jeep
Revell 1/72 Millennium Falcon
Tay99
Master Sergeant
Master Sergeant
Posts: 442
Joined: Wed Nov 25, 2015 8:46 pm
Location: South west uk
Turkmenistan

Re: Tomcat's Aoshima McLaren F1 GTR

Post by Tay99 »

Great looking engine, this kit is a lot more detailed than the fujimi.
I forgot I a had a book on the mclaren gtr some really great photos I will post some later.

I've been to castle Combe a few times my farther in law used to comontate there, can hear the cars from the back garden.
:hi:
User avatar
Twokidsnosleep
General
General
Posts: 18019
Joined: Thu Aug 07, 2014 4:07 pm
Location: BC,Canada
Canada

Re: Tomcat's Aoshima McLaren F1 GTR

Post by Twokidsnosleep »

OOOoo perfect Python meme, well played, well played :clap: :bow::
Scott

On, Under or Near the Bench:
American Graffiti Ford Coupe
Headless Horseman...figure sig
1/72 Black Pearl Pirate Ship
Tay99
Master Sergeant
Master Sergeant
Posts: 442
Joined: Wed Nov 25, 2015 8:46 pm
Location: South west uk
Turkmenistan

Re: Tomcat's Aoshima McLaren F1 GTR

Post by Tay99 »

Completely forgot I had this book, been looking on line for ref pics :wall:

These are just a few if you need any other just ask and I'll see what I can find.

Image

Image

Image

Image

I think the different race teams changed the rear exhaust box because as you can see there are differences.
Or the first one could be from a short tail.

Hope this helps with your build.
:hi:
User avatar
Tomcat64
Brigadier General
Brigadier General
Posts: 7034
Joined: Thu Sep 22, 2016 3:24 pm
Location: Swindon, UK
England

Re: Tomcat's Aoshima McLaren F1 GTR

Post by Tomcat64 »

Great looking book! Thanks Tay.

I've had a quick look at my instructions and that rear exhaust box isn't included, the exhaust is straight through. That's not a real surprise as most race cars tended to avoid anything that slowed down the escaping gases if they had free rein and no noise restrictions; I could be wrong but my guess is that it's variations on the road cars exhaust that we're looking at as they'd probably need some kind of silencing in place to make them legal.

We used to be regulars at Combe over the years but haven't been for the last couple so need to get back up there again - always great racing.
Cheers, Neil

On the Bench:
Tamiya 1/35 PzKpfwIB
Tamiya 1/35 Willys Jeep
Revell 1/72 Millennium Falcon
User avatar
demarcation
Command Sergeant Major
Posts: 960
Joined: Wed May 13, 2015 11:34 pm
Location: Denmark
Denmark

Re: Tomcat's Aoshima McLaren F1 GTR

Post by demarcation »

Cool build :th: :pop: A real beauty! My mate got the GTR as an RC car, large scale 1:8 or 1:10.
:cheers2:

//Anders
User avatar
pourquoi61
Sergeant Major of the Army
Posts: 1289
Joined: Tue Feb 16, 2016 12:57 pm
Location: Ilkeston, Derbyshire
Great Britain

Re: Tomcat's Aoshima McLaren F1 GTR

Post by pourquoi61 »

Very nice looking kit and great work so far. :th:
Image
User avatar
Tomcat64
Brigadier General
Brigadier General
Posts: 7034
Joined: Thu Sep 22, 2016 3:24 pm
Location: Swindon, UK
England

Re: Tomcat's Aoshima McLaren F1 GTR

Post by Tomcat64 »

demarcation wrote: Wed Feb 07, 2018 3:11 pm Cool build :th: :pop: A real beauty! My mate got the GTR as an RC car, large scale 1:8 or 1:10.
pourquoi61 wrote: Wed Feb 07, 2018 5:57 pm Very nice looking kit and great work so far. :th:
Thanks guys!

Just a quick update this evening as I've been playing with the exhaust system. I used Tay's idea of mixing silver & gold (thanks for the tip mate) and also misted an additional coat of gold over it when dry to try and just give a bit more tonal variation.

I think I probably overdid it slightly but here's how it looks now before I have to bury it in the chassis.
Image
Cheers, Neil

On the Bench:
Tamiya 1/35 PzKpfwIB
Tamiya 1/35 Willys Jeep
Revell 1/72 Millennium Falcon
User avatar
DrSprue
Warrant Officer
Warrant Officer
Posts: 1497
Joined: Wed Apr 26, 2017 3:24 am
United States of America

Re: Tomcat's Aoshima McLaren F1 GTR

Post by DrSprue »

I thought you are making a 1/24th scale kit Neil... not a 1:1???? :lol:
-Doc
On the bench:
Tay99
Master Sergeant
Master Sergeant
Posts: 442
Joined: Wed Nov 25, 2015 8:46 pm
Location: South west uk
Turkmenistan

Re: Tomcat's Aoshima McLaren F1 GTR

Post by Tay99 »

Great building and painting :thumb2:
:hi:
User avatar
gaz45
Chief Warrant Officer 3
Posts: 1971
Joined: Mon Jan 06, 2014 3:35 pm
Location: Nottingham uk
Great Britain

Re: Tomcat's Aoshima McLaren F1 GTR

Post by gaz45 »

Great work on the engine mate
User avatar
Tomcat64
Brigadier General
Brigadier General
Posts: 7034
Joined: Thu Sep 22, 2016 3:24 pm
Location: Swindon, UK
England

Tomcat's Aoshima McLaren F1 GTR - Build Part 2

Post by Tomcat64 »

DrSprue wrote: Wed Feb 07, 2018 8:10 pm I thought you are making a 1/24th scale kit Neil... not a 1:1???? :lol:
Tay99 wrote: Wed Feb 07, 2018 8:27 pm Great building and painting :thumb2:
gaz45 wrote: Fri Feb 09, 2018 3:16 pm Great work on the engine mate
Thanks guys :cheers2:

Progress on this has been slow & steady as I try and figure out what I'm doing!

Next up in the instructions was burying the engine into the bay, so with one last lingering look at the detail I'd picked out on the front of the engine it was hidden away forever. It was a tight fit, but went in without too much pushing and shoving and as you can see I've picked out the moulded suspension arms in Citadel gold.
Image

Then it was onto the assembly of the gearbox which was straightforward enough
Image

However the instructions did imply that getting it into the bay on the back of the engine might be a challenge and that was definitely the case. There was much fiddling and twisting and minor swearage to get it all in place but it's now settled in snugly.
Image

Adding the wheel/damper parts proved slightly more challenging than the instructions may have hinted, until I realised the top end of the dampers needed to sit inside the engine bay
Image

The only hint towards this is by looking closely at the next step in the instructions. However even with that knowledge there was some manipulation required to get everything where it needed to be.
Image

It was then a case of adding the rear bay to the floor pan - which went without a problem although I did resort to a couple of dabs of CA to get the wheels to stay put in the suspension arms
Image

The instructions then call for adding the brake assemblies and wheels, so I added the brakes but skipped the wheels for now. Then it was onto finishing up the engine by adding the exhaust pipes and what I assume is the injector assembly. I couldn't get the joints sorted on the exhaust system so I may come back and fill these when I see how much will be visible when the body shell is in place. I've dribbled some extra CA in there for now to see if that helps disguise the joins.
Image

Then it was time to finish up the rear bay by adding the side beams and reinforcing struts. A couple of notes here in that there is a notch on the beams which is intended to accept the locating lugs on top of the dampers mentioned earlier, and although the positioning of the struts is a little vague on the instructions it's important to add the beams first as the struts connect with them
Image

So that's the rear bay done, next up will be the cockpit so I took the opportunity of dry fitting the tub to see how it all looks now.
Image

My intention was to build this completely out of the box, but checking ahead reveals that there is no harness included for the seat so I may do a little looking around to see if I can find a set as I think it'll look a little lacking without the belts.

That's all for now - thanks as always for looking!
Cheers, Neil

On the Bench:
Tamiya 1/35 PzKpfwIB
Tamiya 1/35 Willys Jeep
Revell 1/72 Millennium Falcon
User avatar
DrSprue
Warrant Officer
Warrant Officer
Posts: 1497
Joined: Wed Apr 26, 2017 3:24 am
United States of America

Re: Tomcat's Aoshima McLaren F1 GTR

Post by DrSprue »

Awesome detail! Maybe some close work on some thin Tamiya masking tape and some kind of links would do OK for that car. Do they have PE seat-belt for these cars? I think adding this in would still be OOB with just a small improvement. Especially being that Aoshima forgot obvious detail.
-Doc
On the bench:
User avatar
Tomcat64
Brigadier General
Brigadier General
Posts: 7034
Joined: Thu Sep 22, 2016 3:24 pm
Location: Swindon, UK
England

Re: Tomcat's Aoshima McLaren F1 GTR

Post by Tomcat64 »

DrSprue wrote: Mon Feb 12, 2018 2:28 pm Awesome detail! Maybe some close work on some thin Tamiya masking tape and some kind of links would do OK for that car. Do they have PE seat-belt for these cars? I think adding this in would still be OOB with just a small improvement. Especially being that Aoshima forgot obvious detail.
Thanks Tony and apologies - I thought I'd already replied to you on this :oops:

I decided to go for it and have ordered up a 6-point harness for this, which will hopefully be here in the next few days.

Also big thanks to Tay99 for checking his book for cockpit details for me when I started this section.

So whilst waiting for the harness to turn up I pretty much finished the cockpit, with the first section adding the gear-stick and switch panel (I think) to the main tub. As with the previous sections the parts have been painted up first with decals where appropriate. Painting again has been done mainly with Vallejo ModelAir for large sections with details picked out in Model Colour, Citadel (gold) and Tamiya (semi-gloss black).
Image

Then the pedals and footplate - nothing too taxing here
Image

The dash and steering assembly was next. Unfortunately I managed to sand off the locating lug at the top of the steering column as I thought it was flash :wall: Nothing a dab of CA couldn't solve
Image

Flipping the page on the instructions we add the completed dash and seat next; the seat requires a largish carbon fibre decal on the back and this is still settling with some Solvaset at this point so I just added the dash and rear support. The gap where the dash joins the tub at the upper left of this photo has since received a little corrective attention.
Image

Next up the inner roll bar, fire extinguisher and some sort of small pipe thingy - the seat is now dry fitted
Image

Then the main roll cage goes one, because I'm leaving the seat dry fitted until the harness arrives I've also just dry fitted the cage in case I need to remove them both for access when fitting the belts. But here's how it looks
Image

And then with everything fitted to the floor, again the cockpit is just dry fitted to allow for ease of fiddling. The front cover is glued in place now, but the front splitter still needs to be finished.
Image

Here's how it all looks in place
Image

Leaving aside the fitting of the harness and final installation of the seat and roll-cage it's onto the body work next and I can't help but feel the hardest part is still ahead! I'm away for work this coming week so won't get chance to progress it until I'm back but hopefully the belts will be waiting for me on my return and I can also start experimenting with gloss black and top coats on spoons...

Thanks as always for looking!
Cheers, Neil

On the Bench:
Tamiya 1/35 PzKpfwIB
Tamiya 1/35 Willys Jeep
Revell 1/72 Millennium Falcon
User avatar
DrSprue
Warrant Officer
Warrant Officer
Posts: 1497
Joined: Wed Apr 26, 2017 3:24 am
United States of America

Re: Tomcat's Aoshima McLaren F1 GTR

Post by DrSprue »

Oh man that interior looks just great! and the detail with the knobs and stuff.. awesome Neil! :thumb2:
-Doc
On the bench:
User avatar
Tomcat64
Brigadier General
Brigadier General
Posts: 7034
Joined: Thu Sep 22, 2016 3:24 pm
Location: Swindon, UK
England

Re: Tomcat's Aoshima McLaren F1 GTR

Post by Tomcat64 »

DrSprue wrote: Sun Feb 18, 2018 4:11 pm Oh man that interior looks just great! and the detail with the knobs and stuff.. awesome Neil! :thumb2:
Thanks Tony :cheers2:
Cheers, Neil

On the Bench:
Tamiya 1/35 PzKpfwIB
Tamiya 1/35 Willys Jeep
Revell 1/72 Millennium Falcon
Tay99
Master Sergeant
Master Sergeant
Posts: 442
Joined: Wed Nov 25, 2015 8:46 pm
Location: South west uk
Turkmenistan

Re: Tomcat's Aoshima McLaren F1 GTR

Post by Tay99 »

Great job mate keep it going looking good👏
:hi:
User avatar
gaz45
Chief Warrant Officer 3
Posts: 1971
Joined: Mon Jan 06, 2014 3:35 pm
Location: Nottingham uk
Great Britain

Re: Tomcat's Aoshima McLaren F1 GTR

Post by gaz45 »

Awesome work there mate
User avatar
Tomcat64
Brigadier General
Brigadier General
Posts: 7034
Joined: Thu Sep 22, 2016 3:24 pm
Location: Swindon, UK
England

Tomcat's Aoshima McLaren F1 GTR - Build Part 4

Post by Tomcat64 »

Tay99 wrote: Sun Feb 18, 2018 4:19 pm Great job mate keep it going looking good👏
gaz45 wrote: Tue Feb 20, 2018 10:54 am Awesome work there mate
Thanks guys :cheers2:

Quick update for this weekend as the harness turned up while I was away this week.

This is how the instructions looked alongside the PE frets; I didn't realise when I bought them but Eduard included two identical frets so I've got another harness for my next car...
Image

And a close up of the frets - they're coloured on both sides with the backs being slightly darker than the front. The blue belts I've seen used in the actual car were generally Willans rather than Sabelt, but I could only find Sabelt replicas so that's what we're going with.
Image

Aside from the general fiddliness of small PE parts, they went together pretty well in a couple of hours with strategic dabs of PE... I only lost one of the mounting brackets to the carpet monster but since that was going to be hidden away under the seat I wasn't too worried about it in this case
Image

Some more fiddling and PE saw them fitted to the seat. I couldn't find a decent reference for the rear (shoulder) mounting points so took a little poetic license to bury them behind the tub
Image

Hopefully it'll look ok when the body shell is in place
Image

And then it was a case of permanently attaching the tub onto the floor and fixing the roll cage in place
Image

Aside from painting up some plastic spoons to experiment with gloss black that's it for this update. I'm happy with the way the belts have gone in and added enough to the detail for me to finish the kit with one of the doors swung open.

Thanks as always for looking!
Cheers, Neil

On the Bench:
Tamiya 1/35 PzKpfwIB
Tamiya 1/35 Willys Jeep
Revell 1/72 Millennium Falcon
OlaHansson
Staff Sergeant
Staff Sergeant
Posts: 166
Joined: Wed Mar 01, 2017 6:38 pm
Location: Sweden
Contact:
Sweden

Re: Tomcat's Aoshima McLaren F1 GTR

Post by OlaHansson »

That looks really great!
User avatar
DrSprue
Warrant Officer
Warrant Officer
Posts: 1497
Joined: Wed Apr 26, 2017 3:24 am
United States of America

Re: Tomcat's Aoshima McLaren F1 GTR

Post by DrSprue »

Really cool belts Neil! :thumb2:
-Doc
On the bench:
User avatar
Tomcat64
Brigadier General
Brigadier General
Posts: 7034
Joined: Thu Sep 22, 2016 3:24 pm
Location: Swindon, UK
England

Re: Tomcat's Aoshima McLaren F1 GTR

Post by Tomcat64 »

OlaHansson wrote: Sun Feb 25, 2018 5:08 pm That looks really great!
DrSprue wrote: Sun Feb 25, 2018 6:12 pm Really cool belts Neil! :thumb2:
Thanks guys :cheers2:
Cheers, Neil

On the Bench:
Tamiya 1/35 PzKpfwIB
Tamiya 1/35 Willys Jeep
Revell 1/72 Millennium Falcon
User avatar
Tomcat64
Brigadier General
Brigadier General
Posts: 7034
Joined: Thu Sep 22, 2016 3:24 pm
Location: Swindon, UK
England

Tomcat's Aoshima McLaren F1 GTR - Build Part 5

Post by Tomcat64 »

I made a start on the main body last week; so this is where me and the instructions part company

Firstly I clipped all the spacers etc from the body and cleaned everything up.
Image

Which left this
Image

I couldn't resist fitting the shell to see how it looked on the chassis
Image

Fortunately I was also able to get it back off again without breaking anything! So I then added any external body-coloured parts that could be attached at this stage without impacting the later stages. The interior was sprayed with Ultimate grey primer and then the metallic grey that covers most of the internal components. This was masked off and then had a layer of Ultimate black primer followed by four layers of Ultimate Gloss black primer built up at 2-hourly intervals to give some depth
Image

Finally a couple of hours of decalling to start bringing things to life
Image

I did have a couple of issues with the "Goodyear" stencils; firstly the instructions had blank panels for the stencils, and the decals were on a separate sheet from the remaining decals - presumably some sort of license issue at some point
Image

And then true to form I managed to nause up one of the stencils trying to get it "exactly" into place - so there's a bit of tidying up to do and a replacement to be dug out (along with the duster again looking at this photo!)
Image

So that's where we are now
Image

As well as sorting out the missing stencil on the nose next up will be the assembly of the doors and rear engine covers and then a couple of layers of Aqua Gloss.

Thanks as always for looking.
Cheers, Neil

On the Bench:
Tamiya 1/35 PzKpfwIB
Tamiya 1/35 Willys Jeep
Revell 1/72 Millennium Falcon
User avatar
DrSprue
Warrant Officer
Warrant Officer
Posts: 1497
Joined: Wed Apr 26, 2017 3:24 am
United States of America

Re: Tomcat's Aoshima McLaren F1 GTR

Post by DrSprue »

Wow, awesome body work bud! :thumb2:
-Doc
On the bench:
User avatar
Tomcat64
Brigadier General
Brigadier General
Posts: 7034
Joined: Thu Sep 22, 2016 3:24 pm
Location: Swindon, UK
England

Re: Tomcat's Aoshima McLaren F1 GTR

Post by Tomcat64 »

DrSprue wrote: Mon Mar 05, 2018 2:00 pm Wow, awesome body work bud! :thumb2:
Thanks Tony! :cheers2:
Cheers, Neil

On the Bench:
Tamiya 1/35 PzKpfwIB
Tamiya 1/35 Willys Jeep
Revell 1/72 Millennium Falcon
Tay99
Master Sergeant
Master Sergeant
Posts: 442
Joined: Wed Nov 25, 2015 8:46 pm
Location: South west uk
Turkmenistan

Re: Tomcat's Aoshima McLaren F1 GTR

Post by Tay99 »

Coming along nicely,
I know what's you mean about dust and hairs you never see it until you take a photo.
:hi:
User avatar
Twokidsnosleep
General
General
Posts: 18019
Joined: Thu Aug 07, 2014 4:07 pm
Location: BC,Canada
Canada

Re: Tomcat's Aoshima McLaren F1 GTR

Post by Twokidsnosleep »

Tub looks sweet, nice belts :thumb2:
Love the decals over the grills, those look spectacular
Bet they were fun :wall: :bash:
Scott

On, Under or Near the Bench:
American Graffiti Ford Coupe
Headless Horseman...figure sig
1/72 Black Pearl Pirate Ship
User avatar
Tomcat64
Brigadier General
Brigadier General
Posts: 7034
Joined: Thu Sep 22, 2016 3:24 pm
Location: Swindon, UK
England

Re: Tomcat's Aoshima McLaren F1 GTR

Post by Tomcat64 »

Tay99 wrote: Wed Mar 07, 2018 4:29 pm Coming along nicely,
I know what's you mean about dust and hairs you never see it until you take a photo.
Twokidsnosleep wrote: Wed Mar 07, 2018 4:32 pm Tub looks sweet, nice belts :thumb2:
Love the decals over the grills, those look spectacular
Bet they were fun :wall: :bash:
Thanks guys :cheers2:

Yah the grill decals were... interesting... several coats of Solvaset seemed to remind them that resistance is futile though :dance:
Cheers, Neil

On the Bench:
Tamiya 1/35 PzKpfwIB
Tamiya 1/35 Willys Jeep
Revell 1/72 Millennium Falcon
User avatar
demarcation
Command Sergeant Major
Posts: 960
Joined: Wed May 13, 2015 11:34 pm
Location: Denmark
Denmark

Re: Tomcat's Aoshima McLaren F1 GTR

Post by demarcation »

Fantastic work so far Neil!! :th:
:cheers2:

//Anders
User avatar
Tomcat64
Brigadier General
Brigadier General
Posts: 7034
Joined: Thu Sep 22, 2016 3:24 pm
Location: Swindon, UK
England

Re: Tomcat's Aoshima McLaren F1 GTR

Post by Tomcat64 »

demarcation wrote: Sun Mar 11, 2018 9:31 am Fantastic work so far Neil!! :th:
Thanks Anders :cheers2:

Quick update for this weekend as the doors are just about done, just waiting for the gloss coats now. I dry fitted the doors onto the main body to try and get the split "Loctite" logos lined up... We'll see if that worked a bit later
Image

Rear engine covers are still in progress as I've had a bit of a nightmare with one of them - more on that next time!

Thanks as always for looking.
Cheers, Neil

On the Bench:
Tamiya 1/35 PzKpfwIB
Tamiya 1/35 Willys Jeep
Revell 1/72 Millennium Falcon
User avatar
Stokesy44
Major General
Major General
Posts: 8217
Joined: Thu Jun 18, 2015 10:13 am
Location: The Midlands, UK
Great Britain

Re: Tomcat's Aoshima McLaren F1 GTR

Post by Stokesy44 »

Gutted I've not kept up with the build matey.

That interior looks stunning, love the seat and harness :clap: :clap: :clap:

Decals and bodywork looks proper tasty too :bow::
Its been tried and tested, it works! So don't blame the system if you're no good. :doh:
User avatar
Tomcat64
Brigadier General
Brigadier General
Posts: 7034
Joined: Thu Sep 22, 2016 3:24 pm
Location: Swindon, UK
England

Re: Tomcat's Aoshima McLaren F1 GTR

Post by Tomcat64 »

Stokesy44 wrote: Sun Mar 11, 2018 11:02 am Gutted I've not kept up with the build matey.

That interior looks stunning, love the seat and harness :clap: :clap: :clap:

Decals and bodywork looks proper tasty too :bow::
Thanks mate - this definitely applies...
Image
Cheers, Neil

On the Bench:
Tamiya 1/35 PzKpfwIB
Tamiya 1/35 Willys Jeep
Revell 1/72 Millennium Falcon
User avatar
Twokidsnosleep
General
General
Posts: 18019
Joined: Thu Aug 07, 2014 4:07 pm
Location: BC,Canada
Canada

Re: Tomcat's Aoshima McLaren F1 GTR

Post by Twokidsnosleep »

Coming alive with the decals...spectacular

As an aside, after a meeting, we had a late Friday night dinner downtown Vancouver...haven’t done that in ages.
Saw two white McLarens, two Bentley’s and a powder blue Lambo Hurricane that screamed down the street. I thought it was going to break windows it was incredible, heard it from a block away.
The McLaren engine was MUCH quieter in comparison
Scott

On, Under or Near the Bench:
American Graffiti Ford Coupe
Headless Horseman...figure sig
1/72 Black Pearl Pirate Ship
User avatar
DrSprue
Warrant Officer
Warrant Officer
Posts: 1497
Joined: Wed Apr 26, 2017 3:24 am
United States of America

Re: Tomcat's Aoshima McLaren F1 GTR

Post by DrSprue »

Man ya cant beat the decal work in that kit Neil, just awesome! :thumb2:
-Doc
On the bench:
User avatar
Tomcat64
Brigadier General
Brigadier General
Posts: 7034
Joined: Thu Sep 22, 2016 3:24 pm
Location: Swindon, UK
England

Tomcat's Aoshima McLaren F1 GTR - Build Part 6

Post by Tomcat64 »

Twokidsnosleep wrote: Sun Mar 11, 2018 3:30 pm Coming alive with the decals...spectacular

As an aside, after a meeting, we had a late Friday night dinner downtown Vancouver...haven’t done that in ages.
Saw two white McLarens, two Bentley’s and a powder blue Lambo Hurricane that screamed down the street. I thought it was going to break windows it was incredible, heard it from a block away.
The McLaren engine was MUCH quieter in comparison
Thanks Scott - yeah the noise these supercars can make is phenomenal, especially if someone tinkers with the exhaust system. I've always been fascinated by the variations in pitch & tone from the different engine configurations too.
DrSprue wrote: Sun Mar 11, 2018 7:24 pm Man ya cant beat the decal work in that kit Neil, just awesome! :thumb2:
Thank Tony - yep the Cartograf decals are great!

So after couple of weeks of not moving things along very much I finally got stuck in at the bench yesterday.

Here are the rear engine covers, all painted in Ultimate Gloss black primer and a couple of coats of Aqua Gloss. I mentioned in the previous update that one of them (on the right in this picture) had been fighting me back; well no matter what I did with this one it always seemed to be the one panel that ended up with great dollops of muck on the surface. I stripped it back to plastic twice before I finally got here - it's not perfect but it'll do. Then I added the Loctite decal and managed to nudge it out of alignment by a mm or two when soaking off the excess liquid, by that time it was clinging tightly to the surface so given that I didn't want to ruin another decal like the Goodyear one I decided to leave it - it's irritating but not as irritating as wrecking it.
Image

Underneath the rear panel I installed the vents - this mates up with the gearbox radiator so I had a sneaking suspicion that some adjustment might be required to get it to sit properly once the body is on the chassis
Image

Talking of Goodyear decals, the replacements I bought turned up - they're not as finessed as the originals but again it'll do the job. These are from EasyDecal and despite saying 60secs for activation it took a lot longer!
Image

With that in place I laid down a couple of coats of AquaGloss and stripped off the interior masking
Image

Engine panels and doors dry fitted
Image

Then it was dodge the fingerprint time to glue the body components such as the headlight mounts in place
Image

The front indicators are two pieces each, one clear and one orange. The instructions say to put these together first and fit them from behind, but I found it easier to fit the clear parts and then install the orange from the outside. All using Microscale Krystal Klear.
Image

Down the back I installed the centre grille panel as well as the rear light reflectors. I did toy with stripping the kit chrome and repainting, but given how little is on show I went with the kit chrome
Image

Same with the door mirrors, and I'll do the same with the headlight reflectors too
Image

Then it was time to mate the body and the chassis
Image

I was glad I'd test fitted this earlier as it was still a bit of a struggle even with prior knowledge, but the finished fit is really snug
Image

I then installed the final engine components. And it was about this time that I realised that I'd missed some decals from the engine build :bash: Basically the covers with "BMW Motorsport" on them should have had carbon fibre effect decals first - don't know how I managed to miss that, but nothing I can do about it now so leaving it as is. The arrowed gearbox radiator is where the vent from the engine cover meets up, and I was also thinking the upper cover might need some attention now that final stack is in place
Image

As it turned out the upper cover was fine, but I did need to take the sanding stick to the bottom of the vent on the rear cover before it sat down properly, but sit down it did
Image

Tailpipes are installed
Image

And finally here's how it looks after all of that
Image

Next up is the rear spoiler and some wheels. Also the door-mounts and hinges as I've decided that one will be open and one closed and know which way around I want to do that and then finally it'll be the glasswork & final details.

Thanks as always for looking! :cheers2:
Cheers, Neil

On the Bench:
Tamiya 1/35 PzKpfwIB
Tamiya 1/35 Willys Jeep
Revell 1/72 Millennium Falcon
Tay99
Master Sergeant
Master Sergeant
Posts: 442
Joined: Wed Nov 25, 2015 8:46 pm
Location: South west uk
Turkmenistan

Re: Tomcat's Aoshima McLaren F1 GTR

Post by Tay99 »

Starting to look like a race car now, amazing the difference when you start to put the decals on. :th:
:hi:
Post Reply

Return to “Build threads”