Twokidsnosleep wrote: ↑Sun Mar 18, 2018 5:40 pm
Mr Cat, that looks spectacular!!!
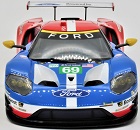
First car in a bit, but absolutely a fine one

The wheels and tires are stunning. I have not done tire decals before...my Lotus doesn’t seem to have any tire logo on it?!
The small details like the copper nut on the wheel show your skill....all of them are perfectly painted

Really nice job, not just blowing smoke up your.....
The aluminum pipes are so simple...give me a holler when you want a go at them

Thanks Buddy - really appreciate it
So with Mrs T unexpectedly having to work today I've taken the opportunity to dive at the bench and move this along after a decent session yesterday as well.
I've been nervous about screwing up the glasswork but finally took the plunge the kit has masks which is great - I thought they had the left/right masks the wrong way around, but I've since realised I was probably supposed to mask and paint on the inside not the outside

Anyway - I did it on the outside using the reverse masks - here they are all masked up and ready with the insides protected by Tamiya masking tape

And the results - I've also freehand painted the light mounts. There's a couple of fuzzy edges, but the one on the top of the windscreen will be hidden under a strategically placed decal so not going to worry too much about that; likewise the bottom edge will be hidden under the rim of the bodywork.

Headlight lenses attached - all the glasswork has been fitted with Krystal Klear

Tail-lights installed

Windscreen installed and left door fitted in the closed position - I wanted to install the door first but on dry fitting found that would be even more of a hassle when it came to getting the screen in place so the windscreen went in first. The quarter-light and door windows were fitted after the door was in place

The right door was fitted in the open position to add some variety and also provide a better view of the internal details - this took a little fiddling to get the hinges lined up and in place. As you can see the wiper has also been fitted.

The hydraulic strut was fiddly to install and basically had to be done after the door was in place to get it lined up correctly, luckily the tweezers didn't rebel during this process

And here's the internal junk on show - I've also fitted the antenna at some point along the way

So here's how it looks with the rear panels back in place


So that leaves me with a couple of tiny details (wing repeaters for the indictors and the door switches) and the rear spoiler where once again I'm struggling to get a decent surface, but hopefully I can knock that into submission this week and add the final couple of decals.
Thanks as always for looking.