Update 6 - Salty Results
It's been a while. Two things came up since the last update. First, my wife and I spent a week in France! She had a three day meeting in Toulouse, so I had some time to explore a little there while she worked, although I wasn't 100%. Neat city, not at all what I'm used to. I must say; I fell in love with real baguette sandwiches! Then we took the TGV to Paris for two nights, that's all the time we had (due to her travel arrangements we had to return to Toulouse in order to fly home). So we had one day for a whirlwind walking tour of the major Paris highlights! Upon return, we were both exhausted so I didn't get any modeling in.
Then, after a fairly routine Dr's visit, I had a bit of a health scare when the blood test showed some "anomalies". While final test results are still two weeks away, the specialist is optimistic that it is a treatable condition. Until those results are in, I'm not ready to "talk" about it too much, other than to say I'm feeling pretty normal. The few days between the time of the initial "scare" and I was able to consult a specialist were pretty anxious. So, again, I've stayed away from the bench; until today. I did a little bit of weathering and detailing. Not much progress and no pictures, but its a start back...
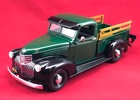
However, before all of this I did finish up my attempt at salt chipping, but did not have time to post. So here it is.
After the salt dried over night, I applied a coat of Tamiya XF-2 Flat White. I kept it a light coat trying to allow the base coat to peek through a bit; I'm not sure how successful I was.

After this dried, again overnight as I recall, I removed the salt. I was a bit disappointed with the results.

First, since I used mostly table salt with just a little flake salt mixed in, the patterns seem very square due to the fairly square grains of table salt. I think this also resulted is the line between the top and bottom coats to be very soft. Finally, the salt coverage was not as dense as I was hoping in a few places allowing the top coat to reach in between the grains. I fixed some of this by brushing the bottom color over areas that I wanted less of the top coat. I also did some "scraping" with sandpaper and a brass brush; I'm not sure that helped much... Oh well, live and learn. It's not that bad for a first attempt, so I'm not putting any more effort into it.
But, then it was on to decals and weathering. There are only 6 decal, no real drama there (and no pictures to show). For weathering I slopped on a variety of Ultimate Washes, Light Dirt, Dark Dirt, and Mud.

After drying these were wiped away using a damp cotton bud.

At this point all that is left is some final detailing, assembly and a final flat coat (not necessarily in that order)
Thanks,
Bob