Scargsy's Italeri 1/24 Ford Escort Mk.II RS1800 rally build

Post your in progress build pictures and write ups here

Moderator: T3hGuppy

Post Reply
Scargsy
Private
Private
Posts: 9
Joined: Tue Feb 13, 2018 9:05 pm

Scargsy's Italeri 1/24 Ford Escort Mk.II RS1800 rally build

Post by Scargsy »

Hello one and all I'm new here and a little late joining this group build (hope I've got everything in order)...

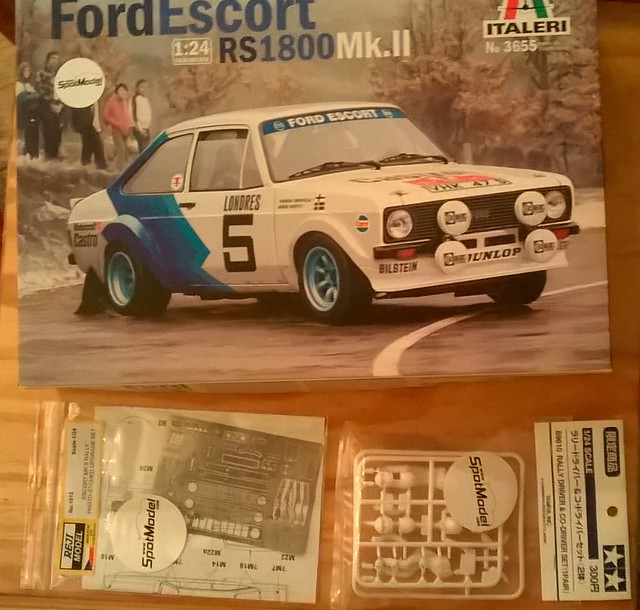
I'm going to attempt to build this Italeri Ford Escort Mk. II rally car, I'm terrible at doing smooth paint finishes and decals, so hopefully the rally car will give me the option to weather it to hide my mistakes. Apparently this kit is some kind of re-run / re-pressing of a kit that's been doing the rounds for a while.

Image

I've decided to try adding some optional extras - a Reji model photo-etch kit and a Tamiya driver and co-driver pair.

I don't currently have an airbrush (though I'm tempted to buy one), so it will probably be finished with rattle cans and hand painted internal/small parts.

I haven't decided whether I'll go with the stock decals / colour scheme or knock-up something that looks more like a privateer rally car (my uncle who is a mechanic used to have one of these back in the day, finished in black with I think a gold stripe down the side).
Last edited by Scargsy on Tue Feb 13, 2018 11:18 pm, edited 1 time in total.
Scargsy
Private
Private
Posts: 9
Joined: Tue Feb 13, 2018 9:05 pm

Re: Italeri 1/24 Ford Escort Mk.II RS1800

Post by Scargsy »

Here's a few shots of the instructions, sprues, etc.

Fresh out of the box:
Image

The tyres seem to be modelled as slicks (not very rally like!), but at least there seems to be something of an engine model and the bonnet is modelled as a separate piece.
Image

Here's a few spue shots...
Image
Image

and a body shot:
Image

some instruction pages / images:
Image
Image
Image
Image

So all in all not too many parts in the base kit, here's some close-ups of the extra bits: photo-etched kit and driver/co-driver kit...
Image
Image
Scargsy
Private
Private
Posts: 9
Joined: Tue Feb 13, 2018 9:05 pm

Re: Scargsy's Italeri 1/24 Ford Escort Mk.II RS1800 rally build

Post by Scargsy »

OK so I got stuck in, however after a quick wash of the sprues in some soapy water I suddenly discovered she was a pig of bag of plastic...

Whist the separate bonnet (or "hood" depending on which side of the pond you're from) had nicely moulded strengthening bars, there were also some rather nasty injection marks (I think that's what they are, big round indents):
Image
the strengthening bars (sorry probably not the right technical term for car bits) mouldings had also left some sink marks on the top side...
Image

The spoiler also had some sink marks in it...
Image
That probably wouldn't be too bad, on the real car they're made of some kind of semi-rubbery plastic material if memory serves me right so can be a bit 'off' and not very sharp in shape.
There were also some round indents (I think they're called injector marks?) on the underside of the boot (trunk) which had slightly warped the topside -
I couldn't get a good shot from the top but here's the underside - note some on the roof portion too...
Image
There was also some excessive plastic stuck in one of the window surround detail areas, and the top of the instrument binnacle seemed a bit uneven.
Image

The interior / lower body shell was also suffering from some indent holes, both in the cabin and the engine bay sides...
Image

However the seats seemed nicely modelled, as did the door card / side inserts:
Image

So how to start - the instructions said to start with the engine and interior:
Image

I removed the 4 main engine parts, cleaned them, then attached them together, sanded the edges and added a little putty over the rough edge.
I also got slap happy with the putty, filling holes left, right and centre (ooo-err)...
Image
Image

I also did some 'dry' test fitting, holding the bits together with some masking tape...
Image
Image
Image
Image

The dry fit showed everything fitted quite nicely, though I'd have preferred a little overlap between the engine bay interior and body (you can see a bit of daylight through there and there's a slight wiggle room. Also there's a little wiggle room between the body upper and lower halves, which could lead to a gap between the engine bay interior and outer shell at the front but shouldn't cause too much of a problem.

The only real issues I found were that the lower front spoiler doesn't really have any attachment points onto the main body from what I can see and the shell seems a little uneven between left and right there, also the dashboard was a pain to get correctly located - to try and get around that once I had it in a good place I added a little filler to the sides - not really to hold it more to give me some reference points hopefully later on when it comes to attaching it...
Image

One interesting thing (that could either end up being a godsend or a pain later - the Tamiya dudes (who remind me of Jackie Chan in Cannonball Run in the white jumpsuits at present) are quite malleable, squishy plastic - I hope the paint will stick well.
Scargsy
Private
Private
Posts: 9
Joined: Tue Feb 13, 2018 9:05 pm

Re: Scargsy's Italeri 1/24 Ford Escort Mk.II RS1800 rally build

Post by Scargsy »

So the big question is going to be what colour to paint the car...
I was going to go with black, as a tribute to my uncles Mk.2 rally car but that's going to be a bit too dull I think (interior being lots of shades of black and near black).
The kit suggests white (most rally cars tend to be white) - though in some parts of the instructions it tells you to paint the engine bay both black and white! White is probably a little boring for me, might show up too many imperfections in the shell and I kind of want some more colour in my photos - white shell, white filler, white primer, white main coat isn't going to look good. Plus the last car model I built was white, so I'm not sure how much is left in the rattle can.

I've ordered some paints - so it's either going to be Candy Apple Green or Metallic Orange, lurid either way but showing off the body colour for the interior tub parts / engine bay. I could even I guess go for a mix of the two (separate bonnet / boot colour).

Having been screwed over on my last car build by trying to use Tamiya Pearl White over a grey primer (it's more like a pearl clear with a hint of white, which made the grey primer look more like a metallic grey) I guess I should do some testing first.
User avatar
DrSprue
Warrant Officer
Warrant Officer
Posts: 1497
Joined: Wed Apr 26, 2017 3:24 am
United States of America

Re: Scargsy's Italeri 1/24 Ford Escort Mk.II RS1800 rally build

Post by DrSprue »

Nice looking build so far! :thumb2:

Yup... get out the spoons for testing!
-Doc
On the bench:
User avatar
Tomcat64
Brigadier General
Brigadier General
Posts: 7034
Joined: Thu Sep 22, 2016 3:24 pm
Location: Swindon, UK
England

Re: Scargsy's Italeri 1/24 Ford Escort Mk.II RS1800 rally build

Post by Tomcat64 »

Shame about the quality of the plastic and hope you can beat it into shape.

I do love the fact that this one comes with a crew though!

Looking forward to seeing how it all comes together.
Cheers, Neil

On the Bench:
Tamiya 1/35 PzKpfwIB
Tamiya 1/35 Willys Jeep
Revell 1/72 Millennium Falcon
Scargsy
Private
Private
Posts: 9
Joined: Tue Feb 13, 2018 9:05 pm

Re: Scargsy's Italeri 1/24 Ford Escort Mk.II RS1800 rally build

Post by Scargsy »

OK a little more slow and painful progress...

Firstly I assembled the roll cage (but not gluing it into the car yet), this was far from easy - the parts have very small contact points / very shallow indents so won't hold together on their own, thus I had to solve the only 2 hands problem via lots of masking tape to check the fit, then untaping one at a time and applying some poly cement - allowing each joint to set slightly before gluing the next. Once all together the rear mount points don't match up exactly to the rear-parcel shelf points but I feel they should be gluable into position for final fitting. The reason I decided to glue before painting was to get a better joints with the solvent cement.

Image

I decided to start the priming - for the smaller parts (engine / etc.) I attached them to a sheet of paper using masking tape so I wouldn't loose any, then used 2 dust coats of Tamiya grey primer
Image
Image

I figured that since I'd be hand painting most of these and didn't really need a smooth finish on the parts the dust coat would hopefully be enough, the remaining small parts on the sprues also got a couple of quick dust coats. Hopefully the primer will be enough to help the paint stick - and maybe will give some texture/paint depth with the 'dust'. There's some nice detail parts - like a car battery and what I think is an oil pot, though these fit in the boot and won't be visible on the final model?

The door cards and lower body tub will need to be body coloured, so I started with two dust coats of Tamiya white primer, these will need full coverage prior to painting but since they're black and need to match the body I thought I'd make a start with some initial primer dust coats. I also dust coated the roll cage in white.

Image
Image
Image

Next job was to fit the front lower bumper / body - this was quite a bad fit..
Image
After a bit of sanding though I managed to get a fairly decent fit, in order to get a good alignment I used some tape prior to applying glue to get as accurate a fit as possible (there are no locator 'pins') and glued it upside down to let gravity help the joint set.
Image

Once it had set I wasn't happy with the corner edges - they didn't seem to look very smooth curves as they do in photos, so I broke out the filler, since the lower front bumper is very thin plastic I also built up the rear of the joint and bumper with a little filler for strength.

Image
Image

I sanded that back a bit, though I think the corners still need some work - I'm not sure if this water based putty actually reactivates or not when I'm rubbing it down with wet paper (wet and dry sand paper)?

I'm going to add some photo-etched bits (first time trying this stuff) and there's a double layer front grille for the car but I thought that would look terrible with just the plastic behind it - so I hatched a plan to cut out the front grille area. I initially put some masking tape on, then used a pencil to mark out the areas I wanted to remove - I was planning to leave a central vertical strut (there's one on the real car from videos I found on YouTube). However my rotary tool skills leave something to be desired and I ended up making quite a pigs ear of it with the tiny drill bit and rotary cutter...
Image

So I then got out the craft knife, sand paper, etc. and ended up having to cut the central strut out. I think I managed to clean it up fairly well although the opening is somewhat 'lop-sided' being slightly higher at once side than another, though I'm hopefully with the front grilles in front you won't notice - I might go back and clean it up though, I just got a bit annoyed with it for now. There's a slight chip on one side but I should be able to filler that out. I had to remove the central pillar point due to my terrible grinding but I built a replacement part from a bit of white sprue that I just sanded down and glued in at the rear, that actually helps by adding a little 3D 'depth' into the model but testing showed it's going to have very tight clearance with the radiator part so I'll need to take care.

Image

I cut out the first bit of photo-etch grill and test fitted it, I'm not sure what the techniques are to use this stuff - it's very fragile, well bendy I should say (what's the best way to clean up / sand it down - wedge it between 2 blocks of wood with just the offending parts showing or just use a sharp blade?) I had to clip the corners off the photo-etch corners (that fit under the wing arches) which I did rather badly with some wire-cutters (sprue cutters) though it seems OK once in place.

In other news my paint arrived, I didn't have any disposable plastic spoons to hand so I improvised with some disposable cups - giving them a quick dust coat of white first. I quite like the Tamiya rubber colour, I always find that doing window surrounds in matt black always seems to be a bit too high contrast when I try it (and I usually muck it up).
I still haven't decided on the Candy Lime Green or Metallic Orange yet..
Image
Gethyn1983
New Recruit
Posts: 1
Joined: Sat Jul 06, 2019 7:34 pm
Wales

Re: Scargsy's Italeri 1/24 Ford Escort Mk.II RS1800 rally build

Post by Gethyn1983 »

Hi Scargsy

I am after a small bit of help. I have started the build on my mk 2 RS 1800 Rally Car. (Same as yours in this thread). I have managed to somewhere mis place my build instrucion sheet. Wouls there be anyway you could send them to me via email so I can print them off this end? I have looked online, on Facebook and on the Italeri website but I am unable to find anywhere I can download them to print off.

Also, how did yours come with a crew? Or was this purchased seperatly?

Cheers

Gethyn :cheers2:
SeanMc
New Recruit
Posts: 4
Joined: Wed Jun 19, 2019 5:48 pm
Ireland

Re: Scargsy's Italeri 1/24 Ford Escort Mk.II RS1800 rally build

Post by SeanMc »

Gethyn I have several copies of the instructions that came with the Revell boxing. I'll dig a set out and post pics of them for you or I can email them over if you prefer?
Steve40
New Recruit
Posts: 3
Joined: Tue Jul 09, 2019 7:15 pm
Wales

Re: Scargsy's Italeri 1/24 Ford Escort Mk.II RS1800 rally build

Post by Steve40 »

I've made one of these but changed it to a road car an put rs 1800 decals on it
IMG_20190814_150430910.jpg
IMG_20190814_150430910.jpg (130.49 KiB) Viewed 4002 times
IMG_20190814_150430910.jpg
IMG_20190814_150430910.jpg (130.49 KiB) Viewed 4002 times
Attachments
_IMG_000000_000000.jpg
_IMG_000000_000000.jpg (263.52 KiB) Viewed 4002 times
ben
New Recruit
Posts: 2
Joined: Sat Aug 31, 2019 5:41 pm
South Africa

Re: Scargsy's Italeri 1/24 Ford Escort Mk.II RS1800 rally build

Post by ben »

Nice one Scargsy, I am building one and found the rear wheels does not sit perfectly in the wheel well. It looks very awkward. Trying my best to move the rear axle backward and managed quite well by cutting open the lugs where it is glued to the rear shocks so I can move it backwards. Have you experienced it as well?
Post Reply

Return to “Build threads”