Kinetic 1/48 Sea Harrier FA.2

Post your build progress here :)

Moderator: T3hGuppy

User avatar
TommyKillander
Chief Warrant Officer 5
Posts: 2776
Joined: Sat Dec 27, 2014 1:59 pm
Location: Gothenburg, Sweden
Sweden

Re: Kinetic 1/48 Sea Harrier FA.2

Post by TommyKillander »

RangerNeil wrote: Thu Jan 16, 2020 12:12 am Thats an impressive result - well done!!!
jmurphy18 wrote: Fri Jan 17, 2020 5:29 pm Looking really good here Tommy!
Thanks ! :)

Ok... I better pull my stuff together and produce some output with this kit... nearly 50 % of the time is up and I'm stuck on Page 2 in the assembly instructions... :bash: :wall: :pistols:

Let's build the second air intake
Image

I'm using Tamiya White Putty dissolved in Laquer Thinner to fill the gaps...
Image
A bit time-consuming since it shrinks a lot, but I can't use Sprue Goo :violin:

Almost done...
Image

I got a bit bored with all the sanding so I started to put primer the white parts :lol:
Image

Image

Image

I got the doors left to do, but they are a different colour so I will add them later on, because I want to paint them in the same colour as the fuselage and I haven't made up my mind if I should use the Gunze Aqueous paints or Mr Paint... :think:

:cheers2:
Tommy
User avatar
TommyKillander
Chief Warrant Officer 5
Posts: 2776
Joined: Sat Dec 27, 2014 1:59 pm
Location: Gothenburg, Sweden
Sweden

Re: Kinetic 1/48 Sea Harrier FA.2

Post by TommyKillander »

Ok... I'm chuggin' on with the submodules for the interior.... I'm very eager to close up the fuselage and push on with the rest of the build... There are a lot of work left to do :crazy:

Got some white X-2 and a GX-100 gloss coat on the white parts
Image

Image

Image

Image

Gluing stuff together.... will it fit ? :?
Image

After that I added some PE on the sidewalls and also did some random detailing. I was looking at ref pics of the cockpit and it is incredibly busy. One thing that I added from the pictures was a strip of plasticard under each side of the IP cover, to add the row of red and orange warning lights.
Image

Painted with Gunze H308, same colour as the rest of the interior
Image

Next step will be to add all the small painted PE to the sidewalls :bash:

:cheers2:
Tommy
Meliodas2019
Sergeant
Sergeant
Posts: 135
Joined: Mon Dec 16, 2019 7:20 pm
England

Re: Kinetic 1/48 Sea Harrier FA.2

Post by Meliodas2019 »

keep going Tommy its looking amazing as excited as you to see it once closed up
BennetHeirwegh
New Recruit
Posts: 1
Joined: Thu Nov 28, 2019 6:56 pm
Belgium

Re: Kinetic 1/48 Sea Harrier FA.2

Post by BennetHeirwegh »

Very nice build Tommy. Keep on going.
Future website: www.sprueandglue.com
User avatar
digger303
General
General
Posts: 15941
Joined: Mon Mar 16, 2015 10:01 am
Location: Western Australia
Australia

Re: Kinetic 1/48 Sea Harrier FA.2

Post by digger303 »

Your eye for detail and patience plus skill is producing a very fine result. The gloss finish on the engine intakes being stand out for me. How did you get that look ?
:bow:: :cheers2:
Listen and appear wise
Image
Image

scalemates stash https://www.scalemates.com/profiles/mat ... ION[]=Kits
Image
User avatar
bfrd
Site Admin
Site Admin
Posts: 1921
Joined: Tue Aug 01, 2017 11:43 am
Location: Carrollton, TX
Contact:
United States of America

Re: Kinetic 1/48 Sea Harrier FA.2

Post by bfrd »

I still can't decide if you inspire me or make me question what I am doing. I have such a great amount of respect for your attention to detail and using all of the tools at your disposal to make the best model possible. Simply outstanding work!

bra jobb, min vän

google translate...
Matthew (or Bifford if you prefer)
Stash
User avatar
TommyKillander
Chief Warrant Officer 5
Posts: 2776
Joined: Sat Dec 27, 2014 1:59 pm
Location: Gothenburg, Sweden
Sweden

Re: Kinetic 1/48 Sea Harrier FA.2

Post by TommyKillander »

Meliodas2019 wrote: Fri Jan 24, 2020 7:19 pm keep going Tommy its looking amazing as excited as you to see it once closed up
BennetHeirwegh wrote: Sun Jan 26, 2020 6:59 pm Very nice build Tommy. Keep on going.
Thanks Meliodas2019 and BennetHeirwegh :)
digger303 wrote: Sun Jan 26, 2020 11:31 pm Your eye for detail and patience plus skill is producing a very fine result. The gloss finish on the engine intakes being stand out for me. How did you get that look ?
:bow:: :cheers2:
Thanks digger303!
I took used this procedure; clean the surface with alcohol, spray heated (warm) Ultimate white primer in 4-5 very thin layers, let it dry overnight, sand back any dust or uneven spots of paint, spray Tamiya X-2 diluted with MLT, let it dry overnight, spray a couple of coats of GX-100 thinned with MLT.
bfrd wrote: Mon Jan 27, 2020 10:57 am I still can't decide if you inspire me or make me question what I am doing. I have such a great amount of respect for your attention to detail and using all of the tools at your disposal to make the best model possible. Simply outstanding work!

bra jobb, min vän

google translate...
Thank you vey much, Matthew! :bow::

I hope that I inspire... :)
The best thing with this hobby is that there are always new things to learn and there so much great stuff to be inspired by out on the Interwebs...
PS. "Be inspired by" is another word for Stealing! :lol: ;)


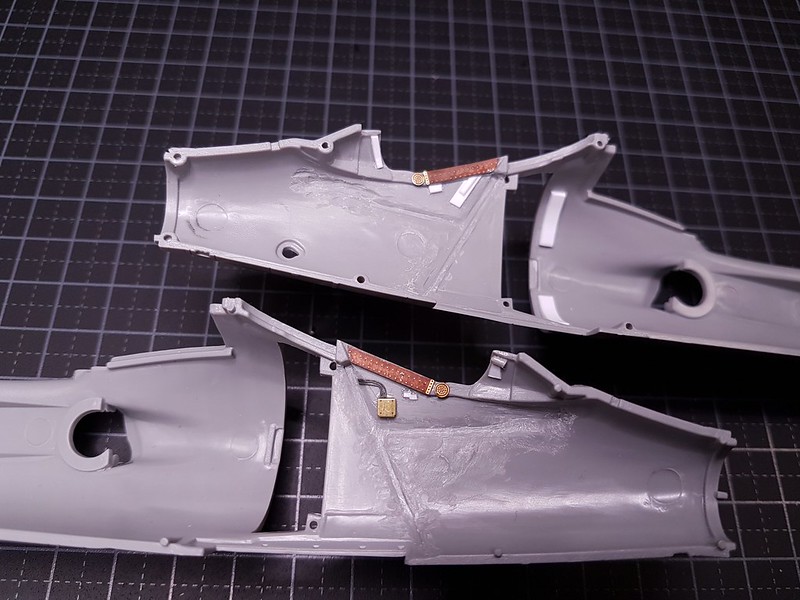
Ok... it's time to paint those red and orange warning lights I mentioned earlier and add more PE to the sidepanels
Image

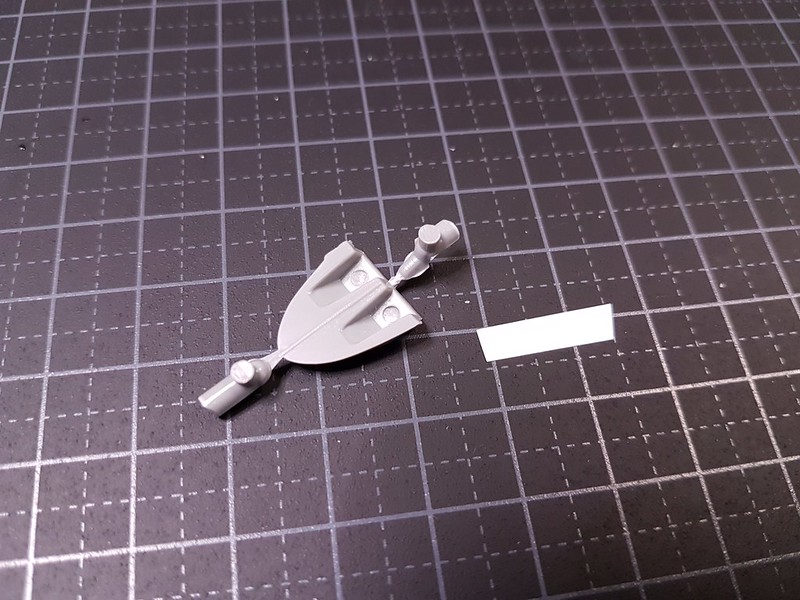
There is a small glass window on the right side of the nose section - I better glue it in so I don't forget it when I close up the fuselage ;)
Image

This kit has a system of levers and rods to provide poseable aand synchronised exhaust nozzles, but that looks way too complicated for my need, so I decided to glue them in VTOL position.
Image

Image

Image

Image

Weathering of the sidewalls
Image

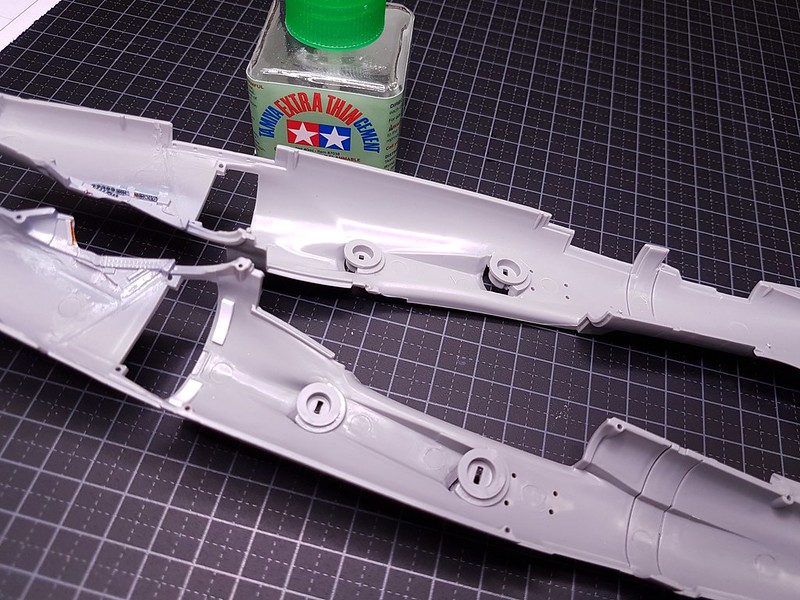
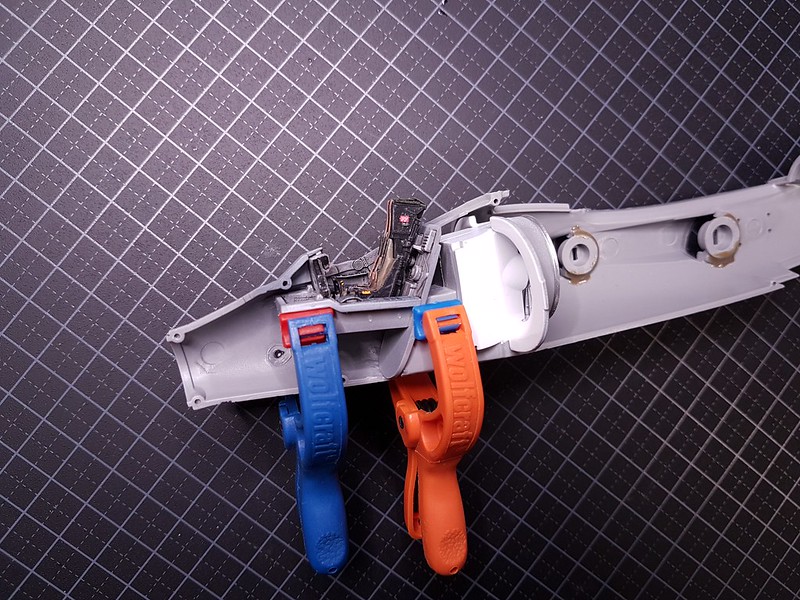
And we can finally start to glue in stuff into the fuselage :banana:
Image

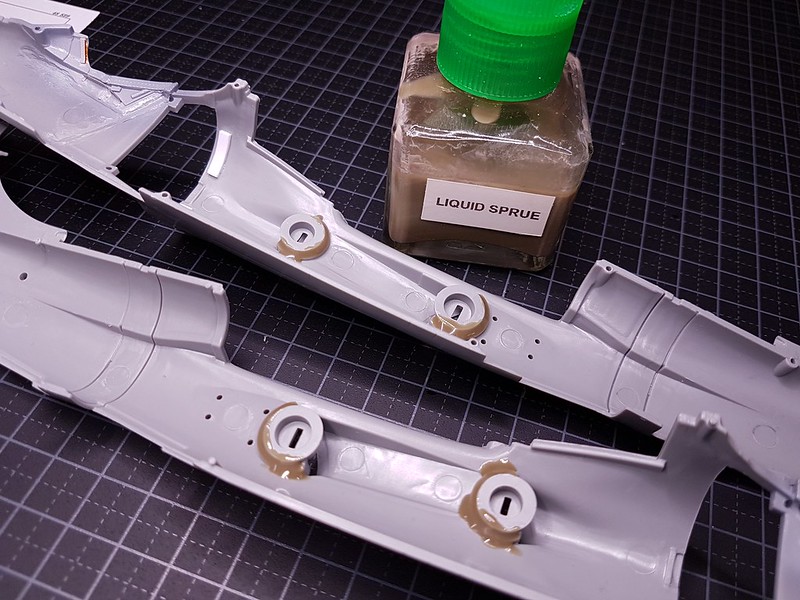
There will probably be a lot of stress on the internal parts when I put this bird together, so I reinforce the gluespots with some liquid sprue. Last thing I want to happen is that parts snap loose when I start applying force on this thing :bash:
Image

...slowly moving forward ;)

:cheers2:
Tommy
User avatar
digger303
General
General
Posts: 15941
Joined: Mon Mar 16, 2015 10:01 am
Location: Western Australia
Australia

Re: Kinetic 1/48 Sea Harrier FA.2

Post by digger303 »

I took used this procedure; clean the surface with alcohol, spray heated (warm) Ultimate white primer in 4-5 very thin layers, let it dry overnight, sand back any dust or uneven spots of paint, spray Tamiya X-2 diluted with MLT, let it dry overnight, spray a couple of coats of GX-100 thinned with MLT.

Thanks Tommy
Listen and appear wise
Image
Image

scalemates stash https://www.scalemates.com/profiles/mat ... ION[]=Kits
Image
User avatar
TommyKillander
Chief Warrant Officer 5
Posts: 2776
Joined: Sat Dec 27, 2014 1:59 pm
Location: Gothenburg, Sweden
Sweden

Re: Kinetic 1/48 Sea Harrier FA.2

Post by TommyKillander »

digger303 wrote: Tue Jan 28, 2020 1:28 am I took used this procedure; clean the surface with alcohol, spray heated (warm) Ultimate white primer in 4-5 very thin layers, let it dry overnight, sand back any dust or uneven spots of paint, spray Tamiya X-2 diluted with MLT, let it dry overnight, spray a couple of coats of GX-100 thinned with MLT.

Thanks Tommy
Yeah, I forgot to mention that the X-2 should also be sprayed in thin layers, but not too thin because if the paint hits too dry it will cause orange peel and if the layers are too thick they will pool - it's a bit tricky to get it right so practice on a paint-mule until you you feel comfortable to throw paint on your model :thumb2:

Good luck, hope this helps you :)

:cheers2:
Tommy
User avatar
digger303
General
General
Posts: 15941
Joined: Mon Mar 16, 2015 10:01 am
Location: Western Australia
Australia

Re: Kinetic 1/48 Sea Harrier FA.2

Post by digger303 »

TommyKillander wrote: Tue Jan 28, 2020 6:03 pm
digger303 wrote: Tue Jan 28, 2020 1:28 am I took used this procedure; clean the surface with alcohol, spray heated (warm) Ultimate white primer in 4-5 very thin layers, let it dry overnight, sand back any dust or uneven spots of paint, spray Tamiya X-2 diluted with MLT, let it dry overnight, spray a couple of coats of GX-100 thinned with MLT.

Thanks Tommy
Yeah, I forgot to mention that the X-2 should also be sprayed in thin layers, but not too thin because if the paint hits too dry it will cause orange peel and if the layers are too thick they will pool - it's a bit tricky to get it right so practice on a paint-mule until you you feel comfortable to throw paint on your model :thumb2:

Good luck, hope this helps you :)

:cheers2:
Tommy
Very helpful thanks Tommy. I actually do use the X-2 mix. Never used the GX-100 before though or the Ulitmate Primer yet. I generally use the Mr Surfacer.
Washing down with Alcohol is only something I have just started to do. I was finding in this warm climate I was getting a awful lot of finger print oil problems no matter how much I washed my hands. Doesn't seem to be a problem in winter. I been using those hand wipes for the job. One seems to be enough to do the whole kit.
:th: :th: :cheers2:
Listen and appear wise
Image
Image

scalemates stash https://www.scalemates.com/profiles/mat ... ION[]=Kits
Image
User avatar
TommyKillander
Chief Warrant Officer 5
Posts: 2776
Joined: Sat Dec 27, 2014 1:59 pm
Location: Gothenburg, Sweden
Sweden

Re: Kinetic 1/48 Sea Harrier FA.2

Post by TommyKillander »

Hey Guys!

I got some more done on the SHAR...

Glued in the main wheel well and the airbrake compartment
Image

Added some Liquid Sprue here as well ;)
Image

Cleanup of the area behind the ejection seat. I'm using 0.13 mm plasticard to hide those hideous ejection pin marks :crazy:
Image

Image

:cheers2:
Tommy
Meliodas2019
Sergeant
Sergeant
Posts: 135
Joined: Mon Dec 16, 2019 7:20 pm
England

Re: Kinetic 1/48 Sea Harrier FA.2

Post by Meliodas2019 »

TommyKillander wrote: Thu Jan 30, 2020 6:36 pm Hey Guys!

I got some more done on the SHAR...

Glued in the main wheel well and the airbrake compartment
Image

Added some Liquid Sprue here as well ;)
Image

Cleanup of the area behind the ejection seat. I'm using 0.13 mm plasticard to hide those hideous ejection pin marks :crazy:
Image

Image

:cheers2:
Tommy
thats a great idea/tip I will use it when i get more advances and build some of my more details models
keep the good work going excited to see it closed :dance:
User avatar
Twokidsnosleep
General
General
Posts: 18150
Joined: Thu Aug 07, 2014 4:07 pm
Location: BC,Canada
Canada

Re: Kinetic 1/48 Sea Harrier FA.2

Post by Twokidsnosleep »

Tommy, your liquid sprue looks like the devil's sewer water!
You must be of pure blood and use white Tamiya sprue...for purity and evangelical holiness :D
Much like me :tongue:
Scott

On, Under or near the desk
Brewster Buffalo ..buddy build
Rockford Firebird
1/72 Black Pearl Pirate Ship in dry dock
User avatar
digger303
General
General
Posts: 15941
Joined: Mon Mar 16, 2015 10:01 am
Location: Western Australia
Australia

Re: Kinetic 1/48 Sea Harrier FA.2

Post by digger303 »

Twokidsnosleep wrote: Thu Jan 30, 2020 10:18 pm Tommy, your liquid sprue looks like the devil's sewer water!
You must be of pure blood and use white Tamiya sprue...for purity and evangelical holiness :D
Much like me :tongue:
Ohhh seems I'm impure as well......damn sure I'll never reach that lofty goal of purity and evangelical holiness... :lol: :lol:
My sprue is tainted......the shock and horror of it all... :lol: :lol:
Listen and appear wise
Image
Image

scalemates stash https://www.scalemates.com/profiles/mat ... ION[]=Kits
Image
User avatar
Twokidsnosleep
General
General
Posts: 18150
Joined: Thu Aug 07, 2014 4:07 pm
Location: BC,Canada
Canada

Re: Kinetic 1/48 Sea Harrier FA.2

Post by Twokidsnosleep »

digger303 wrote: Fri Jan 31, 2020 12:04 am
Twokidsnosleep wrote: Thu Jan 30, 2020 10:18 pm Tommy, your liquid sprue looks like the devil's sewer water!
You must be of pure blood and use white Tamiya sprue...for purity and evangelical holiness :D
Much like me :tongue:
Ohhh seems I'm impure as well......damn sure I'll never reach that lofty goal of purity and evangelical holiness... :lol: :lol:
My sprue is tainted......the shock and horror of it all... :lol: :lol:
You are tainted :think:
Ya well, knock me over with a feather
Scott

On, Under or near the desk
Brewster Buffalo ..buddy build
Rockford Firebird
1/72 Black Pearl Pirate Ship in dry dock
User avatar
TommyKillander
Chief Warrant Officer 5
Posts: 2776
Joined: Sat Dec 27, 2014 1:59 pm
Location: Gothenburg, Sweden
Sweden

Re: Kinetic 1/48 Sea Harrier FA.2

Post by TommyKillander »

Twokidsnosleep wrote: Thu Jan 30, 2020 10:18 pm Tommy, your liquid sprue looks like the devil's sewer water!
You must be of pure blood and use white Tamiya sprue...for purity and evangelical holiness :D
Much like me :tongue:

I have some grey Hasegawa sprue too, but it's not the same thing as Sacred White Tamiya... I know, I'm a lost soul :ooops: :tongue:

:cheers2:
Tommy
User avatar
digger303
General
General
Posts: 15941
Joined: Mon Mar 16, 2015 10:01 am
Location: Western Australia
Australia

Re: Kinetic 1/48 Sea Harrier FA.2

Post by digger303 »

Twokidsnosleep wrote: Fri Jan 31, 2020 3:17 am
digger303 wrote: Fri Jan 31, 2020 12:04 am
Twokidsnosleep wrote: Thu Jan 30, 2020 10:18 pm Tommy, your liquid sprue looks like the devil's sewer water!
You must be of pure blood and use white Tamiya sprue...for purity and evangelical holiness :D
Much like me :tongue:
Ohhh seems I'm impure as well......damn sure I'll never reach that lofty goal of purity and evangelical holiness... :lol: :lol:
My sprue is tainted......the shock and horror of it all... :lol: :lol:
You are tainted :think:
Ya well, knock me over with a feather
OY aspersions on my character......fully justified...I need to find the holy grail of model making. White plastic from the Tamiya fountain of life.. :whistle:
Listen and appear wise
Image
Image

scalemates stash https://www.scalemates.com/profiles/mat ... ION[]=Kits
Image
User avatar
TommyKillander
Chief Warrant Officer 5
Posts: 2776
Joined: Sat Dec 27, 2014 1:59 pm
Location: Gothenburg, Sweden
Sweden

Re: Kinetic 1/48 Sea Harrier FA.2

Post by TommyKillander »

Hey Guys!

Let's do some dryfitting! :banana:

Image

Image

Not great - not terrible.... :shifty: :think:
Image

This turned out better than expected :)
Image

Image

The cockpit
Image

Image

I had a bit of a :crazy: :wall: moment here... but it actually looks worse than it is. The holes are for a pair of antennas :shifty:
Image
...but the fit is really awful here - but I'm getting used to it now :whistle:

So let's commit to glue...
Image

Some PE on the compartment behind the cockpit
Image

Image

I use a debonder to clean up excess glue around the PE - I wish I had this product years ago...
Image

Despite all the warning-labels I can thorougly recommend this product
Image

:cheers2:
Tommy
Meliodas2019
Sergeant
Sergeant
Posts: 135
Joined: Mon Dec 16, 2019 7:20 pm
England

Re: Kinetic 1/48 Sea Harrier FA.2

Post by Meliodas2019 »

that fit is better than I was expecting, looks great minus the few gaps but thats childs play compared to what you have already over come
User avatar
digger303
General
General
Posts: 15941
Joined: Mon Mar 16, 2015 10:01 am
Location: Western Australia
Australia

Re: Kinetic 1/48 Sea Harrier FA.2

Post by digger303 »

TommyKillander wrote: Thu Jan 30, 2020 6:36 pm
sorry please delete this nothing post
Last edited by digger303 on Sat Feb 01, 2020 3:34 am, edited 1 time in total.
Listen and appear wise
Image
Image

scalemates stash https://www.scalemates.com/profiles/mat ... ION[]=Kits
Image
User avatar
digger303
General
General
Posts: 15941
Joined: Mon Mar 16, 2015 10:01 am
Location: Western Australia
Australia

Re: Kinetic 1/48 Sea Harrier FA.2

Post by digger303 »

So let's commit to glue...

Despite all the warning-labels I can thorougly recommend this product
Image

:cheers2:
Tommy
[/quote]

Is that debonder just the same as other brands or something a cut above the rest and what brand is it ?
:cheers2:
Listen and appear wise
Image
Image

scalemates stash https://www.scalemates.com/profiles/mat ... ION[]=Kits
Image
User avatar
TommyKillander
Chief Warrant Officer 5
Posts: 2776
Joined: Sat Dec 27, 2014 1:59 pm
Location: Gothenburg, Sweden
Sweden

Re: Kinetic 1/48 Sea Harrier FA.2

Post by TommyKillander »

digger303 wrote: Sat Feb 01, 2020 3:33 am Is that debonder just the same as other brands or something a cut above the rest and what brand is it ?
:cheers2:
It's called Debonder-PS-F by Petr Dousek (same guy that makes Rosie the Riveter tools)
https://www.super-hobby.co.uk/products/ ... -PS-F.html

Unfortunately i couldn't find any shop outside Europe that seems to carry it :(

:cheers2:
Tommy
User avatar
digger303
General
General
Posts: 15941
Joined: Mon Mar 16, 2015 10:01 am
Location: Western Australia
Australia

Re: Kinetic 1/48 Sea Harrier FA.2

Post by digger303 »

TommyKillander wrote: Sat Feb 01, 2020 8:07 am
digger303 wrote: Sat Feb 01, 2020 3:33 am Is that debonder just the same as other brands or something a cut above the rest and what brand is it ?
:cheers2:
It's called Debonder-PS-F by Petr Dousek (same guy that makes Rosie the Riveter tools)
https://www.super-hobby.co.uk/products/ ... -PS-F.html

Unfortunately i couldn't find any shop outside Europe that seems to carry it :(

:cheers2:
Tommy
Thanks :th: :th: :cheers2:
Listen and appear wise
Image
Image

scalemates stash https://www.scalemates.com/profiles/mat ... ION[]=Kits
Image
Hawkmoon
Chief Warrant Officer 3
Posts: 2121
Joined: Fri Mar 01, 2019 7:19 pm
England

Re: Kinetic 1/48 Sea Harrier FA.2

Post by Hawkmoon »

:th: Starting to come together nicely :thumb2:
User avatar
TommyKillander
Chief Warrant Officer 5
Posts: 2776
Joined: Sat Dec 27, 2014 1:59 pm
Location: Gothenburg, Sweden
Sweden

Re: Kinetic 1/48 Sea Harrier FA.2

Post by TommyKillander »

Hawkmoon wrote: Sun Feb 02, 2020 8:49 am :th: Starting to come together nicely :thumb2:
Thanks a lot, Hawkmoon! :)

I made an attempt to reduce the gap around the cockpit tub a bit with a clamp... :scratch:: :?
Image

Gluing the main wing together
Image

Dryfitting.... :think:
Image

Image

Checking the air intakes... they will need some adjustments, but in general I'm very pleased with them
Image

Image

I cant get rid of the gap on the IP cover, by pressing the fuselage halves together, so I'm checking that the windscreen fits. It looks OK so I will go ahead and fill the gap and sand it.
Image

The exhaust nozzles are made using a sliding cam tooling and the gils are free from seams :thumb2:
But the need some cleanup nevertheless... :P
Image

:cheers2:
User avatar
Kevthemodeller
Lieutenant Colonel
Lieutenant Colonel
Posts: 5647
Joined: Sat Mar 26, 2016 8:31 am
Location: Newton Abbot UK
England

Re: Kinetic 1/48 Sea Harrier FA.2

Post by Kevthemodeller »

A few fitting issues there Tommy, I'm sure you'll get them ironed out :th:
Kev

On the bench:
Border Model FOCKE-WULF W190A-8 R2 - 8
User avatar
TommyKillander
Chief Warrant Officer 5
Posts: 2776
Joined: Sat Dec 27, 2014 1:59 pm
Location: Gothenburg, Sweden
Sweden

Re: Kinetic 1/48 Sea Harrier FA.2

Post by TommyKillander »

Kevthemodeller wrote: Mon Feb 03, 2020 7:39 am A few fitting issues there Tommy, I'm sure you'll get them ironed out :th:
Yeah, fixing the seams and rescribing isn't rocket-science - it's just a bit time consuming. Spent time is directly proportional to the end result :shifty: :?

But I have other things to switch between if it gets too tiresome... Like ordnance and the undercarriage :tongue:


Short update today; I have started to fill the seams on the fuselage.

Image

Image
Topside done, I will continue with the belly tomorrow

And I also started to cleanup the main wing, I'm thinking of attaching the hardpoints early on, I will probably add metalpins to locate the weapons beforehand... :think: One thing I learned from my Viggen build was that it's well spent time to make the final assembly easy.
Image

:cheers2:
Tommy
Meliodas2019
Sergeant
Sergeant
Posts: 135
Joined: Mon Dec 16, 2019 7:20 pm
England

Re: Kinetic 1/48 Sea Harrier FA.2

Post by Meliodas2019 »

bit of gap fill is a simple issue to over come tommy given all the amazing work already, cockpit looks incrediable no its together :bow:: :th:
User avatar
SaG
Corporal
Corporal
Posts: 95
Joined: Sun Sep 22, 2013 9:00 am
Contact:
Belgium

Re: Kinetic 1/48 Sea Harrier FA.2

Post by SaG »

Going on nicely Tommy. This is turning into (another) great model!

cheers,
Bennet
On the bench:
- empty :roll:

http://www.sprueandglue.com (SaG)
User avatar
TommyKillander
Chief Warrant Officer 5
Posts: 2776
Joined: Sat Dec 27, 2014 1:59 pm
Location: Gothenburg, Sweden
Sweden

Re: Kinetic 1/48 Sea Harrier FA.2

Post by TommyKillander »

Meliodas2019 wrote: Tue Feb 04, 2020 9:41 pm bit of gap fill is a simple issue to over come tommy given all the amazing work already, cockpit looks incrediable no its together :bow:: :th:
Thanks :) Yeah, the rest will be easier I hope :tongue:

SaG wrote: Thu Feb 06, 2020 2:36 pm Going on nicely Tommy. This is turning into (another) great model!

cheers,
Bennet
Thanks Bennet, nice to see you here on ISM ;)

:cheers2:
Tommy
User avatar
TommyKillander
Chief Warrant Officer 5
Posts: 2776
Joined: Sat Dec 27, 2014 1:59 pm
Location: Gothenburg, Sweden
Sweden

Re: Kinetic 1/48 Sea Harrier FA.2

Post by TommyKillander »

Ok...

I have put some liquid sprue on the bottom side of the fuselage and left it to cure for a couple of days.
Image

Did some sanding and polishing of the seams on the fuselage top.
Image

Image

Adjusting and dryfitting the main wing section...
Image

Maybe maybe.... :think: It might be enough to clamp it to make it fit :)
Image

Did some rescribing and riveting - I really hate doing that :bash: :violin:
Image

:cheers2:
Tommy
User avatar
TommyKillander
Chief Warrant Officer 5
Posts: 2776
Joined: Sat Dec 27, 2014 1:59 pm
Location: Gothenburg, Sweden
Sweden

Re: Kinetic 1/48 Sea Harrier FA.2

Post by TommyKillander »

Long time. no see!
No, I haven't given up; I'm just really busy right now with stuff and things :wtf: :tongue:

Okay... I'm continuing the sanding and polishing effort... :bash:
Image

Also managed to do some rescribing and reriveting
Image

Putting together the hardpoints:
Image

And I have decided on the loadout; It will be gunpods, fueltanks and AIM120 AMRAAMs
Image

Image

Image

:cheers2:
Tommy
Meliodas2019
Sergeant
Sergeant
Posts: 135
Joined: Mon Dec 16, 2019 7:20 pm
England

Re: Kinetic 1/48 Sea Harrier FA.2

Post by Meliodas2019 »

TommyKillander wrote: Thu Feb 27, 2020 10:32 am
Also managed to do some rescribing and reriveting
Image

:cheers2:
Tommy
looking nice Tommy like the work and like the sound of the layout.
am intersted in the "rescribing and reriveting" never come across that...though i am new still, how do you go about that?
User avatar
TommyKillander
Chief Warrant Officer 5
Posts: 2776
Joined: Sat Dec 27, 2014 1:59 pm
Location: Gothenburg, Sweden
Sweden

Re: Kinetic 1/48 Sea Harrier FA.2

Post by TommyKillander »

Meliodas2019 wrote: Thu Feb 27, 2020 4:18 pm
TommyKillander wrote: Thu Feb 27, 2020 10:32 am
Also managed to do some rescribing and reriveting
Image

:cheers2:
Tommy
looking nice Tommy like the work and like the sound of the layout.
am intersted in the "rescribing and reriveting" never come across that...though i am new still, how do you go about that?
After filling and sanding sometimes panel-lines and rivets are lost, so you may want to recover them by using a sharp scribing tool or a riveting tool (see below in this post).


Okay... only one month left so it's time to speed up this build so I don't miss the deadline :eeek:

The SHAR FA.2 where the first aircraft to integrate the AIM-120 AMRAAM missile, outside US ofcourse.
Image

Image

But the the Aden 30 mm gunpods are more familiar...
Image

I used CA-glue to fill the gaps around the clear part. After that I sanded and polished it and polish it
Image

Re-scribing some lost panel lines.
Image

Added some plasticard to rear end to hide the seams :shifty:
Image

Added a piece of 1mm brass tube to detail the gun barrel
Image

The Kinetic kit does not have the gun vent ports, so I made a drill template and added that detail
Image

Image

Next up are the hardpoints under the wings... I will add some photoetch
Image

Image

But something is not right :wtf: The sway braces should of course be glued in *before* the PE :wall: :doh:

So let's remove the PE using plastic safe debonder and do it right!
Image

Image

Image

Attachement to the main wing
Image

:cheers2:
Tommy
User avatar
TommyKillander
Chief Warrant Officer 5
Posts: 2776
Joined: Sat Dec 27, 2014 1:59 pm
Location: Gothenburg, Sweden
Sweden

Re: Kinetic 1/48 Sea Harrier FA.2

Post by TommyKillander »

Hey Guys!

The buildning mojo is really low right now, so things go a bit slow.

Adding some weight to the nose cone.
Image

...and I discovered that fitting the exhausts required that I removed a lot of plastic :wtf: :eeek:
Image

But I got that sorted after some use of my Proxxon drill and a sprue-cutter :violin:
Image

Next up is the PE for the exhaust heat shield... but I will continue with that tomorrow ;)
Image

:cheers2:
Tommy
User avatar
digger303
General
General
Posts: 15941
Joined: Mon Mar 16, 2015 10:01 am
Location: Western Australia
Australia

Re: Kinetic 1/48 Sea Harrier FA.2

Post by digger303 »

Lots of Pe still to do , but it's promising to be a stand out build.... :th: :th: :cheers2:
Listen and appear wise
Image
Image

scalemates stash https://www.scalemates.com/profiles/mat ... ION[]=Kits
Image
User avatar
bfrd
Site Admin
Site Admin
Posts: 1921
Joined: Tue Aug 01, 2017 11:43 am
Location: Carrollton, TX
Contact:
United States of America

Re: Kinetic 1/48 Sea Harrier FA.2

Post by bfrd »

As always, your work is astounding!
Matthew (or Bifford if you prefer)
Stash
User avatar
Kevthemodeller
Lieutenant Colonel
Lieutenant Colonel
Posts: 5647
Joined: Sat Mar 26, 2016 8:31 am
Location: Newton Abbot UK
England

Re: Kinetic 1/48 Sea Harrier FA.2

Post by Kevthemodeller »

TommyKillander wrote: Tue Mar 10, 2020 7:31 pm Hey Guys!

The buildning mojo is really low right now, so things go a bit slow.
Tommy the rate and standard you build it's not surprising you lose a bit of mojo every now and again :bow::
Kev

On the bench:
Border Model FOCKE-WULF W190A-8 R2 - 8
User avatar
Tomcat64
Brigadier General
Brigadier General
Posts: 7049
Joined: Thu Sep 22, 2016 3:24 pm
Location: Swindon, UK
England

Re: Kinetic 1/48 Sea Harrier FA.2

Post by Tomcat64 »

Hej Tommy!

Just done some major catching up on this project - stunning work and attention to detail as always, and it's a shame the kit is fighting you back on the fit issues.

Hope you stick with it as I think this is going to look stunning when you've beaten it into submission - and that debonder just got added to a shopping list :)
Cheers, Neil

On the Bench:
Revell 1/72 Millennium Falcon
Tamiya 1/48 P-38F/G
User avatar
TommyKillander
Chief Warrant Officer 5
Posts: 2776
Joined: Sat Dec 27, 2014 1:59 pm
Location: Gothenburg, Sweden
Sweden

Re: Kinetic 1/48 Sea Harrier FA.2

Post by TommyKillander »

Thanks a lot, fellas!

I really appreciate the support! :D

I haven't given up yet, but I doubt that I will make it to the deadline :think:

:cheers2:
Tommy
User avatar
TommyKillander
Chief Warrant Officer 5
Posts: 2776
Joined: Sat Dec 27, 2014 1:59 pm
Location: Gothenburg, Sweden
Sweden

Re: Kinetic 1/48 Sea Harrier FA.2

Post by TommyKillander »

Let's push on with the build :)

I first scraped off the detail on the heatshield
Image

but after checking the instructions some more and dryfitting the PE, I soon realised that I had to remove more plastic ;)
Image

It was quite fiddly to position and glue in place... It's amazing how long time fast curing CA-glue can take before it's grips (when you *REALLY* want it to adhere to the surface). When you get it on your fingers it's rock-solid in milli-seconds :crazy: :lol:
Image

The only solution thet seemed viable for seams in front of the airscoops was to fill it with either Liquid Sprue or CA-glue - I decided to use the first alternative; right or wrong. :shifty:
Image

Horisontal stabilisers - they shall be positioned in a anhedral configuration. There are none (or very poor) instructions and supports for that in the kit parts... :bash:
Image

Image
I hope this will be OK... :think:

:cheers2:
Tommy
User avatar
Tomcat64
Brigadier General
Brigadier General
Posts: 7049
Joined: Thu Sep 22, 2016 3:24 pm
Location: Swindon, UK
England

Re: Kinetic 1/48 Sea Harrier FA.2

Post by Tomcat64 »

Great to see that you're still making progress Tommy :th:

If you haven't seen it elsewhere already I'm planning to extend the deadline on the SIG for a while in the current climate to allow people time to finish off without needing to rush anything so plenty of time left now :cheers2:
Cheers, Neil

On the Bench:
Revell 1/72 Millennium Falcon
Tamiya 1/48 P-38F/G
User avatar
TommyKillander
Chief Warrant Officer 5
Posts: 2776
Joined: Sat Dec 27, 2014 1:59 pm
Location: Gothenburg, Sweden
Sweden

Re: Kinetic 1/48 Sea Harrier FA.2

Post by TommyKillander »

Tomcat64 wrote: Sun Mar 29, 2020 2:03 pm Great to see that you're still making progress Tommy :th:

If you haven't seen it elsewhere already I'm planning to extend the deadline on the SIG for a while in the current climate to allow people time to finish off without needing to rush anything so plenty of time left now :cheers2:
That's excellent news! Thanks :)

:cheers2:
Tommy
User avatar
TommyKillander
Chief Warrant Officer 5
Posts: 2776
Joined: Sat Dec 27, 2014 1:59 pm
Location: Gothenburg, Sweden
Sweden

Re: Kinetic 1/48 Sea Harrier FA.2

Post by TommyKillander »

It's Alive :o :shock:

I've been working on another project for a while now, but it has just been finished off - so it's back to this bird again :)

I started by sanding down the seams on the droptanks.
One of the droptanks had a visible seam in the front (unfortunately I didn't catch it on the photo)
Image

But it's fixed now anyway. I have also rescribed the lost panel lines and polished the parts.
Image

Main landing gear: it needs some cleanup, but it looks reasonable OK.
Image

The nose landing gear, on the other hand, had some issues:

Short-mould:
Image
But it's not gonna be seen so I will ignore that, even if it feels bad.... :think:

I never figured out how you are supposed to paint and assemble this... :crazy:
Image

So I decided cut the fork to make it possible to assemble, detail up, paint and weather the oleo strut and the wheel separately.
Image

Padded with some plasticard to get rid of the seam made by the saw
Image

...something like this will work I think.
Image

Now I only need to clean up the part and do all the stuff I mentioned above ;)

It's good to be back at the bench again :)
:cheers2:
Tommy
User avatar
digger303
General
General
Posts: 15941
Joined: Mon Mar 16, 2015 10:01 am
Location: Western Australia
Australia

Re: Kinetic 1/48 Sea Harrier FA.2

Post by digger303 »

:th: :th: :banana: :cheers2:
Listen and appear wise
Image
Image

scalemates stash https://www.scalemates.com/profiles/mat ... ION[]=Kits
Image
User avatar
TommyKillander
Chief Warrant Officer 5
Posts: 2776
Joined: Sat Dec 27, 2014 1:59 pm
Location: Gothenburg, Sweden
Sweden

Re: Kinetic 1/48 Sea Harrier FA.2

Post by TommyKillander »

digger303 wrote: Sun Apr 19, 2020 11:04 am :th: :th: :banana: :cheers2:
Thanks, mate! :)


Remember that I said something about the short-mould in my previous post "won't fix that, it won't be visible anyway" ?
I couldn't been more wrong :lol: :bash:

So instead if fixing it when it was easy to do, I had to do styrene-brain-surgery :crazy: :wtf:
Image

While I was still all worked up I decided to detail the nose landinggear a bit :tongue:
Image

Image

When studying the reference pictures I decided to scratchbuild and paint the cable-harness separately... I don't know if that is a good or bad idea, but it's worth a try because I think that i can be difficult to detail paint that.

Image
Image

:cheers2:
Tommy
User avatar
TommyKillander
Chief Warrant Officer 5
Posts: 2776
Joined: Sat Dec 27, 2014 1:59 pm
Location: Gothenburg, Sweden
Sweden

Re: Kinetic 1/48 Sea Harrier FA.2

Post by TommyKillander »

Okey.

I'm moving on with the under-carriage related stuff

Image

Baaad Kinetic - bad boi! :bash:
Image

So I have to fix those sink-marks...
Image

The PE set included a couple of PE upgrades, so I decided to go with those
Image

Image

And we have started to prepare some parts for painting... :banana:
Image

:cheers2:
Tommy
User avatar
Kevthemodeller
Lieutenant Colonel
Lieutenant Colonel
Posts: 5647
Joined: Sat Mar 26, 2016 8:31 am
Location: Newton Abbot UK
England

Re: Kinetic 1/48 Sea Harrier FA.2

Post by Kevthemodeller »

As ever, superb detailing Tommy :th:
Kev

On the bench:
Border Model FOCKE-WULF W190A-8 R2 - 8
User avatar
digger303
General
General
Posts: 15941
Joined: Mon Mar 16, 2015 10:01 am
Location: Western Australia
Australia

Re: Kinetic 1/48 Sea Harrier FA.2

Post by digger303 »

Kevthemodeller wrote: Tue Apr 21, 2020 10:16 am As ever, superb detailing Tommy :th:
:th: :th: :cheers2:
Listen and appear wise
Image
Image

scalemates stash https://www.scalemates.com/profiles/mat ... ION[]=Kits
Image
User avatar
TommyKillander
Chief Warrant Officer 5
Posts: 2776
Joined: Sat Dec 27, 2014 1:59 pm
Location: Gothenburg, Sweden
Sweden

Re: Kinetic 1/48 Sea Harrier FA.2

Post by TommyKillander »

digger303 wrote: Tue Apr 21, 2020 1:25 pm
Kevthemodeller wrote: Tue Apr 21, 2020 10:16 am As ever, superb detailing Tommy :th:
:th: :th: :cheers2:
Thanks guys! :bow::

Short update; been working on the HUD today.

Protecting the cockpit with some masking-tape
Image

Black anti glare paint on the IP cover
Image

Added the PE hud. I found a small round clear part from some finished kit (the TS-11 maybe?) that serves well as a optic lens for the HUD projector.
Image

I'm sure that I made a HUD glass from PET earlier in this build, but I cant find it now.. :think: :shifty:
So I had to make a new one
Image

:cheers2:
Tommy
Post Reply

Return to “Build threads”