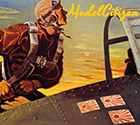
 Jagdtiger 1 by Big Wall, on Flickr
1/35 Tamiya Jagdtiger
Moderator: T3hGuppy
-
BigWall
- Chief Warrant Officer 5

- Posts: 2961
- Joined: Sun Mar 15, 2020 11:44 pm
- Location: Denver, Colorado

1/35 Tamiya Jagdtiger
This will be my first group build. Hopefully I can finish in 4 months. I have some issues going on so time will tell. I'll be building Tamiya's 1/35 Panzerjager "Jagdtiger" Fruhe Produktion model. More info to come.
Jagdtiger 1 by Big Wall, on Flickr
Jagdtiger 1 by Big Wall, on Flickr
Last edited by BigWall on Thu Sep 03, 2020 3:49 am, edited 1 time in total.
Joe


Re: 1/35 Tamiya Jagdtiger
great box art.....what a chunk of steel. 


Re: 1/35 Tamiya Jagdtiger
Very nice, I have one of these in my stash I may need to dig out.
-
SMAddict66

- Sergeant First Class

- Posts: 315
- Joined: Sun Jan 24, 2016 9:33 am
- Location: Redditch, UK

Re: 1/35 Tamiya Jagdtiger
Awesome bit of kit. Good luck with the build
Phil
On the bench - Trumpeter 1/32 Fairey Swordfish
Just off the bench - Airfix 1/48 Buccaneer S2B
Next on the bench - Airfix 1/48 EE Lightning F2A/F6
On the bench - Trumpeter 1/32 Fairey Swordfish
Just off the bench - Airfix 1/48 Buccaneer S2B
Next on the bench - Airfix 1/48 EE Lightning F2A/F6

Re: 1/35 Tamiya Jagdtiger
Lovely! And as already said, that box art is fantastic, good luck with the build.
Portfolio
Click here
Click here


Re: 1/35 Tamiya Jagdtiger
Looking forward to watching this one - best of luck with it.
Rob
ElCapitan
ElCapitan

Re: 1/35 Tamiya Jagdtiger
very nice... looking forward to this being built (time pressure also as I lose all modelling space from 1st Dec so need to be all done before then)....
-
Quax
- Sergeant Major of the Army

- Posts: 1263
- Joined: Thu Feb 26, 2015 9:52 am
- Location: Andover, Hampshire
Re: 1/35 Tamiya Jagdtiger
Ah the JagdTiger its easy to have a soft spot for this lump! good luck with the build mate! 
Paul
Paul
Paul  (not THE Paul a more inconsequential Paul)
On the bench:
A mess as usual...
now residing in the Peoples Democratic Republic of Penguinland - long live the Emperor!
On the bench:
A mess as usual...
now residing in the Peoples Democratic Republic of Penguinland - long live the Emperor!


Re: 1/35 Tamiya Jagdtiger
That really is a hefty piece of kit isn't it - count me in too
Cheers, Neil
On the Bench:
Tamiya 1/35 PzKpfwIB
Tamiya 1/35 Willys Jeep
Revell 1/72 Millennium Falcon
On the Bench:
Tamiya 1/35 PzKpfwIB
Tamiya 1/35 Willys Jeep
Revell 1/72 Millennium Falcon

-
BigWall
- Chief Warrant Officer 5
- Posts: 2961
- Joined: Sun Mar 15, 2020 11:44 pm
- Location: Denver, Colorado
Re: 1/35 Tamiya Jagdtiger
So, lets start with a brief history of the jagdtiger or hunting tiger. It was in service from late 1944 until the end of the war and was used on both the eastern and western fronts. 150 were ordered but only 77 to 88 were actually built. Weighing 158,000 pounds, the jagdtiger was the heaviest AFV fielded by any nation involved in WWII.
It was born from someones desire to blow the hell out of that Allied armor way over there. To accomplish this it was armed with the 128 mm PaK 44 L/55 main gun which was capable of defeating any Allied tank or AFV, some of which were taken out at more than 4,000 meters away in actual combat. One story tells of a 128 mm shell passing thru all of the walls of a house and still destroying an American tank on the other side.
Although the jagdtiger was highly effective when it was able to be used properly, many factors limited its abilities. Among these were Allied air superiority limiting the German's ability to maneuver such a huge beast into position, poor moral, insufficient training for the crews, lack of fuel and an extremely underpowered drivetrain. Because the entire vehicle needed to be rotated to acquire targets outside of the gun's limited traverse, the weak drivetrain was very susceptible to breaking down due to the jagdtiger's extreme weight.
Three jagdtigers are still in existence in museums around the world. One each in the US, the UK and Russia.
Joe
-
BigWall
- Chief Warrant Officer 5
- Posts: 2961
- Joined: Sun Mar 15, 2020 11:44 pm
- Location: Denver, Colorado
Re: 1/35 Tamiya Jagdtiger
I bought this model as the threat of a lock down was looming. It turns out that I have an essential job and not only did we not have to shut down, we are extremely busy due to the 'rona. My wife and I are very lucky to be able to continue earning a living during these bizarre times.
The jagdtiger panders to my love of what I consider to be odd German armor design. I mean really, who not only would design something like this but also send it into production?
For now, I'm planning on doing an out of the box build.
Opening the box reveals a nicely packaged model.
 JT 2 by Big Wall, on Flickr
The kit contains 6 sprues of parts plus the upper and lower hulls and both rubber band and link and length tracks.
 JT 3 by Big Wall, on Flickr
 JT 6 by Big Wall, on Flickr
 JT 8 by Big Wall, on Flickr
 JT 7 by Big Wall, on Flickr
 JT 4 by Big Wall, on Flickr
It also includes PE grill screens, poly caps for, I'm assuming, the wheels and gun assembly and a small decal sheet.
 JT 9 by Big Wall, on Flickr
Also the instruction sheet and a separate brochure for several different paint schemes.
 JT 10 by Big Wall, on Flickr
The jagdtiger panders to my love of what I consider to be odd German armor design. I mean really, who not only would design something like this but also send it into production?
For now, I'm planning on doing an out of the box build.
Opening the box reveals a nicely packaged model.
JT 2 by Big Wall, on FlickrThe kit contains 6 sprues of parts plus the upper and lower hulls and both rubber band and link and length tracks.
JT 3 by Big Wall, on FlickrJT 6 by Big Wall, on FlickrJT 8 by Big Wall, on FlickrJT 7 by Big Wall, on FlickrJT 4 by Big Wall, on FlickrIt also includes PE grill screens, poly caps for, I'm assuming, the wheels and gun assembly and a small decal sheet.
JT 9 by Big Wall, on FlickrAlso the instruction sheet and a separate brochure for several different paint schemes.
JT 10 by Big Wall, on FlickrJoe
Re: 1/35 Tamiya Jagdtiger
I've seen this in the metal at the Bovington museum, it really is a big old lump! I think they were compensating for the size of something else when they put this into production, completely impractical, just a big show off, 'look at us' kind of deal. I guess it really would put the fear of God in you though if you saw one on the horizon pointing straight at you.
Portfolio
Click here
Click here


Re: 1/35 Tamiya Jagdtiger
Lovely kit. Nice link and length tracks too. Are you planning on keeping the fenders on or showing off the sag!
Its been tried and tested, it works! So don't blame the system if you're no good. 

Re: 1/35 Tamiya Jagdtiger
-
BigWall
- Chief Warrant Officer 5
- Posts: 2961
- Joined: Sun Mar 15, 2020 11:44 pm
- Location: Denver, Colorado
Re: 1/35 Tamiya Jagdtiger
I think I want to show off the sag. Time will tell I guess.
Last edited by BigWall on Sat Sep 05, 2020 12:59 am, edited 1 time in total.
Joe
-
BigWall
- Chief Warrant Officer 5
- Posts: 2961
- Joined: Sun Mar 15, 2020 11:44 pm
- Location: Denver, Colorado
Re: 1/35 Tamiya Jagdtiger
I started on the build tonight after work.
Step 1 is building up the tub style hull. A piece on each corner, the rear of the hull and 4 bump stops for the suspension. Everything fit together with typical Tamiya excellence and with minimal sanding. There are 6 holes that need to be drilled in the rear hull plate. 4 are for the brackets that hold the jack and 2 are for the jack block.
Along with the Tamiya Extra Thin glue I normally use, I started using the Tamiya thicker slower drying glue for the larger surface areas. I'm liking it as I don't feel like I have to rush from applying the glue to sticking the pieces together before it evaporates. Both are such a huge leap forward from the old thick, stringy tube glue from the past.
I also bought Tamiya's basic file set with the intent of no longer using sanding sticks. My initial thoughts are that they take material off of parts, such as sprue nubs, quickly but a fine sanding stick is still needed to smooth out the area. I've only used the flat one so far. I do wish that it was wider for the way I'm using it though.
 JT 11 by Big Wall, on Flickr
Step 1 is building up the tub style hull. A piece on each corner, the rear of the hull and 4 bump stops for the suspension. Everything fit together with typical Tamiya excellence and with minimal sanding. There are 6 holes that need to be drilled in the rear hull plate. 4 are for the brackets that hold the jack and 2 are for the jack block.
Along with the Tamiya Extra Thin glue I normally use, I started using the Tamiya thicker slower drying glue for the larger surface areas. I'm liking it as I don't feel like I have to rush from applying the glue to sticking the pieces together before it evaporates. Both are such a huge leap forward from the old thick, stringy tube glue from the past.
I also bought Tamiya's basic file set with the intent of no longer using sanding sticks. My initial thoughts are that they take material off of parts, such as sprue nubs, quickly but a fine sanding stick is still needed to smooth out the area. I've only used the flat one so far. I do wish that it was wider for the way I'm using it though.
JT 11 by Big Wall, on Flickr
Last edited by BigWall on Sun Sep 06, 2020 7:40 pm, edited 1 time in total.
Joe
-
BigWall
- Chief Warrant Officer 5
- Posts: 2961
- Joined: Sun Mar 15, 2020 11:44 pm
- Location: Denver, Colorado
Re: 1/35 Tamiya Jagdtiger
Step 2 is the assembly of the wheels, drive sprockets and idler wheels. I haven't decided if I want to assemble them before I paint them yet so I moved on to step 3.
Step 3 returns to the lower hull to attach the suspension arms and transmission covers. There are two different suspension arms, some have shorter axles for the inner wheels and the others are longer for the outer wheels. The arms are easy to tell apart. Tamiya made it easy to not get the arms in the wrong places by varying the distance from the main pivot to the locating pins that insure the arms are installed level. Tamiya also made sure to have vent holes inside the hull to allow the glue to dry and not leave pockets of uncured glue. Again, the parts all fit together nicely with minimal sanding of seam lines.
 JT 12 by Big Wall, on Flickr
Step 3 returns to the lower hull to attach the suspension arms and transmission covers. There are two different suspension arms, some have shorter axles for the inner wheels and the others are longer for the outer wheels. The arms are easy to tell apart. Tamiya made it easy to not get the arms in the wrong places by varying the distance from the main pivot to the locating pins that insure the arms are installed level. Tamiya also made sure to have vent holes inside the hull to allow the glue to dry and not leave pockets of uncured glue. Again, the parts all fit together nicely with minimal sanding of seam lines.
JT 12 by Big Wall, on Flickr
Last edited by BigWall on Sun Sep 06, 2020 7:42 pm, edited 1 time in total.
Joe
-
RangerNeil

- Captain

- Posts: 4280
- Joined: Fri Jul 12, 2019 9:42 pm
- Location: Dagenham
- Contact:

Re: 1/35 Tamiya Jagdtiger
That's a lovely looking kit. Somewhere in the house - dating back to when I was about 10 - I have a book covering all the Tigers and once we get settled after moving (to wherever it is the OH has us move to) I want to find it and build one of each of the Tiger family.
If you think the JagdTiger is an OTT design - have you seen the Maus??
If you think the JagdTiger is an OTT design - have you seen the Maus??
On the board now:
Airfix 1/35 Alvis Stalwart Mk2 FV622
Airfix 1/72 Westland Wessex
Mastercraft 1/72 Westland Wessex
OKits 1/72 Mil Mi-2
WNW Bristol F2B
2 x Airfix Triumph TR4A
Scalemates stash info
=58417&fkSTASHSTATUS[]=58417-Stash&page=stash]Scalemates Stash manager
-
BigWall
- Chief Warrant Officer 5
- Posts: 2961
- Joined: Sun Mar 15, 2020 11:44 pm
- Location: Denver, Colorado
Re: 1/35 Tamiya Jagdtiger
No doubt! German armor in general is just so uniquely odd. The book sounds really cool.RangerNeil wrote: ↑Sun Sep 06, 2020 12:40 pm That's a lovely looking kit. Somewhere in the house - dating back to when I was about 10 - I have a book covering all the Tigers and once we get settled after moving (to wherever it is the OH has us move to) I want to find it and build one of each of the Tiger family.
If you think the JagdTiger is an OTT design - have you seen the Maus??
Joe
-
BigWall
- Chief Warrant Officer 5
- Posts: 2961
- Joined: Sun Mar 15, 2020 11:44 pm
- Location: Denver, Colorado
Re: 1/35 Tamiya Jagdtiger
Step 2 was assembling the road wheels etc. I decided to go ahead and put them all together. All had poly caps, which I really like. The drive sprockets are made up of 2 parts plus the poly caps, the idler wheels are made up of 3 parts plus the poly caps and the road wheels are each made up of 4 parts and the poly caps. These are the inner and outer wheels for each axle, the axle cap (for lack of better words) and the face of the outer wheel. The face of the outer wheel is a very thin piece. Why it is molded separately seems strange to me. 2 little pieces of the sprue that are on a tiny lip need to be trimmed off of each one. I used an exacto knife to cut down from the back side and then use a twisting/scraping motion to cut the piece of sprue off. Care needs to be taken here as too much pressure will cut all the way thru the wheel face leaving a flat spot. It will also send the knife into your finger leaving you frantically looking for some paper towels, as you gush blood all over the misappropriated dining room table, and worry about the wife removing parts of your anatomy for making such a big mess at 2 am. Or so I hear.
Each of the road wheels have a slight seam line that needs to be removed. I like to sand/file these seams down once the wheels are assembled. I found that the Tamiya flat file worked really well for this but again wished that it was 3-4 times wider. I need to find a wider fine file somewhere. If anyone has a recommendation please let me know.
On to Step 4 which is gluing the rubber band tracks together. I'm not going to use them so on to step 5.
Step 5 is placing the wheels onto the hull which is easy enough to do with the poly caps. The front road wheel and the drive sprocket need to be put on together as they overlap.
 JT 13 by Big Wall, on Flickr
Step 6 is assembling the link and length tracks which I will do later.
Step 7 is putting together the jack and exhaust. For parts like these, I like to make each one it's own little project. I think this adds interesting bits all the way around the model and they really don't take much time to do something interesting with and add a lot to the final look of the model. I also like to paint/detail these while they are off of the model so I will be saving them for later. I use a highlighter to mark these parts on the instruction sheet so I can easily find any skipped parts later.
Step 8 Is adding on lower rear hull details. First I added on the rear mud flaps and the brackets for the jack. The brackets have 2 pins used to attach them to the hull. The lower pins are longer and do not fit in the holes drilled earlier. They just need a little sanding to slide into place. These brackets are exactly the kind of things that my fat fingers will break off so I glued the hell out of them and I'm going to have to be careful as the build goes on. This step also has you attach the jack block, jack, exhaust covers, and towing shackles, all of which I will save for after the paint is applied and before i start the overall weathering.
 JT 14 by Big Wall, on Flickr
It sounds like a transformer just exploded and we lost power and internet so no more modeling for now and hopefully the laptop battery lasts long enough to attach pictures and get this posted before I lose all of it.
Each of the road wheels have a slight seam line that needs to be removed. I like to sand/file these seams down once the wheels are assembled. I found that the Tamiya flat file worked really well for this but again wished that it was 3-4 times wider. I need to find a wider fine file somewhere. If anyone has a recommendation please let me know.
On to Step 4 which is gluing the rubber band tracks together. I'm not going to use them so on to step 5.
Step 5 is placing the wheels onto the hull which is easy enough to do with the poly caps. The front road wheel and the drive sprocket need to be put on together as they overlap.
JT 13 by Big Wall, on FlickrStep 6 is assembling the link and length tracks which I will do later.
Step 7 is putting together the jack and exhaust. For parts like these, I like to make each one it's own little project. I think this adds interesting bits all the way around the model and they really don't take much time to do something interesting with and add a lot to the final look of the model. I also like to paint/detail these while they are off of the model so I will be saving them for later. I use a highlighter to mark these parts on the instruction sheet so I can easily find any skipped parts later.
Step 8 Is adding on lower rear hull details. First I added on the rear mud flaps and the brackets for the jack. The brackets have 2 pins used to attach them to the hull. The lower pins are longer and do not fit in the holes drilled earlier. They just need a little sanding to slide into place. These brackets are exactly the kind of things that my fat fingers will break off so I glued the hell out of them and I'm going to have to be careful as the build goes on. This step also has you attach the jack block, jack, exhaust covers, and towing shackles, all of which I will save for after the paint is applied and before i start the overall weathering.
JT 14 by Big Wall, on FlickrIt sounds like a transformer just exploded and we lost power and internet so no more modeling for now and hopefully the laptop battery lasts long enough to attach pictures and get this posted before I lose all of it.
Joe
Re: 1/35 Tamiya Jagdtiger
Re: 1/35 Tamiya Jagdtiger
very nice... thats a heck of a lot of wheels - think thats one reason I never progressed past the PzIV....
-
SMAddict66
- Sergeant First Class
- Posts: 315
- Joined: Sun Jan 24, 2016 9:33 am
- Location: Redditch, UK
Re: 1/35 Tamiya Jagdtiger
Looking great
Phil
On the bench - Trumpeter 1/32 Fairey Swordfish
Just off the bench - Airfix 1/48 Buccaneer S2B
Next on the bench - Airfix 1/48 EE Lightning F2A/F6
On the bench - Trumpeter 1/32 Fairey Swordfish
Just off the bench - Airfix 1/48 Buccaneer S2B
Next on the bench - Airfix 1/48 EE Lightning F2A/F6
Re: 1/35 Tamiya Jagdtiger
Can see some nice moldings there.
Re: 1/35 Tamiya Jagdtiger
-
BigWall
- Chief Warrant Officer 5
- Posts: 2961
- Joined: Sun Mar 15, 2020 11:44 pm
- Location: Denver, Colorado
Re: 1/35 Tamiya Jagdtiger
Step 9 consists of assembling the barrel and gun breach. With the barrel, I clamped the 2 pieces together with mini clothes pins in 2 directions. Some to clamp the 2 pieces together and some to help keep the 2 pieces aligned.
 JT 15 by Big Wall, on Flickr
After letting the glue dry for awhile, I removed the clamps and it only took a little sanding to eliminate the seam between the 2 pieces. On the far end of the barrel there is a groove that got some melted plastic in it from gluing the pieces together. I first tried to scrape it out with an exacto blade and that didn't work. I then tried a Tamiya Scriber 2. It was my first time trying it out and it worked perfectly for the job.
Starting with assembling the breach and continuing into the next 2 steps, there is a distinct lack of normally great Tamiya engineering. The pieces just don't have the fit that I've come to expect. It's nothing horrible but I needed to do extra sanding to get the faces leveled out once the pieces were assembled. The instructions say to not glue the breach in place so that it can be moved from opened to closed. I decided to model it open and glued it in place.
 JT 16 by Big Wall, on Flickr
Step 10 continues with the assembly of the gun. In this step, you're given the option to show the gun in a recoiled position. There is a tab that fits into a slot on the barrel on part #D19. If this tab is removed, the barrel can be slid back into a recoiled position.
 JT 16.5 by Big Wall, on Flickr
Attention needs to be payed here as parts C24 and C34 need to be attached before D47. There a 2 poly caps used to let the gun move in elevation and these also help align the 2 pieces of the gun mount as there is not a lot molded in to keep these 2 parts aligned. Also part D58 just has a vague arrow showing it's mounting position. You can see where I decided it should go in the picture below. It's the cone shaped piece on the side of the gun base.
 JT 17 by Big Wall, on Flickr
Step 11 wraps up assembling the lower hull. First, the floor of the fighting compartment needs to be installed. Here again, the instructions are very vague. Some trial and error will get it into the right location. There are 3 vertical ribs on the inside of each side of the hull. On the rear underside of the floor piece, there are 2 very small tabs. They need to be pushed back against the rearmost ribs. There is a step from the floor to the area where the gun mounts. This will fit up against the middle ribs. The front of the floor sits on the front ribs.
 JT 18 by Big Wall, on Flickr
There is a poly cap used to allow the gun to move horizontally. There is a tab on the back of the gun mount that fits into the floor and this along with the poly cap hold the gun in place.
 JT 19 by Big Wall, on Flickr
JT 15 by Big Wall, on FlickrAfter letting the glue dry for awhile, I removed the clamps and it only took a little sanding to eliminate the seam between the 2 pieces. On the far end of the barrel there is a groove that got some melted plastic in it from gluing the pieces together. I first tried to scrape it out with an exacto blade and that didn't work. I then tried a Tamiya Scriber 2. It was my first time trying it out and it worked perfectly for the job.
Starting with assembling the breach and continuing into the next 2 steps, there is a distinct lack of normally great Tamiya engineering. The pieces just don't have the fit that I've come to expect. It's nothing horrible but I needed to do extra sanding to get the faces leveled out once the pieces were assembled. The instructions say to not glue the breach in place so that it can be moved from opened to closed. I decided to model it open and glued it in place.
JT 16 by Big Wall, on FlickrStep 10 continues with the assembly of the gun. In this step, you're given the option to show the gun in a recoiled position. There is a tab that fits into a slot on the barrel on part #D19. If this tab is removed, the barrel can be slid back into a recoiled position.
JT 16.5 by Big Wall, on FlickrAttention needs to be payed here as parts C24 and C34 need to be attached before D47. There a 2 poly caps used to let the gun move in elevation and these also help align the 2 pieces of the gun mount as there is not a lot molded in to keep these 2 parts aligned. Also part D58 just has a vague arrow showing it's mounting position. You can see where I decided it should go in the picture below. It's the cone shaped piece on the side of the gun base.
JT 17 by Big Wall, on FlickrStep 11 wraps up assembling the lower hull. First, the floor of the fighting compartment needs to be installed. Here again, the instructions are very vague. Some trial and error will get it into the right location. There are 3 vertical ribs on the inside of each side of the hull. On the rear underside of the floor piece, there are 2 very small tabs. They need to be pushed back against the rearmost ribs. There is a step from the floor to the area where the gun mounts. This will fit up against the middle ribs. The front of the floor sits on the front ribs.
JT 18 by Big Wall, on FlickrThere is a poly cap used to allow the gun to move horizontally. There is a tab on the back of the gun mount that fits into the floor and this along with the poly cap hold the gun in place.
JT 19 by Big Wall, on Flickr
Last edited by BigWall on Wed Sep 09, 2020 2:16 am, edited 1 time in total.
Joe
Re: 1/35 Tamiya Jagdtiger
Awesome! Never considered your clothes pin method, I'll have to try it out in the future.
Re: 1/35 Tamiya Jagdtiger
Looking good. Huge beast. Built it myself, you've gotta love Tamiya.
Its been tried and tested, it works! So don't blame the system if you're no good.
Re: 1/35 Tamiya Jagdtiger
That's coming together really nicely Joe even with the small surprises Tamiya has snuck in there for you 
The opposing peg trick for the barrel has been filed away for future use
The opposing peg trick for the barrel has been filed away for future use
Cheers, Neil
On the Bench:
Tamiya 1/35 PzKpfwIB
Tamiya 1/35 Willys Jeep
Revell 1/72 Millennium Falcon
On the Bench:
Tamiya 1/35 PzKpfwIB
Tamiya 1/35 Willys Jeep
Revell 1/72 Millennium Falcon
Re: 1/35 Tamiya Jagdtiger
-
BigWall
- Chief Warrant Officer 5
- Posts: 2961
- Joined: Sun Mar 15, 2020 11:44 pm
- Location: Denver, Colorado
-
BigWall
- Chief Warrant Officer 5
- Posts: 2961
- Joined: Sun Mar 15, 2020 11:44 pm
- Location: Denver, Colorado
Re: 1/35 Tamiya Jagdtiger
I like the way you have it coming together...looks great
-
BigWall
- Chief Warrant Officer 5
- Posts: 2961
- Joined: Sun Mar 15, 2020 11:44 pm
- Location: Denver, Colorado
Re: 1/35 Tamiya Jagdtiger
Thank you Andy. I'm torn on the metal barrels as these just sit on my shelf at home. For the tracks, I'm going with the link and length tracks from the kit.Hawkmoon wrote: ↑Thu Sep 10, 2020 10:02 pmProgressing very nicely and a top tip on the barrel too although I tend to go for the metal barrels if there available these days as the plastic used by a lot of kit makers these days tends to be on the soft side rather than the solid stuff of years ago. What track set did you get for this beast


Joe
-
BigWall
- Chief Warrant Officer 5
- Posts: 2961
- Joined: Sun Mar 15, 2020 11:44 pm
- Location: Denver, Colorado
Re: 1/35 Tamiya Jagdtiger
Well, the weekend has come again and I've spent some time building today.
Step 6 was building the link and length tracks. I decided it was time to put these together. There is a very small amount of flash on a few of the tracks to keep an eye out for. I left one link unglued so that I can remove them for painting and weathering. I taped the last link together to let the glue set.
 JT 20 by Big Wall, on Flickr
On to Step 12 which is building the outer rear wall of the fighting compartment. Everything went together well here. I left the doors movable for painting and I will glue them open after painting.
 JT 21 by Big Wall, on Flickr
Step 13 starts the building of the upper hull. It has you attach the rear wall of the fighting compartment and the machine gun mount. It also has you tape on the front wall of the fighting compartment for some reason. There's no point in the later instructions where they say to glue the piece on. I left it taped in place for now just in case it becomes apparent why they had you do so later on.
 JT 22 by Big Wall, on Flickr
Step 14 is attaching a couple plates to the lower hull so that there isn't just an open gap over the tracks and gluing in a couple periscopes.
 JT 23 by Big Wall, on Flickr
Step 15 is attaching the upper hull to the lower hull. I'm not gluing them together at this point because i want to do some basic painting to the interior before permanently attaching them together.
 JT 24 by Big Wall, on Flickr
I'm starting to think that this puzzle is going to be some sort of armored fighting vehicle.
Step 6 was building the link and length tracks. I decided it was time to put these together. There is a very small amount of flash on a few of the tracks to keep an eye out for. I left one link unglued so that I can remove them for painting and weathering. I taped the last link together to let the glue set.
JT 20 by Big Wall, on FlickrOn to Step 12 which is building the outer rear wall of the fighting compartment. Everything went together well here. I left the doors movable for painting and I will glue them open after painting.
JT 21 by Big Wall, on FlickrStep 13 starts the building of the upper hull. It has you attach the rear wall of the fighting compartment and the machine gun mount. It also has you tape on the front wall of the fighting compartment for some reason. There's no point in the later instructions where they say to glue the piece on. I left it taped in place for now just in case it becomes apparent why they had you do so later on.
JT 22 by Big Wall, on FlickrStep 14 is attaching a couple plates to the lower hull so that there isn't just an open gap over the tracks and gluing in a couple periscopes.
JT 23 by Big Wall, on FlickrStep 15 is attaching the upper hull to the lower hull. I'm not gluing them together at this point because i want to do some basic painting to the interior before permanently attaching them together.
JT 24 by Big Wall, on FlickrI'm starting to think that this puzzle is going to be some sort of armored fighting vehicle.
Last edited by BigWall on Sun Sep 27, 2020 8:40 pm, edited 1 time in total.
Joe
-
SMAddict66
- Sergeant First Class
- Posts: 315
- Joined: Sun Jan 24, 2016 9:33 am
- Location: Redditch, UK
Re: 1/35 Tamiya Jagdtiger
Coming together nicely
Phil
On the bench - Trumpeter 1/32 Fairey Swordfish
Just off the bench - Airfix 1/48 Buccaneer S2B
Next on the bench - Airfix 1/48 EE Lightning F2A/F6
On the bench - Trumpeter 1/32 Fairey Swordfish
Just off the bench - Airfix 1/48 Buccaneer S2B
Next on the bench - Airfix 1/48 EE Lightning F2A/F6
Re: 1/35 Tamiya Jagdtiger
Its not getting any smaller, that's for sure.
Tracks look nice and that slab sided hull screams out for chipping and weathering!
Tracks look nice and that slab sided hull screams out for chipping and weathering!
Its been tried and tested, it works! So don't blame the system if you're no good.


Re: 1/35 Tamiya Jagdtiger
Looking great, going to be a large model. Definitely one I want to have a go building one day.
Re: 1/35 Tamiya Jagdtiger
Looking good!
Re: 1/35 Tamiya Jagdtiger
Good progress
Re: 1/35 Tamiya Jagdtiger
Very nice & tidy progress Joe - that's coming together very steadily; it really is quite a beast!
Cheers, Neil
On the Bench:
Tamiya 1/35 PzKpfwIB
Tamiya 1/35 Willys Jeep
Revell 1/72 Millennium Falcon
On the Bench:
Tamiya 1/35 PzKpfwIB
Tamiya 1/35 Willys Jeep
Revell 1/72 Millennium Falcon
-
Quax
- Sergeant Major of the Army
- Posts: 1263
- Joined: Thu Feb 26, 2015 9:52 am
- Location: Andover, Hampshire
Re: 1/35 Tamiya Jagdtiger
terrific job with the tracks, link and length gives me the shakes almost as much as individual but you've cracked it.
Paul
Paul
Paul (not THE Paul a more inconsequential Paul)
On the bench:
A mess as usual...
now residing in the Peoples Democratic Republic of Penguinland - long live the Emperor!
On the bench:
A mess as usual...
now residing in the Peoples Democratic Republic of Penguinland - long live the Emperor!
-
BigWall
- Chief Warrant Officer 5
- Posts: 2961
- Joined: Sun Mar 15, 2020 11:44 pm
- Location: Denver, Colorado
Re: 1/35 Tamiya Jagdtiger
Thank you.
I quit modeling for a while so it's probably been close to 30 years since I've done individual tracks. I don't remember that being as hard as these link and length tracks were. Younger eyes I guess. Still, it wasn't bad. I figured out where I wanted the loose link to be and then just glued them all together in a line, let them set up for awhile and then bent them into place. I couldn't even guess how many places I placed glue that weren't real joints but I know it was quite a few. 

I quit modeling for a while so it's probably been close to 30 years since I've done individual tracks. I don't remember that being as hard as these link and length tracks were. Younger eyes I guess. Still, it wasn't bad. I figured out where I wanted the loose link to be and then just glued them all together in a line, let them set up for awhile and then bent them into place. I couldn't even guess how many places I placed glue that weren't real joints but I know it was quite a few.
Joe
-
BigWall
- Chief Warrant Officer 5
- Posts: 2961
- Joined: Sun Mar 15, 2020 11:44 pm
- Location: Denver, Colorado
Re: 1/35 Tamiya Jagdtiger
Well, I get to start chemo therapy again so it's looking like this build won't be completed by the end of December. At least not to the level I wanted it to be at. I'm going to have to spend a month in the hospital at some point so that's not going to help.
The last two weeks have been full of tests and I've been exhausted. The wrong parts for my Jeep showed up and my wife had the chance to visit her relatives in Mexico for a week so I took the opportunity to get some modeling done this weekend.
Step 16 is the assembly of the top of the fighting compartment. The only downfall here is that there are not any provisions given for opening up the large hatches to get a better glimpse of the interior. This is making me think that I may just glue everything shut instead of leaving them open and doing some basic painting of the interior.
 JT 25 by Big Wall, on Flickr
The last two weeks have been full of tests and I've been exhausted. The wrong parts for my Jeep showed up and my wife had the chance to visit her relatives in Mexico for a week so I took the opportunity to get some modeling done this weekend.
Step 16 is the assembly of the top of the fighting compartment. The only downfall here is that there are not any provisions given for opening up the large hatches to get a better glimpse of the interior. This is making me think that I may just glue everything shut instead of leaving them open and doing some basic painting of the interior.
JT 25 by Big Wall, on Flickr
Last edited by BigWall on Sat Oct 31, 2020 5:48 pm, edited 1 time in total.
Joe
